☕️ 개요
이번 글에서는 실전에서도 사용 가능한 수준으로 Spring security와 JPA를 이용해서, 인증 서버를 만들어보도록 하겠다.
단순히 로컬에서 한 번 인증 기능을 제공하는 서버가 아니라 '실무에서도 사용할 수 있음'이 기준이기에 배포나 DB 작업 등등을 고려하여 서버를 구성할 것이므로, Spring security이외의 기술들도 등장할 예정이다.
만약 Spring security의 기본적인 기능들이 궁금하다면, 공식 문서나 내가 이전에 작성한 글들을 살펴보면 좋을 것 같다.
👨🍳 준비
💡 Java 25, Spring boot 4.x, Spring security 7.x 버전을 기준으로 합니다.
1) build.gradle
// 인증 서버를 구성하는데에 있어서 가장 주요한 프레임워크 및 라이브러리
implementation 'org.springframework.boot:spring-boot-starter-security-oauth2-authorization-server'
implementation 'org.springframework.boot:spring-boot-starter-webmvc'
implementation 'org.springframework.boot:spring-boot-starter-data-jpa'
runtimeOnly 'com.mysql:mysql-connector-j'

// Flyway
implementation 'org.springframework.boot:spring-boot-starter-flyway'
implementation 'org.flywaydb:flyway-mysql'

// Thymeleaf
implementation 'org.springframework.boot:spring-boot-starter-thymeleaf'

// Lombok
compileOnly 'org.projectlombok:lombok'
annotationProcessor 'org.projectlombok:lombok'

// Test 코드 작성을 위한 라이브러리
testImplementation 'org.springframework.boot:spring-boot-starter-security-oauth2-authorization-server-test'
testImplementation 'org.springframework.boot:spring-boot-starter-test'
testCompileOnly 'org.projectlombok:lombok'
testAnnotationProcessor 'org.projectlombok:lombok'
Spring security와 Boot 이외에도 다양한 라이브러리를 확인할 수 있는데, 각각을 간단히 설명하고 넘어가도록 하겠다.
- MySQL: RDB. 유저 정보와 권한 정보를 관리하는 데에 사용한다.
- Flyway: RDB 형상 관리 도구. DDL, DML들을 버전 관리할 수 있게 도우며 DDL, DML 실행 및 롤백을 전담한다.
- Thymeleaf: 이번 글에서는 전혀 사용하지 않을 것이긴 하지만, 커스텀한 로그인 페이지를 구성하고 싶다면 필요한 템플릿 엔진이여서 언급하고 넘어가도록 하겠다.
- Lombok: 어노테이션 기반의 Java 편의 기능 제공 라이브러리.
2) Spring security 활성화
@EnableWebSecurity
@EnableJpaAuditing
@SpringBootApplication
public class Application {

	static void main(String[] args) {
		SpringApplication.run(Application.class, args);
	}

}@EnableWebSecurity를 메인클래스 또는 설정 클래스에 붙여줌으로 인해서, Spring security를 사용할 준비가 완료되었다.
👨🎨 인증/인가 기능 정의하기
Spring security를 사용하게 되면 인증 및 인가 기능을 필터에서 구현하게 된다.
그래서 개발자 입장에서는 인증 기능 구현에 있어서 컨트롤러 이하의 레이어에서 해줄 것이 거의 없다.
인증과 인가에 대한 정의를 설정 파일(application.yaml)이나 설정 클래스를 작성하는 것만으로도 거의 할 수 있는데, 나는 설정 클래스를 활용해보도록 하겠다.
본격적으로 들어가기에 앞서, 두괄식으로다가 설정 클래스 전체를 공개하고 시작하도록 하겠다.
@Configuration
public class SecurityConfig {

	@Bean
	public CorsConfigurationSource corsConfigurationSource() {
		var config = new CorsConfiguration();

		String[] corsAllowed = {
			"http://localhost:3000"
		};

		config.setAllowCredentials(true);
		config.setAllowedOrigins(List.of(corsAllowed));
		config.setAllowedMethods(List.of("GET", "POST", "PUT", "DELETE", "PATCH", "OPTIONS"));
		config.setAllowedHeaders(List.of("*"));
		config.setExposedHeaders(List.of("*"));

		var source = new UrlBasedCorsConfigurationSource();
		source.registerCorsConfiguration("/**", config);
		return source;
	}

	@Bean
	public PasswordEncoder passwordEncoder() {
		return new BCryptPasswordEncoder();
	}

	/**
	 * Protocol endpoints 를 위한 설정
	 */
	@Bean
	@Order(1)
	public SecurityFilterChain authorizationServerSecurityFilterChain(HttpSecurity http) {
		var authorizationServerConfigurer = new OAuth2AuthorizationServerConfigurer();
		authorizationServerConfigurer.oidc(Customizer.withDefaults()); // OpenID Connect 1.0 활성화

		var endpointsMatcher = authorizationServerConfigurer.getEndpointsMatcher();

		http.securityMatcher(endpointsMatcher)
			.authorizeHttpRequests(authorize -> authorize.anyRequest().authenticated())
			.csrf(csrf -> csrf.ignoringRequestMatchers(endpointsMatcher))
			.apply(authorizationServerConfigurer);

		http.cors(configurer -> configurer.configurationSource(corsConfigurationSource()))
			.exceptionHandling(exceptions -> exceptions
				.defaultAuthenticationEntryPointFor(
					new LoginUrlAuthenticationEntryPoint("/login"),
					new MediaTypeRequestMatcher(MediaType.TEXT_HTML)
				)
			)
			.oauth2ResourceServer(resourceServer -> resourceServer.jwt(withDefaults()));

		return http.build();
	}

	/**
	 * 인증(Authentication)을 위한 설정
	 */
	@Bean
	@Order(2)
	public SecurityFilterChain defaultSecurityFilterChain(HttpSecurity http) {
		http.cors(configurer -> configurer.configurationSource(corsConfigurationSource()))
			.csrf(AbstractHttpConfigurer::disable)
			.authorizeHttpRequests(authorize -> {
				authorize
					.requestMatchers("/").permitAll()
					.requestMatchers("/login").permitAll()
					.requestMatchers("/error").permitAll()
					.requestMatchers("/public/**").permitAll()
					.requestMatchers("/connect/logout").permitAll()
					.anyRequest().authenticated();
			})
			.exceptionHandling(exceptions -> exceptions
				.defaultAuthenticationEntryPointFor(
					new LoginUrlAuthenticationEntryPoint("/login"),
					new MediaTypeRequestMatcher(MediaType.TEXT_HTML)
				)
			)
			.oauth2ResourceServer(resourceServer -> resourceServer.jwt(withDefaults()))
			.formLogin(withDefaults());
		return http.build();
	}

	private RegisteredClient createRegisteredClient(
		String clientName,
		String clientId,
		String clientSecret,
		List<String> redirectUris,
		List<String> postLogoutRedirectUris
	) {
		var encodedClientSecret = passwordEncoder().encode(clientSecret);
		return RegisteredClient.withId(UUID.randomUUID().toString())
			.clientName(clientName)
			.clientId(clientId)
			.clientSecret(encodedClientSecret)
			.clientAuthenticationMethods(methods -> {
				methods.add(ClientAuthenticationMethod.CLIENT_SECRET_BASIC); // 서버 간 통신용
				methods.add(ClientAuthenticationMethod.NONE); // 클라이언트용
			})
			.authorizationGrantTypes(types -> {
				types.add(AuthorizationGrantType.AUTHORIZATION_CODE);
				types.add(AuthorizationGrantType.REFRESH_TOKEN);
			})
			.redirectUris(uri -> uri.addAll(redirectUris))
			.postLogoutRedirectUris(uri -> uri.addAll(postLogoutRedirectUris))
			.scopes(scope -> {
				scope.add(OidcScopes.OPENID);
				scope.add(OidcScopes.PROFILE);
			})
			.clientSettings(
				ClientSettings.builder()
					.requireAuthorizationConsent(false) // 사용자 동의 생략
					.requireProofKey(false) // PKCE 미사용
					.build()
			)
			.tokenSettings(
				TokenSettings.builder()
					.accessTokenTimeToLive(Duration.ofHours(2))  // AccessToken: 2시간
					.refreshTokenTimeToLive(Duration.ofDays(3))  // RefreshToken: 3일
					.build()
			)
			.build();
	}

	/**
	 * 클라이언트의 정보를 등록하고 관리하는 역할을 한다.
	 */
	@Bean
	public RegisteredClientRepository registeredClientRepository(
		@Value("${client-id}") String clientId,
		@Value("${client-secret}") String clientSecret
	) {
		var client = createRegisteredClient(
			"Client name",
			clientId,
			clientSecret,
			List.of(
				"http://localhost:3000/callback"
			),
			List.of(
				"http://localhost:3000"
			)
		);
		return new InMemoryRegisteredClientRepository(client);
	}

	/**
	 * jwt 생성에 필요한 RSA키 generate, 실제 운영에 사용하려면 KeyStore에 저장해야한다.
	 */
	@Bean
	public JWKSource<SecurityContext> jwkSource(
		@Value("${seed}") String seed
	) throws NoSuchAlgorithmException {
		var keyPair = generateRsaKey(seed);
		var publicKey = (RSAPublicKey)keyPair.getPublic();
		var privateKey = (RSAPrivateKey)keyPair.getPrivate();
		var rsaKey = new RSAKey.Builder(publicKey).privateKey(privateKey)
			.keyID(seed)
			.build();
		var jwkSet = new JWKSet(rsaKey);
		return new ImmutableJWKSet<>(jwkSet);
	}

	private static KeyPair generateRsaKey(String seed) throws NoSuchAlgorithmException {
		var keyPairGenerator = KeyPairGenerator.getInstance("RSA");
		var secureRandom = java.security.SecureRandom.getInstance("SHA1PRNG");
		secureRandom.setSeed(seed.getBytes());
		keyPairGenerator.initialize(2048, secureRandom);
		return keyPairGenerator.generateKeyPair();
	}

	/**
	 * 토큰 검증을 위한 디코더
	 */
	@Bean
	public JwtDecoder jwtDecoder(JWKSource<SecurityContext> jwkSource) {
		return OAuth2AuthorizationServerConfiguration.jwtDecoder(jwkSource);
	}

	/**
	 * Authorization server를 구성하기 위한 여러 EndPoint를 설정하는 객체
	 */
	@Bean
	public AuthorizationServerSettings authorizationServerSettings() {
		return AuthorizationServerSettings.builder()
			.build();
	}

}
뭐가 상당히 많은데, 하나 하나 자세히 살펴보도록하자. 🧐
1) 설정 해부하기: CORS 허용
	@Bean
	public CorsConfigurationSource corsConfigurationSource() {
		var config = new CorsConfiguration();

		String[] corsAllowed = {
			"http://localhost:3000"
		};

		config.setAllowCredentials(true);
		config.setAllowedOrigins(List.of(corsAllowed));
		config.setAllowedMethods(List.of("GET", "POST", "PUT", "DELETE", "PATCH", "OPTIONS"));
		config.setAllowedHeaders(List.of("*"));
		config.setExposedHeaders(List.of("*"));

		var source = new UrlBasedCorsConfigurationSource();
		source.registerCorsConfiguration("/**", config);
		return source;
	}
인증 서버도 어찌됐든 서버이다보니, 접근 가능한 클라이언트를 명시해줘야한다. 위의 설정은 localhost:3000에 대해서 모든 요청을 허용해준 상태이고, 각자가 원하는 대로 설정을 변경해주면 된다.
2) 설정 해부하기: PasswordEncoder Bean 생성
	@Bean
	public PasswordEncoder passwordEncoder() {
		return new BCryptPasswordEncoder();
}PasswordEncoder는 Spring security에서 기본으로 제공되는 것을 사용하지 않고, 이렇게 명시적으로 Bean을 생성해서 사용하는 것을 추천한다.
추천하는 이유는 사실 좀 개인적인 취향이 묻어 있는데, PasswordEncoder는 이곳 저곳에서 많이 사용되는 녀석이여서, 이렇게 드러내어 놓는 것이 좀 더 직관적이여서 좋다고 생각하기 때문이다.
3) 설정 해부하기: 프로토콜 정의하기
	/**
	 * Protocol endpoints 를 위한 설정
	 */
	@Bean
	@Order(1)
	public SecurityFilterChain authorizationServerSecurityFilterChain(HttpSecurity http) {
		var authorizationServerConfigurer = new OAuth2AuthorizationServerConfigurer();
		authorizationServerConfigurer.oidc(Customizer.withDefaults()); // OpenID Connect 1.0 활성화

		var endpointsMatcher = authorizationServerConfigurer.getEndpointsMatcher();

		http.securityMatcher(endpointsMatcher)
			.authorizeHttpRequests(authorize -> authorize.anyRequest().authenticated())
			.csrf(csrf -> csrf.ignoringRequestMatchers(endpointsMatcher))
			.apply(authorizationServerConfigurer);

		http.cors(configurer -> configurer.configurationSource(corsConfigurationSource()))
			.exceptionHandling(exceptions -> exceptions
				.defaultAuthenticationEntryPointFor(
					new LoginUrlAuthenticationEntryPoint("/login"),
					new MediaTypeRequestMatcher(MediaType.TEXT_HTML)
				)
			)
			.oauth2ResourceServer(resourceServer -> resourceServer.jwt(withDefaults()));

		return http.build();
	}
OAuth 표준에 의하면, 인증 서버는 .well-known 엔드포인트에 인증 스펙을 명시하고, 인증 서버를 사용하는 클라이언트는 해당 스펙을 바라보고 요청을 하는 것이 권장된다.
그래서, Spring security를 사용할 때에도 /.well-known/configuration에 인증 스펙이 명시되게 되는데, 위 설정은 이 인증 스펙을 정의하는 역할을 하는 코드이다.
authorizationServerConfigurer.getEndpointsMatcher()를 통해서 기본적으로 제공되는 인증 프로토콜들의 엔드포인트를 가져오고, 이 엔드포인트들에 설정을 적용하는 것이라고 할 수 있다.
		.exceptionHandling(exceptions -> exceptions
				.defaultAuthenticationEntryPointFor(
					new LoginUrlAuthenticationEntryPoint("/login"),
					new MediaTypeRequestMatcher(MediaType.TEXT_HTML)
				)
			)
중요한 부분은 이 부분인데, 기본적으로 모든 요청에 대해서 인증이 되어 있어야 요청을 허가하는데, 허가되지 않는 상황에서는 /login 페이지로 리다이렉트 시키는 설정이다.
즉, 인증되지 않았을 경우 로그인 페이지로 떨어지도록 하는 것이다.
4) 설정 해부하기: 인증 설정
	/**
	 * 인증(Authentication)을 위한 설정
	 */
	@Bean
	@Order(2)
	public SecurityFilterChain defaultSecurityFilterChain(HttpSecurity http) {
		http.cors(configurer -> configurer.configurationSource(corsConfigurationSource()))
			.csrf(AbstractHttpConfigurer::disable)
			.authorizeHttpRequests(authorize -> {
				authorize
					.requestMatchers("/").permitAll()
					.requestMatchers("/login").permitAll()
					.requestMatchers("/error").permitAll()
					.requestMatchers("/public/**").permitAll()
                    .requestMatchers("/connect/logout").permitAll()
					.anyRequest().authenticated();
			})
			.exceptionHandling(exceptions -> exceptions
				.defaultAuthenticationEntryPointFor(
					new LoginUrlAuthenticationEntryPoint("/login"),
					new MediaTypeRequestMatcher(MediaType.TEXT_HTML)
				)
			)
			.oauth2ResourceServer(resourceServer -> resourceServer.jwt(withDefaults()))
			.formLogin(withDefaults());
		return http.build();
	}
3번에서 구성한 Security filter chain은 인증 프로토콜들에 대한 것이였다면, 이 설정은 서버 애플리케이션의 입장에서의 인증 정책을 구성한 것이다.
이 필터에서도 인증이 필요한 요청에서 인증이 성공하지 못한 경우에는 로그인 페이지로 리다이렉트가 되도록 하여, 처리의 통일성을 유지하였다.
🤔 /connect/logout 엔드포인트에 대한 의문
여기서 개인적으로 의문이 하나 있었다. /connect/logout 엔드포인트는 공식적인 인증 스펙에 포함되는 엔드포인트인데, '왜 별도로 접근 허용 처리를 해주지 않으면 접근이 안될까?'였다.
 공식 문서를 찾아보니, 위 기능들에 대해서만
 authorizationServerConfigurer.getEndpointsMatcher()에 부합하는 엔드포인트들인 것으로 확인하였다. 그래서, 로그아웃 엔드포인트에 대한 접근을 허용하고 싶다면, 별도로 접근 허용 처리를 해줘야한다.
5) 설정 해부하기: 클라이언트 설정
	private RegisteredClient createRegisteredClient(
		String clientName,
		String clientId,
		String clientSecret,
		List<String> redirectUris,
		List<String> postLogoutRedirectUris
	) {
		var encodedClientSecret = passwordEncoder().encode(clientSecret);
		return RegisteredClient.withId(UUID.randomUUID().toString())
			.clientName(clientName)
			.clientId(clientId)
			.clientSecret(encodedClientSecret)
			.clientAuthenticationMethods(methods -> {
				methods.add(ClientAuthenticationMethod.CLIENT_SECRET_BASIC); // 서버 간 통신용
				methods.add(ClientAuthenticationMethod.NONE); // 클라이언트용
			})
			.authorizationGrantTypes(types -> {
				types.add(AuthorizationGrantType.AUTHORIZATION_CODE);
				types.add(AuthorizationGrantType.REFRESH_TOKEN);
			})
			.redirectUris(uri -> uri.addAll(redirectUris))
			.postLogoutRedirectUris(uri -> uri.addAll(postLogoutRedirectUris))
			.scopes(scope -> {
				scope.add(OidcScopes.OPENID);
				scope.add(OidcScopes.PROFILE);
			})
			.clientSettings(
				ClientSettings.builder()
                    .requireAuthorizationConsent(false) // 사용자 동의 생략
					.requireProofKey(true) // PKCE 사용
					.build()
			)
			.tokenSettings(
				TokenSettings.builder()
					.accessTokenTimeToLive(Duration.ofHours(2))  // AccessToken: 2시간
					.refreshTokenTimeToLive(Duration.ofDays(3))  // RefreshToken: 3일
					.build()
			)
			.build();
	}

	/**
	 * 클라이언트의 정보를 등록하고 관리하는 역할을 한다.
	 */
	@Bean
	public RegisteredClientRepository registeredClientRepository(
		@Value("${client-id}") String clientId,
		@Value("${client-secret}") String clientSecret
	) {
		var client = createRegisteredClient(
			"Application",
			clientId,
			clientSecret,
			List.of(
				"http://localhost:3000/callback"
			),
			List.of(
				"http://localhost:3000"
			)
		);
		return new InMemoryRegisteredClientRepository(client);
	}
뭔가 내용이 많은데, 아래와 같이 정리해볼 수 있다.
clientAuthenticationMethods: 인증 요청 시에 사용할 규약에 대한 정의 FE에서 접근할 때에는 중요 키 값을 함께 전달하는 것이 더 위험하므로,ClientAuthenticationMethod.NONE을 활성화해준다.authorizationGrantTypes: 인증 유형을 정의한다. 나는 가장 정석적인 '코드'기반으로 인증 토큰을 발급받는 방식을 사용할 것이고, 토큰 갱신 기능도 제공할 것이므로, 위에 정의한 2개의 인증 유형을 활성화해준다.redirectUris: 로그인 성공 후, 리다이렉트 시킬 경로들을 지정한다. 여기에 지정되지 않은 곳으로 리다이렉트 파라미터를 넘기면 해당 인증 요청은 거부된다.postLogoutRedirectUris: 로그아웃 성공 후, 리다이렉트 시킬 경로들을 지정한다.scopes: 여러 인증 관련 정보들 중에서 접근 가능한 정보의 범위를 지정한다.clientSettings: 클라이언트와의 소통 방식에 대한 것을 정의한다. 여기서 중요한 부분은 PKCE를 사용하는 부분인데, 미사용할 수도 있긴 하지만 인증 요청과 함께 Challenge 정보를 함께 보내는 기능이 추가되어 요청의 위변조를 방지할 수 있어서 가급적이면 활성화해주는 것을 권장한다.tokenSettings: 발급할 토큰의 유효기간에 대한 설정을 정의한다.
그리고, 이런 인증 정보는 나처럼 메모리에서 관리할 수도 있고, DB에서도 관리하도록 할 수 있는데 개인적으로는 메모리에서 관리해도 충분하지 않나 생각한다.
6) 설정 해부하기: 키 생성
	/**
	 * jwt 생성에 필요한 RSA키 generate, 실제 운영에 사용하려면 KeyStore에 저장해야한다.
	 */
	@Bean
	public JWKSource<SecurityContext> jwkSource(
		@Value("${seed}") String seed
	) throws NoSuchAlgorithmException {
		var keyPair = generateRsaKey(seed);
		var publicKey = (RSAPublicKey)keyPair.getPublic();
		var privateKey = (RSAPrivateKey)keyPair.getPrivate();
		var rsaKey = new RSAKey.Builder(publicKey).privateKey(privateKey)
			.keyID(seed)
			.build();
		var jwkSet = new JWKSet(rsaKey);
		return new ImmutableJWKSet<>(jwkSet);
	}

	private static KeyPair generateRsaKey(String seed) throws NoSuchAlgorithmException {
		var keyPairGenerator = KeyPairGenerator.getInstance("RSA");
		var secureRandom = java.security.SecureRandom.getInstance("SHA1PRNG");
		secureRandom.setSeed(seed.getBytes());
		keyPairGenerator.initialize(2048, secureRandom);
		return keyPairGenerator.generateKeyPair();
	}
주석에 작성한대로, JWT를 생성할 때 사용할 Seed값과 알고리즘을 정의하는 코드이다.
Seed이야기가 나온 김에 위에서 등장하는 Key값이나 Secret값은 절대로 외부에 유출되서는 안되는 값들임을 잊지 말자. 🔥
7) 설정 해부하기: 기타(?)
	/**
	 * 토큰 검증을 위한 디코더
	 */
	@Bean
	public JwtDecoder jwtDecoder(JWKSource<SecurityContext> jwkSource) {
		return OAuth2AuthorizationServerConfiguration.jwtDecoder(jwkSource);
	}

	/**
	 * Authorization server를 구성하기 위한 여러 EndPoint를 설정하는 객체
	 */
	@Bean
	public AuthorizationServerSettings authorizationServerSettings() {
		return AuthorizationServerSettings.builder()
			.build();
	}
기타라고 하기엔 적절하지 않긴 하지만, 코드의 양이 길지 않고 모두 기본 설정들을 사용하도록 되어 있어서 길게 설명하지 않고 넘어가겠다.
8) 동작 확인
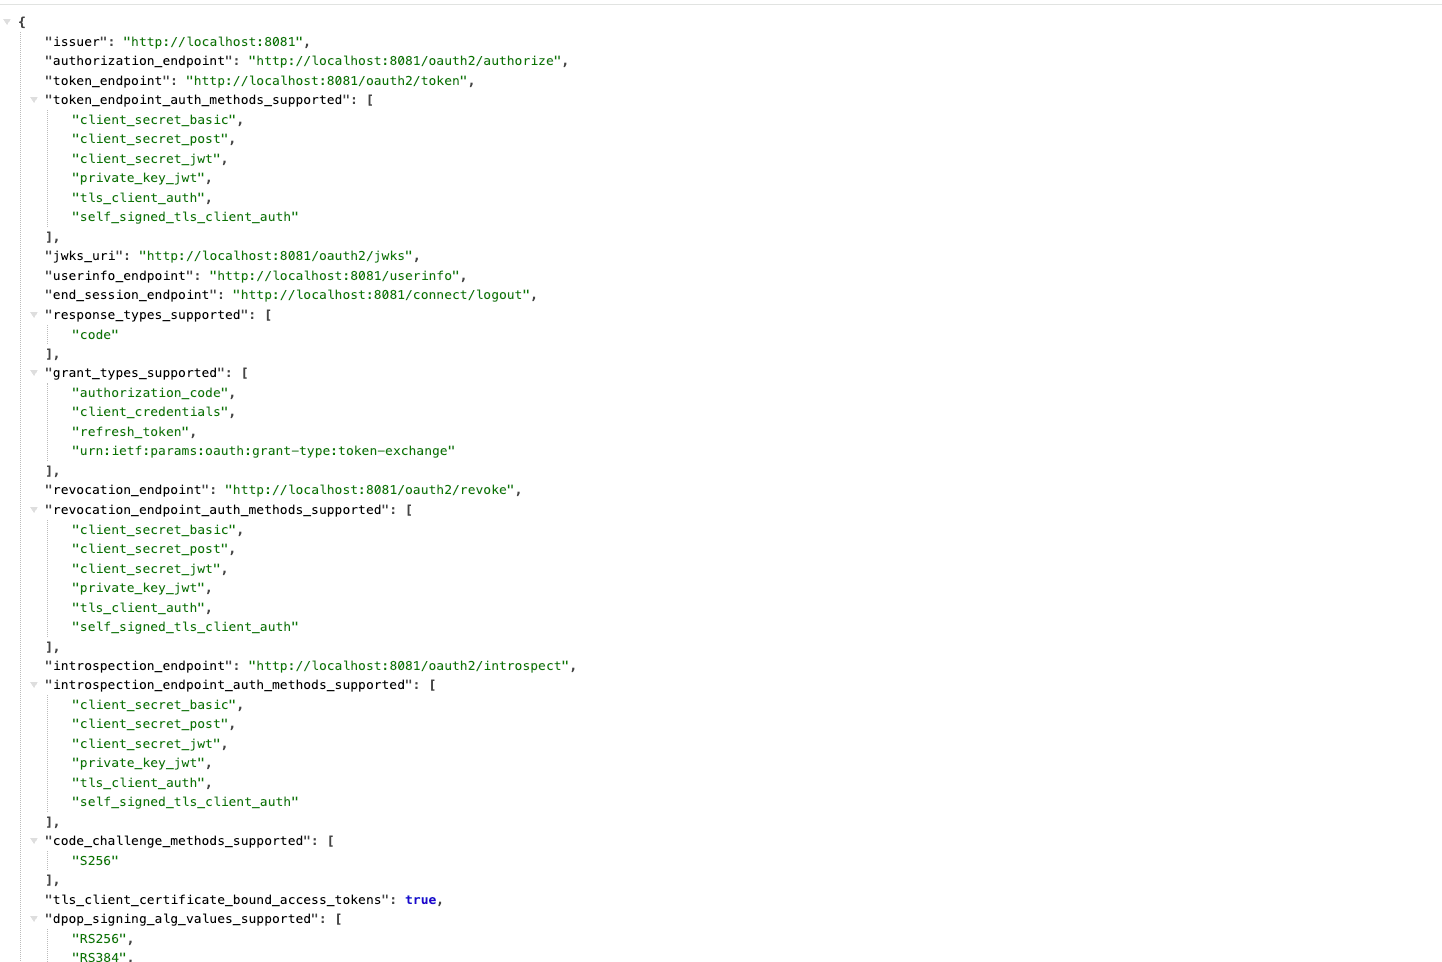 이 설정을 완료하게 되면,
 /.well-known/openid-configuration에 접속하게 되면, 인증 스펙이 쫙 명시되어 있는 것을 확인할 수 있다.
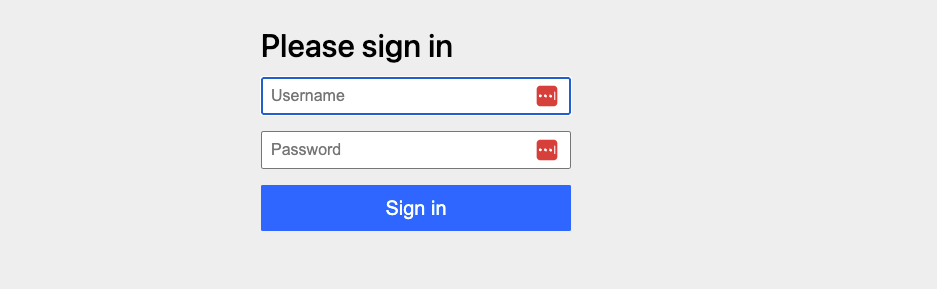 그리고,
그리고, /abcd, /blah-blah와 같은 엄한(?) 경로로 접속하려고 하면 로그인 페이지로 리다이렉트되는 것 또한 확인할 수 있다.
🧙♂️ 유저 처리 기능 구현하기
위에서 살펴본 인증/인가 설정하는 부분이 우심방이라고 한다면, 유저 처리 기능 구현하는 부분은 좌심실이라고 할 수 있다. 인증 서버 입장에서의 비지니스 로직이라고도 할 수 있을 것 같다.
자 그럼 바-로 알아보자. 🔥
1) 계정 관련 엔티티 정의
Spring security에서는 UserDetails와 GrantedAuthority라는 인터페이스를 제공하는데, 이 둘은 각각 '유저'와 유저가 갖는 '권한'을 의미하며, 이 둘을 꼭 상속해야 실질적인 처리들이 가능해진다.
우리는 JPA를 사용할 것이기 때문에 이 인터페이스들을 JPA Entity로 구현해주면 된다.
@Getter
@Entity
@AllArgsConstructor
@NoArgsConstructor
@Table(name = "authority")
public class AuthorityEntity implements GrantedAuthority {

	@Id
	@GeneratedValue(strategy = GenerationType.IDENTITY)
	private Long authorityId;

	@Column(unique = true)
	private String authority;

	@ManyToOne(fetch = FetchType.LAZY)
	@JoinColumn(name = "user_id")
	private UserEntity user;

}
@Getter
@Entity
@AllArgsConstructor
@NoArgsConstructor
@Table(name = "user")
public class UserEntity implements UserDetails {
@Id
@GeneratedValue(strategy = GenerationType.IDENTITY)
private Long userId;
@Column(unique = true)
private String username;
private String password;
private boolean enabled;
private boolean verified;
@JsonIgnore
@OneToMany(mappedBy = "user")
private List<AuthorityEntity> authorities = new ArrayList<>();
public static UserEntity create(String username, String encodedPassword) {
var user = new UserEntity();
user.username = username;
user.password = encodedPassword;
user.verified = false;
user.enabled = true;
return user;
}
public List<SimpleGrantedAuthority> getSimpleAuthorities() {
return this.authorities.stream()
.map(authority -> new SimpleGrantedAuthority(authority.getAuthority()))
.toList();
}
public void updatePassword(String newEncodedPassword) {
this.password = newEncodedPassword;
}
}🙋♂️ DB에 테이블들은 직접 만드나요?
도입에서도 이야기했듯이 '실전에서 사용할 수 있음'이 기준이기 때문에 Flyway를 통해서 정의하는 것으로 하겠다. resources.db.migration 하위에 V1__migrate.sql 파일을 아래와 같이 생성한다.
create table if not exists user
(
    user_id    bigint auto_increment primary key,
    updated_at TIMESTAMP             DEFAULT (now()),
    created_at TIMESTAMP             DEFAULT (now()),
    password   varchar(300) not null,
    username   varchar(255) not null,
    enabled    boolean      not null default true,
    verified   boolean      not null default false,
    INDEX username_index (`username`),
    INDEX verified_index (`verified`),
    INDEX enabled_index (`enabled`)
);

create table if not exists authority
(
    authority_id bigint auto_increment primary key,
    user_id      bigint       not null,
    updated_at   TIMESTAMP DEFAULT (now()),
    created_at   TIMESTAMP DEFAULT (now()),
    authority    varchar(200) not null,
    INDEX authority_user_id_index (`user_id`)
);
Flyway의 사용 방법은 매우 직관적이여서 금방 익힐 수 있는데, 이 글에서는 모두 언급할 수 없으니, 내가 적은 이전 블로그 글들을 참고하면 좋을 것 같다.
spring:
  flyway:
    enabled: true
    baseline-on-migrate: true
그리고, 설정 파일에는 위와 같은 내용을 추가하여, Flyway를 활성화해준다.
2) UserDetailsService 구현
위에서 유저와 권한에 대해서 구현체들을 만들어주었는데, 이번에는 가장 핵심적인 유저 조회 로직을 담당할 UserDetailsService를 구현해줘야한다.
별것은 아니고, 특정 유저를 구분할 수 있는 username이 주어졌을 때, 고유한 유저가 잘 조회되도록 기능 구현을 하나 해주면 된다.
public interface UserJpaRepository extends JpaRepository<UserEntity, Long> {

    @Query("SELECT u FROM UserEntity u LEFT JOIN FETCH u.authorities " +
           "WHERE u.username = :username AND u.enabled = true")
    Optional<UserEntity> findByUsername(@Param("username") String username);

}

public interface UserRepository {

	Optional<UserEntity> findByUsername(String username);

}


@Repository
@RequiredArgsConstructor
public class UserRepositoryImpl implements UserRepository {

	private final PasswordEncoder passwordEncoder;
	private final UserJpaRepository userJpaRepository;

	@Override
	public Optional<UserEntity> findByUsername(String username) {
		return userJpaRepository.findByUsername(username);
	}

}


@Slf4j
@RequiredArgsConstructor
@Service
@Transactional
public class UserDetailServiceImpl implements UserDetailsService {

	private final UserRepository userRepository;

	@Override
	public UserDetails loadUserByUsername(String username) throws UsernameNotFoundException {
		return userRepository.findByUsername(username)
			.orElseThrow(() -> new UsernameNotFoundException("User not found with username: " + username));
	}

}
꼭 위와 정확히 동일하게 구현해줄 필요는 없다. 원하는 방식 또는 기술을 사용하여 구현해줘도 되고, 반드시 해줘야할 것은 UserDetailsService의 아래의 메서드만 구현해주는 것이다.
UserDetails loadUserByUsername(String username);3) 그 외
그 외에 회원 가입 기능이나, 비밀번호 찾기 등등의 유저 관련된 부가적인 기능들은 정책에 맞게 직접 구현해주면 된다. 👍
🙏 마무리
이번 글에서는 Spring security와 JPA를 주로 사용하여 '실무에서 사용할 수 있을 정도'라는 나름의 기준으로 인증 서버를 구축하는 방법을 알아보았다.
이번 글에서 해본 것은 실무에서 사용할 수 있는 '최소 스펙'이라고 보는 게 맞을 것 같고, 인증 클라이언트를 DB에 저장하도록 한다거나 인증 정보를 Redis같은 것을 활용하여 캐싱을 하는 등등의 처리를 곁들여줄 수도 있을 것 같다.
이 글을 통해서 대략적인 인증 흐름과 인증 서버의 구색을 갖추는 방법에 대해서 접했길 바라며 마치도록 하겠다. 🙏