1. 영상파일 읽기 및 display in colab
  import cv2
  from google.colab.patches import cv2_imshow

  image = cv2.imread("chest.bmp", cv2.IMREAD_GRAYSCALE)
  cv2_imshow(image)
  cv2_waitKey(0)

  # 결과 : chest.bmp 영상 추출
2. 의료영상처리 프로그램 기초
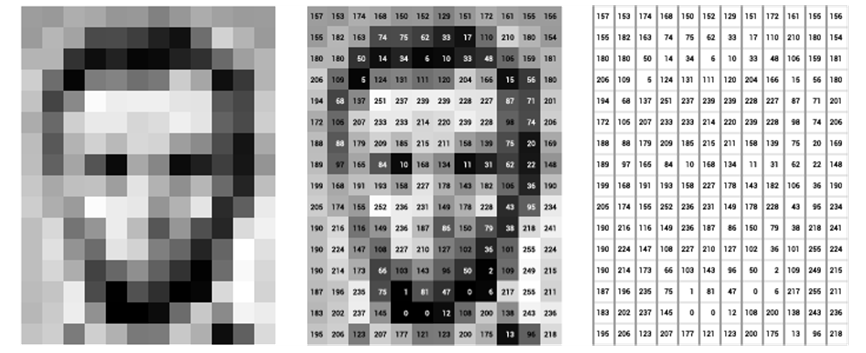 0~255 사이의 값들로 이루어져있다.
0에 가까운값-어두운값, 1에 가까운값-밝은 값
흑백은 1개의 level로 표현
컬러는 3개의 level로 표현(red, green, blue)
3. Basic of Python
- 변수값 print
  print(name + "is" + str(age) + "years old")
print(name, "is", age, "years old")- class
class Person:
	def __init__(self, name):	# 객체 초기화 method
    	self.name = name
    def say_hi(self):			# 객체 method
    	print "Hello, my name is", self.name

p = Person("파이썬")  # 객체 instance 만들기
p.say_hi()			 # 객체 method 호출
say_hi는 호출할때만 사용, __init__은 자동적으로 호출
4. ndarray 클래스
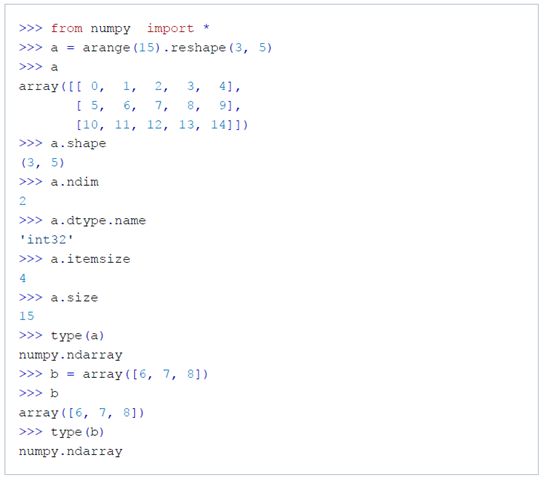 ndarra.ndim : 배열의 차원
ndarray.shape : 배열의 크기로 2차원 matrix의 행의 개수가 n, 열의 개수가 m이면 shape은 (n,m)이 된다.
ndarray.size : 배열 전체 요소의 개수
ndarray.dtype : 배열 요소의 데이터 type
ndarray.itemsize : 배열 요소의 바이트 크기
-
numpy data type
int32 : 32bit 정수형(32bit = 4byte)
uint8 : 부호가 없는 정수형으로 영상의 밝기를 나타낼 때 주로 사용(0 ~ 255) -
openCV data type
CV_8UC2 : openCV_8bit unsigned character/int channel수
CV_8UC3 : 컬러
5. OpenCV Python 핸드북
- 이미지 보기
  image = cv2.imread("chest.bmp", cv2.IMREAD_GRAYSCALE)
  cv2_imshow(image)
cv2_waitKey(0)- 이미지 읽기 & 저장
	#color load
    image = cv2.imread("sample.jpg")
    #gray load
    image = cv2.imread("samle.jpg", cv2.IMRAD_GRAYSCALE)

cv2.imwrite("fname.jpg",image) # fname 이름으로 저장- 이미지 생성, 복사, 형변환 색상변환
	import numpy as np
    w = 320
    h = 240

    # 1채널 float32를 가지는 w*h 크기 영상 만들기
    image = np.zeros(shape=(h,w), dtype=np.float32)
    # 3채널 unsigned char pixel을 가지는 w*h 크기 영상 만들기
    image = np.zeros(shaep=(h,w,3), dtype=np.uint8)

    # 복사
    dst = image.copy()

    # 형변환
    u_img = np.uint8(img)

    # color 변환
gray_img = cv2.cvtColor(color_img, cv2.COLOR_GRAY2BGR) - 영상 크기 변경 및 상하좌우 반전
	# 크기 변경
    dst = cv2.resize(img, (new_w, new_h), cv2.INTER_NEAREST)
    dst = cv2.resize(img, (new_w, new_h), cv2.INTER_CUBIC)
    # INTER_NEAREST : 모자이크 현상
    # INTER_CUBIC : 중앙값으로 채워주기 때문에 더욱 선명한 영상이 나온다.

    # 영상 반전(flip)
    dst = cv2.flip(img, 0)  # vertical flip 상하 반전
    dst = cv2.flip(img, 1)  # horizontal flip 좌우 반전
    dst = cv2.flip(img, -1) # 대각선 반전
Data Engineer