이번 게시글에서는 푸시알람을 구현해보도록 하겠다. 현재 개발에 이용하고 있는 firebase에서 푸시알람을 손쉽게 구현할 수 있도록 만들어놨다고 하니 한번 사용해보자.
주로 '플러터파이어'라는 사이트를 참고했다. 플러터랑 파이어베이스 조합이 많다보니 따로 사이트를 마련해놓은 듯
0. 기초작업 - 플러터와 파이어베이스 연동
이 과정이 일단 선행되어야 한다. 그런데 이건 워낙 잘 나와있는 자료나 유튜브가 많아서 그거 보고 따라하면 된다. 특히나 요새는 flutterfire_cli 라는게 나왔는데 정말 신세계다. 귀찮게 뭐 파일 넣고 gradle 수정할 필요가 없더라. 유튜브에 flutterfire_cli 치면 개발하는 남자님 유튜브에도 나와있다. 나는 그거랑 공식문서 참고했다.
본격작업 -- 메시지 구현하기
일단 연동이 완료되었다고 가정하고 설명해보겠다. 푸시알람을 구현하기 위해서는 일단 firebase_messaging과 flutter_local_notifications이라는 라이브러리가 필요하다.
(2022.02.26 기준 최신버전)

2개의 라이브러리를 yaml에 추가해주고 pub get 해주자.
- firebase_messaging은 파이어베이스에서 제공하는 공식 서비스다
- flutter_local_notifications는 추가작업을 위해 필요한 라이브러리다. 말그대로 local 상의 알림이 나오도록 해주는 라이브러리인데, 이게 필요한 이유는 다음과 같다.
** 안드로이드에서는 앱이 켜져있을 때(화면을 내가 보고 있을 때), 알림이 나오지 않도록 자동 설정되어 있다. 그러므로 알림이 파이어베이스 서비스 통해서 도착했을 때 수동으로 local 알림을 넣어주는 거다. 그걸 위해 필요한 라이브러리
firebase_messaing은 Stream을 통해서 들어온다. 나도 정확히 이해한 것은 아니지만 일종의 데이터 파이프라인 같은 것이다. Stream을 만들어 놓으면 언제든 Stream에 무언가 들어왔을 때 그것에 대한 callback을 실행하는 것이 가능한 것.
처음에 공식문서 보고 구현할 때 헷갈렸던 것은 도대체 firebase_messaging의 핵심이 되는 Stream을 코드 어느 부분에 써넣어야 하는지였다. 다른 분들이 작성하신 코드를 참고한 결과 대부분 최상단 앱을 stateful로 만들고 state 상에서 관리하거나 가장 먼저 실행되는 getXController를 하나 놓고 onInit 상에 넣어놓더라.
나는 후자의 방법 getXController의 onInit에 구현한는 방식을 택했다.
아래는 간단한 목차다.
- NotificationController 만들기 - 알림과 관련된 작업 처리하기 위한 컨트롤러
- GetMaterialApp에서 initialBindings 에 NotificationController 넣어줘서 앱 실행과 거의 동시에 컨트롤러를 주입해놓기
- NotificationController에 코드 작성해놓기
- FirebaseConsole 통해서 메시지 테스팅 해보기
1. NotificationController 만들기 - 알림과 관련된 작업 처리하기 위한 컨트롤러
notification_controller.dart 파일을 따로 만들고 컨트롤러 틀을 작성한다.
import getX 임포트해놓으셈

class NotificationController extends GetXController {
	// 아직 비어있다.
}
2. GetMaterialApp에서 initialBindings 에 NotificationController 넣어줘서 앱 실행과 거의 동시에 실행될 컨트롤러를 주입해놓기

GetMaterialApp 내부 파라미터에 이런 식으로 넣어주자. 그럼 이제 앱이 실행될 때 가장 먼저 실행되는 컨트롤러가 된다. 혹시 몰라서 컨트롤러가 꺼지지 않도록 permanent 파라미터를 true로 설정해 놓았다. 이렇게 해놓으면 어떤 일이 있어도 알아서 컨트롤러가 onDelete() 되는 경우는 없다고 한다.
3. NotificationController에 코드 작성해놓기
이제부터가 진짜다.
일단 전체 코드를 올려보겠다.
전체 코드
import 'package:get/get.dart';
import 'package:firebase_messaging/firebase_messaging.dart';
import 'package:flutter_local_notifications/flutter_local_notifications.dart';
class NotificationController extends GetxController {
// 메시징 서비스 기본 객체 생성
  FirebaseMessaging messaging = FirebaseMessaging.instance;
void onInit() async{
// TODO: implement onInit
/// 첫 빌드시, 권한 확인하기
/// 아이폰은 무조건 받아야 하고, 안드로이드는 상관 없음. 따로 유저가 설정하지 않는 한,
/// 자동 권한 확보 상태
NotificationSettings settings = await messaging.requestPermission(
alert: true,
announcement: false,
badge: true,
carPlay: false,
criticalAlert: false,
provisional: false,
sound: true,
);
// 한번 이걸 프린트해서 콘솔에서 확인해봐도 된다.
print(settings.authorizationStatus);
_getToken();
_onMessage();
super.onInit();
}
  /// 디바이스 고유 토큰을 얻기 위한 메소드, 처음 한번만 사용해서 토큰을 확보하자.
  /// 이는 파이어베이스 콘솔에서 손쉽게 디바이스에 테스팅을 할 때 쓰인다.
  void _getToken() async{
    String? token= await messaging.getToken();
    try{
      print(token);
    } catch(e) {}
  }
/// ----------------------------------------------------------------------------

  /// * 안드로이드에서 foreground 알림 위한 flutter_local_notification 라이브러리 *
  ///
  /// 1. channel 생성 (우리의 알림을 따로 전달해줄 채널을 직접 만든다)
  /// 2. 그 채널을 우리 메인 채널로 정해줄 플러그인을 만들어준다.
  /// - 준비 끝!!
  // 1.
  final AndroidNotificationChannel channel = const AndroidNotificationChannel(
    'high_importance_channel', // id
    'High Importance Notifications', // title
    description: 'This channel is used for important notifications.', // description
    importance: Importance.max,
  );
  // 2.
  final FlutterLocalNotificationsPlugin flutterLocalNotificationsPlugin =
  FlutterLocalNotificationsPlugin();
void _onMessage() async{
/// * local_notification 관련한 플러그인 활용 *
///
/// 1. 위에서 생성한 channel 을 플러그인 통해 메인 채널로 설정한다.
/// 2. 플러그인을 초기화하여 추가 설정을 해준다.
// 1.
await flutterLocalNotificationsPlugin
.resolvePlatformSpecificImplementation<AndroidFlutterLocalNotificationsPlugin>()
?.createNotificationChannel(channel);
// 2.
await flutterLocalNotificationsPlugin.initialize(
const InitializationSettings(
android: AndroidInitializationSettings('@mipmap/ic_launcher'), iOS: IOSInitializationSettings()),
onSelectNotification: (String? payload) async {});
/// * onMessage 설정 - 이것만 설정해줘도 알림을 받아낼 수 있다. *
// 1. 콘솔에서 발송하는 메시지를 message 파라미터로 받아온다.
/// 메시지가 올 때마다 listen 내부 콜백이 실행된다.
FirebaseMessaging.onMessage.listen((RemoteMessage message) {
RemoteNotification? notification = message.notification;
AndroidNotification? android = message.notification?.android;
// android 일 때만 flutterLocalNotification 을 대신 보여주는 거임. 그래서 아래와 같은 조건문 설정.
if (notification != null && android != null) {
flutterLocalNotificationsPlugin.show(
notification.hashCode,
notification.title,
notification.body,
NotificationDetails(
android: AndroidNotificationDetails(
channel.id,
channel.name,
channelDescription: channel.description
),
),
// 넘겨줄 데이터가 있으면 아래 코드를 써주면 됨.
// payload: message.data['argument']
);
}
// 개발 확인 용으로 print 구문 추가
print('foreground 상황에서 메시지를 받았다.');
// 데이터 유무 확인
print('Message data: ${message.data}');
// notification 유무 확인
if (message.notification != null) {
print('Message also contained a notification: ${message.notification!.body}');
}
});
}
}이제 하나하나 순서대로 위에서부터 뜯어보자.
서비스 객체 messaging 생성
// 메시징 서비스 기본 객체 생성
FirebaseMessaging messaging = FirebaseMessaging.instance;일단 이렇게 서비스 엔트리포인트(서비스의 중심되는...!)를 이런식으로 객체화 한다.
onInit 내부 코드 작성 (1,2,3 단계 - 1,2 먼저 하고 3은 마지막에)
void onInit() async{
// TODO: implement onInit
/// 첫 빌드시, 권한 확인하기
/// 아이폰은 무조건 받아야 하고, 안드로이드는 상관 없음. 따로 유저가 설정하지 않는 한,
/// 자동 권한 확보 상태
NotificationSettings settings = await messaging.requestPermission(
alert: true,
announcement: false,
badge: true,
carPlay: false,
criticalAlert: false,
provisional: false,
sound: true,
);
// 한번 이걸 프린트해서 콘솔에서 확인해봐도 된다.
print(settings.authorizationStatus);
_getToken();
_onMessage();
super.onInit();
}onInit 내부는 크게 3개의 영역이다.
- 권한 확인
- _getToken() 메소드
- _onMessage() 메소드
1번 권한 확인부터 살펴보자.
코드 내 주석에 써놓은 그대로 권한을 확보하는 메소드다. 안드로이드는 기본적으로 허가 상태이지만 IOS는 한번 권한을 받아야 한다. 나는 안드로이드 에뮬레이터로 코드작업을 하고 있으므로 따로 권한 확인을 묻는 알림창은 뜨지 않고 그냥 print 결과로 권한이 있다고 뜰 것이다.
2번 _getToken을 살펴보자
_getToken(); /// 디바이스 고유 토큰을 얻기 위한 메소드, 처음 한번만 사용해서 토큰을 확보하자.
/// 이는 파이어베이스 콘솔에서 손쉽게 디바이스에 테스팅을 할 때 쓰인다.
void _getToken() async{
String? token= await messaging.getToken();
try{
print(token);
} catch(e) {}
}이 메소드는 디바이스 자체 토큰을 확보해, 파이어베이스 콘솔 상에서 실제 메시지가 가나 테스팅을 할 수 있도록 함이다. 기기마다 고유한 토큰이 있는데, 이 토큰이 있으면 내가 입력한 토큰한테만 메시지가 가도록 설정할 수가 있다고 한다.
여기까지 하고 한번 실행시켜보자. onMessage()는 일단 작성하지 말고..!
그대로 했다면 실행 콘솔에 아래와같은 print 결과 2개가 있을 것이다.

1. 권한 authorized 됐다는 표시
2. 해당 디바이스의 고유 토큰
토큰은 복사해서 메모장에 따로 기록해놓자.
이제 3번 onMessage를 살펴볼 차례지만 일단 그 전에 아래 코드부터 살펴보도록 하자. onMessage는 가장 핵심이 되는 메소드이므로 마지막에 살펴본다.
onInit 바깥 변수 할당 - local_flutter_notifications를 활용
안드로이드 알림 설정
먼저 local_flutter_notifications를 좀 활용해볼 거다. 그냥 아래 코드 그대로 복붙해서 써넣자. 참고로 onInit 바깥이다!
/// ----------------------------------------------------------------------------
/// * 안드로이드에서 foreground 알림 위한 flutter_local_notification 라이브러리 *
///
/// 1. channel 생성 (우리의 알림을 따로 전달해줄 채널을 직접 만든다)
/// 2. 그 채널을 우리 메인 채널로 정해줄 플러그인을 만들어준다.
/// - 준비 끝!!
// 1.
final AndroidNotificationChannel channel = const AndroidNotificationChannel(
'high_importance_channel', // id
'High Importance Notifications', // title
description: 'This channel is used for important notifications.', // description
importance: Importance.max,
);
// 2.
final FlutterLocalNotificationsPlugin flutterLocalNotificationsPlugin =
FlutterLocalNotificationsPlugin();이 코드는 온전히 안드로이드를 위한 코드다. 위에서 살짝 언급했듯이, 안드로이드는 앱이 켜져있고, 사용중일 때는 기본적으로 알림을 막는다. 그러므로 이걸 강제로 작동시킬 방법이 필요하다.
1. 채널을 생성한다. - 알림이 오고가는 구멍 정도로 생각하면 될 듯
2. 그 채널을 우리 메인 채널로 만들어줄 플러그인을 만든다.
3. 차후, onMessage 안에 위에서 할당해준 변수객체들을 활용해 알림을 보내주는 콜백을 만들 것이다.
그리고 android 네이티브 설정이 좀 필요하다.
프로젝트 최상단 폴더의 anodroid -> app -> src -> main -> AndroidMenifest.xml 파일을 수정해주어야 한다.
<meta-data
           android:name="com.google.firebase.messaging.default_notification_channel_id"
           android:value="high_importance_channel" />
어려울 건 없고 그냥 위 코드를 복사해서
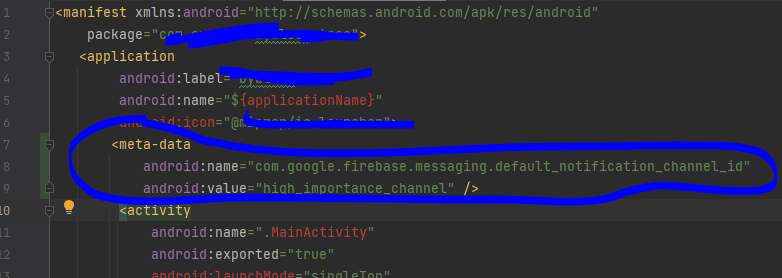 이렇게 껴넣어주면 된다.
high_importance_channel이란 이름을 가진 걸 우리 채널로 인식한다? 뭐 이런 설정인 것 같다.
위에 만들어놓은 채널의 id를 그대로 써준 것이다.
onMessage() 메서드 작성
전체코드는 아래와 같고 위에서부터 하나하나 뜯어보자.
void _onMessage() async{
    /// * local_notification 관련한 플러그인 활용 *
    ///
    /// 1. 위에서 생성한 channel 을 플러그인 통해 메인 채널로 설정한다.
    /// 2. 플러그인을 초기화하여 추가 설정을 해준다.

    // 1.
    await flutterLocalNotificationsPlugin
        .resolvePlatformSpecificImplementation<AndroidFlutterLocalNotificationsPlugin>()
        ?.createNotificationChannel(channel);
    // 2.
    await flutterLocalNotificationsPlugin.initialize(
        const InitializationSettings(
            android: AndroidInitializationSettings('@mipmap/ic_launcher'), iOS: IOSInitializationSettings()),
        onSelectNotification: (String? payload) async {});

    /// * onMessage 설정 - 이것만 설정해줘도 알림을 받아낼 수 있다. *

    // 1. 콘솔에서 발송하는 메시지를 message 파라미터로 받아온다.
    /// 메시지가 올 때마다 listen 내부 콜백이 실행된다.
    FirebaseMessaging.onMessage.listen((RemoteMessage message) {
      RemoteNotification? notification = message.notification;
      AndroidNotification? android = message.notification?.android;

      // android 일 때만 flutterLocalNotification 을 대신 보여주는 거임. 그래서 아래와 같은 조건문 설정.
      if (notification != null && android != null) {
        flutterLocalNotificationsPlugin.show(
            notification.hashCode,
            notification.title,
            notification.body,
            NotificationDetails(
              android: AndroidNotificationDetails(
                  channel.id,
                  channel.name,
                  channelDescription: channel.description
              ),
            ),

            // 넘겨줄 데이터가 있으면 아래 코드를 써주면 됨.
            // payload: message.data['argument']
        );
      }
      // 개발 확인 용으로 print 구문 추가
      print('foreground 상황에서 메시지를 받았다.');
      // 데이터 유무 확인
      print('Message data: ${message.data}');
      // notification 유무 확인
      if (message.notification != null) {
        print('Message also contained a notification: ${message.notification!.body}');
      }
    });
  }
flutter_local_notifications 메소드 실행 - 위에서 미리 만들어놓은 채널 등록
/// * local_notification 관련한 플러그인 활용 *
    ///
    /// 1. 위에서 생성한 channel 을 플러그인 통해 메인 채널로 설정한다.
    /// 2. 플러그인을 초기화하여 추가 설정을 해준다.

    // 1.
    await flutterLocalNotificationsPlugin
        .resolvePlatformSpecificImplementation<AndroidFlutterLocalNotificationsPlugin>()
        ?.createNotificationChannel(channel);
    // 2.
    await flutterLocalNotificationsPlugin.initialize(
        const InitializationSettings(
            android: AndroidInitializationSettings('@mipmap/ic_launcher'), iOS: IOSInitializationSettings()),
        onSelectNotification: (String? payload) async {});
1번은 플러그인을 통해 위에서 만들어 놓은 channel 변수에 담긴 객체를 공식 채널로 등록한다는 것이고
2번은 해당 플러그인을 초기화 해주는 작업이다. 2번 메소드 내에 onSElectedNotification 은 해당 알림을 클릭했을 때 발동하는 콜백이다. 클릭했을 때 특정 동작이 나오도록 설정해놓을 수 있다.
android 파라미터에 AndroidInitializationSettings 내부에는 아이콘 설정 값이라는데 정확히 뭔지 잘 모르겠다. 그냥 다른분 코드 참고해서 써봤다.
드디어 onMessage Stream 설정 - 가장 핵심이 되는 부분
// 1. 콘솔에서 발송하는 메시지를 message 파라미터로 받아온다.
    /// 메시지가 올 때마다 listen 내부 콜백이 실행된다.
    FirebaseMessaging.onMessage.listen((RemoteMessage message) {
      RemoteNotification? notification = message.notification;
      AndroidNotification? android = message.notification?.android;

      // android 일 때만 flutterLocalNotification 을 대신 보여주는 거임. 그래서 아래와 같은 조건문 설정.
      if (notification != null && android != null) {
        flutterLocalNotificationsPlugin.show(
            notification.hashCode,
            notification.title,
            notification.body,
            NotificationDetails(
              android: AndroidNotificationDetails(
                  channel.id,
                  channel.name,
                  channelDescription: channel.description
              ),
            ),

            // 넘겨줄 데이터가 있으면 아래 코드를 써주면 됨.
            // payload: message.data['argument']
        );
      }
      // 개발 확인 용으로 print 구문 추가
      print('foreground 상황에서 메시지를 받았다.');
      // 데이터 유무 확인
      print('Message data: ${message.data}');
      // notification 유무 확인
      if (message.notification != null) {
        print('Message also contained a notification: ${message.notification!.body}');
      }
    });
FirebaseMessaging.onMessage는 stream이다. 데이터가 들어오는 파이프라인 .listen은 메시지가 들어올 때마다 실행되는 콜백이라고 생각하면 된다.
콜백 내부 파라미터로 나오는 RemoteMessage message는 메시지가 담겨있는 객체이다.
이 객체는 크게 2개의 부분이다. notification 과 data 각각, 알림메시지, 내부에 숨겨놓은 데이터값이다.
 	  RemoteNotification? notification = message.notification;
      AndroidNotification? android = message.notification?.android;

      // android 일 때만 flutterLocalNotification 을 대신 보여주는 거임. 그래서 아래와 같은 조건문 설정.
      if (notification != null && android != null) {
        flutterLocalNotificationsPlugin.show(
            notification.hashCode,
            notification.title,
            notification.body,
            NotificationDetails(
              android: AndroidNotificationDetails(
                  channel.id,
                  channel.name,
                  channelDescription: channel.description
              ),
            ),

            // 넘겨줄 데이터가 있으면 아래 코드를 써주면 됨.
            // payload: message.data['argument']
        );
이 부분은 android이고 앱이 켜져있을 때 수동으로 보내주는 코드다.
// 개발 확인 용으로 print 구문 추가
      print('foreground 상황에서 메시지를 받았다.');
      // 데이터 유무 확인
      print('Message data: ${message.data}');
      // notification 유무 확인
      if (message.notification != null) {
        print('Message also contained a notification: ${message.notification!.body}');
      }
이 부분은 그냥 개발 확인용으로 프린트 구문을 넣어 놓은 것이다. 여기까지 했으면 다 끝났다!!
실제 메시지 보내기 테스팅
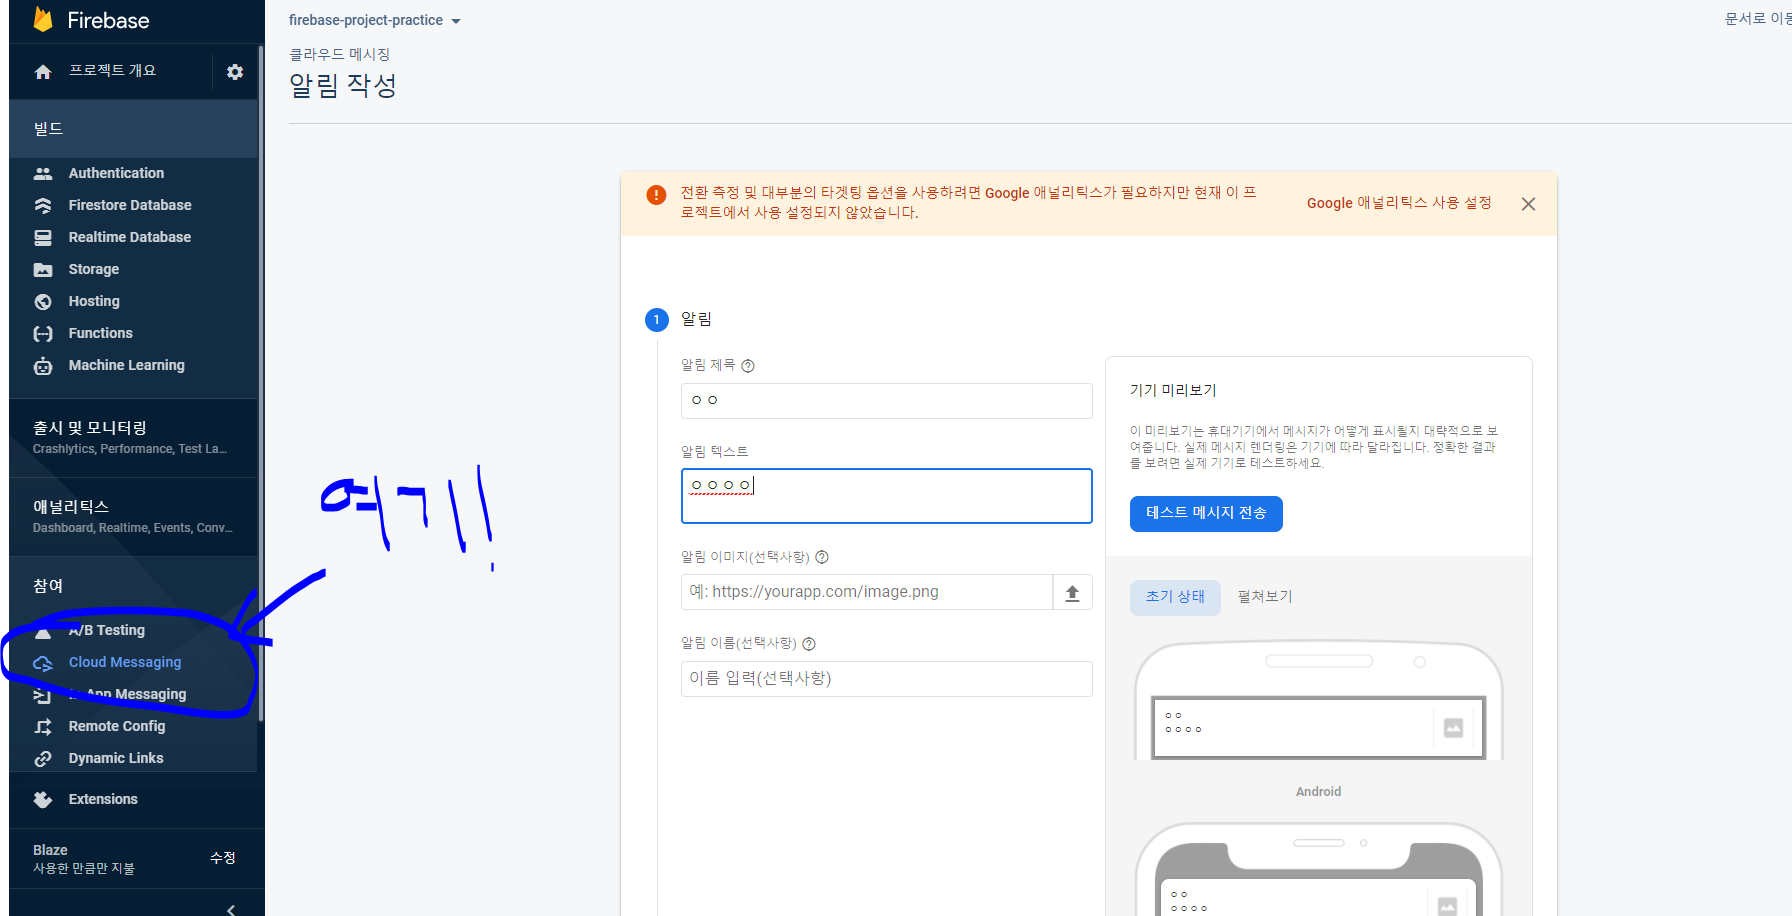
저기로 들어와서 상단의 첫 메시지 보내기 클릭하면 이런 창이 뜬다.
이제 대충 아무거나써놓고 테스트 메시지 전송을 눌러보자
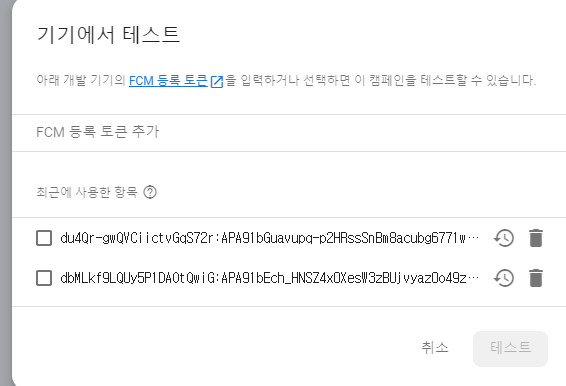
토큰 추가 부분에 아까 메모장에 복사해놓은 토큰을 입력하고 추가한 뒤, 선택해 테스트를 누르면 메시지가 갈 것이다.
테스트메시지 기능을 사용하지 않고 그냥 위 알림 보내기 단계를 다 진행해도 알림이 가긴 가는데 좀 느리더라. 테스트 메시지 사용하는 걸 추천한다.
다만, 테스트메시지에는 data를 못 넣는 것 같다.
이제 끝! 따라오느라 수고했다.
cf) 내가 보려고 해놓는거라 설명이 좀 불친절하다. 가장 좋은 건, 영어로 되어 있는 공식문서를 보며 따라하는 것이다. 그 과정에서 적당한 참고자료가 됐으면 좋겠다.


안녕하세요 좋은 글 감사합니다. 참고해서 프로그램을 돌려본결과 안드로이드 환경에서는 테스트가 잘 되는 것을 확인 했는데 ios 시뮬레이터 환경에서는 fcm코드는 받아와지는데 테스트 메세지가 안나오는데 혹시 안드로이드 환경에서만 작동이 되도록 코딩이 된거 일까요??? ios에서 테스트가 되려면 따로 해줘야하는 작업이 있을까요?