1. 실습#1 weegle 검색바 만들기
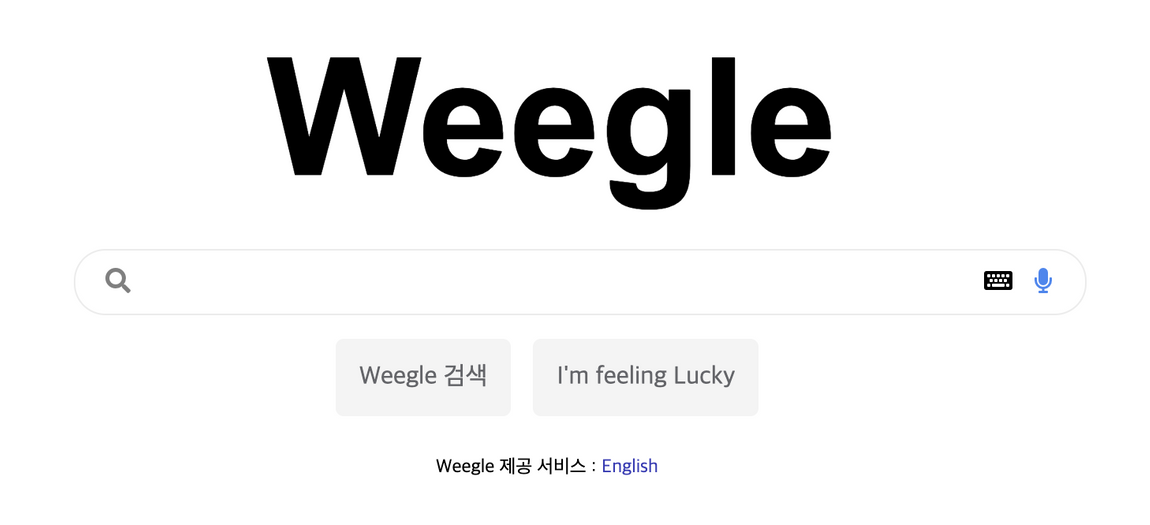
위의 구글 검색바같은 모양을 만들어 보았다. 사용한 HTML은 아래와 같다.
<!DOCTYPE html>
<html>
  <head>
    <meta charset="utf-8">
    <meta name="viewport" content="width=device-width">
    <title>repl.it</title>
    <link href="style.css" rel="stylesheet" type="text/css" />
    <link rel="stylesheet" href="https://cdnjs.cloudflare.com/ajax/libs/font-awesome/5.8.2/css/all.min.css"/>
  </head>
  <body>
    <header>
      <img class="logo" alt="weegle logo" src="https://user-images.githubusercontent.com/61774575/95163201-34411c00-075c-11eb-9987-d6301acb4dab.png">
    </header>
    <form>
      <div class="leftWrapper">
      <i class="fas fa-search"></i>
      </div>
      <input type="text" placeholder="검색어를 입력하세요.">
      <div class="rightWrapper">
        <i class="fas fa-microphone"></i>
        <i class="fas fa-keyboard"></i>
      </div>
    </form>
    <section>
      <button> Weegle 검색</button>
      <button>I'm feeling Lucky</button>
    </section>
    <footer>
      <span>
      Weegle 제공 서비스:
      <a>English</a>
    </foorter>
  </body>
</html>
이번 과제를 하면서 느낀것은 크게 어떻게 레이아웃을 잡고 작업을 할 지 고민를 해야 좀 더 쉽게 작업을 할 수 있다.
1. 이미지는 <header>``</header>태그
2. 검색바, 아이콘들은은 <form>``</form> 태그 그리고 2번 태그 및에 3개의 자식 태그 작성
2-1 왼쪽 아이콘 "leftWrapper" class 지정
2-2 input 태그
2-3 오늘쪽 아이콘 "RightWrapper" class 지정
3. 두개의 <button>``</button> 태그 사용하여
weegle 검색, I'm feeling Lucky 지정
4. 마지막으로 <footer>``</footer>사용하여 weegle 서비스 제공 을 지정
- 사용한 CSS 는 아래와 같다.
- box-sizing : border-box; 는 꼭 입력
flex를 사용하여 모든 속성 가운데 정렬- position relative 와 abosolute 를 사용하여 각각의 위치 조정
- 마지막으로 margin,padding,등의 조정
* {
box-sizing: border-box;
}
body{
display: flex;
flex-direction: column;
align-items: center;
}
header .logo{
width:200px;
}
form{
width: 400px;
height: 40px;
position: relative;
}
form input{
width:100%;
height: 100%;
padding-left:30px;
border-radius: 30px;
border:1px solid #dcdcdc;
}
.leftWrapper{
position: absolute;
left:2%;
top: 50%;
transform: translateY(-50%)
}
.rightWrapper{
position: absolute;
right:2%;
top: 50%;
transform: translateY(-50%)
}
section{
margin: 15px 15px;
}
footer{
font-size: 10px;
}