Goal: CSS의 기본적인 내용 공부
Table of Contents
- 선택자
- 타이포그래피
- Box model
- Layout - Position
1. 선택자 - 선택자 선언
태그를 디자인하기 위해서는 디자인하려는 태그를 선택하고(선택자) 선택한 대상에게 효과를 줘야합니다. (선언)
-
External stylesheets
- 별도의 .css 파일을 만든다.
<head>부분에<link>로 .css 파일을 연결하여 사용
HTML & CSS 은 아래와 같이 작성됨.<!DOCTYPE html> <html> <head> <meta charset="utf-8"> <title>Example CSS stylesheet</title> <link rel="stylesheet" href="styles.css"> </head> <body> <h1>External stylesheets</h1> <p>External stylesheets1</p> </body> </html>h1 {
color: blue;
background-color: yellow;
border: 1px solid black;
}
p {
color: red;
}
-
Internal stylesheets
- HTML
<head>부분에 작성하는 방식.<!DOCTYPE html> <html> <head> <meta charset="utf-8"> <title>My CSS experiment</title> <style> h1 { color: blue; background-color: yellow; border: 1px solid black; } p { color: red; } </style> </head> <body> <h1>Hello World!</h1> <p>This is my first CSS example</p> </body> </html>
- HTML
-
Inline styles
- html 시작태그 내에 style attribute를 추가하여 "property: value;" 형태로 선언하는 방식
<!DOCTYPE html>
<html>
  <head>
    <meta charset="utf-8">
    <title>My CSS experiment</title>
  </head>
  <body>
    <h1 style="color: blue;background-color: yellow;border: 1px solid black;">Hello World!</h1>
    <p style="color:red;">This is my first CSS example</p>
  </body>
</html>
- html 시작태그 내에 style attribute를 추가하여 "property: value;" 형태로 선언하는 방식
1. 선택자 - 선택자 종류
| Selector | Example |
|---|---|
| Type selector | h1{text-aling :center;} |
| Univeral selector | *{font-weight:bold;} |
| Class selector | . box {font-weight:bold;} |
| id selector | #unique {colo:red;} |
| Attribute selector | a[title] {color:puprple;} |
| Pseudo-class selectors | p:first-child { } |
| Pseudo-element selectors | p:first-line { } |
| Descendant combibator | article_p |
| child combinator | article >p |
| Adjacent silbling combinagtor | h1+p |
| General silbling combinagtor | h1 ~ p |
(source : CSS Selector |MDN)
2. 타이포그래피
- Font-size
-
rem: html 태그에 적용된 font-size의 영향을 받습니다. html 태그의 폰트 크기에 따라서 상대적으로 크기가 결정되기 때문에 이해하기 쉽습니다. 가장 바람직한 단위입니다. 이것을 사용하세요.
-
px: 모니터 상의 화소 하나의 크기에 대응되는 단위입니다. 고정된 값이기 때문에 이해하기 쉽습니다만, 사용자가 글꼴의 크기를 조정할 수 없기 때문에 가급적 사용을 하지 않는 것이 좋습니다.
-
em: 부모 태그의 영향을 받는 상대적인 크기입니다. 부모의 크기에 영향을 받기 때문에 파악하기가 어렵습니다. rem이 등장하면서 이 단위 역시 사용이 권장되지 않습니다.
<!DOCTYPE html>
<html>
  <head>
    <style>
      #px{font-size:16px;}
      #rem{font-size:1rem;}
    </style>
  </head>
  <body>
    <div id="px">PX</div>
    <div id="rem">REM</div>
  </body>
</html>
- Color :
CSS 를 통하여 배경, 글자색 등을 변경 할 수 있음. <color>는 다음 방법으로 정의할 수 있습니다.
- 키워드 사용 (blue, transparent 등)
- RGB 3차원 좌표계 사용 (# + 16진수 표기법 또는 rgb(), rgba()의 함수형 표기법)
- HSL 실린더형 좌표계 사용 (hsl(), hsla()의 함수형 표기법)
- 더 자세한 color는 링크 참조 ( CSS color |MDN|)
- Text-align:
text-align의 값으로 올 수 있는 값은 아래와 같습니다.
- left
- right
- center
- justify
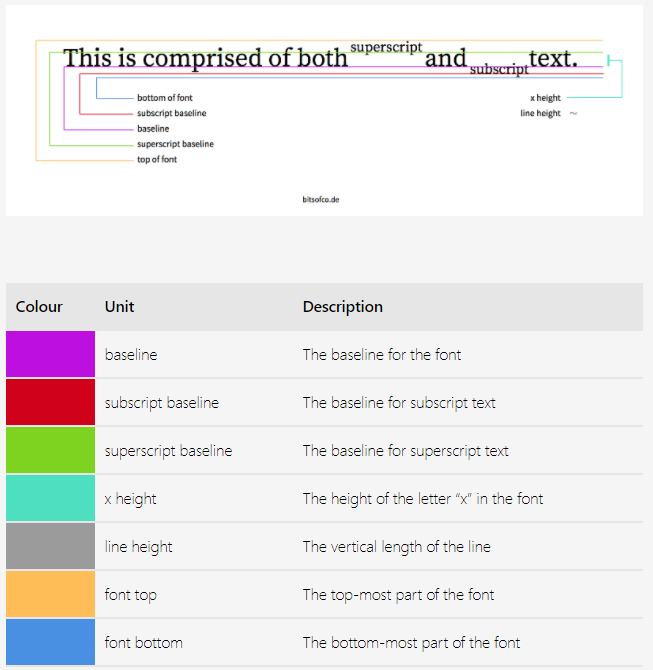
vertical-align : 인라인 요소나 테이블 셀 내에서의 수직정렬 설정 (블록레벨 요소에는 영향을 미치지 않음!) baseline / sub / super / text-top / text-bottom / middle / top / bottom
- Text-font
font-family는 서체를 지정하는 속성입니다. 아래와 같은 방법으로 합니다.
h1{
font-family: "Times New Roman", Times, serif;
}
위 코드의 의미는 h1 태그를 Times New Roman을 지정합니다. 그런데 사용자의 컴퓨터에 폰트가 없으면 Times를 사용하게 됩니다.
이 때 마지막 폰트는 포괄적인 폰트로 지정합니다. 아래와 같은 것이 있습니다.
serif (장식이 있는 폰트)
sans-serif
cursive (흘림체)
fantasy
monospace (고정폭)
출처 : http://matchwebdesign.com/Daily-Thoughts/why-typographically-thinking-ruins-your-site.html
font-weight: 폰트의 두께를 나타냅니다. 대체로 bold만 기억하시면 됩니다. bold를 사용하면 폰트가 두껍게 표시됩니다.
h1{
font-weight: bold;
}
line-height
행과 행 사이의 간격을 지정합니다. 기본 값은 normal로 수치로는 1.2에 해당합니다. 이 수치를 기준으로 간격을 조정하면 됩니다. 값이 1.2라면 현재 엘리먼트 폰트 크기의 1.2배만큼 간격을 준다는 의미입니다.
p{
line-height: 1.3;
}
font
폰트와 관련된 여러 속성을 축약형으로 표현하는 속성입니다. 형식은 아래와 같습니다. 순서를 지켜서 기술하셔야 합니다.
font: font-style font-variant font-weight font-size/line-height font-family|caption|icon|menu|message-box|small-caption|status-bar|initial|inherit;
이 중에서 font-size와 font-size와 font-family는 필수로 포함되어야 하는 정보입니다.
h1{
font: 15px arial, sans-serif;
}
폰트 랭킹
많이 사용하는 폰트의 랭킹을 알려주는 사이트가 있습니다. 이 사이트를 통해서 가장 많이 사용하는 폰트는 무엇인지를 알아보는 것도 재미있을 것 같습니다.
국내폰트
네이버에서 운영하는 국내 자료실입니다. 무료폰트를 다운로드 받을 수 있습니다.
http://software.naver.com/software/fontList.nhn?categoryId=I0000000#brandId=
3. Box model

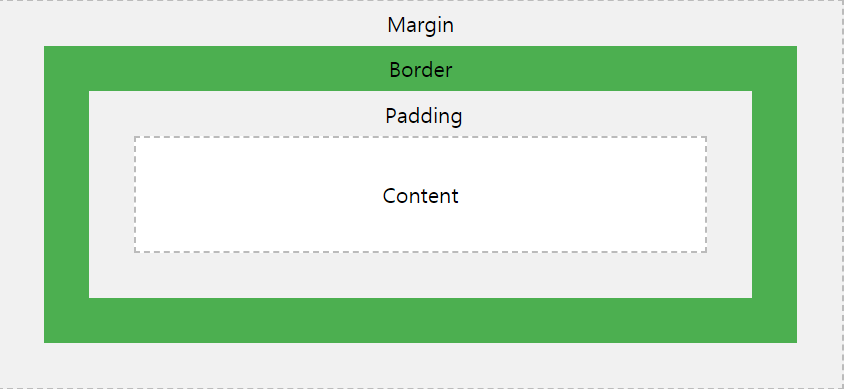
- margin : 요소의 바깥을 둘러싼 공간(외부 여백)
- border : 요소의 테두리
- padding : content를 둘러싼 공간(내부 여백), 테두리로 감싸져 있다
(source: https://www.w3schools.com/css/css_boxmodel.asp)
4. Layout - Position
div {
position: static position
}
- 정적 위치(static position) : positon의 기본값
- 상대 위치(relative position) : 기준 위치와 주어진 속성값에 따라 위치가 달라진다
- 절대 위치(absolute position) : 부모 요소에 따라 달라진다
부모 position에 relative를 부여하면 부모 위치값에 따라 변경된다 - 고정 위치(fixed position) : 보이는 화면 기준에 고정되어진다.

