Redux
"Redux is a predicatale state container for JavaScript apps"
- Redux는 JavaScript application 전체의 상태(state)를 관리하기 위한 라이브러리 이다.
- React 뿐만아니라, 다른 JavaScript 라이브러리나, 순수 라이브러리에서도 사용 가능하다.
- Redux는 state container 이다
- application에서 사용하는 모든 state를 포함한다.
- Redux 는 예상가능하다.
- state의 상태변화가 예상가능하다. state에 넣었다는 것은 state의 상태변화를 미리 감지한 것이고, 사용한다는 뜻
React+Redux
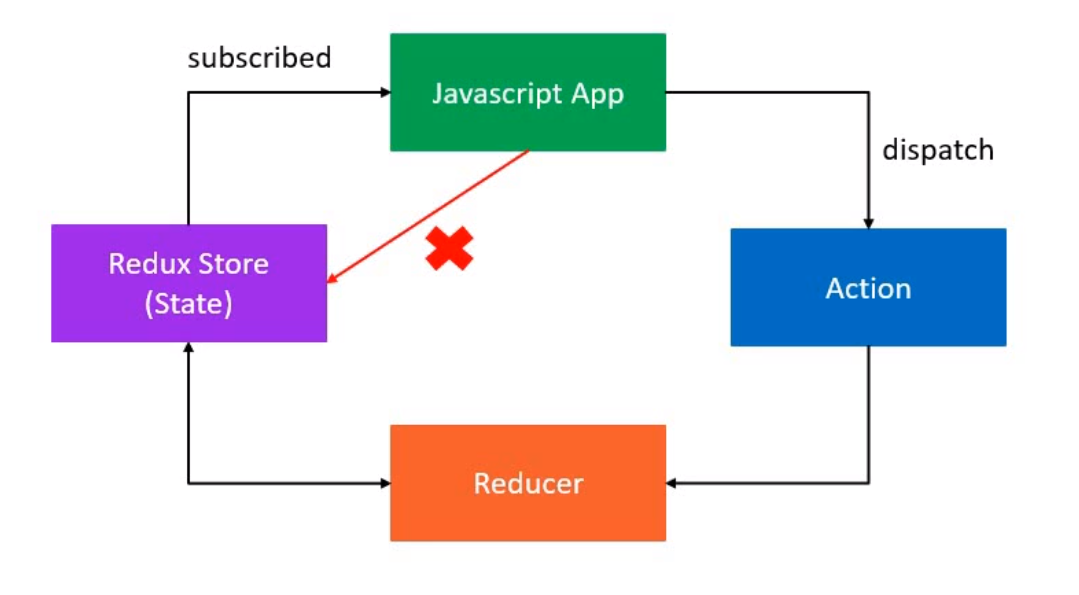
Redux state container 가 component 외부에 존재하고 state의 변화를 감지한다
3 가지 core concepts

Store
- applicaon의 상태값을 저장한다.
Action
- app이 store와 interact할수 있는 유일한 방법이다.
- state의 변화를 describe 하는 JavaScript 객체로서 반드시 'type'을 가져야 한다.
- type은 string형태이며 보통 대문자로 작성하는 것이 convention이다.
- type 과 payload를 키 값으로 받는다. type에 관련된 정보가 객체형태로 payload에 들어간다.
Reducer
- 실제 action의 변화를 감지해서 변화시키는 함수
- Root Reducer에서 전체 state를 관리함
3 가지 core principles
-
전체 application의 state는 하나의 객체 tree 형태로 하나의 store에 저장된다.
-
state를 변경하려면, action 객체에 type을 통해 변경한다. 직접 state에 접근해 변경하지 않는다.
-
action 에 의해 state를 변경시키려면, pure reducer를(pure functions) 사용해야 한다.
Reducer - (previousState,action) => newState

출처 : https://www.youtube.com/watch?v=2lxCaLJ2Rbk&list=PLC3y8-rFHvwheJHvseC3I0HuYI2f46oAK&index=5
Actions
const BUY_CAKE = "BUY_CAKE"
//먼저 action 의 type을 나타내 줄 string constants 를 지정한다.
//오타 실수를 방지하기 위해 사전적으로 지정해주는 것이며 꼭 지정할 필요는 없다.


{
    type: BUY_CAKE,
    info : "First redux action"
}
//action을 define 한다.action은 객체여야 하고 type을 받는다.
//꼭 타입만 있어야 하는건 아니고, 다른 string을 받는 property를 추가할 수 있다. 예: info


function buyCake () {
    return {
        type:BUY_CAKE;
        info:"First redux action"
    }
}
//action creator 함수를 작성한다(action을 return 하는 함수)
Reducer
- action을 받아 state를 변경시켜 store로 보내줌
- state,action을 arguments로 받아서 변경된 state 값을 return 해줌
//(previousState, action) => newState
const initialState = {
    numOfCakes : 10 // 오픈 당시의 케잌의 수를 initial state값으로 지정해 준다.
}

const reducer = (state = initialState,action) => {
switch(action.type) {
    case BUY_CAKE : return {
        ...state,
      // 지금은 하나 밖에 없지만 보통 여러 값을 가지므로,
      //그중에서 numOfCakes 만 변경해 주어야 하므로 spread operator를 사용해준다.
      //먼저 state object를 copy하고 그중에 numOfCakes 만 변경해줘 라는 의미이다.
        numOfCakes : state.numOfCakes -1
      //BUY_CAKE action이 일어나면 기존 cake 수에서 -1 해준다.
    }
    default: return state
}
}
Store
- application status 를 가진다
import { createStore } from 'redux'
//상단에 서 import 해준다
const store = createStore(reducer);
//reducer함수를 argument로 받는 store를 지정해 준다.
getState()함수를 통해 state에 접근할 수 있다.
const store = createStore(reducer);
//store를 변수에 담고 다른 action을 취하지 않고 바로
//console.log로 getState를 하면 초기 값을 확인 할 수 있다.
console.log("Initial state", store.getState())- state를 바라보는 listener를 등록할 수 있도록 subscribe(listener)함수를 실행한다.
콜백으로 작성해서, 해당 함수가 일어날때 call 할 수 있도록 arrow function으로 지정한다.
const unsubscribe = store.subscribe(() => console.log("Updated state", store.getState())) dispatch(action)함수를 통해 state 가 update될 수 있게 하고 unsubscribe()를 호출해서 update된 state를 확인한다.
store.dispatch(buyCake())
store.dispatch(buyCake())
store.dispatch(buyCake())- function 을 사용해서 unregister하는 listener를 관리한다.
store.dispatch(buyCake())
store.dispatch(buyCake())
store.dispatch(buyCake())
unsubscribe()
Combine Multiple Reducers
- control 하는 reducers 값이 많아 질 경우 아래와 같이 관리할 수 있다.
- action type function을 두 개로 나누어 만들어 준다.
const BUY_CAKE = 'BUY_CAKE';
const BUY_ICECREAM = 'BUY_ICECREAM';
//define action

function buyCake() {
  return {
    type: BUY_CAKE,
  };
}

function buyIceCream() {
  return {
    type: BUY_ICECREAM,
  };
}- 두 종류의 initial state를 가지고 두 종류의 reducer로 사용할 수 있다.
const initialCakeState = {
  numOfCakes: 10,
};

const initialIceCreamState = {
  numOfIceCream: 20,
};


const cakeReducer = (state = initialCakeState, action) => {
  switch (action.type) {
    case BUY_CAKE:
      return {
        ...state,
        numOfCakes: state.numOfCakes - 1,
      };

    default:
      return state;
  }
};

const iceCreamReducer = (state = initialIceCreamState, action) => {
  switch (action.type) {
    case BUY_ICECREAM:
      return {
        ...state,
        numOfIceCream: state.numOfIceCream - 1,
      };
    default:
      return state;
  }
};
-comebineReducers 함수를 호출해서 합치는 두 reducer를 relevant 한 key 값과 함께 묶어준다.
const rootReducer = redux.combineReducers({ cake: cakeReducer, iceCream: iceCreamReducer });- store에 RootReducer를 argument로 지정해 준다.
const store = createStore(rootReducer);Middleware
- dispatch해서 reducer에서 처리되기 전 까지의 기간 사이에 일어나는 작업이다.
- middleware는 action과 reducer의 중간에서 전달받은 action을 logging 하거나, 취소하거나, 추가로 dispatch하거나 하는 기능을 수행한다.
예시로서 redux-logger을 설치한다 npm install redux-logger
Middleware를 적용하는데 필요한 변수를 import 해준다.
const logger = reduxLogger.createLogger();

const applyMiddleware = redux.applyMiddleware;
store의 createStore 함수에 두 개의 인자를 주고, applyMiddleware에는 logger를 argument로 받는 함수를 두번째 인자로 넣어준다.
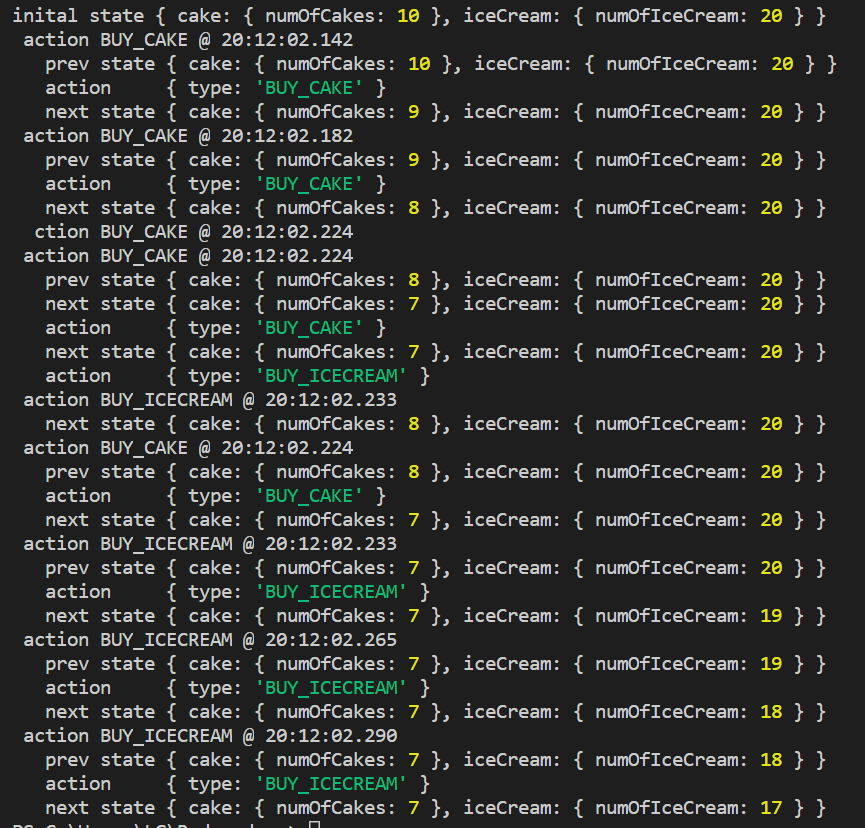
const store = createStore(rootReducer, applyMiddleware(logger));그러고 terminal에 node로 실행해보면 아래와 같이 과정 logging이 되고 있는 것을 알 수 있다.

Async Actions
비동기적으로 작동하는 action(ex. API fetch) 관리하는 방법
- initial state로 사용할 값을 할당해 준다.
const initialState = {
  loading: false,
  users: [],
  error: '',
};- fetch 요청, 성공 , 실패 에 해당하는 각각의 함수를 type 값과 함께 설정해 준다.
const FETCH_USERS_REQUEST = 'FETCH_USERS_REQUEST';
const FETCH_USERS_SUCCESS = 'FETCH_USERS_SUCCESS';
const FETCH_USERS_FAILURE = 'FETCH_USERS_FAILURE';

const fetchRequest = () => {
  return {
    type: FETCH_USERS_REQUEST,
  };
};

const fetchSuccess = (users) => {
  return {
    type: FETCH_USERS_SUCCESS,
    payload: users,
  };
};

const fetchFailure = (error) => {
  return {
    type: FETCH_USERS_FAILURE,
    payload: error,
  };
};
axios,
redux-thunk - async action creators
const fetchReducer = (state = initialState, action) => {
  switch (action.type) {
    case FETCH_USERS_REQUEST:
      return {
        ...state,
        loading: true,
      };

    case FETCH_USERS_SUCCESS:
      return {
        ...state,
        loading: false,
        users: action.payload,
        error: '',
      };

    case FETCH_USERS_FAILURE:
      return {
        ...state,
        loading: false,
        users: [],
        error: action.payload,
      };
  }
};

const fetchUsers = () => {
  return function (dispatch) {
    dispatch(fetchRequest());
    axios
      .get('https://jsonplaceholder.typicode.com/users')
      .then((response) => {
        const users = response.data.map((user) => user.id);
        dispatch(fetchSuccess(users));
      })

      .catch((error) => {
        dispatch(fetchFailure(error.message));
      });
  };
};

const store = createStore(fetchReducer, applyMiddleware(thunkMiddleware));
store.subscribe(() => {
  console.log(store.getState());
});

store.dispatch(fetchUsers());
React with Redux
CRA 에 redux사용에 필요한 library를 설치하고 시작한다!
npx create-react-app redux-react-demo
npm install redux react-redux
Action
별도의 js 파일로 분리해서 import 해서 사용할수 있도록
- cakeType.js는 사용할 TYPE값을 저장하하고
export const BUY_CAKE = "BUY_CAKE"- cakeAction.js에는 함수를 저장할 수 있도록 한다.
import { BUY_CAKE } from './cakeType';


export const buyCake = () => {
  return {
    type: BUY_CAKE,
  }
}
Reducer
cakeReducer.js 파일을 만들고 initialstate를 담을 변수와 reducer 함수를 작성한다.
import { BUY_CAKE } from "./cakeType"

const initialState = {
    numOfCakes : 10
}

const cakeReducer = (state = initialState, action ) => {
    switch(action.type) {
        case BUY_CAKE : return {
            ...state,
             numOfCakes = state.numOfCakes-1
        }
        default: return state
    }
}

export default cakeReducer
Store
ES6 방식으로 createStore를 import 해주고 createStore method를 만들어 reducer함수를 파라미터로 받게 작성한다.
import { createStore } from 'redux';
import cakeReduer from './cake/cakeReducer';

const store = createStore(cakeReduer)

export default store- App.js에 해당 store를 react 에 provide 할 수 있도록 provider 라이브러리를 import 하고 App.js return 문 안에
<Provider ><Provider />로 감싸 준다.
import {Provider} from "react-redux"
import './App.css';
import CakeContainer from './components/CakeContainer';

function App() {
  return (
    <Provider>
    <div className='App'>
      <CakeContainer />
    </div>
</Provider>- Provider 컴포넌트가 redux store에 접근할 수 있도록 props 로 store를 넘겨 준다.
import store from "./redux/store"

    <Provider store ={store}>
- 제일 상단에 Provider를 위치하게 해서 app.js 모든 요소에서 접근할 수 있도록 한다.
Connect
store와 react를 connect 해준다.
import React from 'react';
import { connect } from 'react-redux';
//react function과 redux를 connect해준다
import { buyCake } from '../redux';

function CakeContainer(props) {
  return (
    <div>
      <h2>Number of Cakes - {props.numOfCakes}</h2>
      <button onClick={props.buyCake}>Buy Cake</button>
      //connect 했기 때문에 props로 받아오는 것이 가능!
    </div>
  );
}

const mapStateToProps = (state) => {
  return {
    numOfCakes : state.numOfCakes
  };
};

//redux state를 parameter로 받는다

const mapDispatchToProps = (dispatch) => {
  return {
    buyCake: () => dispatch(buyCake())
  };
};

//redux dispatch를 parameter로 받는다


export default connect(mapStateToProps, mapDispatchToProps)(CakeContainer);
//connect(state관련 props,dispatch관련 props)(해당 컴포넌트)로 표현하면 된다.
React Redux + Hooks
- Hooks를 사용하면 connect를 사용하지 않고, store를 subscribe하고 action을 dispatch할 수 있다.
useSelector Hook/useDispatch hooks
-
const mapStateToProps와 비슷한 역할 을 한다. -
나머지 셋팅은 위와 동일하고 components 파일 경로에 HooksCakeContainer를 만들어 준다.
-
상단에 useSelector를 사용하기 위해 import 해준다.
import React from 'react';
import { useSelector, useDispatch } from 'react-redux';
import { buyCake } from '../redux';
import { addCake } from '../redux';

function HooksCakeContainer() {
  const numOfCakes = useSelector((state) => state.numOfCakes);
  const dispatch = useDispatch();
  return (
    <div>
      <h1>num of cake -{numOfCakes}</h1>
      <button onClick={() => dispatch(buyCake())}>buy cake</button>
      <button onClick={() => dispatch(addCake())}>add cake</button>
    </div>
  );
}

export default HooksCakeContainer;