
📝 6주차
- camera coord에서의 depth값 구하기
- gaussian blur를 separable하게 만들기
1. Depth in Camera coordinate
- Subsurface scattering 구현을 위해 사용하는 Gaussian blur의 kernel은 depth에 따라 조절되야함
- 이때, depth는 카메라 좌표계를 기준으로한 depth
z - depth buffer에 들어있는 depth
d와 Perspective projection행렬을 사용하여z를 구할 수 있음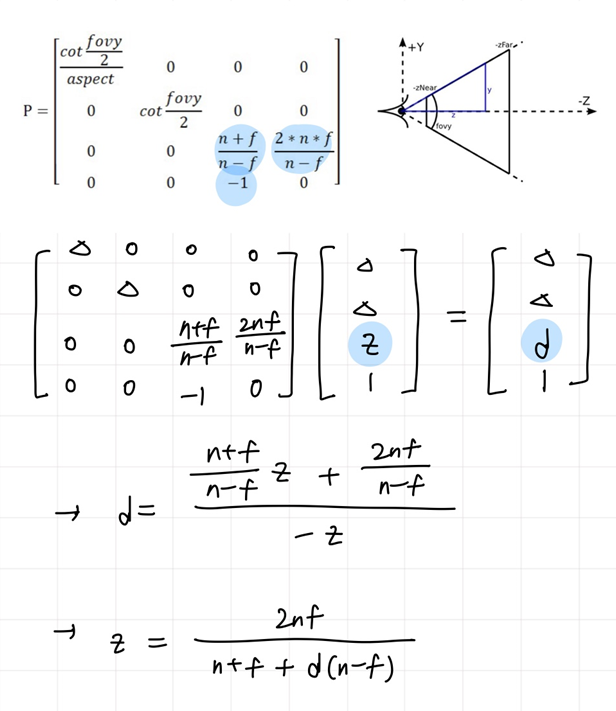
✔️ gaussianBlur.frag
- 위의 식을 사용해
z를 구함 - 실제로 depth buffer에 들어있는 값은
d'( d' = (d+1)/2 )d로 바꿔주는 과정 필요
. . .

float n = 0.01;   // near
float f = 1.0; // far

float LinearizeDepth(float dPri)
{
	float d = dPri * 2 - 1; // d'[0,1] -> d[-1, 1]
	return (2 * n * f) / (n + f + d * (n - f));
}

void main(void)
{
	float depth = texture(depthTex, gl_FragCoord.xy / size).r; // [0,1] (가까울수록 0)
	float z = LinearizeDepth(depth); // camera coord depth

	. . .

	out_Color = vec4(resColor/wSum, 1.0);
	//out_Color = vec4(pow(vec3(z), vec3(4)), 1.0); // camera coord depth test

}- 주석처리된 camera coord depth test로 depth만 출력해보면 카메라와 가까운 부분은 어둡게 나타나는 것을 확인할 수 있음
z값을 사용하여 Gaussian blur kernel을 조절할 수 있게 됨
2. Separable gaussian blur
- Gaussian blur의 kernel은 depth에 따라 유동적으로 변하므로 크기가 매우 커질 수 있으며, 큰 kernel은 계산 속도가 느려짐
- separable한 filter로 계산하면 시간이 줄어들 수 있음
- Gaussian blur operator는 separable하므로 가로 세로 kernel로 분해할 수 있음
(영상처리 강의노트)
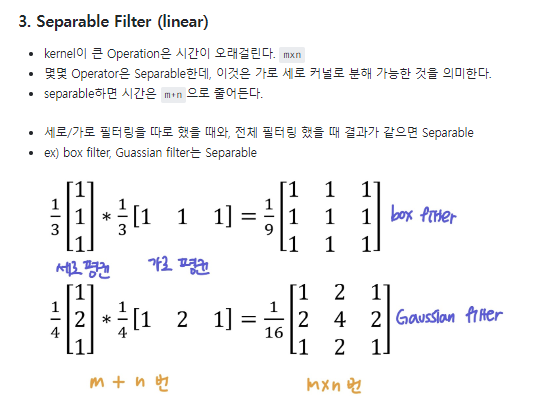
- Gaussian blur operator는 separable하므로 가로 세로 kernel로 분해할 수 있음
- 한 버퍼에 가로로 Gaussain blur한 결과를 저장하고, 그 버퍼의 color texture를 사용하여 세로로 Gaussain blur를 진행
✔️ main.cpp
- 기존
gaussianFBO는rowGaussianFBO로 이름을 변경하여 가로 블러 결과를 저장하고, 세로 블러 결과를 저장할colGaussianFBO를 새로 생성
. . .

FBO rowGaussianFBO;
FBO colGaussianFBO;

Program rowGaussianProgram;
Program colGaussianProgram;

rowGaussianProgram.loadShaders("gaussianBlur.vert", "colGaussianBlur.frag");
colGaussianProgram.loadShaders("gaussianBlur.vert", "rowGaussianBlur.frag");

// gaussian Frame Buffer Object
glGenFramebuffers(1, &rowGaussianFBO.frameBuffer);
glBindFramebuffer(GL_FRAMEBUFFER, rowGaussianFBO.frameBuffer);
attachBuffers(&rowGaussianFBO);

glGenFramebuffers(1, &colGaussianFBO.frameBuffer);
glBindFramebuffer(GL_FRAMEBUFFER, colGaussianFBO.frameBuffer);
attachBuffers(&colGaussianFBO);

. . .

void render(GLFWwindow* window)
{
	. . .

    // 2. draw on rowGaussianFBO
    glBindFramebuffer(GL_FRAMEBUFFER, rowGaussianFBO.frameBuffer);
    glViewport(0, 0, nowSize.x, nowSize.y);
    glClearColor(0.1, 0.1, 0.1, 0);
    glClear(GL_COLOR_BUFFER_BIT | GL_DEPTH_BUFFER_BIT);

    glUseProgram(rowGaussianProgram.programID);

    // diffFBO에 있는 텍스처 사용해서 가우시안 하기 위해 보내기
    glActiveTexture(GL_TEXTURE0);
    glBindTexture(GL_TEXTURE_2D, diffFBO.colorTexBuffer);
    GLuint colorTexLocation = glGetUniformLocation(rowGaussianProgram.programID, "colorTex");
    glUniform1i(colorTexLocation, 0);

    glActiveTexture(GL_TEXTURE1);
    glBindTexture(GL_TEXTURE_2D, diffFBO.depthBuffer);
    GLuint depthTexLocation = glGetUniformLocation(rowGaussianProgram.programID, "depthTex");
    glUniform1i(depthTexLocation, 1);

    GLuint sizeLocation = glGetUniformLocation(rowGaussianProgram.programID, "size");
    glUniform2f(sizeLocation, static_cast<float>(nowSize.x), static_cast<float>(nowSize.y));

    // Draw a quad to apply Gaussian blur
    glBindVertexArray(quadArrrayBuffer);
    glDrawArrays(GL_TRIANGLES, 0, 6);
    glBindVertexArray(0);

    // 3. draw on colGaussianFBO
    glBindFramebuffer(GL_FRAMEBUFFER, colGaussianFBO.frameBuffer);
    glViewport(0, 0, nowSize.x, nowSize.y);
    glClearColor(0.1, 0.1, 0.1, 0);
    glClear(GL_COLOR_BUFFER_BIT | GL_DEPTH_BUFFER_BIT);

    glUseProgram(colGaussianProgram.programID);

    glActiveTexture(GL_TEXTURE0);
    glBindTexture(GL_TEXTURE_2D, rowGaussianFBO.colorTexBuffer);
    colorTexLocation = glGetUniformLocation(colGaussianProgram.programID, "colorTex");
    glUniform1i(colorTexLocation, 0);

    glActiveTexture(GL_TEXTURE1);
    glBindTexture(GL_TEXTURE_2D, rowGaussianFBO.depthBuffer);
    depthTexLocation = glGetUniformLocation(colGaussianProgram.programID, "depthTex");
    glUniform1i(depthTexLocation, 1);

    sizeLocation = glGetUniformLocation(colGaussianProgram.programID, "size");
    glUniform2f(sizeLocation, static_cast<float>(nowSize.x), static_cast<float>(nowSize.y));

    // Draw a quad to apply Gaussian blur
    glBindVertexArray(quadArrrayBuffer);
    glDrawArrays(GL_TRIANGLES, 0, 6);
    glBindVertexArray(0);

    . . .
}
✔️ rowGaussinBlur.frag
- 이전과 거의 동일
. . .

void main(void)
{
	. . .

	int wx = (int(kernel.x)-1)/2;

	float wSum = 0;

	for(int dx=-wx; dx<=wx; dx++)
	{
		float xx =  gl_FragCoord.x / size.x + (dx * texelSize.x);

		float w = exp(-(dx*dx)/(2.0 * sigma * sigma));
		wSum += w;
		resColor += w*texture(colorTex, vec2(xx, gl_FragCoord.y/size.y)).rgb;
	}
	resColor /= wSum;

	out_Color = vec4(resColor, 1.0);
}
(▽가로 블러만 적용한 결과)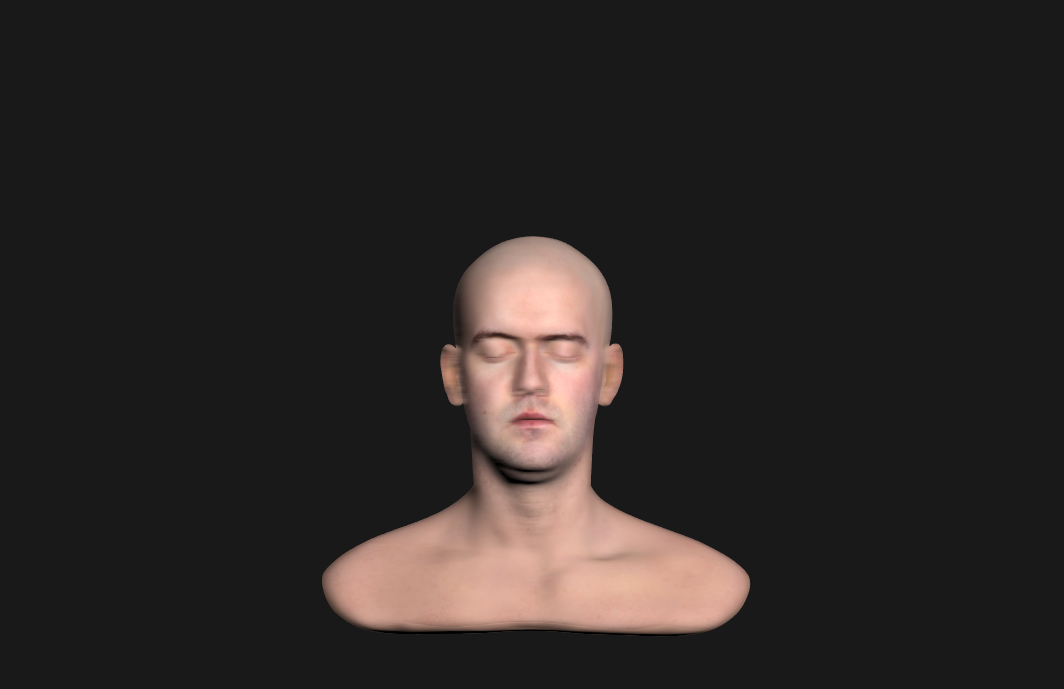
✔️ colGaussianBlur.frag
- 가로, 세로 차이이므로 위의 코드와 x, y 차이가 거의 전부
void main(void)
{
	. . .

	int wy = (int(kernel.y)-1)/2;

	float wSum = 0;

	for(int dy=-wy; dy<=wy; dy++)
	{
		float yy =  gl_FragCoord.y / size.y + (dy * texelSize.y);

		float w = exp(-(dy*dy)/(2.0 * sigma * sigma));
		wSum += w;
		resColor += w*texture(colorTex, vec2(gl_FragCoord.x/size.x, yy)).rgb;
	}
	resColor /= wSum;

	out_Color = vec4(resColor, 1.0);
}
(▽세로 블러만 적용한 결과)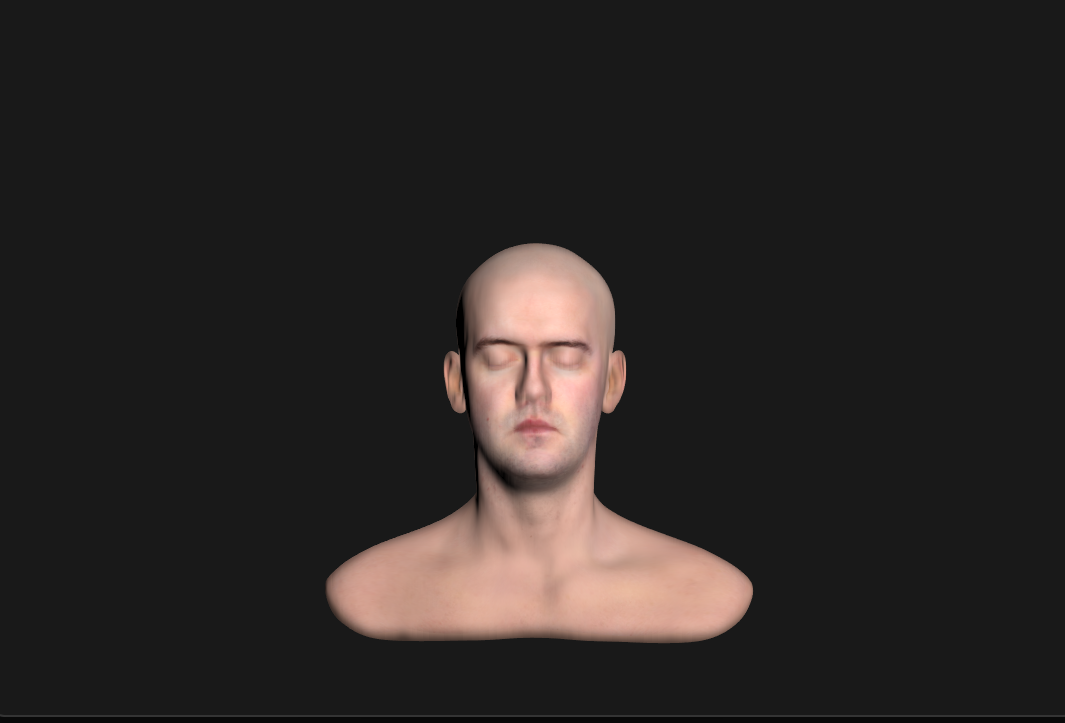
(▽가로/세로 블러 둘 다 적용한 결과) 
- separable하게 블러한 최종 결과가 이전과 동일함
🔎 구현 과정에서...
Depth of Camera coordinate
- 테스트로 depth
z를 출력해보는 과정에서 하얀색 또는 검정색 화면만 보이는 결과가 떴었음
-> 사용하는 obj 모델의 크기를 고려하지 않고 far, near 값을 설정하여 모델이 너무 가깝거나 멀어서 보이지 않았던 것임
-> 모델의 크기는0.3이었고, far는1.0, near은0.01로 설정해줌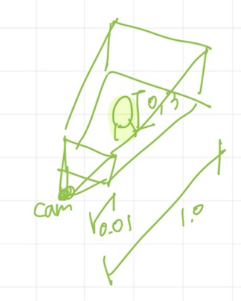
Separable gaussian blur
- separable gaussian blur를 만들 때, 한 버퍼에서 한 쉐이더 코드로만 구현하려하였고, 결과가 나오지 않았음
void main(void)
{
	. . .

	int wx = (int(kernel.x)-1)/2;
	int wy = (int(kernel.y)-1)/2;

	float wSum = 0;

	// separable gaussian
	vec3 rowColor, colColor = vec3(0);
	for(int dx=-wx; dx<=wx; dx++)
	{
		float xx =  gl_FragCoord.x / size.x + (dx * texelSize.x);
  	float w = exp(-(dx*dx)/(2.0 * sigma * sigma));
		wSum += w;
		rowColor += w*texture(colorTex, vec2(xx, gl_FragCoord.y/size.y)).rgb;
  }
	rowColor /= wSum;
	wSum = 0;

	for(int dy=-wy; dy<=wy; dy++)
	{
		float yy =  gl_FragCoord.y / size.y + (dy * texelSize.y);
		float w = exp(-(dy*dy)/(2.0 * sigma * sigma));
		wSum += w;
		colColor += w*texture(colorTex, vec2(gl_FragCoord.x/size.x, yy)).rgb;
  }
	colColor /= wSum;
	resColor = vec3(rowColor[0]*colColor[0], rowColor[1]*colColor[1], rowColor[2]*colColor[2]);

	out_Color = vec4(resColor, 1.0);
}
-> 각 픽셀별로 가로/세로 블러를 적용하는 것이 아닌, 전체 이미지에 가로 블러를 적용한 뒤 그 결과에 세로 블러를 적용해야하므로 새로운 버퍼 사용이 필수적임을 알았음

( •̀ .̫ •́ )✧