서버 인스턴스 생성
사양은 뭘 할까?
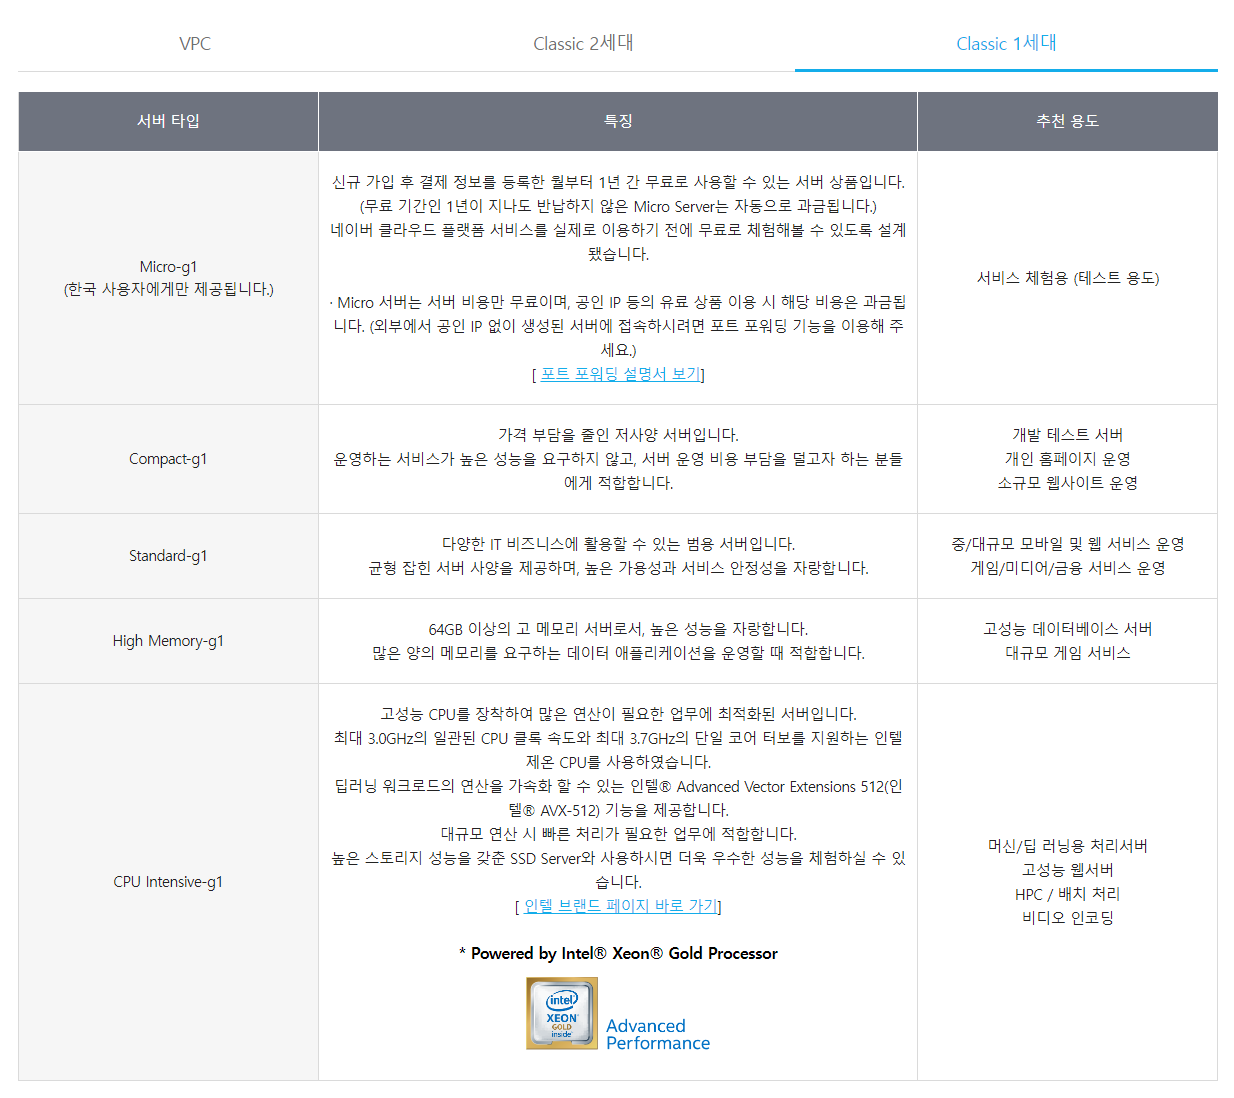
중/대규모 모바일 및 웹 서비스 운영에 적절하다는 Classic 1세대 의 Standard-g1 설정하였다.
또한 우리가 가지고 있는 크레딧이 20만원 이기 때문에
(현재 이 계정으로 테스트 서버도 돌리고 있기 때문에 무리하면 안된다…)
cpu 4개 memory 4gb disk 50gb를 사용하였다. (월 9.2만원)
+ 처음에는 ubuntu 16.04로 했지만, 추후 패키시 절치에서 GLIBC 오류가 생겨서 ubuntu 18로 재설치하였다.
ACG 설정
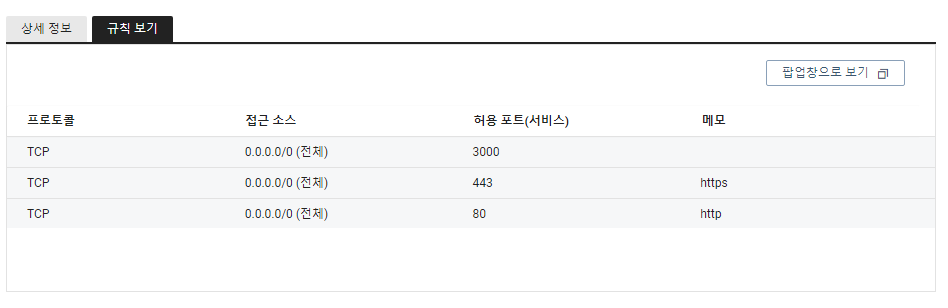
일단 http를 위한 80 포트, https를 위한 443 포트를 열어 놓았는데 추후 수정할 수도 있다.
+ ssh 접속을 위해 22번 포트도 열어놔야 한다.
공인 IP 등록
사이드바에 Server > Public IP 에서 생성할 수 있다.
한달에 약 5000원 정도의 요금이 발생한다.
서버에 접속
putty 로 하는 경우도 있고, 다른 경우도 있겠지만 나는 그냥 vsc에 있는 cmd를 통해 접속한다.
ssh root@서버 공인 ip 주소
혹시 ssh: connect to host 서버 공인 ip 주소 port 22: Connection timed out 라고 뜬다면, ACG 설정 으로 다시 돌아가 22번 포트를 제대로 열어두었는지 확인한다.
제대로 접속이 되었다면,
root@서버 공인 ip 주소mailto:root@4서버 공인 ip 주소's password: 가 뜬다.
이후, 비밀번호 입력하면 된다.
제대로된 비밀번호를 입력 했다면
Welcome to Ubuntu 16.04.1 LTS (GNU/Linux 4.4.0-59-generic x86_64)

 * Documentation:  https://help.ubuntu.com
 * Management:     https://landscape.canonical.com
 * Support:        https://ubuntu.com/advantage

300 packages can be updated.
213 updates are security updates.
이런식으로 뜬다! 이렇게 뜬다면 접속에 성공한 것이다.
리액트 프로젝트 빌드
일단 로컬에서 빌드를 한번 시도해보자.
npm run build
이후 정상적으로 빌드가 됐다면
npm install -g serve
serve -s build
한다!
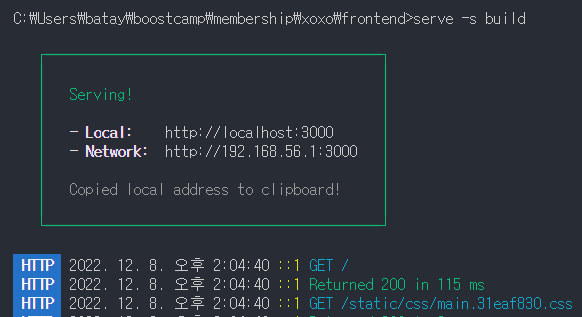
이와 같이, 정상적으로 빌드가 되었음을 알 수 있다.
그냥 로컬에서 index.html 을 열면 제대로 안되고, CORS 오류가 뜨기 때문에 꼭 이런 식으로 서버를 실행해줘야한다.
서버에 설치
우리는 프론트엔드 서버를 설치중이기 때문에 굳이 백엔드 폴더를 불러올 필요가 없다.
그러기 때문에 repository의 특정 디렉토리만 clone 하게 설정 해주자~
-
특정 폴더 clone 설정
git --version을 통해 설치 여부 확인mkdir xoxocd xoxogit initgit config core.sparseCheckout truegit remote add -f originecho "frontend" >> .git/info/sparse-checkout→ 이렇게 하면,
frontend폴더만 clone 해올 수 있다.
-
git clone 해오기
git pull origin maincd frontend
-
패키지 설치
sudo apt-get updatecurl -fsSL https://deb.nodesource.com/setup_16.x | sudo -E bash - &&\ sudo apt-get install -y nodejs // 버전은 GLBC 오류 때문에 16으로 설정.node --version→ node 설치 확인npm --version→ npm 설치 확인npm install --legacy-peer-deps
-
빌드 과정
접속
cd 프로젝트 폴더
git pull origin main
cd frontend
npm run build
nginx 학습
nginx가 정확히 뭐고, 뭘 할수 있을까?
- 클라이언트와 웹 서버 사이에 존재하는 서버, 클라이언트의 요청을 받아 웹 서버로 전달. 응답을 받은 후 다시 클라이언트에게 전달한다.
빌드된거 통해서 서버를 배포할 수도 있고 → 하자
CORS 설정도 가능하고 → 하자
리버스 프록시도 가능하고 → 하자
- 설치
sudo apt-get install nginx
만약 처음 설치하고 나서 에러가 나는 경우가 있는데(start 하는 과정에서 문제가 생기는 것 같았다.), 나같은 경우는 아래에서 default 파일을 수정해주었더니 정상으로 작동 되었다.
- 명령어
- 구문 검사
nginx -t - 재실행
sudo service nginx restart
- 구문 검사
- 코드
worker_processes auto; # 발생하는 이벤트를 처리하는 프로세스의 수

events{
    worker_connections 1024;  # 하나의 프로세스가 동시에 몇 개의 연결을 처리할 수 있는지 (일반적으로 512, 1024)
    use epoll; # 이벤트 처리 방식
}

http {

	upstream frontend {
        server 프론트엔드서버주소;
  }

	upstream backend{
        server 백엔드서버주소;
  }

	server {
		listen 80;

		location / {
			root /home/xoxo/frontend/build;
			index index.html index.htm
		}

		location /users {
			proxy_pass http://backend;
			proxy_http_version  1.1;
      proxy_cache_bypass  $http_upgrade;

      proxy_set_header Upgrade           $http_upgrade;
      proxy_set_header Connection        "upgrade";
      proxy_set_header Host              $host;
      proxy_set_header X-Real-IP         $remote_addr;
      proxy_set_header X-Forwarded-For   $proxy_add_x_forwarded_for;
      proxy_set_header X-Forwarded-Proto $scheme;
      proxy_set_header X-Forwarded-Host  $host;
      proxy_set_header X-Forwarded-Port  $server_port;
		}

**}**
nginx 설정
/etc/nginx/sites-available/default 원본
##
# You should look at the following URL's in order to grasp a solid understanding
# of Nginx configuration files in order to fully unleash the power of Nginx.
# https://www.nginx.com/resources/wiki/start/
# https://www.nginx.com/resources/wiki/start/topics/tutorials/config_pitfalls/
# https://wiki.debian.org/Nginx/DirectoryStructure
#
#
# In most cases, administrators will remove this file from sites-enabled/ and
# leave it as reference inside of sites-available where it will continue to be
# updated by the nginx packaging team.
#
# This file will automatically load configuration files provided by other
# applications, such as Drupal or Wordpress. These applications will be made
# available underneath a path with that package name, such as /drupal8.
#
# Please see /usr/share/doc/nginx-doc/examples/ for more detailed examples.
##
##
# Default server configuration
#
server {
        listen 80 default_server;
        listen [::]:80 default_server;

        # SSL configuration
        #
        # listen 443 ssl default_server;
        # listen [::]:443 ssl default_server;
        #
        # Note: You should disable gzip for SSL traffic.
        # See: https://bugs.debian.org/773332
        #
        # Read up on ssl_ciphers to ensure a secure configuration.
        # See: https://bugs.debian.org/765782
        #
        # Self signed certs generated by the ssl-cert package
        # Don't use them in a production server!
        #
        # include snippets/snakeoil.conf;

        root /var/www/html;

        # Add index.php to the list if you are using PHP
        index index.html index.htm index.nginx-debian.html;

        server_name _;

        location / {
                # First attempt to serve request as file, then
                # as directory, then fall back to displaying a 404.
                root /home/xoxo/frontend/build;
                try_files $uri $uri/ =404;
        }

        # pass PHP scripts to FastCGI server
        #
        #location ~ \.php$ {
        #       include snippets/fastcgi-php.conf;
        #
        #       # With php-fpm (or other unix sockets):
        #       fastcgi_pass unix:/var/run/php/php7.0-fpm.sock;
        #       # With php-cgi (or other tcp sockets):
        #       fastcgi_pass 127.0.0.1:9000;
        #}

        # deny access to .htaccess files, if Apache's document root
        # concurs with nginx's one
        #
        #location ~ /\.ht {
        #       deny all;
				#}
}

# Virtual Host configuration for example.com
#
# You can move that to a different file under sites-available/ and symlink that
# to sites-enabled/ to enable it.
#
#server {
#       listen 80;
#       listen [::]:80;
#
#       server_name example.com;
#
#       root /var/www/example.com;
#       index index.html;
#
#       location / {
#               try_files $uri $uri/ =404;
#       }
#}
변경 후
sudo vi /etc/nginx/sites-available/default

해서 다 지운뒤

server {
		listen 80;

		location / {
			root /home/xoxo/frontend/build;
			index index.html index.htm;
			try_files $uri $uri/ /index.html; # 이거를 넣어줘야만 경로 설정이 가능하다~
		}

		location /api {
			proxy_pass http://백엔드 서버 api 주소:포트/;
			proxy_http_version  1.1;
      proxy_cache_bypass  $http_upgrade;

      proxy_set_header Upgrade           $http_upgrade;
      proxy_set_header Connection        "upgrade";
      proxy_set_header Host              $host;
      proxy_set_header X-Real-IP         $remote_addr;
      proxy_set_header X-Forwarded-For   $proxy_add_x_forwarded_for;
      proxy_set_header X-Forwarded-Proto $scheme;
      proxy_set_header X-Forwarded-Host  $host;
      proxy_set_header X-Forwarded-Port  $server_port;
		}

**}

로 덮어 써준다.**
이후 위의 명령어로 재시작 하자
에러 해결
그런데도 만약 계속 500 Internal Server Error 가 뜨는 경우가 있다면...
아마도 내 생각에는 build 내에 있는 index.html 을 잘 못 받아오는 것 같은데, 막상 빌드 폴더를 살펴보면 정상적으로 빌드 되어 파일이 존재하는 것을 살펴 볼 수 있었다.
그래서 검색을 해보았더니 권한 설정의 문제였다!
내 사용자 계정의 권한 설정을 살펴보아야 한다.
cd /
ls -l

...
dr-xr-xr-x 121 root root     0 Jan 10 17:00 proc
drwx------  10 root root  4096 Jan 10 17:40 root # 내 사용자 계정
drwxr-xr-x  25 root root   940 Jan 10 17:40 run
...
해당 root 의 권한을 바꿔줘야 한다. 나같은 경우는 아래와 같이 바꾸어줬더니 정상으로 작동 하였다.
chmod 711 root
https 반영
letsencrypt를 통해 ssl 인증서를 발급 받아 줄 것이다!
sudo snap install certbot --classic
sudo certbot --nginx
# 동의 사항, 이메일 주소, 어느 도메인에 https를 설정할 것인지 물어본다.(나는 전체 도메인을 설정해주었다.)
이러고 다시 default 파일을 살펴보면 알아서 https 에 관한 설정이 추가되어 있는 것을 알 수 있다.
추가로 트러블슈팅이 필요할 것 같아 긴장되었는데 다행히 바로 잘 작동 되었다.
참고로 https 를 반영해주었으면 기존 코드에서 http 주소와 통신하는 코드를 다 변경해주는 것이 좋다.
나같은 경우는 image CDN 주소가 http였어서 이미지가 모두 에러가 나버려서, CDN을 https 로 다시 설정해주었다!