진행상황
포스팅2에도 작성했듯이 반의 전체 일정은 아래와 같다
- 11/1 - 11/11 : 기획 & 개발 완료
- 11/14 - 11/18 : k8s 환경에서 프로젝트 구성 및 발표
- 11/21 - 12/2 : EKS 환경으로 이전 & 프로젝트 구성 및 발표
하지만 WebRTC의 경우 k8s 환경에서 많은 에러를 겪고 있는 중이다. 공인된 SSL인증이 필요한데 openSSL만으로는 커넥션 문제가 자꾸 일어났고 이를 해결하고자 AWS의 route53, KMS를 사용하는게 에러를 해결하는데 쉬워보였다. 따라서 k8s 환경에서 구축을 멈추고 EKS를 먼저 구축한뒤 시간이 남으면 k8s로 넘어오기로 했다
EKS 아키텍쳐 설계하기
Single Cluster
- VPC1개에서 AZ4를 지정하고 public, private subnet을 각각 만들어줄 계획이다
- k8s 에서 테스트 했던 ELK를 그대로 가져가고 github Action에 적용된 도커허브를 ECR로 변경하기로 함
- 데이터베이스의 경우 권한에 따라 Master, Slave로 나누려는 계획이 있지만 서비스 연동이 모두 해결된 후에 하기로 우선순위를 낮춤
- 데이터베이스와 argoCD는 pod 형태로 진행
CIDR 설정
private 쪽이 많은 오브젝트를 가지고 있기 때문에 22로 늘림
Multi Cluster
멀티 클러스터 구축에 대한 의견도 받아 우리 Eyestalk을 올린다면 어떤식으로 구축을 하게될지 아키텍쳐를 만들었다
- 다중 VPC를 사용할경우 모니터링을 둘 때 VPC를 하나 더 생성하여 모니터링 object를 두어야한다
- 따라서 3개의 VPC를 생성해야함
- 이럴경우 규모가 커지기 때문에 우리 서비스에서 처리하는 정보량에 비해 비효율적이라고 판단됨
- 각각의 VPC에 Baston을 둔 이유
- VPC 피어링을 통해 다중 VPC 접속이 가능하다. 그런데 Baston이 하나일 경우 해당 Baston에 장애가 생기면 개발자가 대응할 수 없다. 따라서 장애대응을 위하여 각각의 VPC에 Baston을 생성함
결론 : 아키텍쳐를 그려본 결과 EyesTalk에는 단일 클러스터가 적합하다고 결정이 되었다
EKS Testing 환경 구축하기
우선 빠른 테스팅이 필요하기 때문에 CloudFormation이나 Terraform은 추후에 적용하기로함. 수동 설치하기로 함
참고 자료 : https://catalog.us-east-1.prod.workshops.aws/workshops/9c0aa9ab-90a9-44a6-abe1-8dff360ae428/ko-KR/50-eks-cluster
Cloud9에서 EKSctl을 사용하여 EKS 클러스터 생성하기
AWS CLI 업데이트
AWS Cloud9은 기본적으로 AWS CLI가 설치되어 있다. AWS CLI는 AWS 서비스와 상호 작용할 수 있는 오픈소스 툴. 특정 범위의 버전에 만족하기 위해 AWS CLI를 업그레이드 해주고 버전을 확인한다
# AWS CLI 버전 업그레이드
sudo pip install --upgrade awscli

# 버전 확인
aws --version
aws-cli/1.19.112 Python/2.7.18 Linux/4.14.296-222.539.amzn2.x86_64 botocore/1.20.112
kubectl 설치
kubectl은 쿠버네티스 클러스터에 명령을 내리는 CLI이다.
배포할 Amazon EKS 버전과 상응하는 kubectl를 설치.
sudo curl -o /usr/local/bin/kubectl  \
https://amazon-eks.s3.us-west-2.amazonaws.com/1.21.2/2021-07-05/bin/linux/amd64/kubectl

sudo chmod +x /usr/local/bin/kubectl

# 확인
kubectl version --client=true --short=true
Client Version: v1.21.2-13+d2965f0db10712
그 외 다른 툴들 설치하기
- jq 유틸리티 설치 & bash-completion 설치
### JSON 형식의 데이터를 다루는 커맨드라인 유틸리티 설치
rapa0005:~/environment $ sudo yum install -y jq
Loaded plugins: extras_suggestions, langpacks, priorities, update-motd
amzn2-core                                                        | 3.7 kB  00:00:00
253 packages excluded due to repository priority protections
Resolving Dependencies
--> Running transaction check
---> Package jq.x86_64 0:1.5-1.amzn2.0.2 will be installed
--> Processing Dependency: libonig.so.2()(64bit) for package: jq-1.5-1.amzn2.0.2.x86_64
--> Running transaction check
---> Package oniguruma.x86_64 0:5.9.6-1.amzn2.0.4 will be installed
--> Finished Dependency Resolution

Dependencies Resolved

=========================================================================================
 Package            Arch            Version                    Repository           Size
=========================================================================================
Installing:
 jq                 x86_64          1.5-1.amzn2.0.2            amzn2-core          154 k
Installing for dependencies:
 oniguruma          x86_64          5.9.6-1.amzn2.0.4          amzn2-core          127 k

Transaction Summary
=========================================================================================
Install  1 Package (+1 Dependent package)

Total download size: 281 k
Installed size: 890 k
Downloading packages:
(1/2): jq-1.5-1.amzn2.0.2.x86_64.rpm                              | 154 kB  00:00:00
(2/2): oniguruma-5.9.6-1.amzn2.0.4.x86_64.rpm                     | 127 kB  00:00:00
-----------------------------------------------------------------------------------------
Total                                                       2.0 MB/s | 281 kB  00:00
Running transaction check
Running transaction test
Transaction test succeeded
Running transaction
  Installing : oniguruma-5.9.6-1.amzn2.0.4.x86_64                                    1/2
  Installing : jq-1.5-1.amzn2.0.2.x86_64                                             2/2
  Verifying  : jq-1.5-1.amzn2.0.2.x86_64                                             1/2
  Verifying  : oniguruma-5.9.6-1.amzn2.0.4.x86_64                                    2/2

Installed:
  jq.x86_64 0:1.5-1.amzn2.0.2

Dependency Installed:
  oniguruma.x86_64 0:5.9.6-1.amzn2.0.4

Complete!

### bash-completion 설치하기
rapa0005:~/environment $ sudo yum install -y bash-completion
Loaded plugins: extras_suggestions, langpacks, priorities, update-motd
253 packages excluded due to repository priority protections
Package 1:bash-completion-2.1-6.amzn2.noarch already installed and latest version
Nothing to do
eksctl 설치하기
eksctl은 EKS 클러스터를 쉽게 생성 및 관리하는 CLI 툴
eksctl을 이용하여 Amazon EKS 클러스터를 배포할 것이기 때문에 eksctl을 설치 - 툴 3개
rapa0005:~/environment $ sudo yum install -y bash-completion
Loaded plugins: extras_suggestions, langpacks, priorities, update-motd
253 packages excluded due to repository priority protections
Package 1:bash-completion-2.1-6.amzn2.noarch already installed and latest version
Nothing to do

# 최신 eksctl 바이너리 다운로드
rapa0005:~/environment $ curl --silent --location "https://github.com/weaveworks/eksctl/releases/latest/download/eksctl_$(uname -s)_amd64.tar.gz" | tar xz -C /tmp

# 바이너리 옮기기
rapa0005:~/environment $ sudo mv -v /tmp/eksctl /usr/local/bin
‘/tmp/eksctl’ -> ‘/usr/local/bin/eksctl’

# 설치 여부 확인
rapa0005:~/environment $ eksctl version
0.120.0
AWS Cloud9 추가 세팅
- 현재 실습이 진행되고 있는 리전(서울)을 기본값으로 설정
rapa0005:~/environment $ export AWS_REGION=$(curl -s 169.254.169.254/latest/dynamic/instance-identity/document | jq -r '.region')
rapa0005:~/environment $ echo "export AWS_REGION=${AWS_REGION}" | tee -a ~/.bash_profile
export AWS_REGION=ap-northeast-2
rapa0005:~/environment $ aws configure set default.region ${AWS_REGION}- 현재 실습을 진행하는 계정 ID를 환경 변수로 등록
rapa0005:~/environment $ export ACCOUNT_ID=$(curl -s {}/latest/dynamic/instance-identity/document | jq -r '.accountId')
rapa0005:~/environment $ echo "export ACCOUNT_ID=${ACCOUNT_ID}" | tee -a ~/.bash_profile
export ACCOUNT_ID={}- 도커 이미지를 빌드하는 동안 용량 부족 이슈를 해결하기 위한 디스크 사이즈 증설 쉘 스크립트 실행
### 디스크 사이즈를 증설하는 쉘 스크립트를 실행
rapa0005:~/environment $ wget https://gist.githubusercontent.com/joozero/b48ee68e2174a4f1ead93aaf2b582090/raw/2dda79390a10328df66e5f6162846017c682bef5/resize.sh
--2022-11-23 06:14:23--  https://gist.githubusercontent.com/joozero/b48ee68e2174a4f1ead93aaf2b582090/raw/2dda79390a10328df66e5f6162846017c682bef5/resize.sh
Resolving gist.githubusercontent.com (gist.githubusercontent.com)... 185.199.108.133, 185.199.109.133, 185.199.111.133, ...
Connecting to gist.githubusercontent.com (gist.githubusercontent.com)|185.199.108.133|:443... connected.
HTTP request sent, awaiting response... 200 OK
Length: 1273 (1.2K) [text/plain]
Saving to: ‘resize.sh.2’

100%[=======================================================================>] 1,273       --.-K/s   in 0s

2022-11-23 06:14:23 (53.6 MB/s) - ‘resize.sh.2’ saved [1273/1273]
rapa0005:~/environment $ sh resize.sh
{
    "VolumeModification": {
        "TargetSize": 30,
        "OriginalMultiAttachEnabled": false,
        "TargetVolumeType": "gp2",
        "ModificationState": "modifying",
        "TargetMultiAttachEnabled": false,
        "VolumeId": "vol-07021f0ff45e6f432",
        "TargetIops": 100,
        "StartTime": "2022-11-23T06:14:35.000Z",
        "Progress": 0,
        "OriginalVolumeType": "gp2",
        "OriginalIops": 100,
        "OriginalSize": 10
    }
}
CHANGED: partition=1 start=4096 old: size=20967391 end=20971487 new: size=62910431 end=62914527
meta-data=/dev/nvme0n1p1         isize=512    agcount=6, agsize=524159 blks
         =                       sectsz=512   attr=2, projid32bit=1
         =                       crc=1        finobt=1 spinodes=0
data     =                       bsize=4096   blocks=2620923, imaxpct=25
         =                       sunit=0      swidth=0 blks
naming   =version 2              bsize=4096   ascii-ci=0 ftype=1
log      =internal               bsize=4096   blocks=2560, version=2
         =                       sectsz=512   sunit=0 blks, lazy-count=1
realtime =none                   extsz=4096   blocks=0, rtextents=0
data blocks changed from 2620923 to 7863803
rapa0005:~/environment $ df -h
Filesystem      Size  Used Avail Use% Mounted on
devtmpfs        970M     0  970M   0% /dev
tmpfs           978M     0  978M   0% /dev/shm
tmpfs           978M  516K  977M   1% /run
tmpfs           978M     0  978M   0% /sys/fs/cgroup
**/dev/nvme0n1p1   30G  5.9G   25G  20% /**
tmpfs           196M     0  196M   0% /run/user/1000
tmpfs           196M     0  196M   0% /run/user/0
EKS 클러스터 생성하기
Amazon EKS 클러스터는 다양한 방식으로 배포 가능하다
- AWS 콘솔 창 에서 클릭으로 배포하는 방법
- AWS CloudFormation 혹은 AWS CDK 와 같은 IaC(Infrastructure as Code) 도구를 사용해 배포하는 방법
- EKS의 공식 CLI인 eksctl 로 배포하는 방법
- Terraform, Pulumi, Rancher 등으로 배포하는 방법
-> eksctl으로 진행
cat << EOF > eks-eyestalk-cluster.yaml
---
apiVersion: eksctl.io/v1alpha5
kind: ClusterConfig

metadata:
  name: eks-eyestalk # 생성할 EKS 클러스터명
  region: ${AWS_REGION} # 클러스터를 생성할 리전
  version: "1.21"

vpc:
  cidr: "10.0.0.0/16" # 클러스터에서 사용할 VPC의 CIDR

# 관리형 노드 그룹
# 노드 프로비저닝과 수명 주기 관리 자동화
# 사용자가 직접 EC2 인스턴스 생성하고 EKS 클러스터에 등록할 필요가 없음
managedNodeGroups:
  - name: node-group # 클러스터의 노드 그룹명
    instanceType: m5.large # 클러스터 워커 노드의 인스턴스 타입
	    desiredCapacity: 3 # 클러스터 워커 노드의 갯수
    volumeSize: 10  # 클러스터 워커 노드의 EBS 용량 (단위: GiB)
    iam: # 권한 설정
      withAddonPolicies:
        imageBuilder: true # Amazon ECR에 대한 권한 추가
        # albIngress: true  # albIngress에 대한 권한 추가
        cloudWatch: true # cloudWatch에 대한 권한 추가
        autoScaler: true # auto scaling에 대한 권한 추가

cloudWatch:
  clusterLogging:
    enableTypes: ["*"]
EOF
클러스터 배포
rapa0005:~/environment $ eksctl create cluster -f eks-eyestalk-cluster.yaml
2022-11-23 06:30:26 [ℹ]  eksctl version 0.120.0
2022-11-23 06:30:26 [ℹ]  using region ap-northeast-2
2022-11-23 06:30:26 [ℹ]  setting availability zones to [ap-northeast-2c ap-northeast-2d ap-northeast-2a]
2022-11-23 06:30:26 [ℹ]  subnets for ap-northeast-2c - public:10.0.0.0/19 private:10.0.96.0/19
2022-11-23 06:30:26 [ℹ]  subnets for ap-northeast-2d - public:10.0.32.0/19 private:10.0.128.0/19
2022-11-23 06:30:26 [ℹ]  subnets for ap-northeast-2a - public:10.0.64.0/19 private:10.0.160.0/19
2022-11-23 06:30:26 [ℹ]  nodegroup "node-group" will use "" [AmazonLinux2/1.21]
2022-11-23 06:30:26 [ℹ]  using Kubernetes version 1.21
2022-11-23 06:30:26 [ℹ]  creating EKS cluster "eks-eyestalk" in "ap-northeast-2" region with managed nodes
2022-11-23 06:30:26 [ℹ]  1 nodegroup (node-group) was included (based on the include/exclude rules)
2022-11-23 06:30:26 [ℹ]  will create a CloudFormation stack for cluster itself and 0 nodegroup stack(s)
2022-11-23 06:30:26 [ℹ]  will create a CloudFormation stack for cluster itself and 1 managed nodegroup stack(s)
2022-11-23 06:30:26 [ℹ]  if you encounter any issues, check CloudFormation console or try 'eksctl utils describe-stacks --region=ap-northeast-2 --cluster=eks-eyestalk'
2022-11-23 06:30:26 [ℹ]  Kubernetes API endpoint access will use default of {publicAccess=true, privateAccess=false} for cluster "eks-eyestalk" in "ap-northeast-2"
2022-11-23 06:30:26 [ℹ]  configuring CloudWatch logging for cluster "eks-eyestalk" in "ap-northeast-2" (enabled types: api, audit, authenticator, controllerManager, scheduler & no types disabled)
2022-11-23 06:30:26 [ℹ]
2 sequential tasks: { create cluster control plane "eks-eyestalk",
    2 sequential sub-tasks: {
        wait for control plane to become ready,
        create managed nodegroup "node-group",
    }
}
2022-11-23 06:30:26 [ℹ]  building cluster stack "eksctl-eks-eyestalk-cluster"
2022-11-23 06:30:27 [ℹ]  deploying stack "eksctl-eks-eyestalk-cluster"
2022-11-23 06:30:57 [ℹ]  waiting for CloudFormation stack "eksctl-eks-eyestalk-cluster"
2022-11-23 06:31:27 [ℹ]  waiting for CloudFormation stack "eksctl-eks-eyestalk-cluster"
2022-11-23 06:32:27 [ℹ]  waiting for CloudFormation stack "eksctl-eks-eyestalk-cluster"
2022-11-23 06:33:27 [ℹ]  waiting for CloudFormation stack "eksctl-eks-eyestalk-cluster"
2022-11-23 06:34:27 [ℹ]  waiting for CloudFormation stack "eksctl-eks-eyestalk-cluster"
2022-11-23 06:35:27 [ℹ]  waiting for CloudFormation stack "eksctl-eks-eyestalk-cluster"
2022-11-23 06:36:27 [ℹ]  waiting for CloudFormation stack "eksctl-eks-eyestalk-cluster"
2022-11-23 06:37:27 [ℹ]  waiting for CloudFormation stack "eksctl-eks-eyestalk-cluster"
2022-11-23 06:38:27 [ℹ]  waiting for CloudFormation stack "eksctl-eks-eyestalk-cluster"
2022-11-23 06:39:27 [ℹ]  waiting for CloudFormation stack "eksctl-eks-eyestalk-cluster"
2022-11-23 06:40:27 [ℹ]  waiting for CloudFormation stack "eksctl-eks-eyestalk-cluster"
2022-11-23 06:41:27 [ℹ]  waiting for CloudFormation stack "eksctl-eks-eyestalk-cluster"
2022-11-23 06:43:28 [ℹ]  building managed nodegroup stack "eksctl-eks-eyestalk-nodegroup-node-group"
2022-11-23 06:43:28 [ℹ]  deploying stack "eksctl-eks-eyestalk-nodegroup-node-group"
2022-11-23 06:43:29 [ℹ]  waiting for CloudFormation stack "eksctl-eks-eyestalk-nodegroup-node-group"
2022-11-23 06:43:59 [ℹ]  waiting for CloudFormation stack "eksctl-eks-eyestalk-nodegroup-node-group"
2022-11-23 06:44:56 [ℹ]  waiting for CloudFormation stack "eksctl-eks-eyestalk-nodegroup-node-group"
2022-11-23 06:46:34 [ℹ]  waiting for CloudFormation stack "eksctl-eks-eyestalk-nodegroup-node-group"
2022-11-23 06:48:01 [ℹ]  waiting for CloudFormation stack "eksctl-eks-eyestalk-nodegroup-node-group"
2022-11-23 06:48:01 [ℹ]  waiting for the control plane to become ready
2022-11-23 06:48:02 [!]  failed to determine authenticator version, leaving API version as default v1alpha1: failed to parse versions: unable to parse first version "": strconv.ParseUint: parsing "": invalid syntax
2022-11-23 06:48:02 [✔]  saved kubeconfig as "/home/ec2-user/.kube/config"
2022-11-23 06:48:02 [ℹ]  no tasks
2022-11-23 06:48:02 [✔]  all EKS cluster resources for "eks-eyestalk" have been created
2022-11-23 06:48:02 [ℹ]  nodegroup "node-group" has 3 node(s)
2022-11-23 06:48:02 [ℹ]  node "ip-10-0-2-4.ap-northeast-2.compute.internal" is ready
2022-11-23 06:48:02 [ℹ]  node "ip-10-0-53-89.ap-northeast-2.compute.internal" is ready
2022-11-23 06:48:02 [ℹ]  node "ip-10-0-84-230.ap-northeast-2.compute.internal" is ready
2022-11-23 06:48:02 [ℹ]  waiting for at least 3 node(s) to become ready in "node-group"
2022-11-23 06:48:02 [ℹ]  nodegroup "node-group" has 3 node(s)
2022-11-23 06:48:02 [ℹ]  node "ip-10-0-2-4.ap-northeast-2.compute.internal" is ready
2022-11-23 06:48:02 [ℹ]  node "ip-10-0-53-89.ap-northeast-2.compute.internal" is ready
2022-11-23 06:48:02 [ℹ]  node "ip-10-0-84-230.ap-northeast-2.compute.internal" is ready
2022-11-23 06:48:04 [ℹ]  kubectl command should work with "/home/ec2-user/.kube/config", try 'kubectl get nodes'
2022-11-23 06:48:04 [✔]  EKS cluster "eks-eyestalk" in "ap-northeast-2" region is ready
배포 확인
rapa0005:~/environment $ kubectl get nodes
NAME                                             STATUS   ROLES    AGE     VERSION
ip-10-0-2-4.ap-northeast-2.compute.internal      Ready    <none>   3m35s   v1.21.14-eks-fb459a0
ip-10-0-53-89.ap-northeast-2.compute.internal    Ready    <none>   3m34s   v1.21.14-eks-fb459a0
ip-10-0-84-230.ap-northeast-2.compute.internal   Ready    <none>   3m35s   v1.21.14-eks-fb459a0
CloudFormation Stack 확인하기
eksctl은 EKS 클러스터를 만들 때, eksctl--cluster라는 이름의 CloudFormation Stack을 생성.
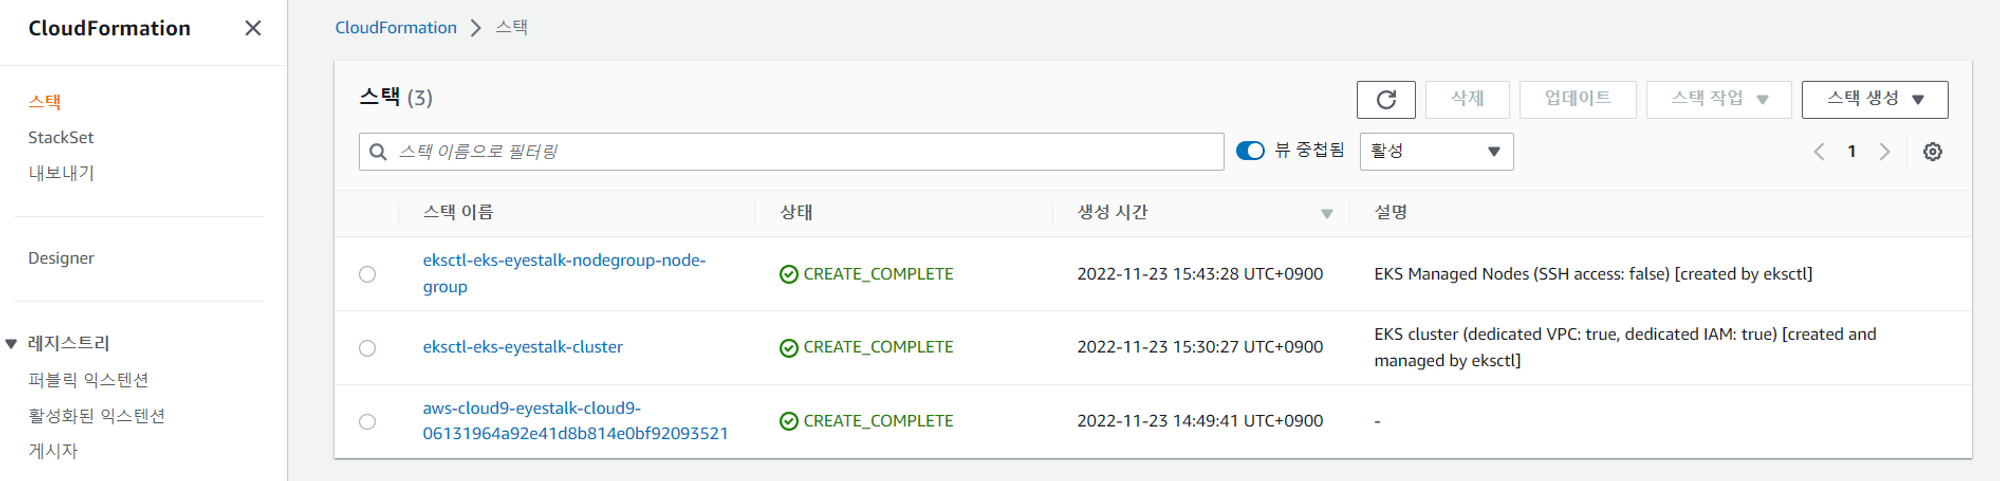
해당 내용은 테스팅의 목적으로한 단순한 public subnet3로만 구성된 아키텍쳐이기 때문에 재구축을 해야함. 본 플젝까지의 시간이 얼마 남지 않아서 위의 내용을 삭제하고 재구축할 예정
ECR 수동 업로드 테스트
backend-spring git clone
rapa0005:~/environment $ git clone https://github.com/muji-StudyRoom/spring-back.git
Cloning into 'spring-back'...
remote: Enumerating objects: 678, done.
remote: Counting objects: 100% (237/237), done.
remote: Compressing objects: 100% (154/154), done.
remote: Total 678 (delta 73), reused 162 (delta 51), pack-reused 441
Receiving objects: 100% (678/678), 87.23 MiB | 18.70 MiB/s, done.
Resolving deltas: 100% (228/228), done.
[backend - spring]
AWS CLI를 통해 image repository 생성.
rapa0005:~/environment $ aws ecr create-repository \
> --repository-name eyestalk-backend-spring \
> --image-scanning-configuration scanOnPush=true \
> --region ${AWS_REGION}
{
    "repository": {
        "repositoryUri": "{id}.dkr.ecr.ap-northeast-2.amazonaws.com/eyestalk-backend-spring",
        "imageScanningConfiguration": {
            "scanOnPush": true
        },
        "encryptionConfiguration": {
            "encryptionType": "AES256"
        },
        "registryId": "{id}",
        "imageTagMutability": "MUTABLE",
        "repositoryArn": "arn:aws:ecr:ap-northeast-2:{id}:repository/eyestalk-backend-spring",
        "repositoryName": "eyestalk-backend-spring",
        "createdAt": 1669186603.0
    }
}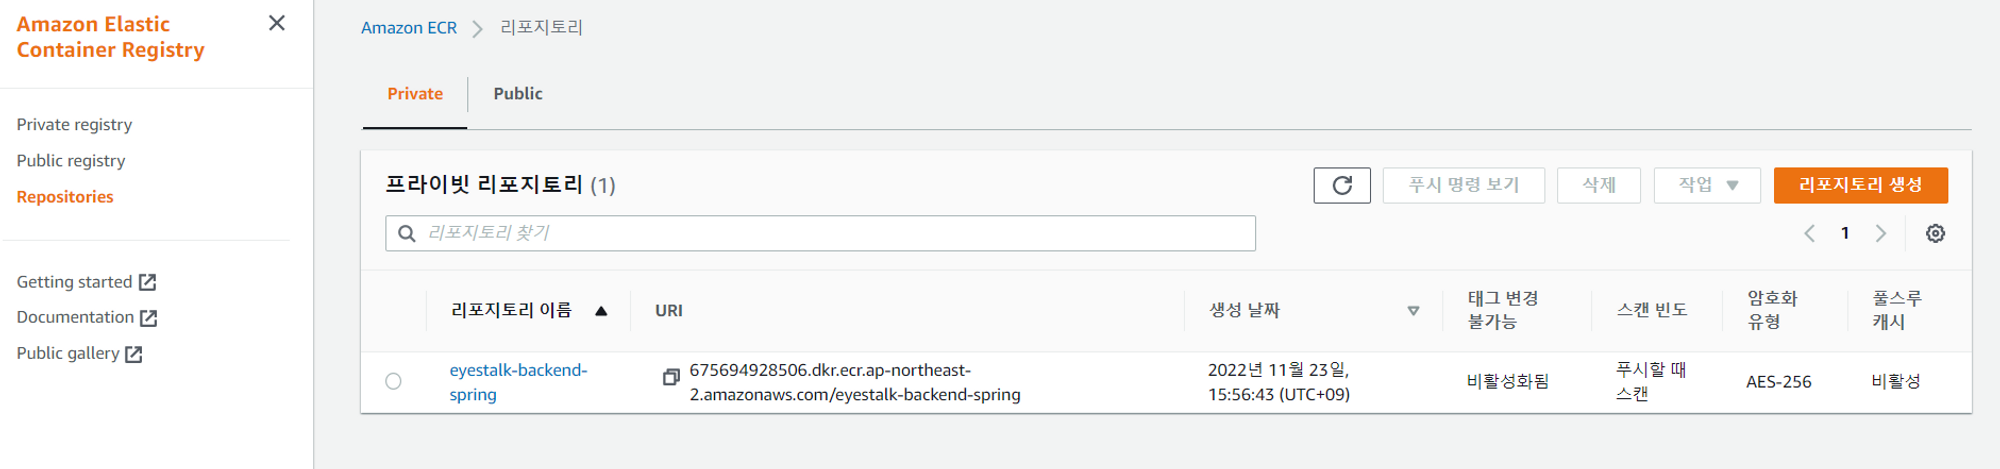
잘 생성된것을 확인
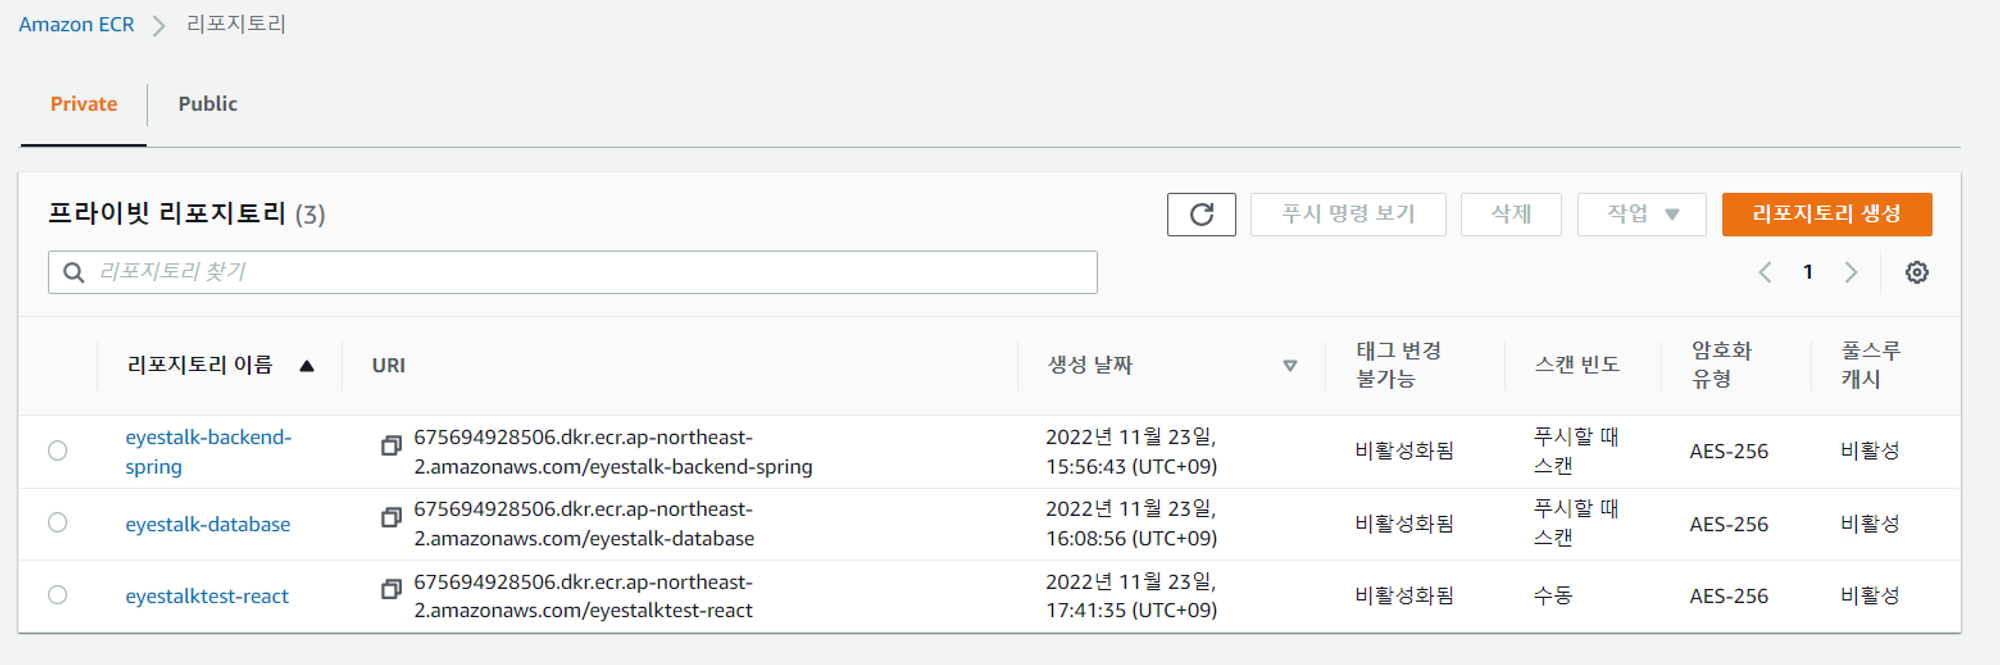
GithubAction & ECR - CI 구축
- 개발 코드가 계속 수정되고 있기 때문에 CI적용이 필요하다
- Dockerhub로 연결된 부분을 ECR로 수정하여 업로드 시키기
- Root Access key, Secret access key 발급 받기
- Github Repo Setting -> Secret에 값 저장하기
- ECR에서 이미지로 만드려는 레포를 미리 생성하기
yaml Code
name: eyestalk-beta-test

on: [push]

jobs:
  build:
    runs-on: ubuntu-latest
    steps:
      -
        name: Checkout
        uses: actions/checkout@v2
      - name: Bump version and push tag
        id: tag_version
        uses: mathieudutour/github-tag-action@v5.5 # 가져다 쓸 auto tagging 프로그램
        with:
          github_token: ${{ secrets.GITHUB_TOKEN }} # secrets.GITHUB_TOKEN 는 자동생성됨
      - name: Create a GitHub release
        uses: actions/create-release@v1
        env:
          GITHUB_TOKEN: ${{ secrets.GITHUB_TOKEN }}
        with:
          tag_name: ${{ steps.tag_version.outputs.new_tag }}
          release_name: Release ${{ steps.tag_version.outputs.new_tag }}
          body: ${{ steps.tag_version.outputs.changelog }}
      - name: Configure AWS credentials
        uses: aws-actions/configure-aws-credentials@v1
        with:
          aws-access-key-id: ${{ secrets.AWS_ACCESS_KEY_ID }}
          aws-secret-access-key: ${{ secrets.AWS_SECRET_ACCESS_KEY }}
          aws-region: ap-northeast-2
      - name: Login to Amazon ECR
        id: login-ecr
        uses: aws-actions/amazon-ecr-login@v1
      - name: Build, tag, and push image to Amazon ECR
        id: image-info
        env:
          ECR_REGISTRY: ${{ steps.login-ecr.outputs.registry }}
          ECR_REPOSITORY: eyestalktest-react
          IMAGE_TAG: ${{ steps.tag_version.outputs.new_tag }}
        run: |
          docker build -t $ECR_REGISTRY/$ECR_REPOSITORY:$IMAGE_TAG .
docker push $ECR_REGISTRY/$ECR_REPOSITORY:$IMAGE_TAG 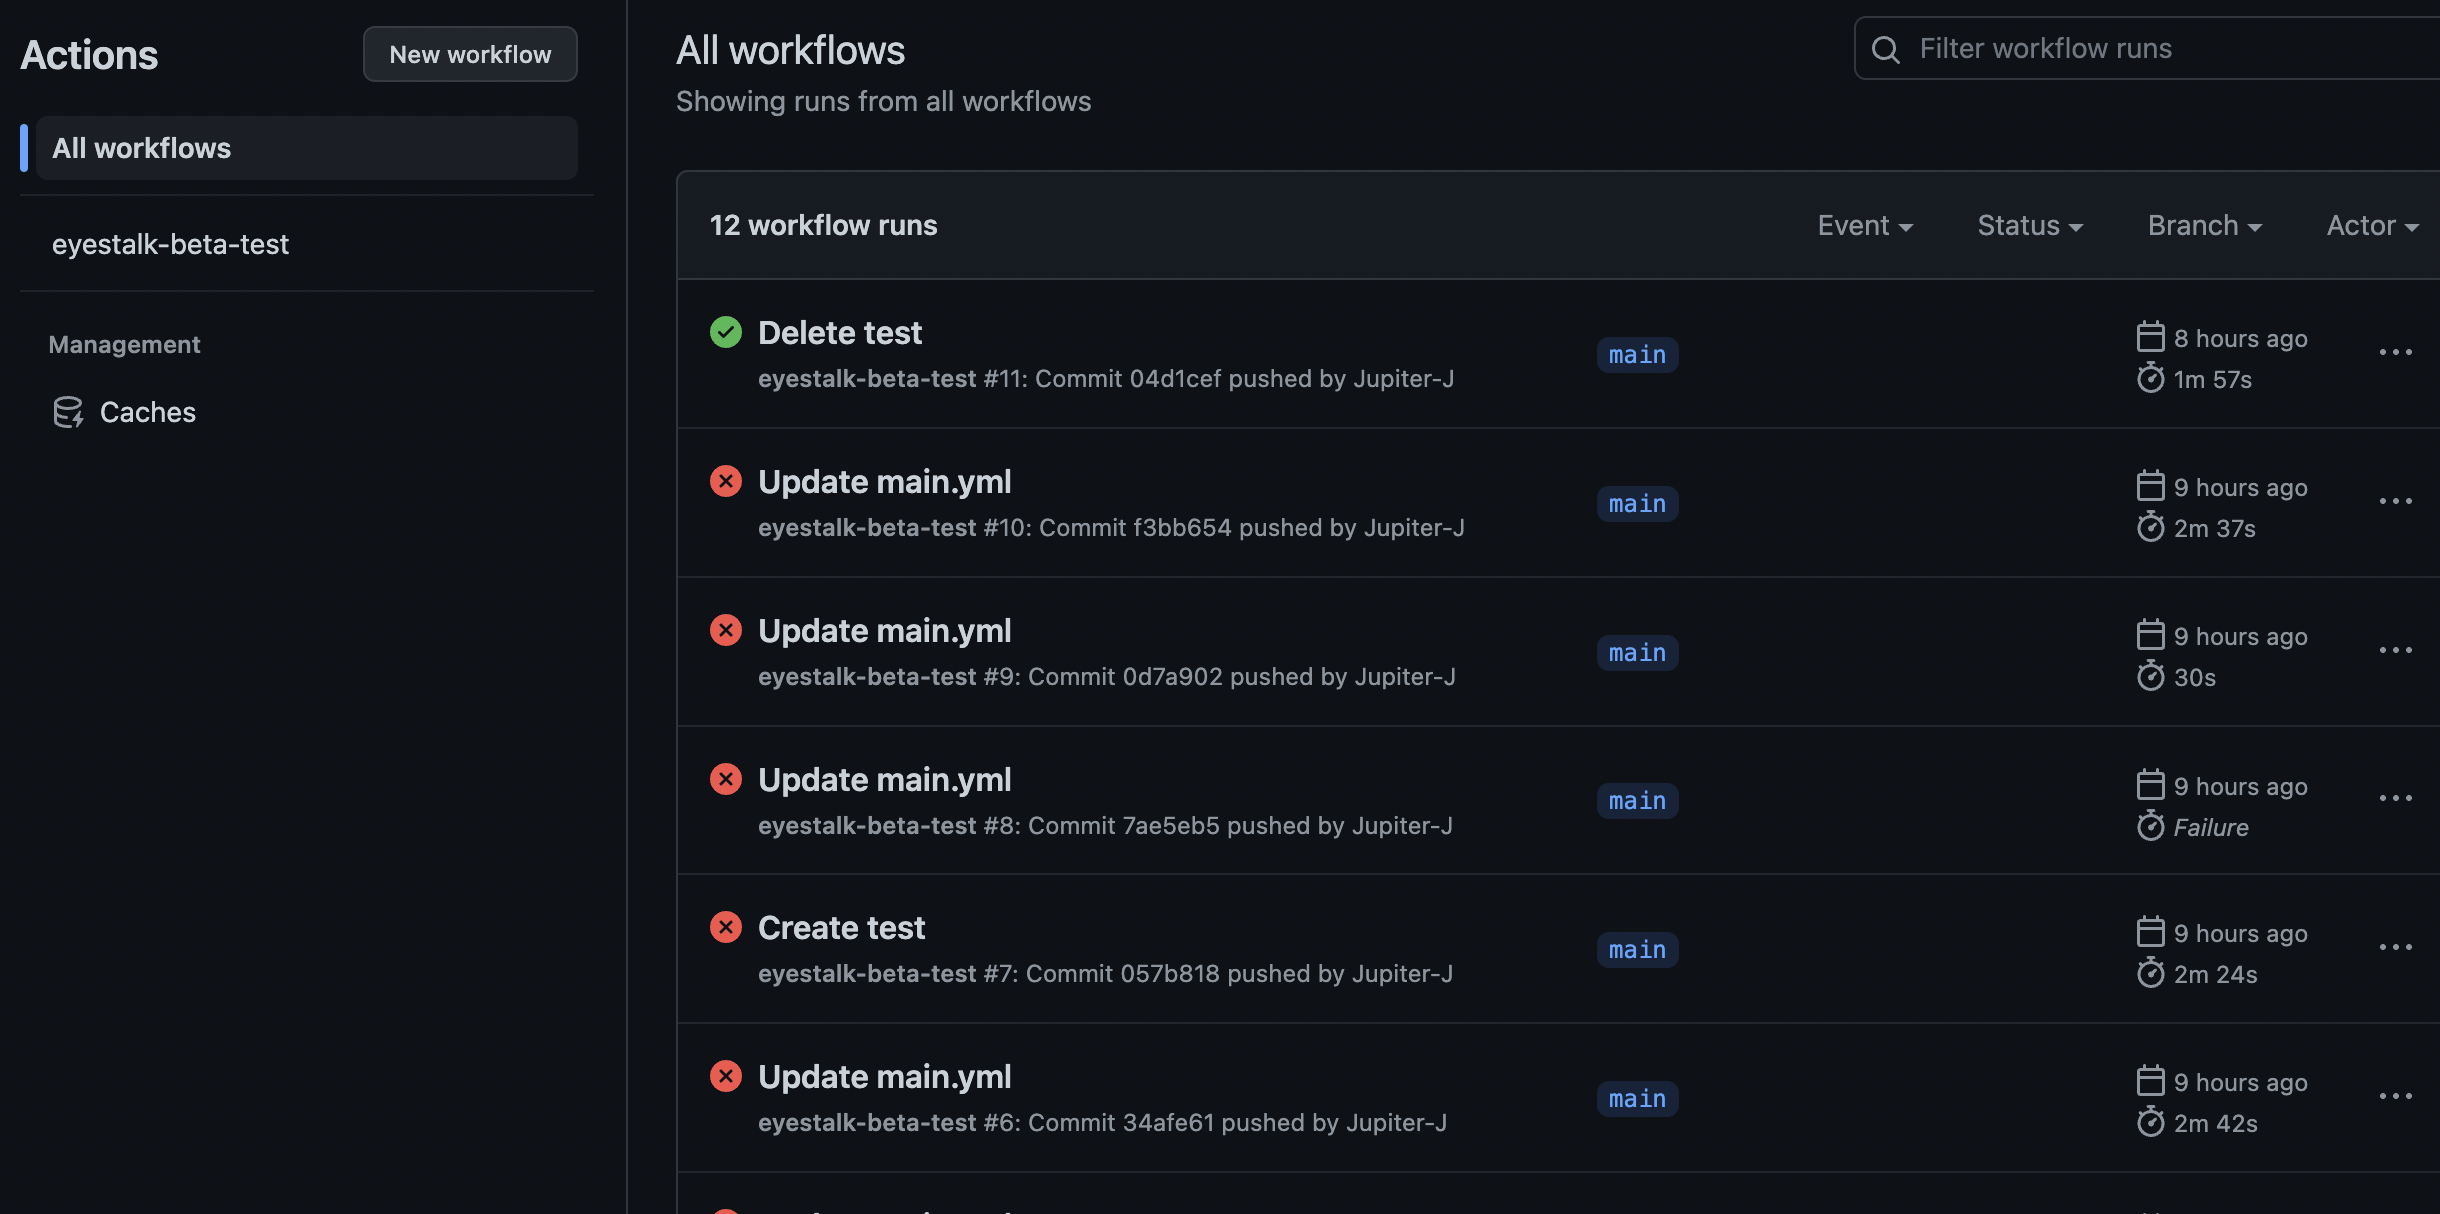
적용 성공