리팩토링(Refactoring)
소프트웨어 공학에서 결과의 변경 업시 코드의 구조를 재조정하는 것
가독성을 높이고 유지보수를 편하게 할 수 있도록 함
① 상속 구조를 활용한 캐릭터 클래스 리팩토링
before
import weapon.무기;

public class Player {
	public String 이름;
	private int hp;
	private int power;
	private int mp;
	private String imgFile1;
	private String imgFile2;
	public 무기 전용무기;


	public Player(String 이름, int hp, int power, int mp, String imgFile1, String imgFile2, 무기 전용무기) {
		setHP(hp);
		setPower(power);
		setImgFile1(imgFile1);
		setImgFile2(imgFile2);
		setMP(mp);
		this.이름 = 이름;
		this.전용무기 = 전용무기;
	}

	// ...get/set 중략...

	public void 공격(Player target) {
		target.hp -= this.power;
	}

	public void 무기로공격(Player target) {

	}

	public Player() {}

}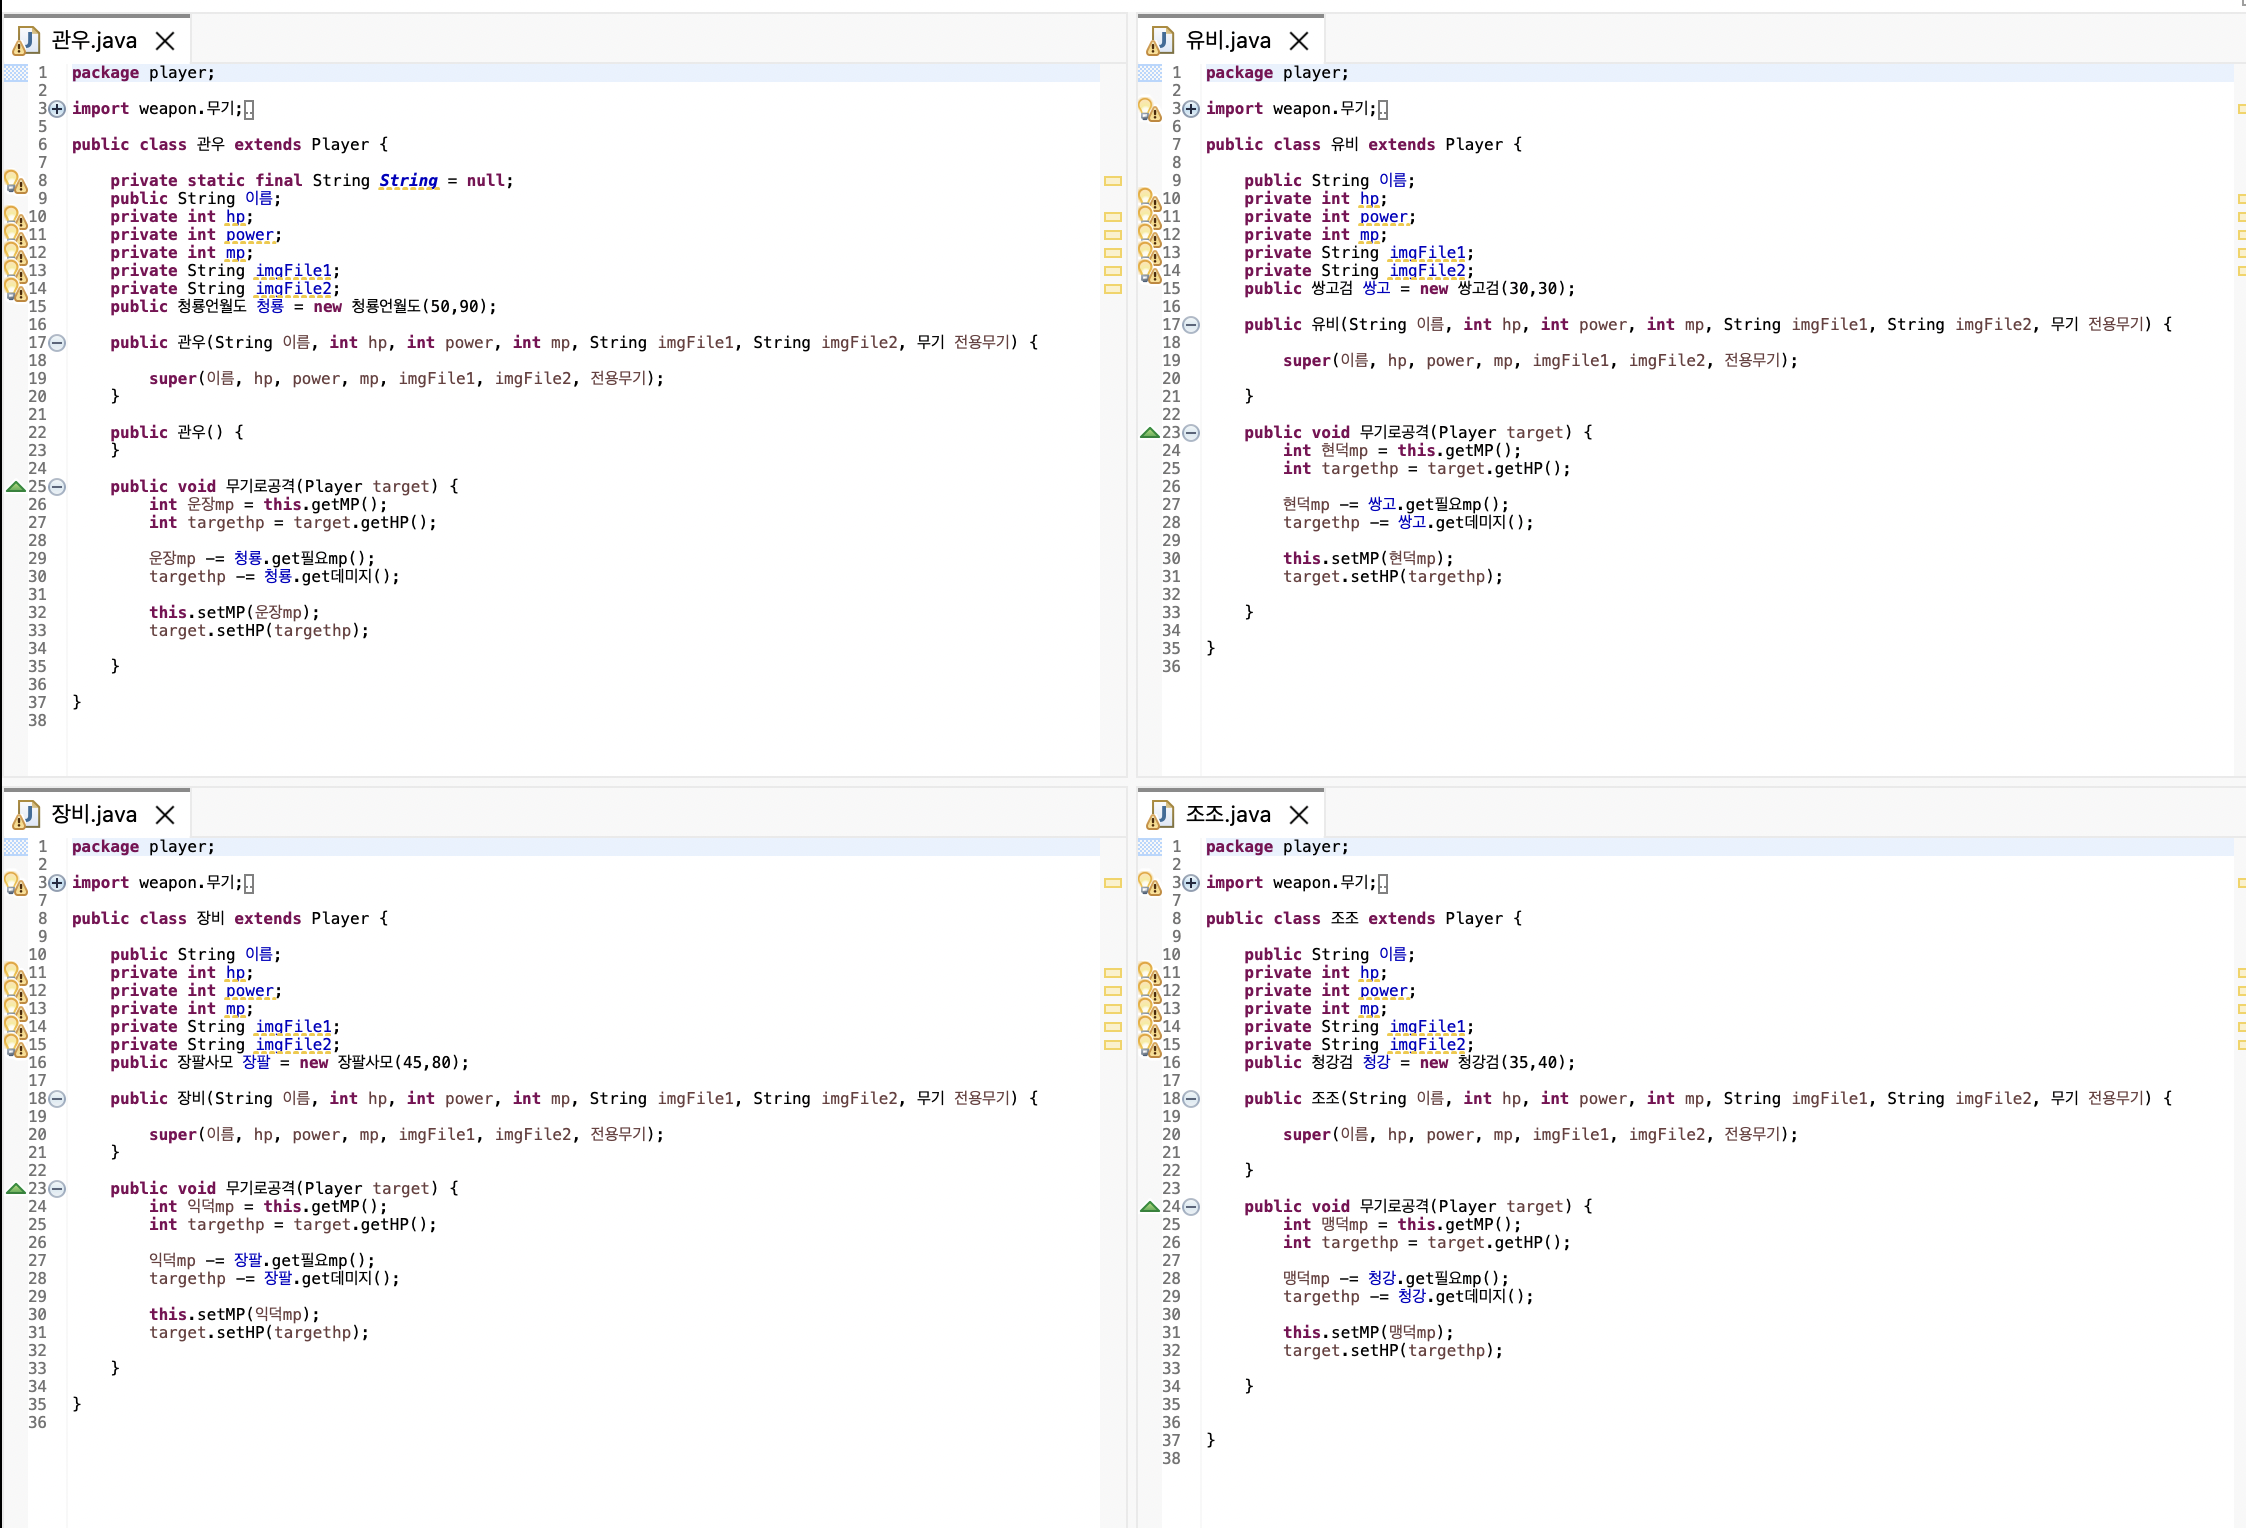
- Player 코드에 이미 정의되어 있는 필드들을 Player을 상속받은 자식 클래스들에서 중복으로 정의하고 있음, 불필요하므로 삭제
- 자식 클래스들에서 무기로공격() 함수가 반복적으로 사용되고 있는 것을 확인할 수 있음, 따라서 이 내용을 부모 클래스에서 정의함으로써 코드를 간략하게 만들 수가 있음
after
import weapon.무기;

public class Player {
	public String 이름;
	private int hp;
	private int power;
	private int mp;
	private String imgFile1;
	private String imgFile2;
	public 무기 전용무기;


	public Player(String 이름, int hp, int power, int mp, String imgFile1, String imgFile2, 무기 전용무기) {
		setHP(hp);
		setPower(power);
		setImgFile1(imgFile1);
		setImgFile2(imgFile2);
		setMP(mp);
		this.이름 = 이름;
		this.전용무기 = 전용무기;
	}

	//...get/set 중략...

	public void 공격(Player target) {
		target.hp -= this.power;
	}

	public void 무기로공격(Player target) {
		int mymp = this.getMP();
		int targethp = target.getHP();

		mymp -= 전용무기.get필요mp();
		targethp -= 전용무기.get데미지();

		this.setMP(mymp);
		target.setHP(targethp);
	}

	public Player() {}

}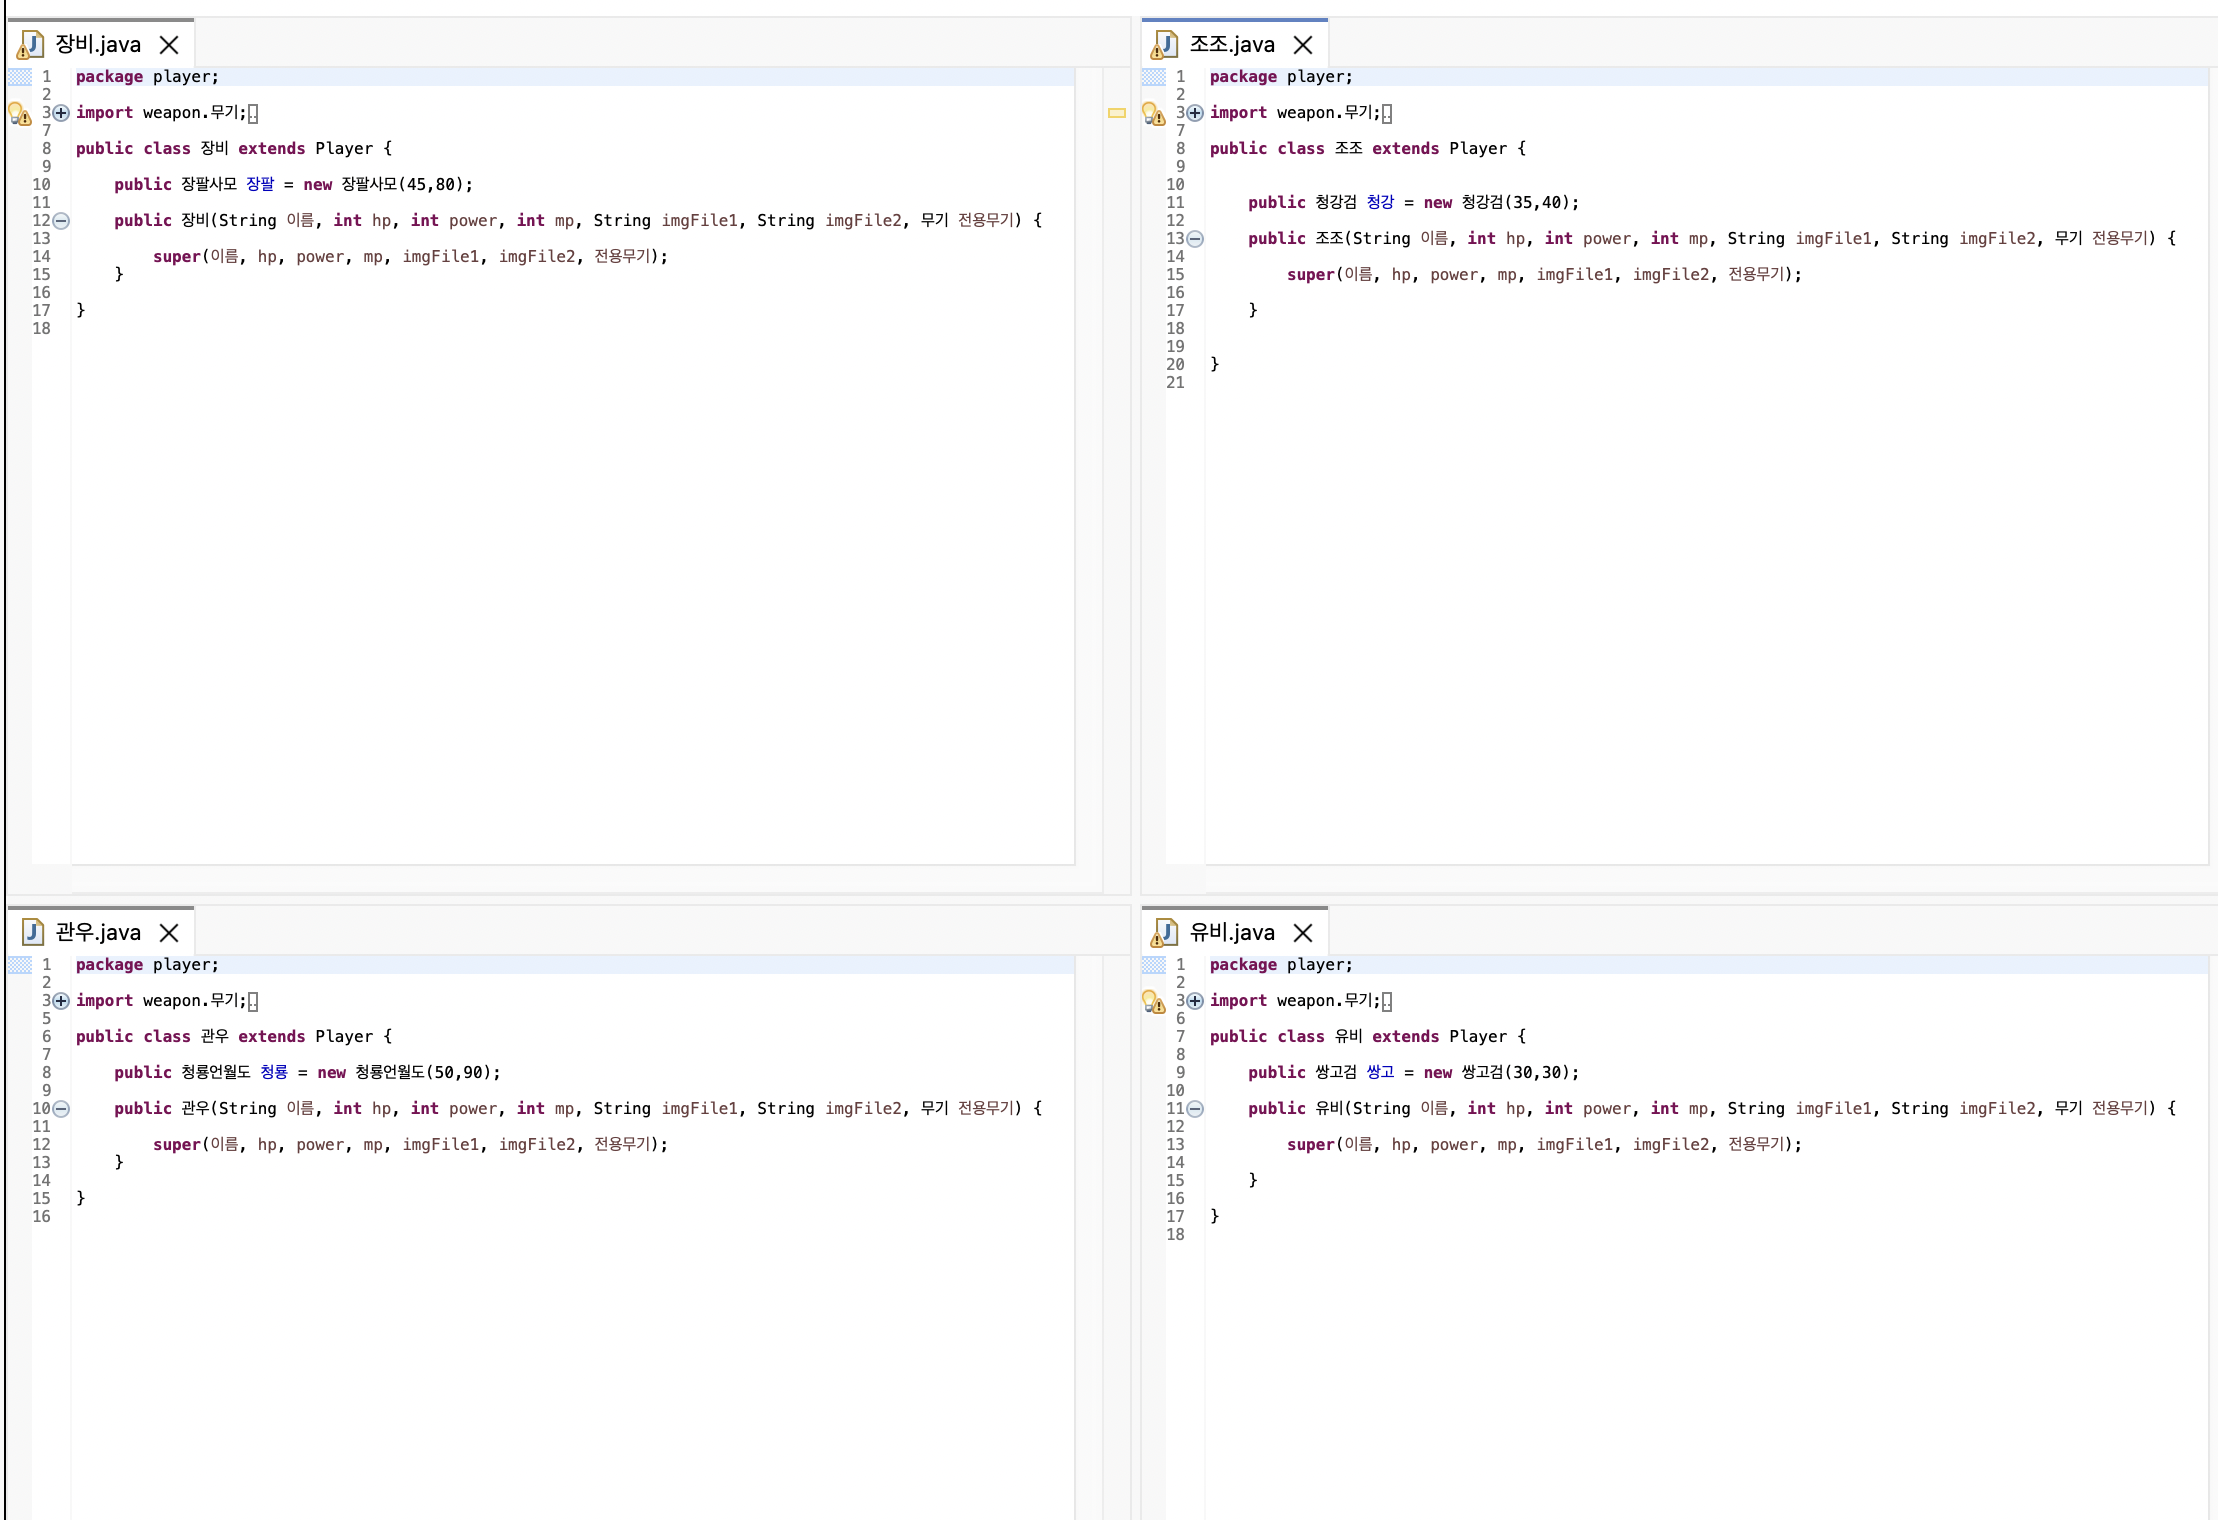
→ 상속을 사용하면 각각의 자식 클래스에서 공통적으로 사용되는 필드나 메소드를 부모 클래스에서 한 번만 정의하면 코드를 간결하게 만들 수 있다!
② 랜덤 캐릭터 설정 로직 리팩토링
before
JLabel 플레이어초상 = new JLabel("New label");

		// 플레이어 생성

		if (Math.random() * 10 < 3) {
			플레이어초상.setIcon(new ImageIcon(Win.class.getResource("/image/" + 운장.getImgFile1())));
			플레이어생성 = 0;
			플레이어 = 운장;
		} else if (Math.random() * 10 >= 8) {
			플레이어초상.setIcon(new ImageIcon(Win.class.getResource("/image/" + 현덕.getImgFile1())));
			플레이어생성 = 1;
			플레이어 = 현덕;
		} else if (Math.random() * 10 >= 3 && Math.random() <= 4) {
			플레이어초상.setIcon(new ImageIcon(Win.class.getResource("/image/" + 맹덕.getImgFile1())));
			플레이어생성 = 2;
			플레이어 = 맹덕;
		} else {
			플레이어초상.setIcon(new ImageIcon(Win.class.getResource("/image/" + 익덕.getImgFile1())));
			플레이어생성 = 3;
			플레이어 = 익덕;
		}

		플레이어초상.setBounds(413, 435, 400, 400);
		contentPane.add(플레이어초상);

		JLabel 상대캐릭터초상 = new JLabel("New label");

		// 상대 생성

		if (Math.random() * 10 < 2 && 플레이어생성 != 0) {
			상대캐릭터초상.setIcon(new ImageIcon(Win.class.getResource("/image/" + 운장.getImgFile1())));
			상대 = 운장;
		} else if (Math.random() * 10 >= 8 && 플레이어생성 != 1) {
			상대캐릭터초상.setIcon(new ImageIcon(Win.class.getResource("/image/" + 현덕.getImgFile1())));
			상대 = 현덕;
		} else if (Math.random() * 10 >= 2 && Math.random() <= 4 && 플레이어생성 != 2) {
			상대캐릭터초상.setIcon(new ImageIcon(Win.class.getResource("/image/" + 맹덕.getImgFile1())));
			상대 = 맹덕;
		} else if (플레이어생성 != 3) {
			상대캐릭터초상.setIcon(new ImageIcon(Win.class.getResource("/image/" + 익덕.getImgFile1())));
			상대 = 익덕;
		}
		상대캐릭터초상.setBounds(345, 10, 400, 400);
contentPane.add(상대캐릭터초상);- Math.random() : 실행 시 0.0 이상 1.0 미만의 double 난수를 생성함
- 현재 코드에서는 if문을 돌릴 때마다 Math.random()이 돌아가서 새로운 난수가 계속 생성되고 있는 상태임, 따라서 한 번만 난수를 생성하여 해당 값을 기준으로 캐릭터를 선택할 수 있도록 만들어야 함
- 그렇게 했을 때 문제는 상대 생성 시에 조건이 전부 false라는 상황이 만들어질 수도 있다는 건데, 그래서 do-while문을 사용하면 플레이어가 상대와 같은 상황이면 한 번 더 난수를 돌리면 돼서 해결할 수 있게 됨
- 조건 돌릴 때마다 이미지 선택되는 부분이 반복적으로 사용되고 있음, 어차피 조건문 이후에는 플레이어=00이 될 테니 이 부분을 조건문 끝난 다음에 플레이어.으로 사용하면 한 번만 쓸 수 있게 됨
after
		JLabel 플레이어초상 = new JLabel("New label");

		// 플레이어 생성

		double random1 = Math.random()*10;

		if (random1 < 3) {
			플레이어 = 운장;
		} else if (random1 >= 8) {
			플레이어 = 현덕;
		} else if (random1 >= 3 && random1 <= 4) {
			플레이어 = 맹덕;
		} else 플레이어 = 익덕;

		플레이어초상.setIcon(new ImageIcon(Win.class.getResource("/image/") + 플레이어.getImgFile1()));

		플레이어초상.setBounds(413, 435, 400, 400);
		contentPane.add(플레이어초상);

		JLabel 상대캐릭터초상 = new JLabel("New label");

		// 상대 생성

		do {

			double random2 = Math.random()*10;

			if (random2 < 2) {
				상대 = 운장;
			} else if (random2 >= 8) {
				상대 = 현덕;
			} else if (random2 >= 2 && random2 <= 4) {
				상대 = 맹덕;
			} else
				상대 = 익덕;
			}  while (플레이어 == 상대);

		상대캐릭터초상.setIcon(new ImageIcon(Win.class.getResource("/image/") + 상대.getImgFile1()));

		상대캐릭터초상.setBounds(345, 10, 400, 400);
		contentPane.add(상대캐릭터초상);
→ 하나의 난수를 기준으로 캐릭터를 설정하고 싶다면 변수에 Math.random() 값을 저장해서 사용하면 된다는 것을 알게 되었다! 그리고 특정 조건일 때만 계속 반복하게 하고 싶으면 do-while을 사용하면 된다!