
AWS Serverless 환경 으로 변경 하게 된 이유는 아래 링크에서 확인 부탁 드립니다.
서버리스 프론트엔드(Nextjs) 배포하기 (1) - 서버리스 서비스 AWS 람다/API GW
요약 드리면, 비용 절감에 대한 니즈가 생기게 되었고 좋은 성능으로 서버사이드 렌더링을 유지하고 싶어서 입니다. EC2에 비해 서버 유지/관리도 편하다는 점도 어느정도 있습니다
시작 하기 전에
- Node.js version 이 v18.17.0 이상 이어야 합니다.
- Docker 가 설치 되있어야 합니다. (용도: 로컬 확인을 위해)
- AWS 계정이 있어야 합니다 (용도: AWS 에서 배포를 하기 때문에)
- Github 계정
Next 프로젝트 생성
npx create-next-app@latestCreate Next App 을 통해서 Next 프로젝트를 생성 합니다. 해당 명령어 을 입력, 각종 환경 설정을 위해서 몇가지를 물어보는데 자신의 환경에 맞게 설정 해주시면 됩니다.
Page.tsx 수정
// page.tsx
const title = process.env.NEXT_PUBLIC_TITLE;

export default function Home() {
  return (
    <main className="w-full flex justify-center h-full items-center bg-slate-50">
      <section className="w-full py-12 md:py-24 lg:py-32 xl:py-48 flex justify-center items-center">
        <div className="container px-4 md:px-6">
          <div className="flex flex-col items-center space-y-4 text-center">
            <div className="space-y-2 py-10 flex flex-col items-end">
              <h1 className="underline text-2xl tracking-tighter sm:text-4xl md:text-5xl lg:text-6xl/none font-thin">
                {title}
              </h1>
              <a className="py-2 w-fit text-blue-500" href="#">
                Github
              </a>
            </div>
            <div className="w-full grid grid-cols-1 md:grid-cols-2 lg:grid-cols-3 gap-4 mt-8">
              <a
                className="rounded-lg border shadow-sm hover:-translate-y-2 hover:bg-slate-200 transition-all"
                data-v0-t="card"
                href="https://velog.io/@jwisgenius/서버리스-프론트엔드Nextjs-배포하기-1-서버리스-서비스-AWS-람다API-GW"
              >
                <div className="flex justify-center items-center p-10 h-full">
                  <h2 className="break-words">
                    서버리스 프론트엔드(Nextjs) 배포하기 <br />
                    (1) 서버리스 서비스 AWS 람다/API GW
                  </h2>
                </div>
              </a>
              <a
                className="rounded-lg border shadow-sm hover:-translate-y-2 hover:bg-slate-200 transition-all"
                data-v0-t="card"
                href="https://velog.io/@jwisgenius/Lambda-NextJS-Docker-Image-배포-실습-2"
              >
                <div className="flex justify-center items-center p-10 h-full">
                  <h2 className="break-words">
                    서버리스 프론트엔드(Nextjs) 배포하기 <br />
                    (2) NextJS 배포 실습하기
                  </h2>
                </div>
              </a>
              <a
                className="rounded-lg border shadow-sm hover:-translate-y-2 hover:bg-slate-200 transition-all"
                data-v0-t="card"
                href="https://velog.io/@jwisgenius/서버리스-프론트엔드Nextjs-배포하기-1-서버리스-서비스-AWS-람다API-GW"
              >
                <div className="flex justify-center items-center p-10 h-full">
                  <h2 className="break-words">
                    서버리스 프론트엔드(Nextjs) 배포하기 <br />
                    (3) NextJS 배포 실습하기 - 심화
                  </h2>
                </div>
              </a>
            </div>
          </div>
        </div>
      </section>
    </main>
  );
}
단순히 기본 탬플릿으로 제공 되는 page.tsx 를 사용 하셔도 됩니다.
주요변경 사항은 process.env.NEXT_PUBLIC_TITLE 을 통해 타이틀 을 가져오고 이를 화면상에 보여주는 역할을 추가 하였습니다.
.env 생성
NEXT_PUBLIC_TITLE=람다로 프론트엔드 배포하기.env 는 프로젝트 상에서 외부에 노출되면 안되는 환경변수를 담아두는 파일로 생각 하시면 됩니다.
.gitignore 에 .env 추가
# See https://help.github.com/articles/ignoring-files/ for more about ignoring files.

# dependencies
/node_modules
/.pnp
.pnp.js
.yarn/install-state.gz

# testing
/coverage

# next.js
/.next/
/out/

# production
/build

# misc
.DS_Store
*.pem

# debug
npm-debug.log*
yarn-debug.log*
yarn-error.log*

# local env files
.env*.local

# vercel
.vercel

# typescript
*.tsbuildinfo
next-env.d.ts

# .env 추가
.env*
next.config.js 수정
const nextConfig = {
  output: "standalone",

// assetPrefix를 사용하여 정적 파일이 제공될 기본 경로를 설정합니다.
  assetPrefix: "/beta/",
};
node_moduels 설치 없이 .next/standalone 폴더를 만들어서 배포를 할 수 있게 해주는 옵션 입니다.
이렇게 할 경우 빌드 이미지의 용량을 획기적으로 감소 할 수 있습니다.

standalone옵션을 제거한 Docker Image 는776MB로 standalone 을 옵션을 사용한151MB보다 약 5배 정도 용량이 큰것을 확인 할 수 있습니다.
ECR 에 이미지를 업로드를 하는 것 조차 비용이기 때문에, 비용 최적화를 위한 작업이기 때문에 최대한 줄여줄 수 있도록 합시다.
- 또한, API GW 로 URL 을 생성 하면 서브디렉토리
/{{stagename}}로 URL이 지정되는데 이 경우assetPrefix를 설정 해줘야. static 및 public 파일들을 제대로 읽어 올 수 있습니다.- 이경우
beta로stagename으로 설정 하였습니다.
- 이경우
Dockerfile 생성
# Dockerfile
# https://github.com/vercel/next.js/blob/canary/examples/with-docker/Dockerfile

FROM node:18-alpine AS base

# Install dependencies only when needed
FROM base AS deps
# Check https://github.com/nodejs/docker-node/tree/b4117f9333da4138b03a546ec926ef50a31506c3#nodealpine to understand why libc6-compat might be needed.
RUN apk add --no-cache libc6-compat
WORKDIR /app

# Install dependencies based on the preferred package manager
COPY package.json yarn.lock* package-lock.json* pnpm-lock.yaml* ./
RUN \
    if [ -f yarn.lock ]; then yarn --frozen-lockfile; \
    elif [ -f package-lock.json ]; then npm ci; \
    elif [ -f pnpm-lock.yaml ]; then corepack enable pnpm && pnpm i --frozen-lockfile; \
    else echo "Lockfile not found." && exit 1; \
    fi

# Rebuild the source code only when needed
FROM base AS builder
WORKDIR /app
COPY --from=deps /app/node_modules ./node_modules
COPY . .

# Next.js collects completely anonymous telemetry data about general usage.
# Learn more here: https://nextjs.org/telemetry
# Uncomment the following line in case you want to disable telemetry during the build.
# ENV NEXT_TELEMETRY_DISABLED 1

RUN \
    if [ -f yarn.lock ]; then yarn run build; \
    elif [ -f package-lock.json ]; then npm run build; \
    elif [ -f pnpm-lock.yaml ]; then corepack enable pnpm && pnpm run build; \
    else echo "Lockfile not found." && exit 1; \
    fi

# Production image, copy all the files and run next
FROM base AS runner
WORKDIR /app

ENV NODE_ENV production
# Uncomment the following line in case you want to disable telemetry during runtime.
# ENV NEXT_TELEMETRY_DISABLED 1

RUN addgroup --system --gid 1001 nodejs
RUN adduser --system --uid 1001 nextjs

COPY --from=builder /app/public ./public

# Set the correct permission for prerender cache
RUN mkdir .next
RUN chown nextjs:nodejs .next

# Automatically leverage output traces to reduce image size
# https://nextjs.org/docs/advanced-features/output-file-tracing
COPY --from=builder --chown=nextjs:nodejs /app/.next/standalone ./
COPY --from=builder --chown=nextjs:nodejs /app/.next/static ./.next/static

# aws-lambda-adapter
COPY --from=public.ecr.aws/awsguru/aws-lambda-adapter:0.6.0 /lambda-adapter /opt/extensions/lambda-adapter

USER nextjs

EXPOSE 3000

ENV PORT 3000

# server.js is created by next build from the standalone output
# https://nextjs.org/docs/pages/api-reference/next-config-js/output
CMD ["node", "server.js"]
Dockerfile 은 Vercel 에서 제공 해준 예시코드 를 그대로 사용 합니다.
대충 읽어보시면 각각 명령어가 무슨일을 하는지 아실 수 있을 겁니다. 저는 ChatGPT의 힘을 많이 빌려서 이해했지만요..
도커 컨테이너 실행 및 확인
$ docker build -t docker-nextjs .
$ docker run -p 3000:3000 docker-nextjs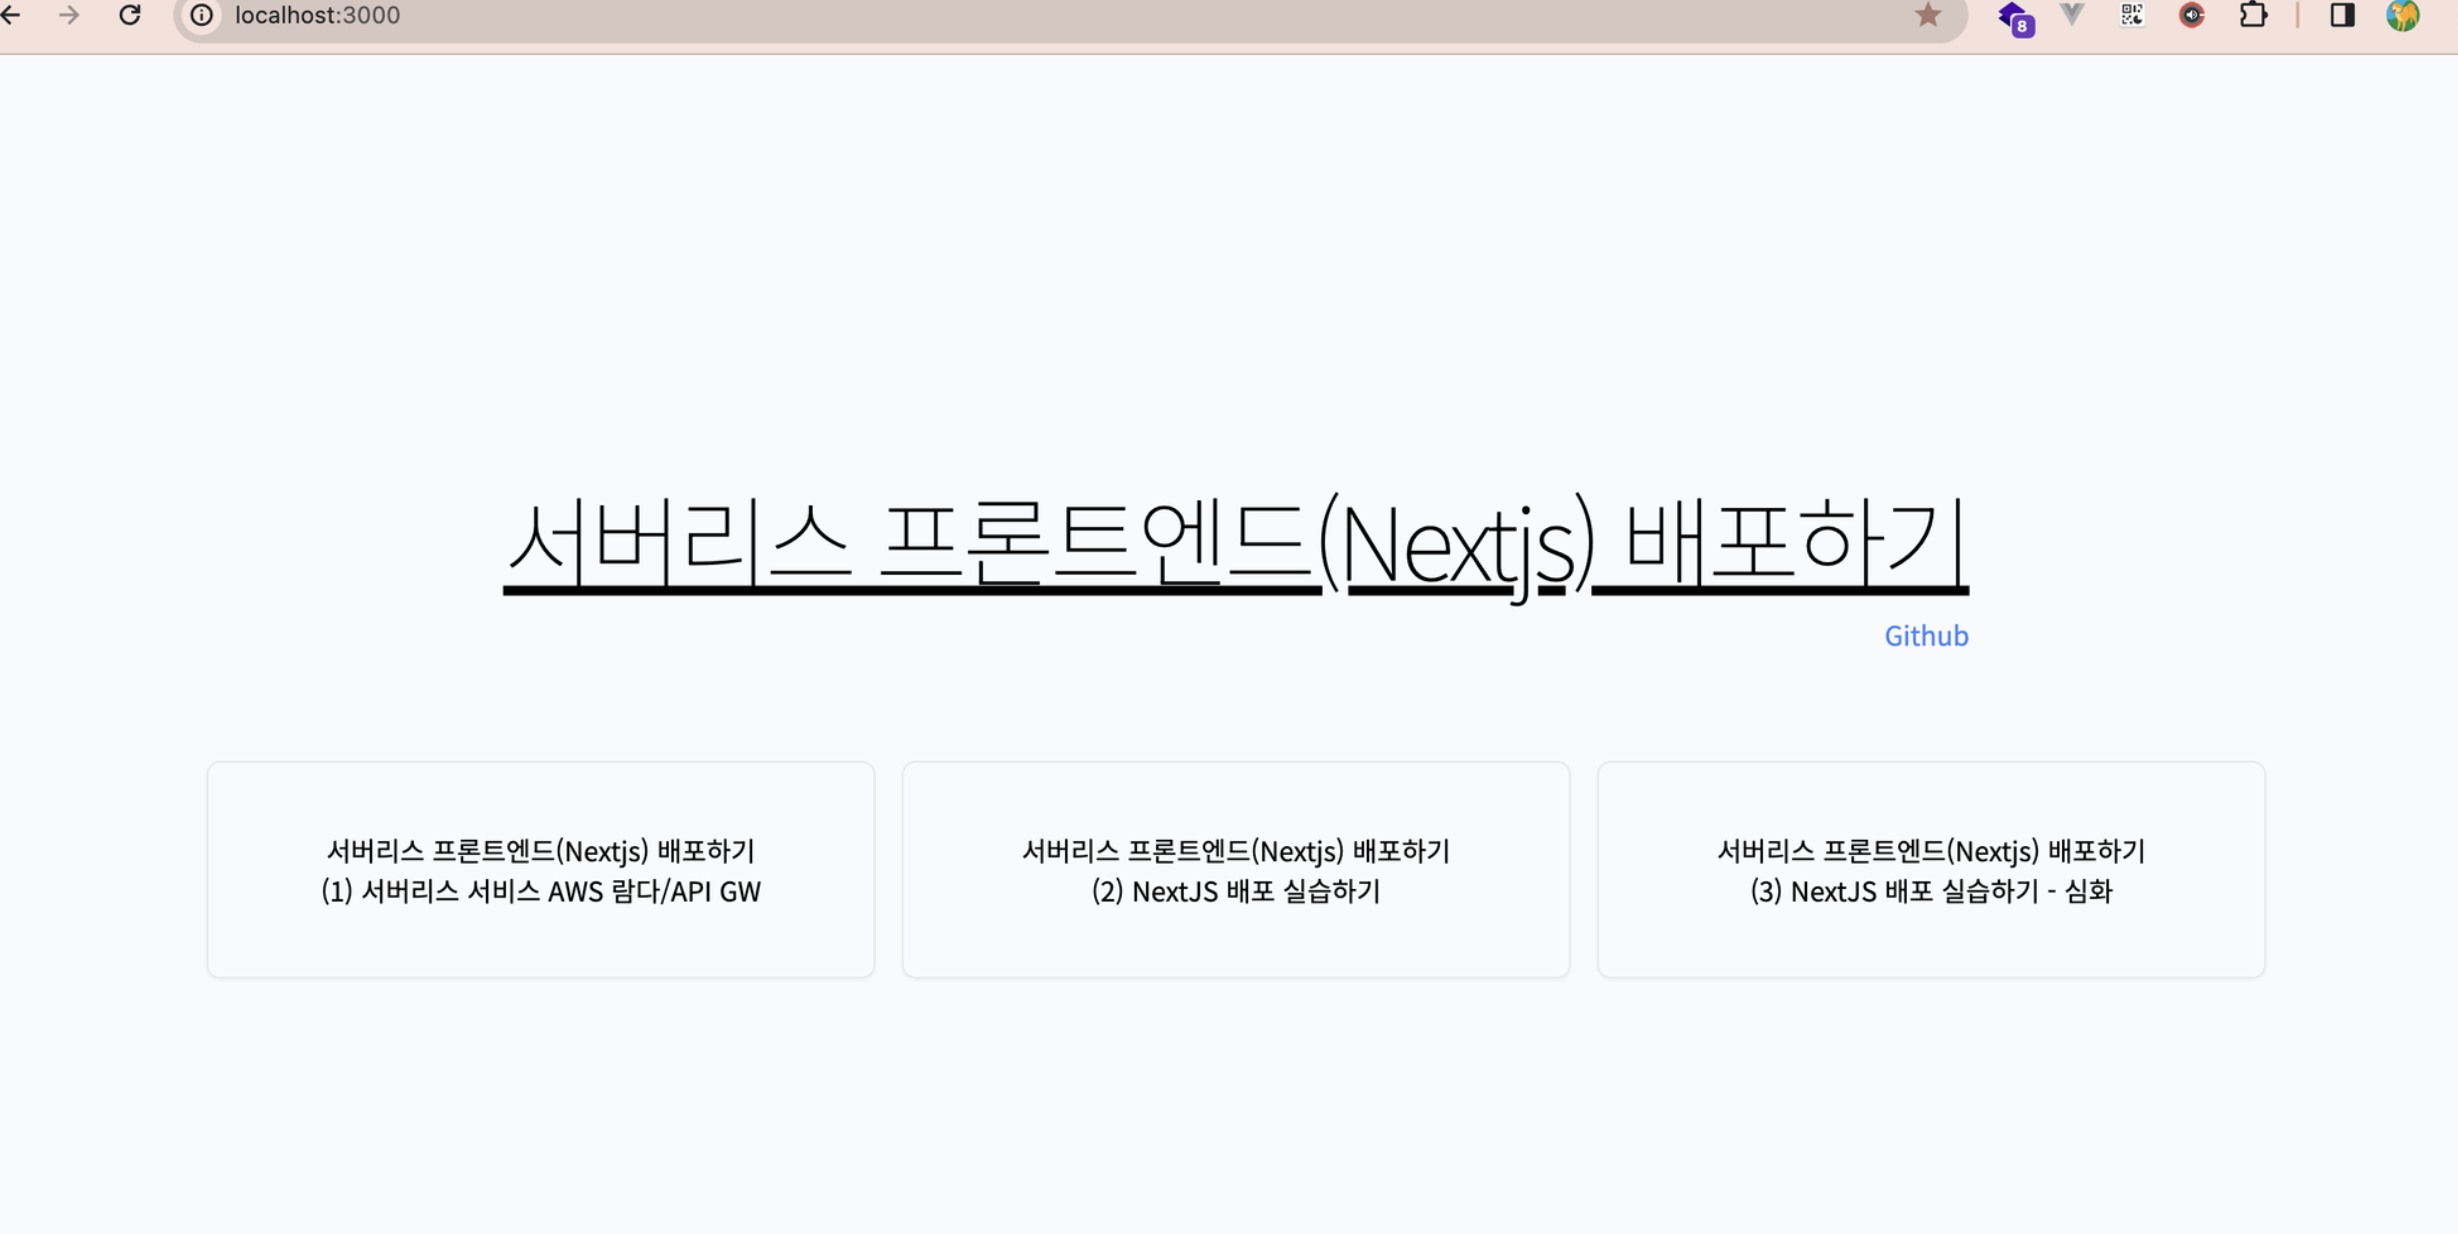
3000 포트로 접속하시면 위와 같은 화면을 확인 할 수 있을 겁니다.
이제 AWS에 배포를 해볼까요?
AWS 배포 하기
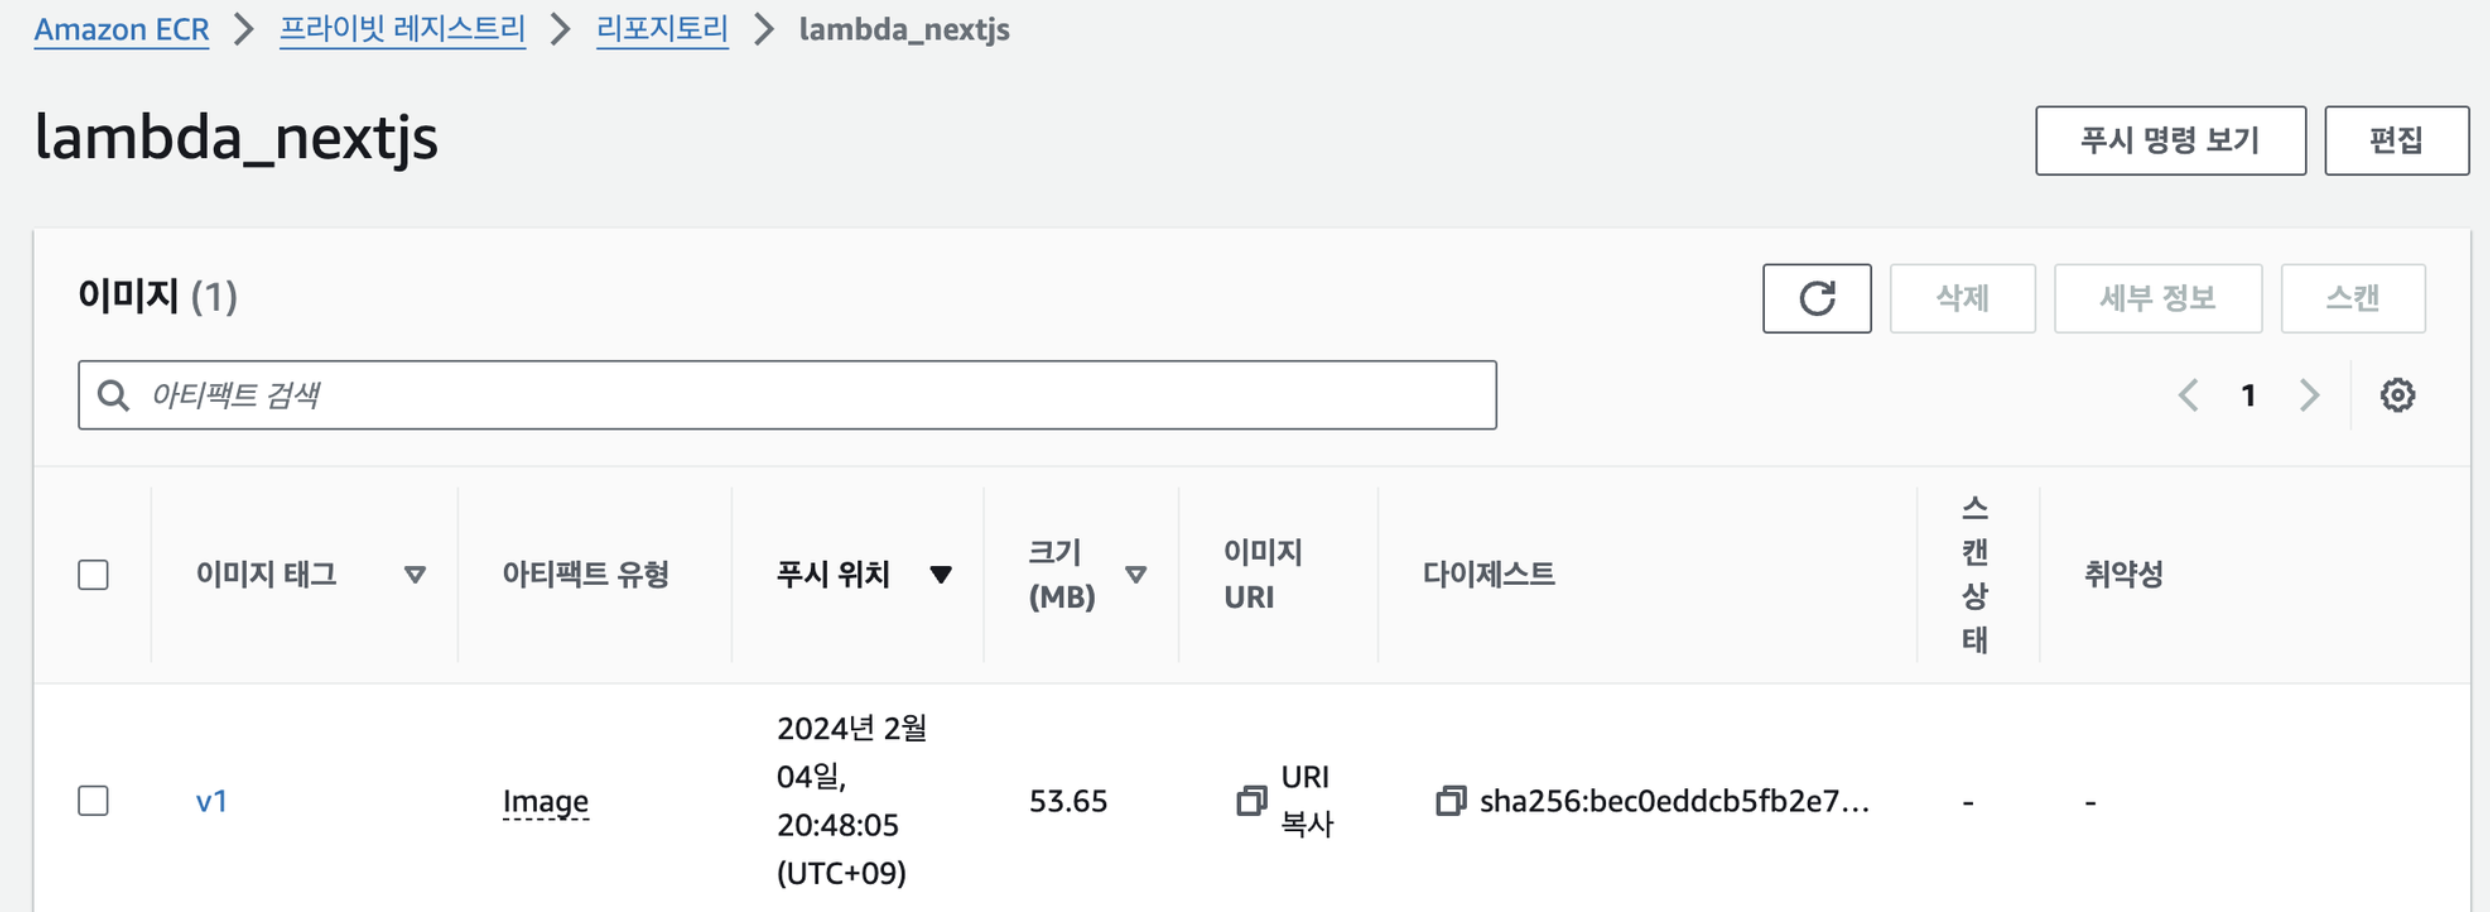
ECR 리포지토리 생성 / 이미지 푸시 하기
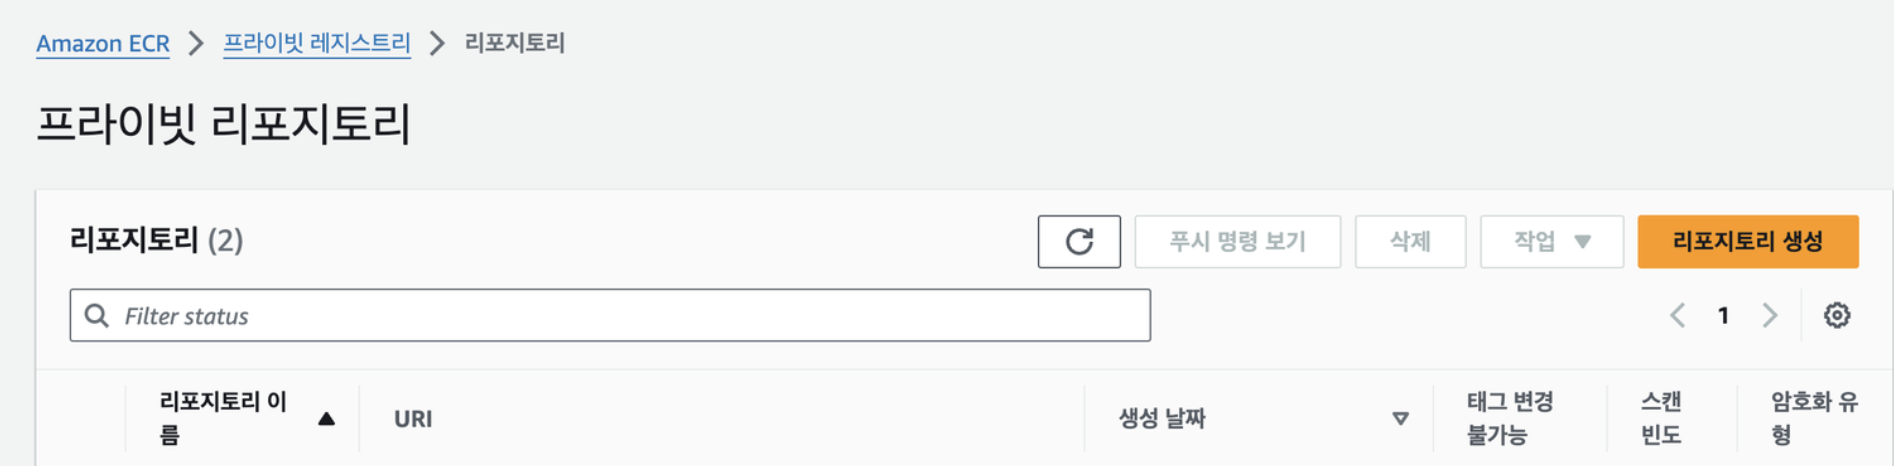
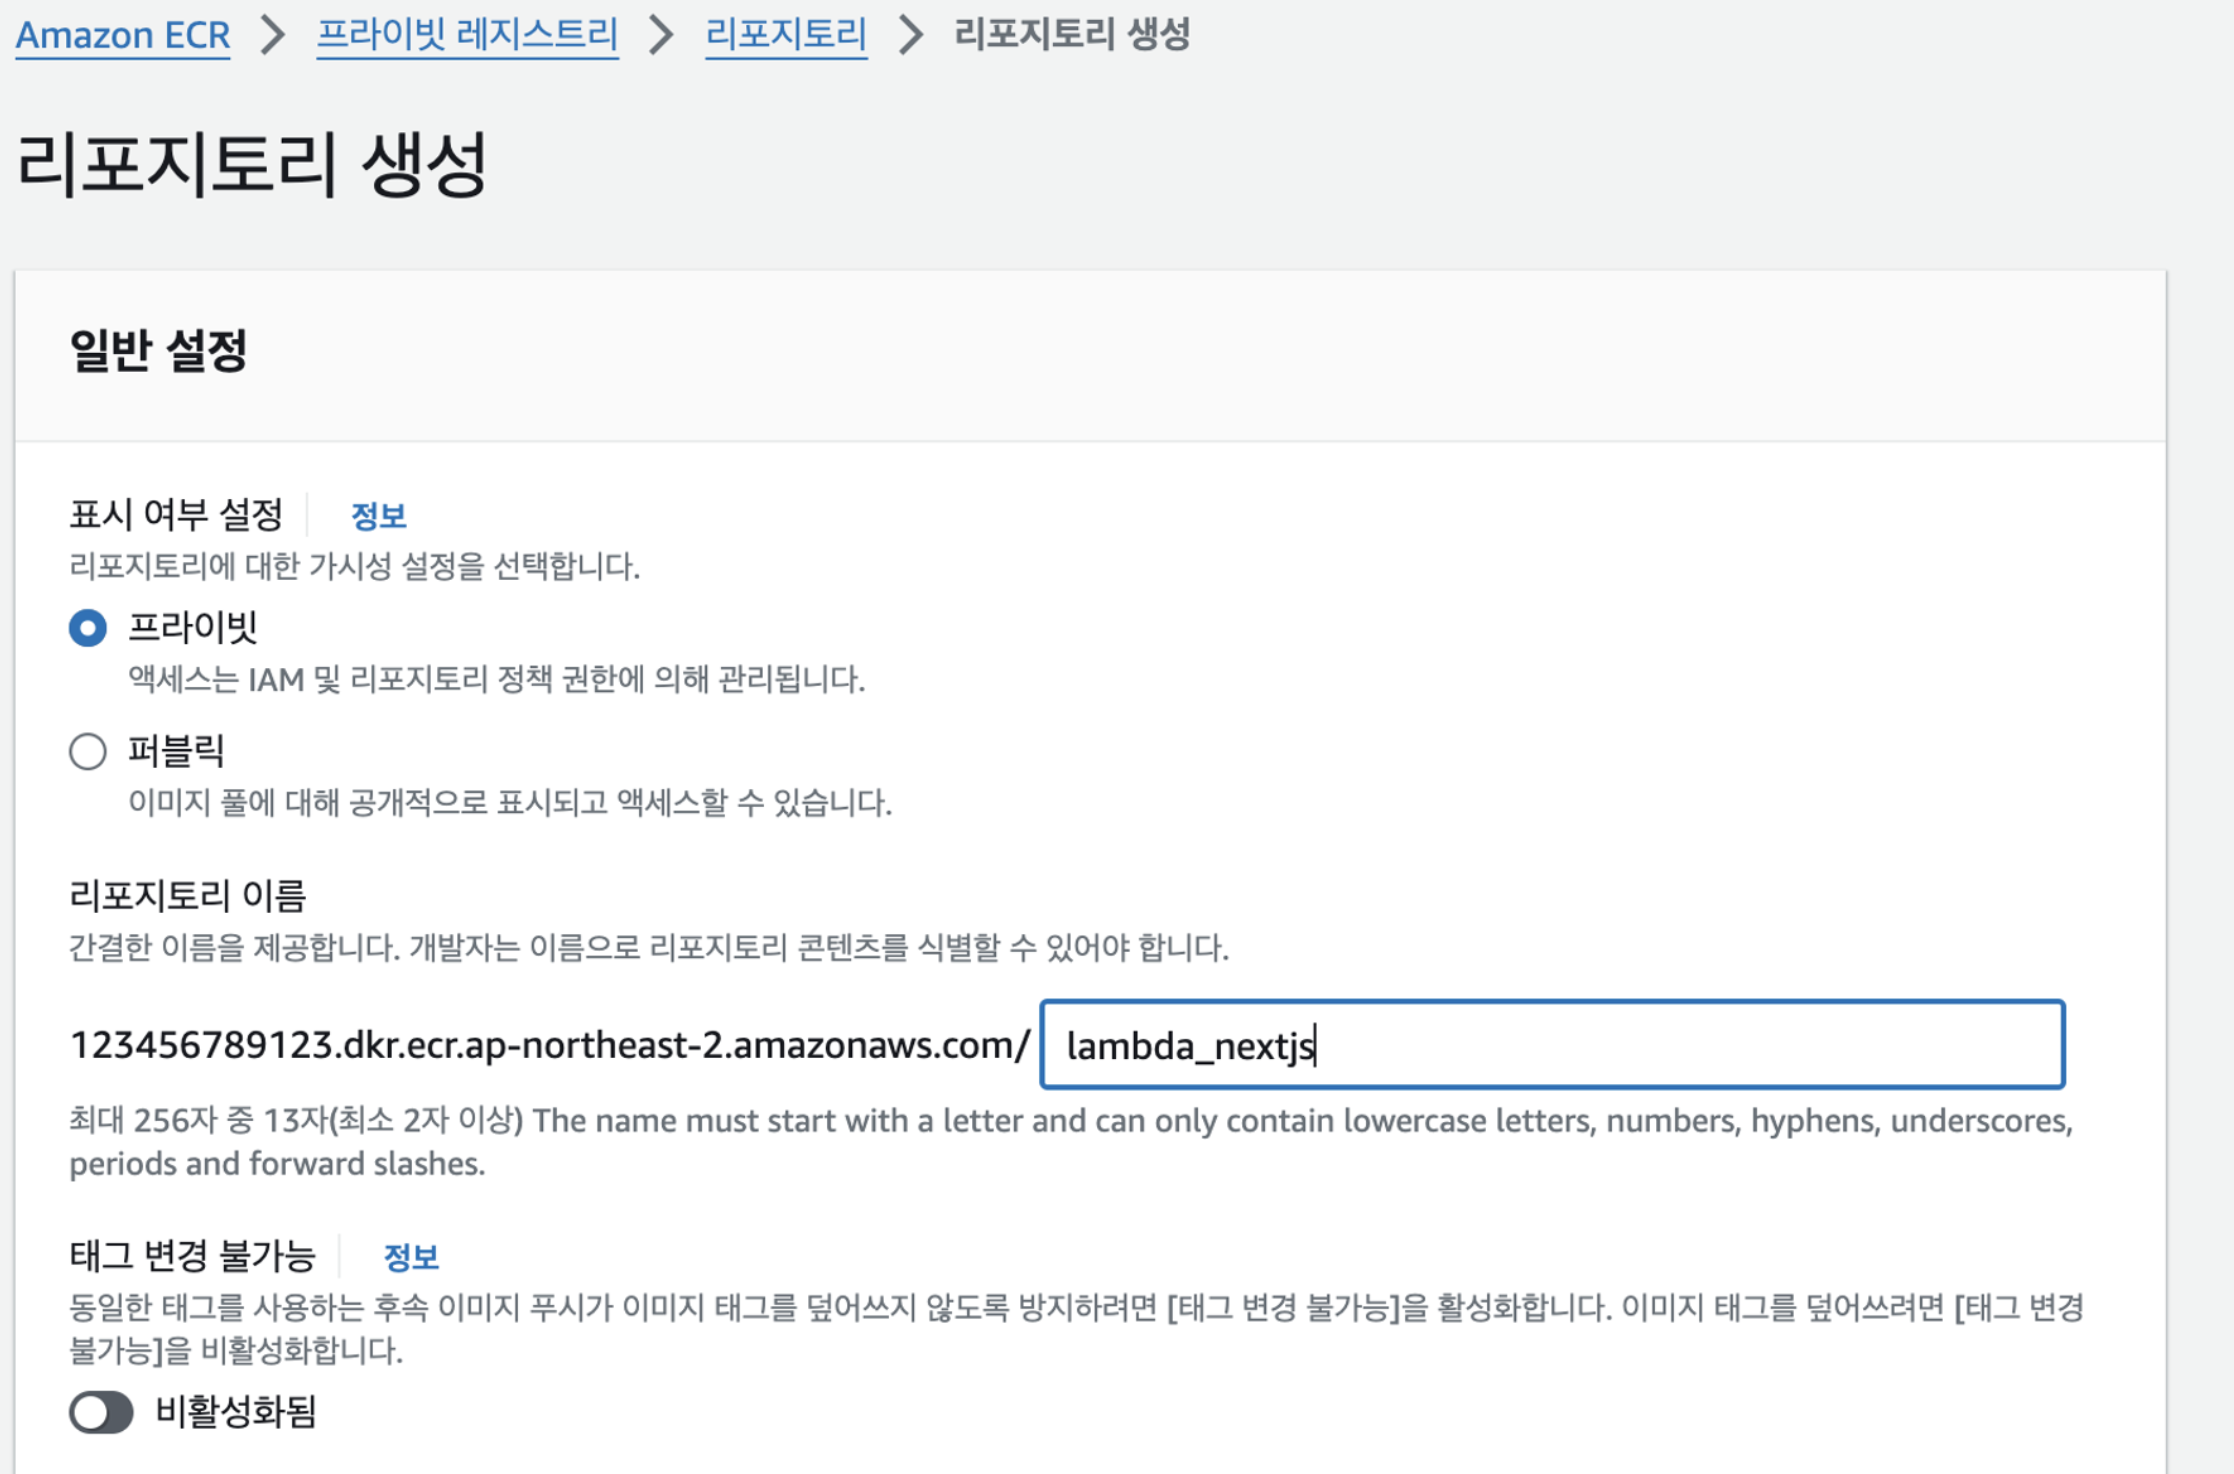
도커 이미지를 저장할 ECR 리포지토리를 생성 합시다.
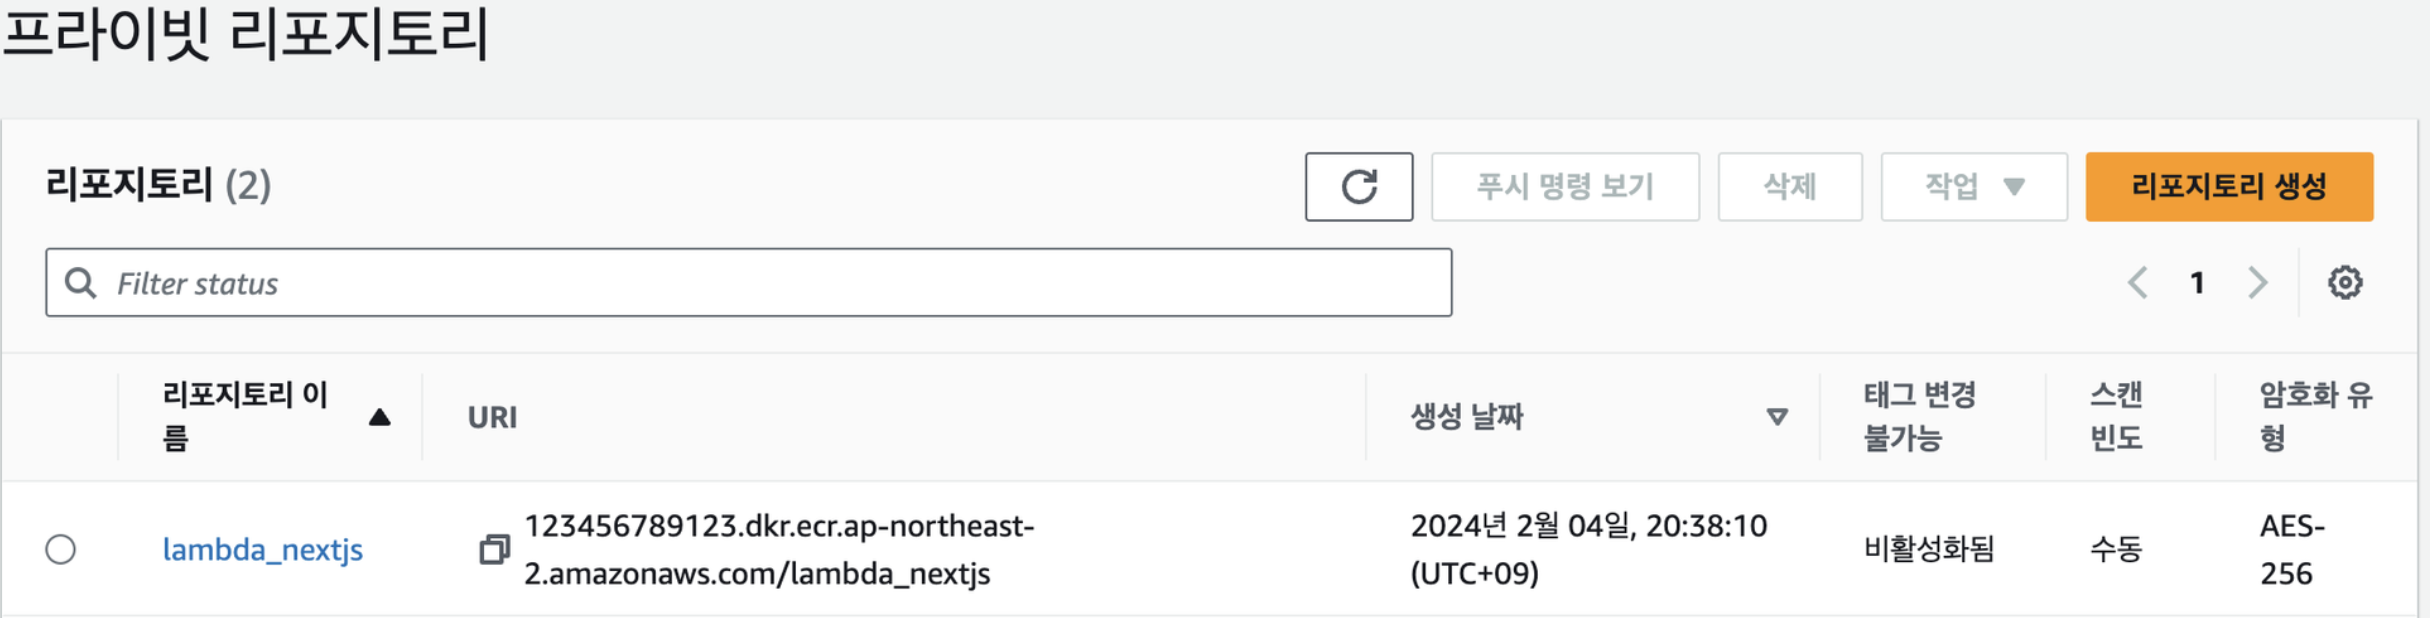
<자신의 Account ID>.dkr.ecr.<region>.amazonaws.com/<repository name> 으로 URI 가 생성되어 있음을 확인 할 수 있습니다.
이미지 푸시 하기
✅ 이미지 푸시 이전에 AWS CLI 와 DOCKER 가 설치 되어 있어야 합니다.
-
아래의 명령어 들은 AWS ECR 리포지토리를 클릭시 나오는
푸시 명령 보기에서 확인 할 수 있습니다.
-
인증 토큰을 검색하고 레지스트리에 대해 Docker 클라이언트를 인증합니다.
$ aws ecr get-login-password --region <region> | docker login --username AWS --password-stdin <aws_account_id>.dkr.ecr.<region>.amazonaws.com
2.다음 명령을 사용하여 도커 이미지를 빌드합니다
$ docker build -t lambda_nextjs .-
빌드가 완료되면 이미지에 태그를 지정하여 이 리포지토리에 푸시할 수 있습니다.
$ docker tag lambda_nextjs:latest 123456789123.dkr.ecr.ap-northeast-2.amazonaws.com/lambda_nextjs:latest
-
다음 명령을 실행하여 이 이미지를 새로 생성한 AWS 리포지토리로 푸시합니다.
$ docker push 123456789123.dkr.ecr.ap-northeast-2.amazonaws.com/lambda_nextjs:v1 -
이미지 푸시 확인
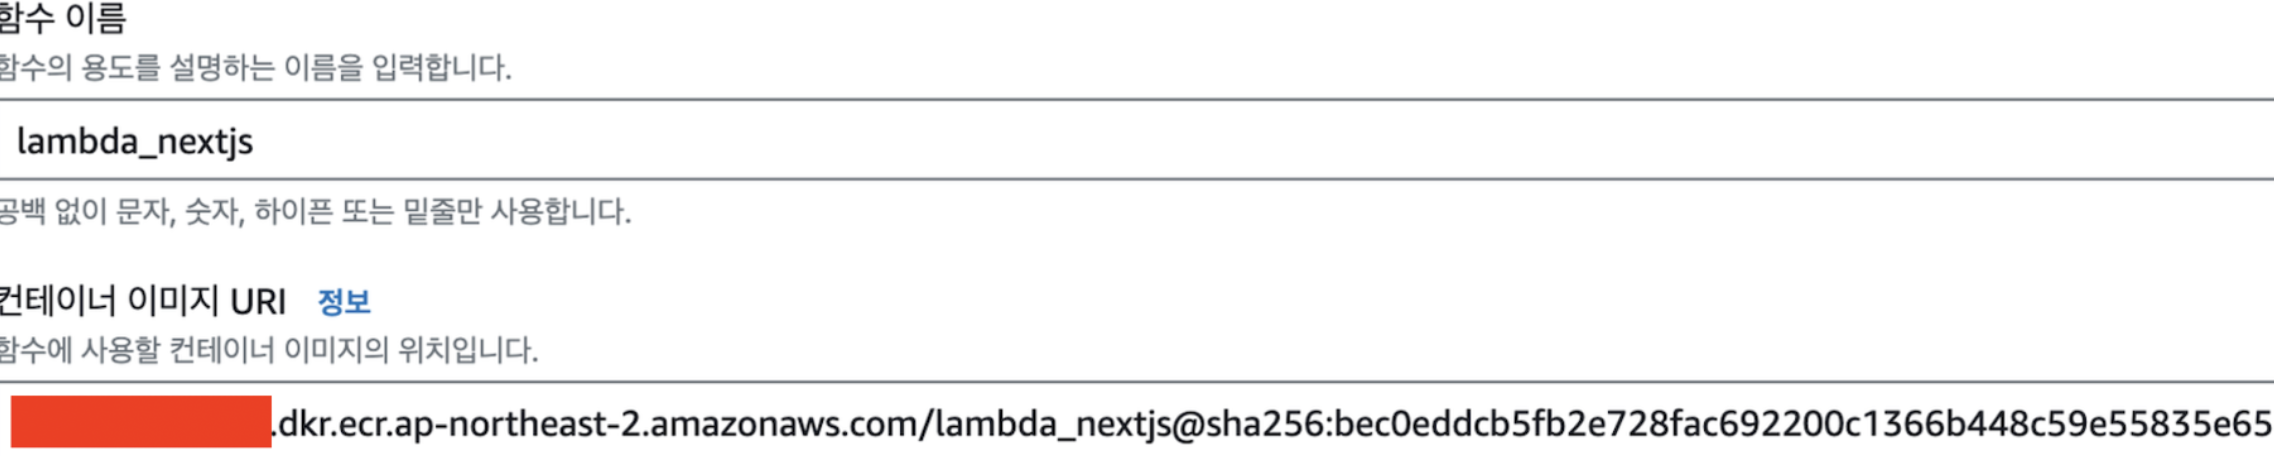
Lambda 함수 생성 하기
-
AWS Lambda 에 들어가, 함수생성을 누르고
컨테이너 이미지탭을 누릅니다.

미리 주의 해야 할점
✅ Mac 에서 Docker Build 시 Lambda 함수에 새 이미지 를 배포 할 때 아키텍쳐를 arm64 로 설정 해줘야 합니다.
다른 경우에는 x86_64 로 설정 해주면 됩니다.
-
컨테이너 이미지 URI 를 이미지 찾아보기를 통해 넣어줍니다.
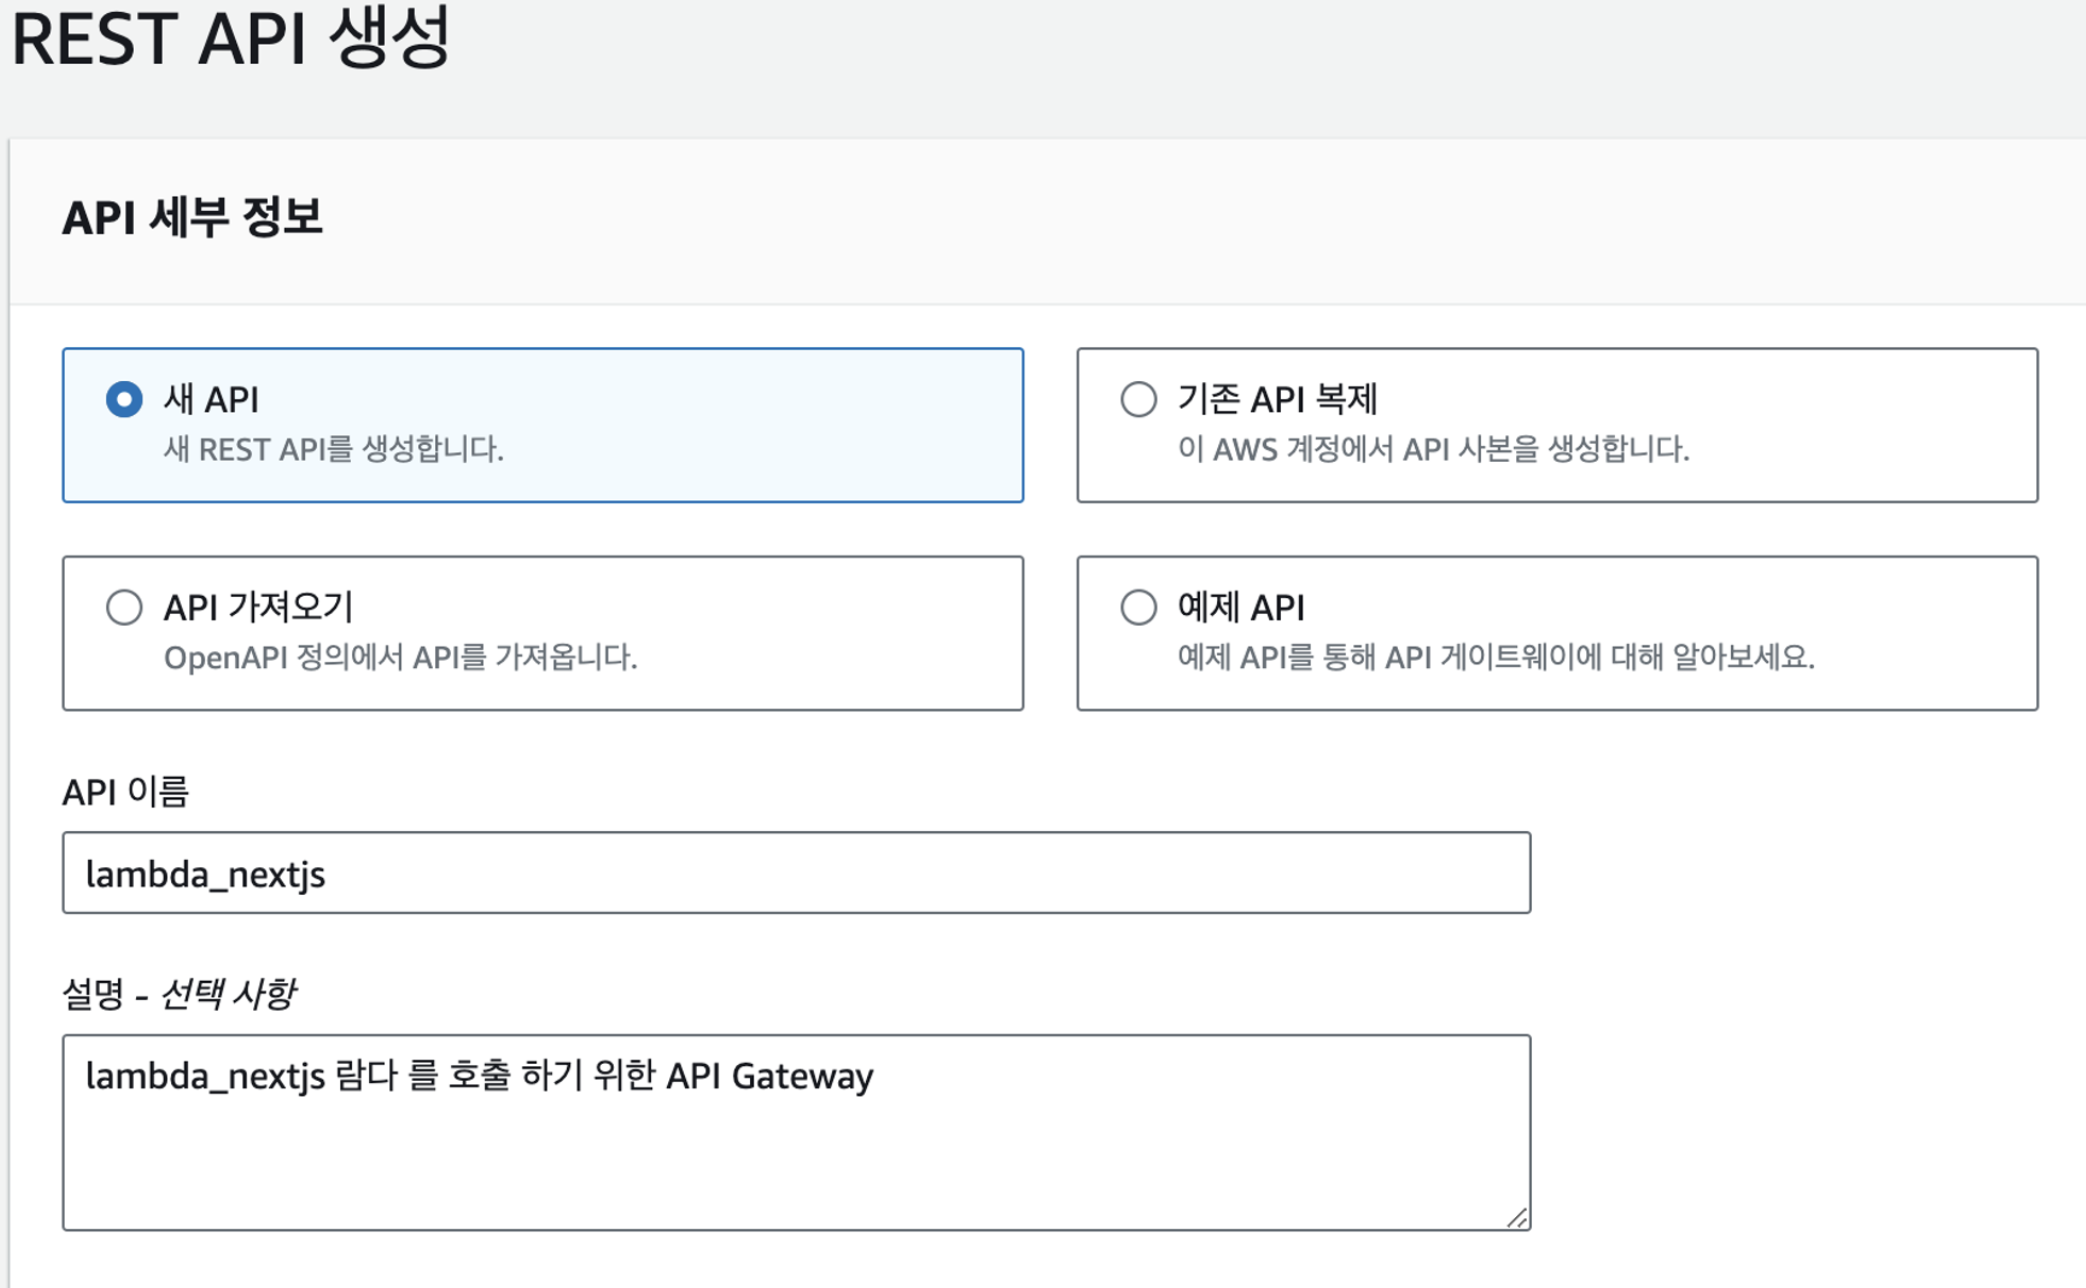
Lambda 트리거를 활용해 API Gateway 연결하기
- API Gateway는 REST API 로 생성합니다. (프록시 사용)
-
API 생성 확인 및 리소스 생성

→ 메서드 생성을 클릭해 ANY Method 를 생성하고 생성한 람다 함수를 연결합니다.
→ 리소스 생성을 클릭해서 리소스를 생성 합니다.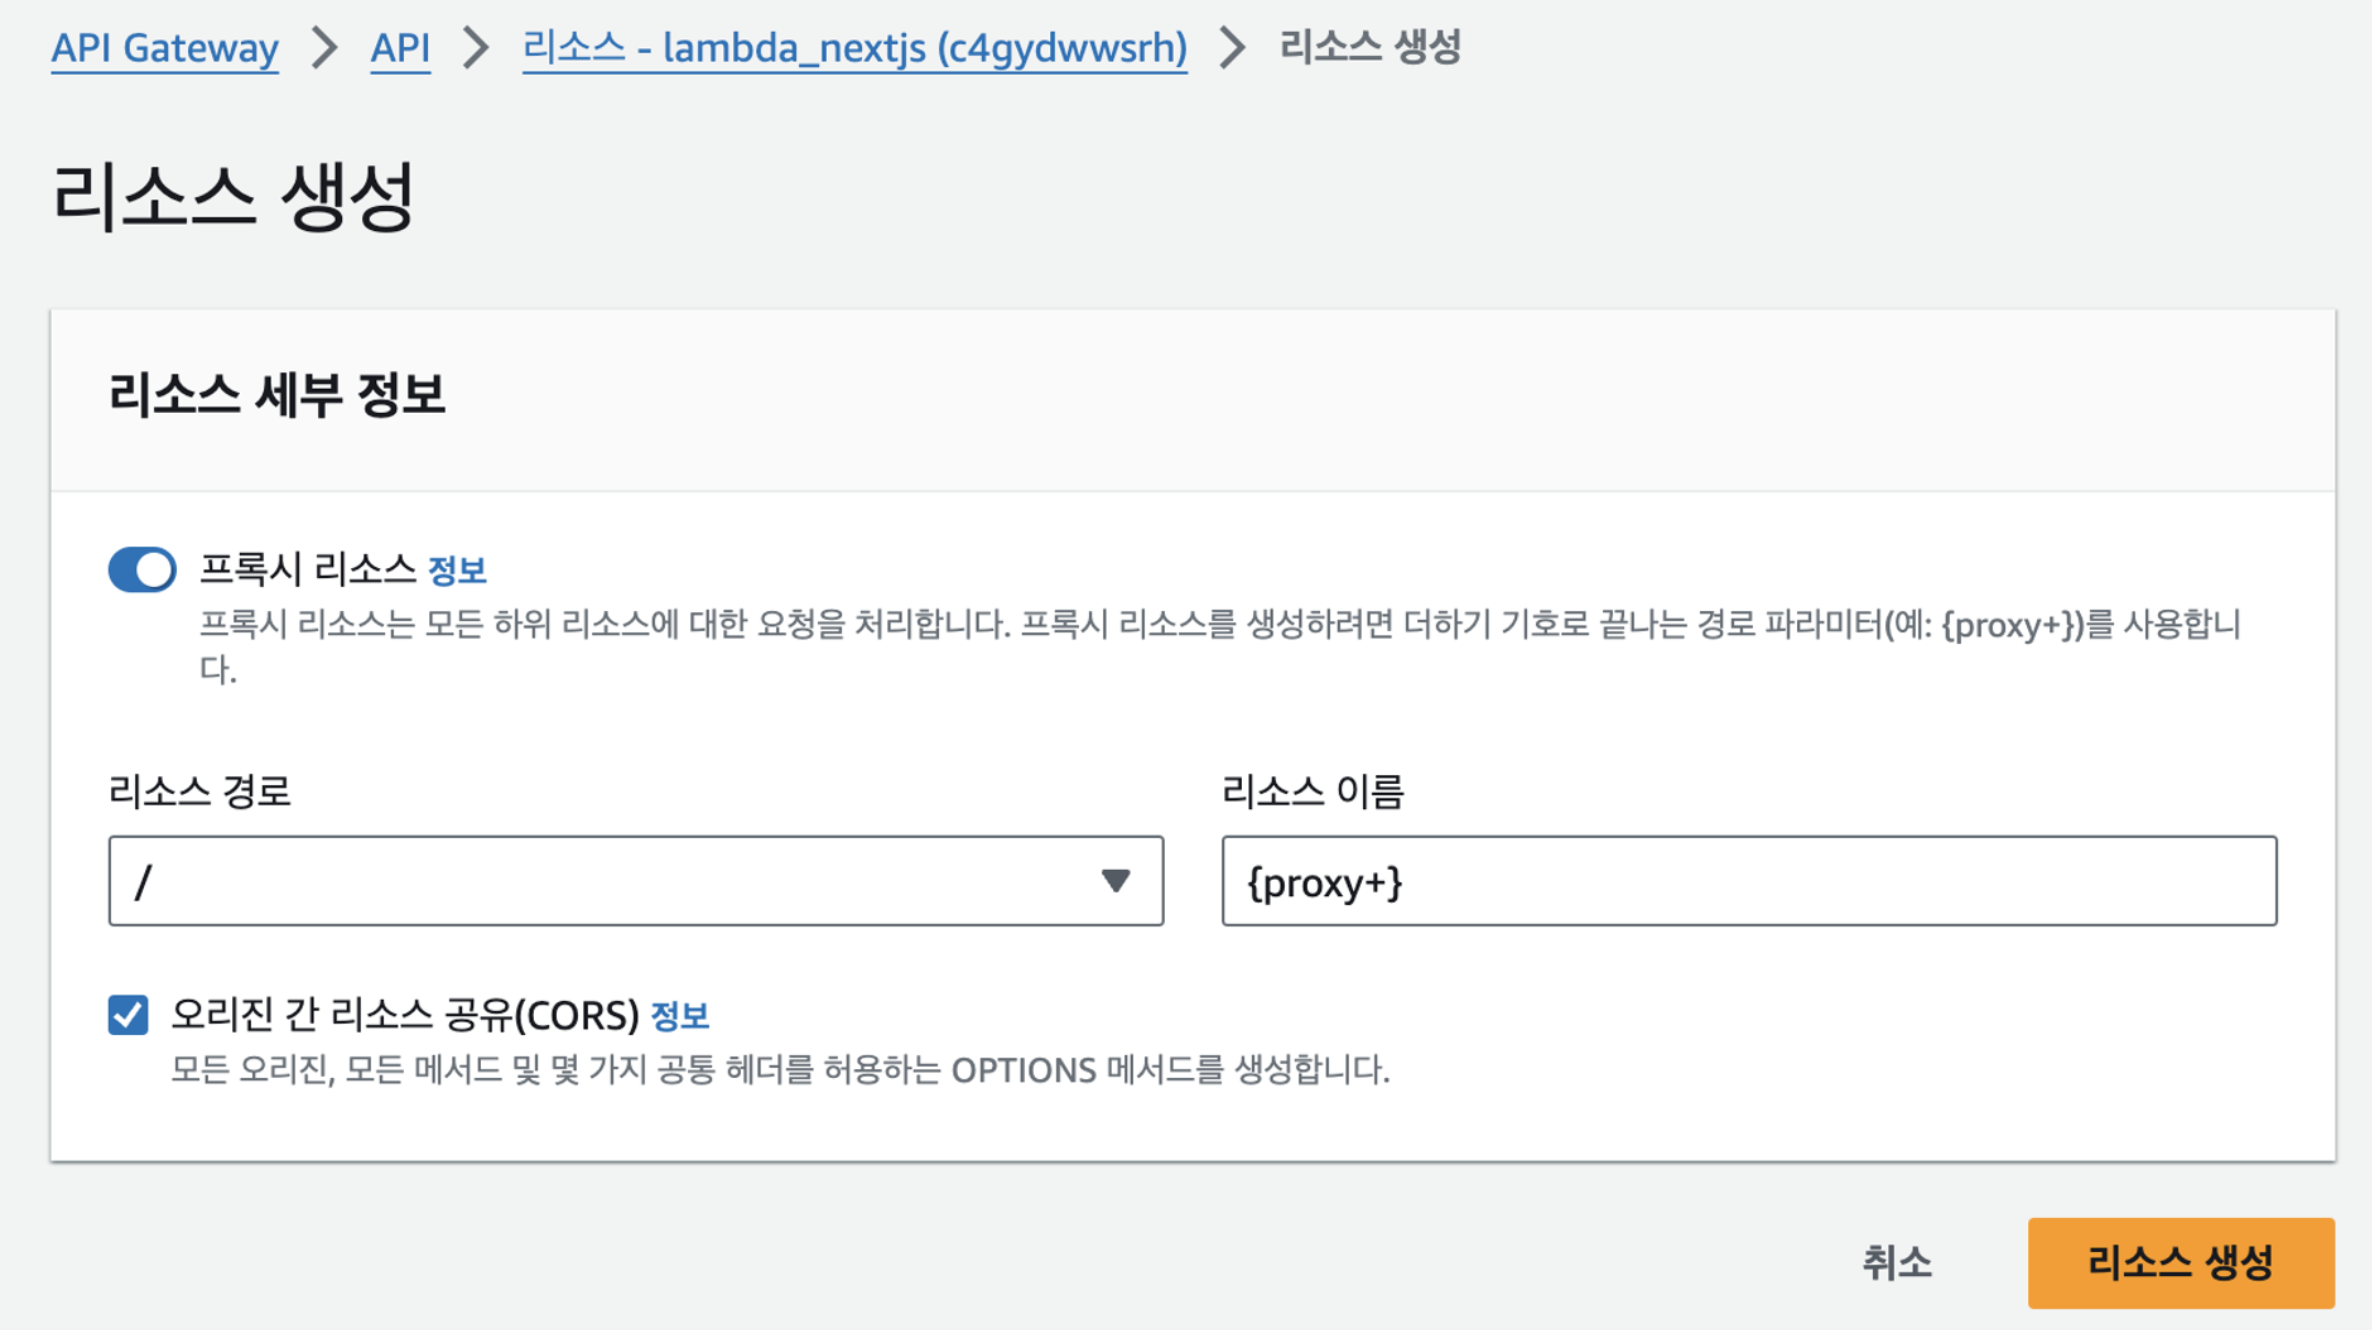
→ 프록시 리소스로 리소스를 생성 합니다. 리소스 이름에는
{proxy+}와 같이 작성하고CORS 옵션을 활성화 한 다음 리소스를 생성합니다.
-
API Gateway 메서드 통합하기 / API 배포 하기

생성된
프록시 리소스에서ANY를 클릭 한 다음,정의되지 않은 통합을 클릭하면 아래와 같이 통합 페이지가 나옵니다.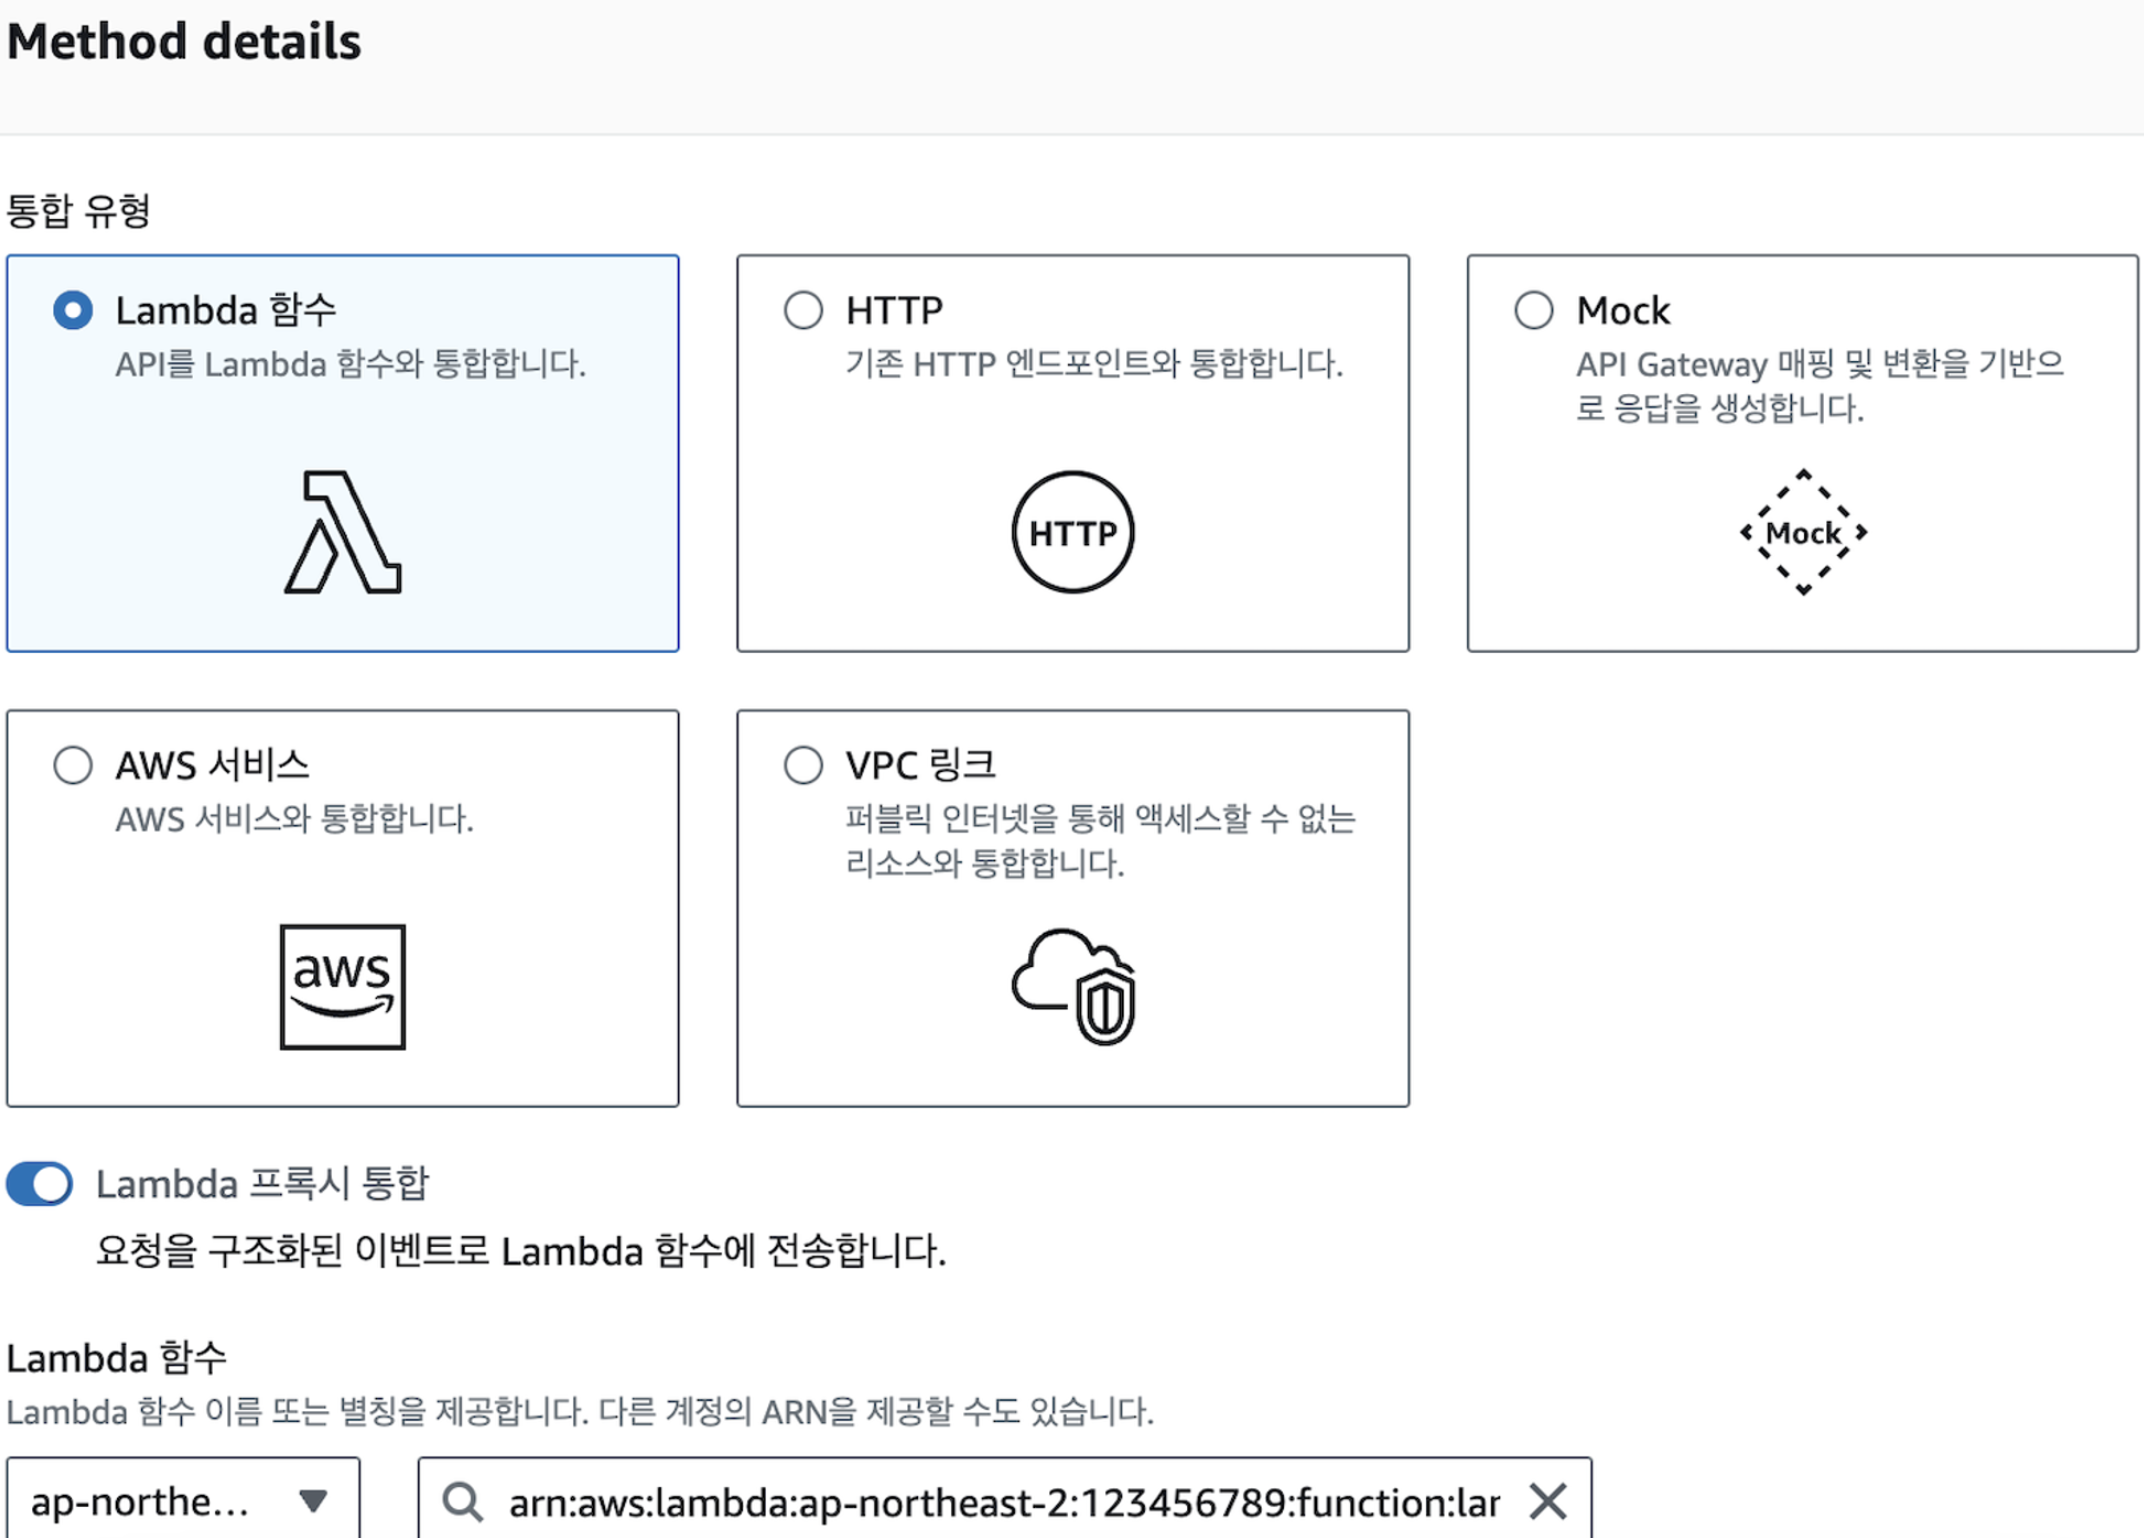
방금 만든
lambda함수를 연결 하여API Gateway 프록시 리소스에 에 접근 시람다 함수가호출되도록 매서드를 통합합시다.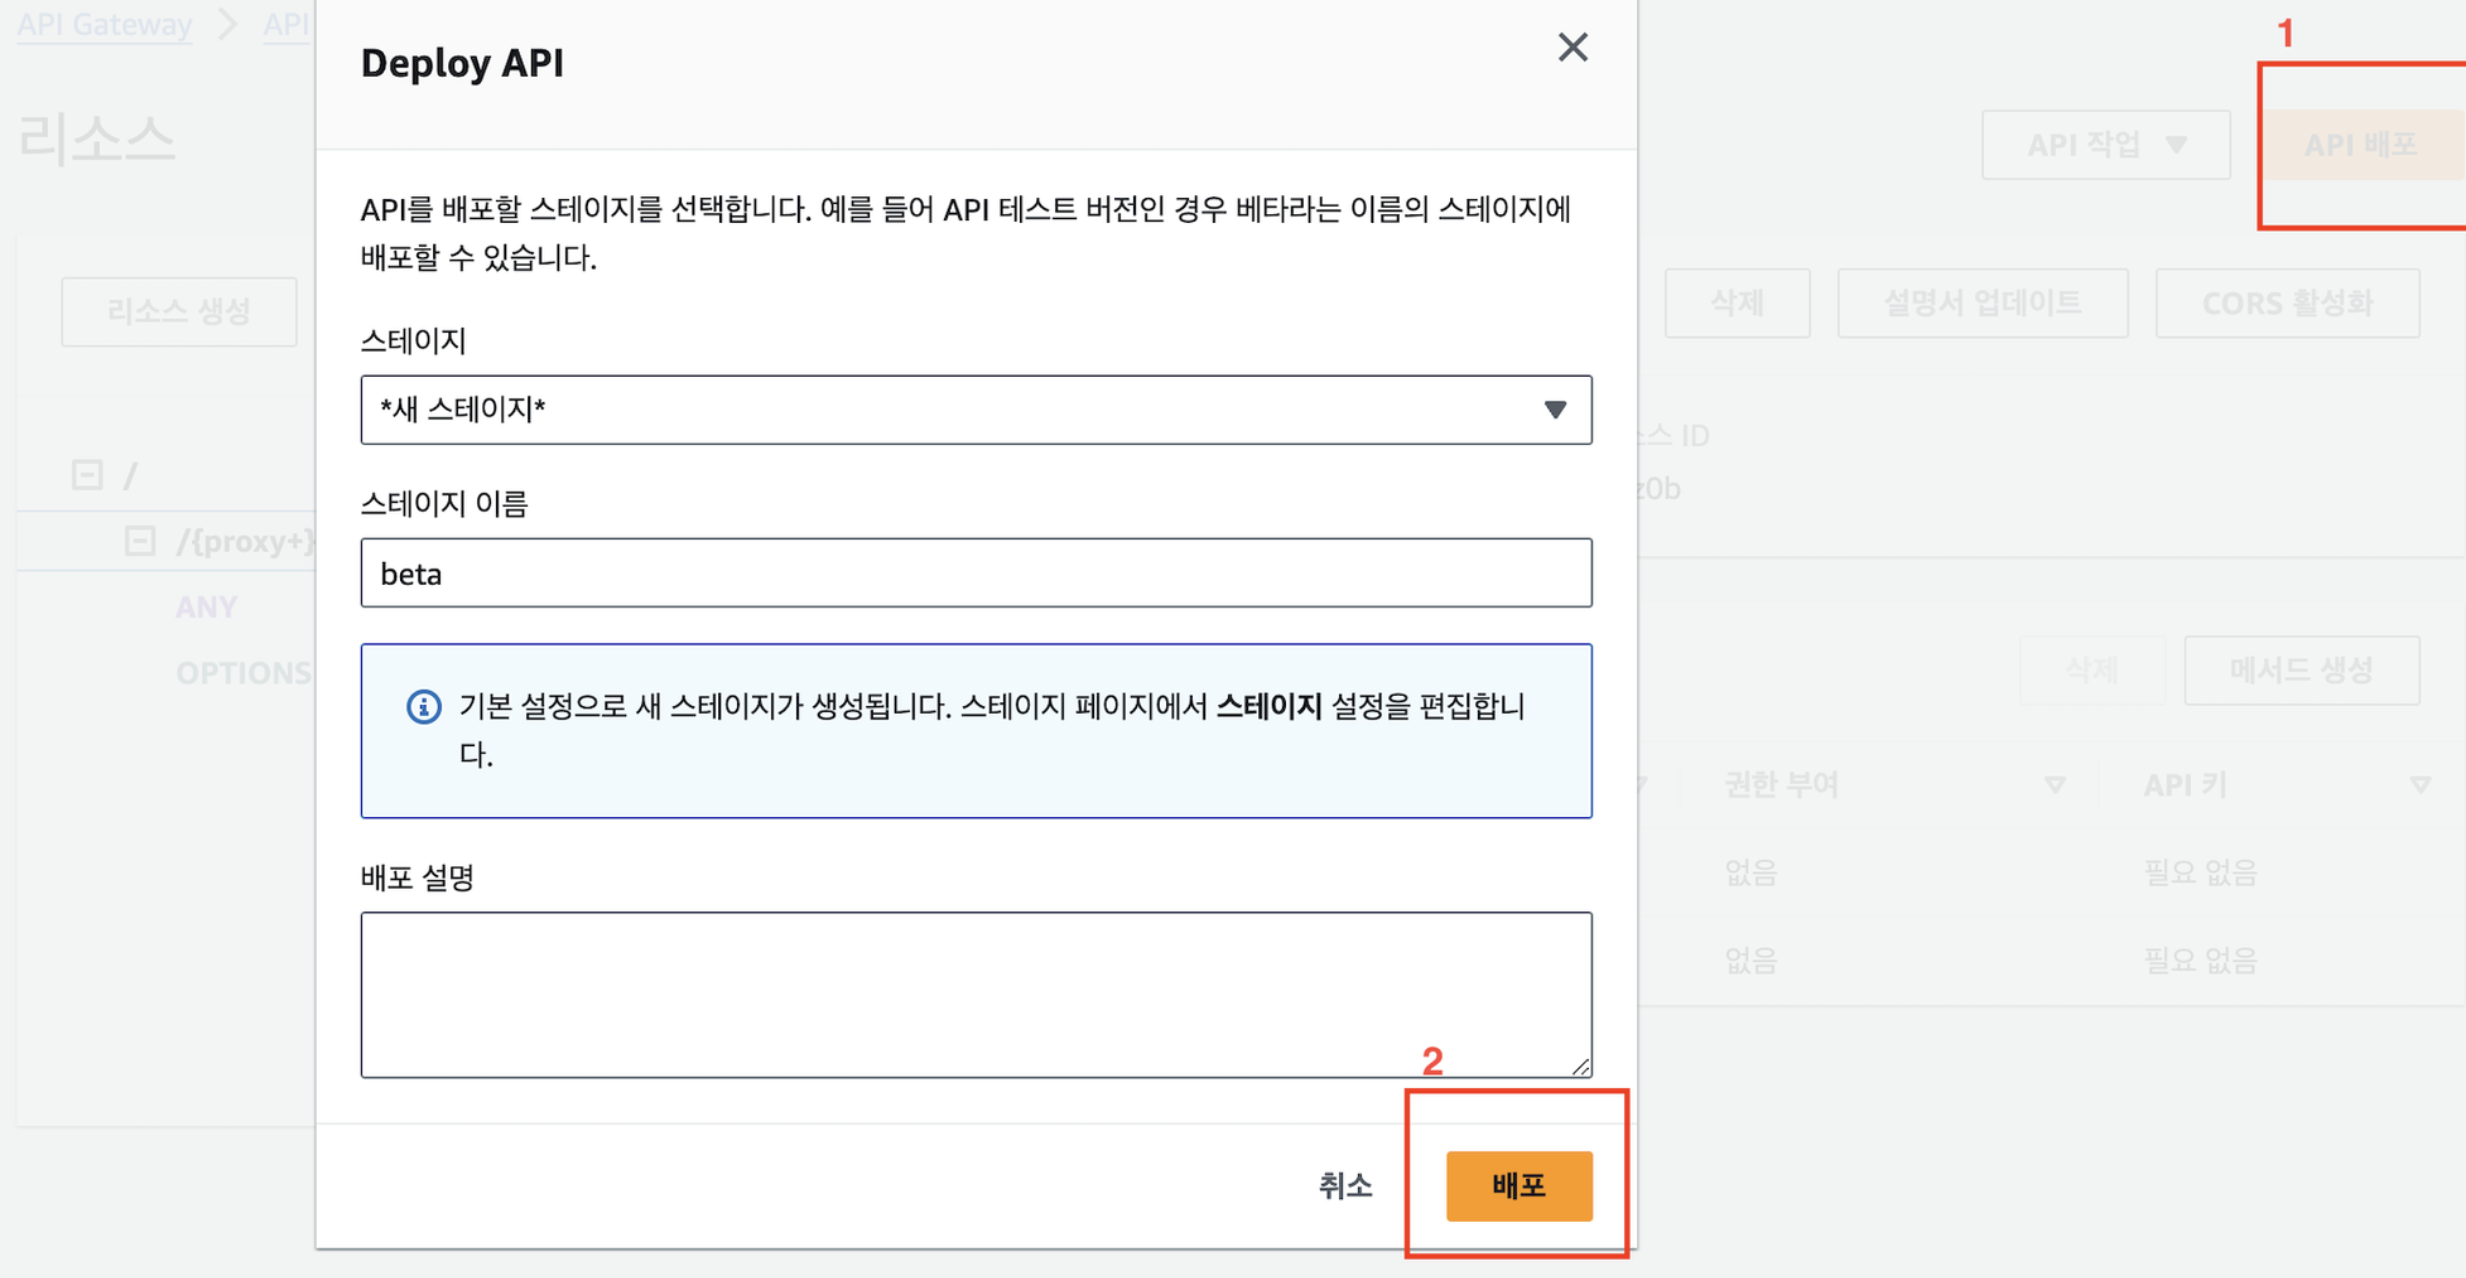
스테이지를 자신이 원하는 이름으로 작성을 하고
배포를 클릭합니다.
스테이지 생성 및 배포 확인 하기
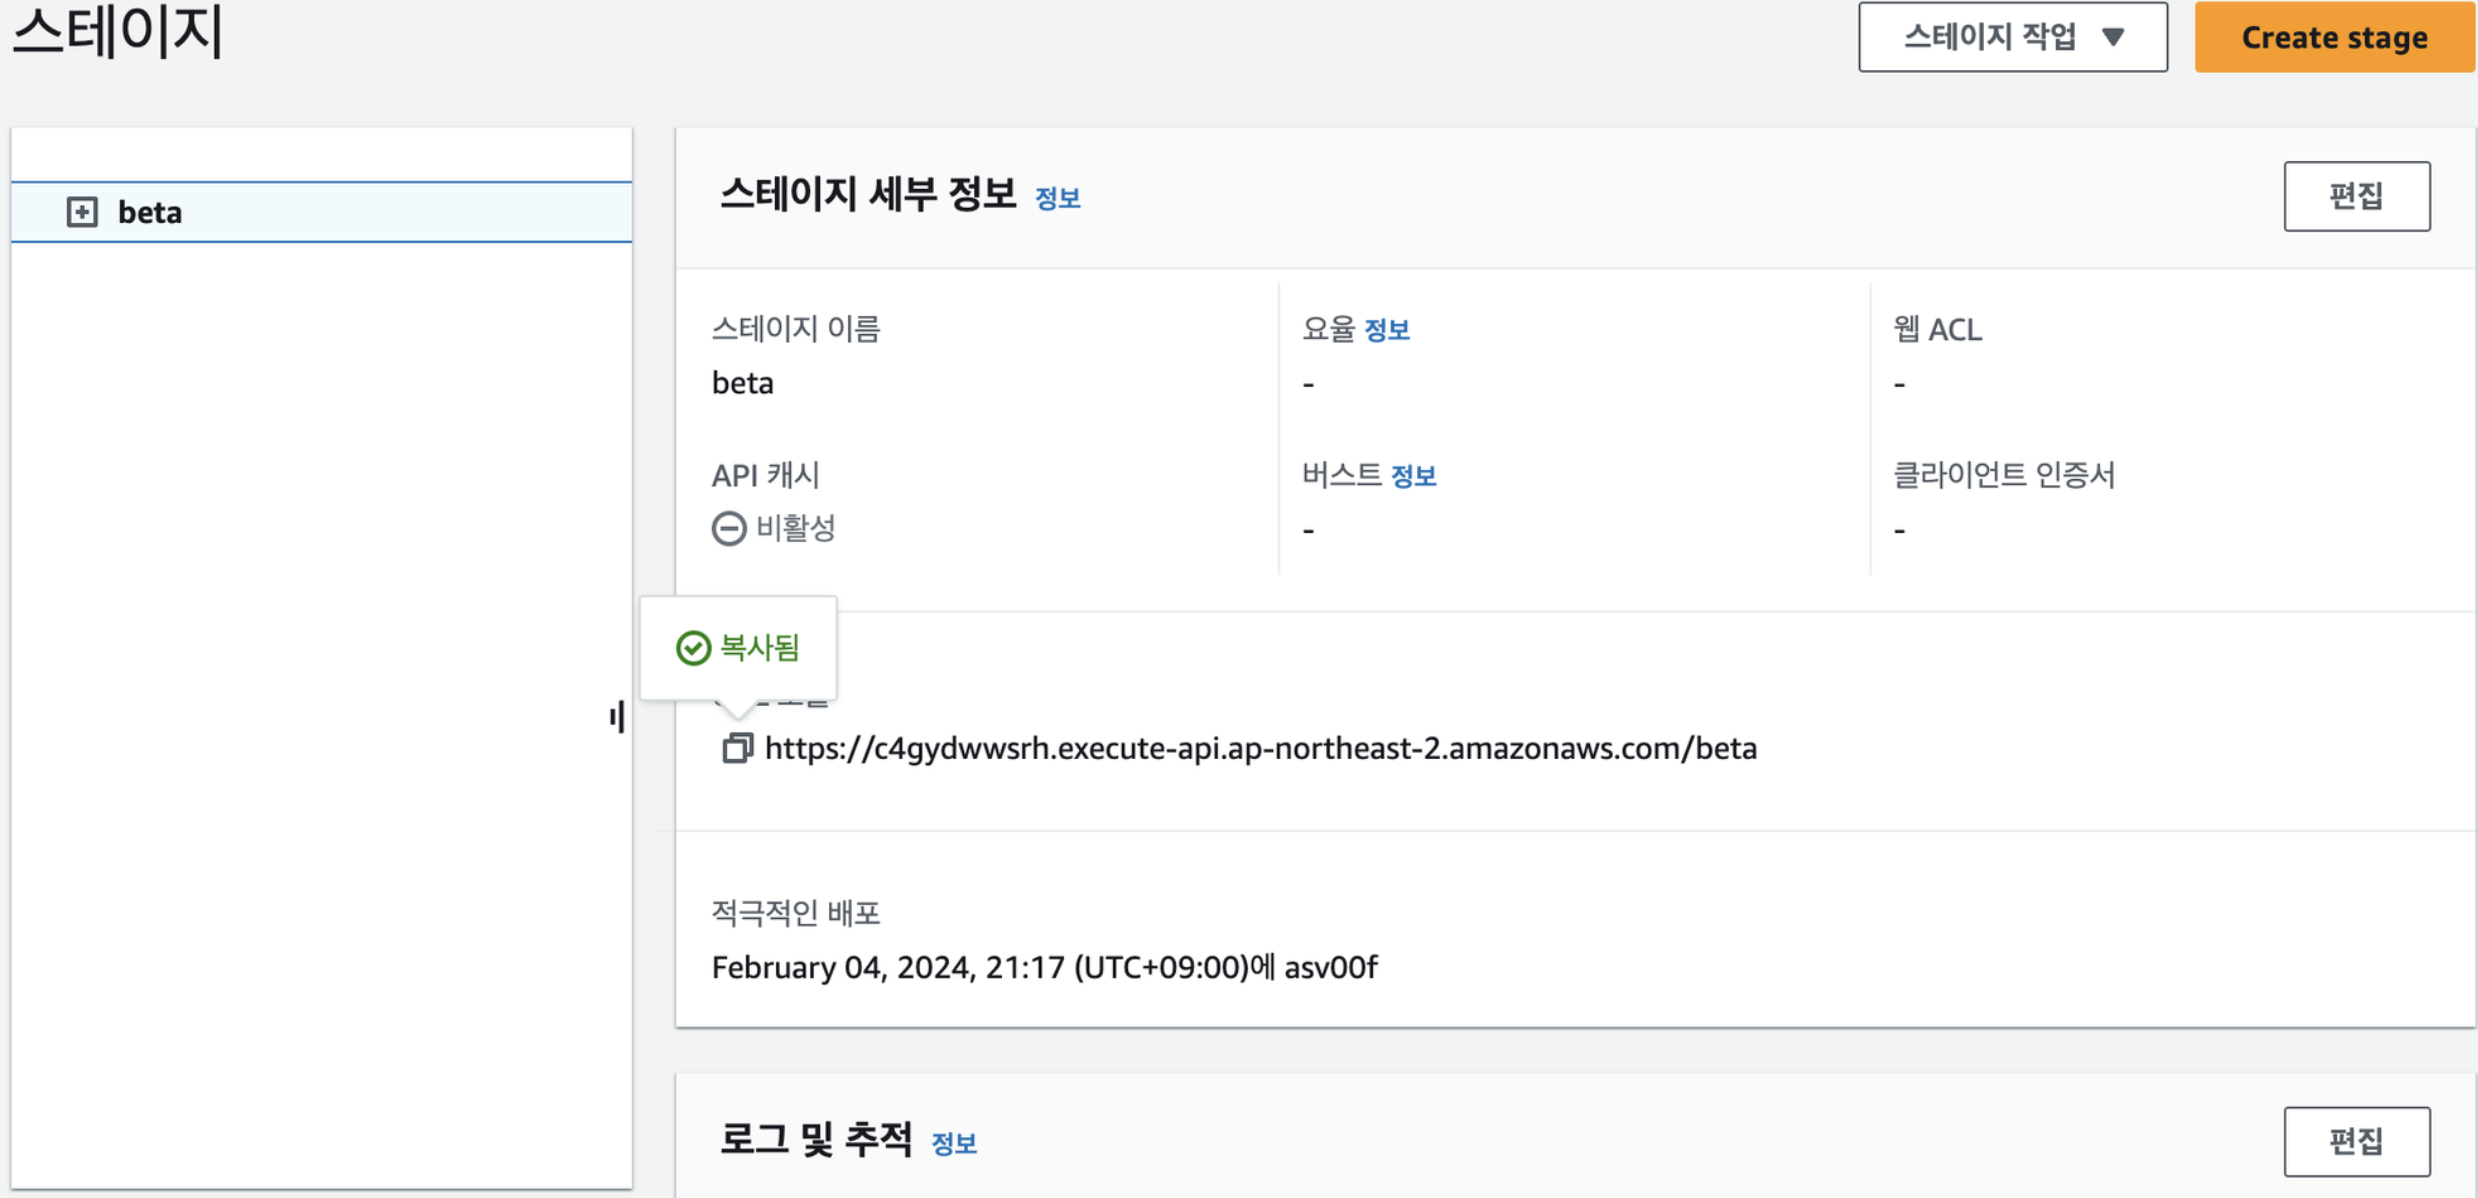
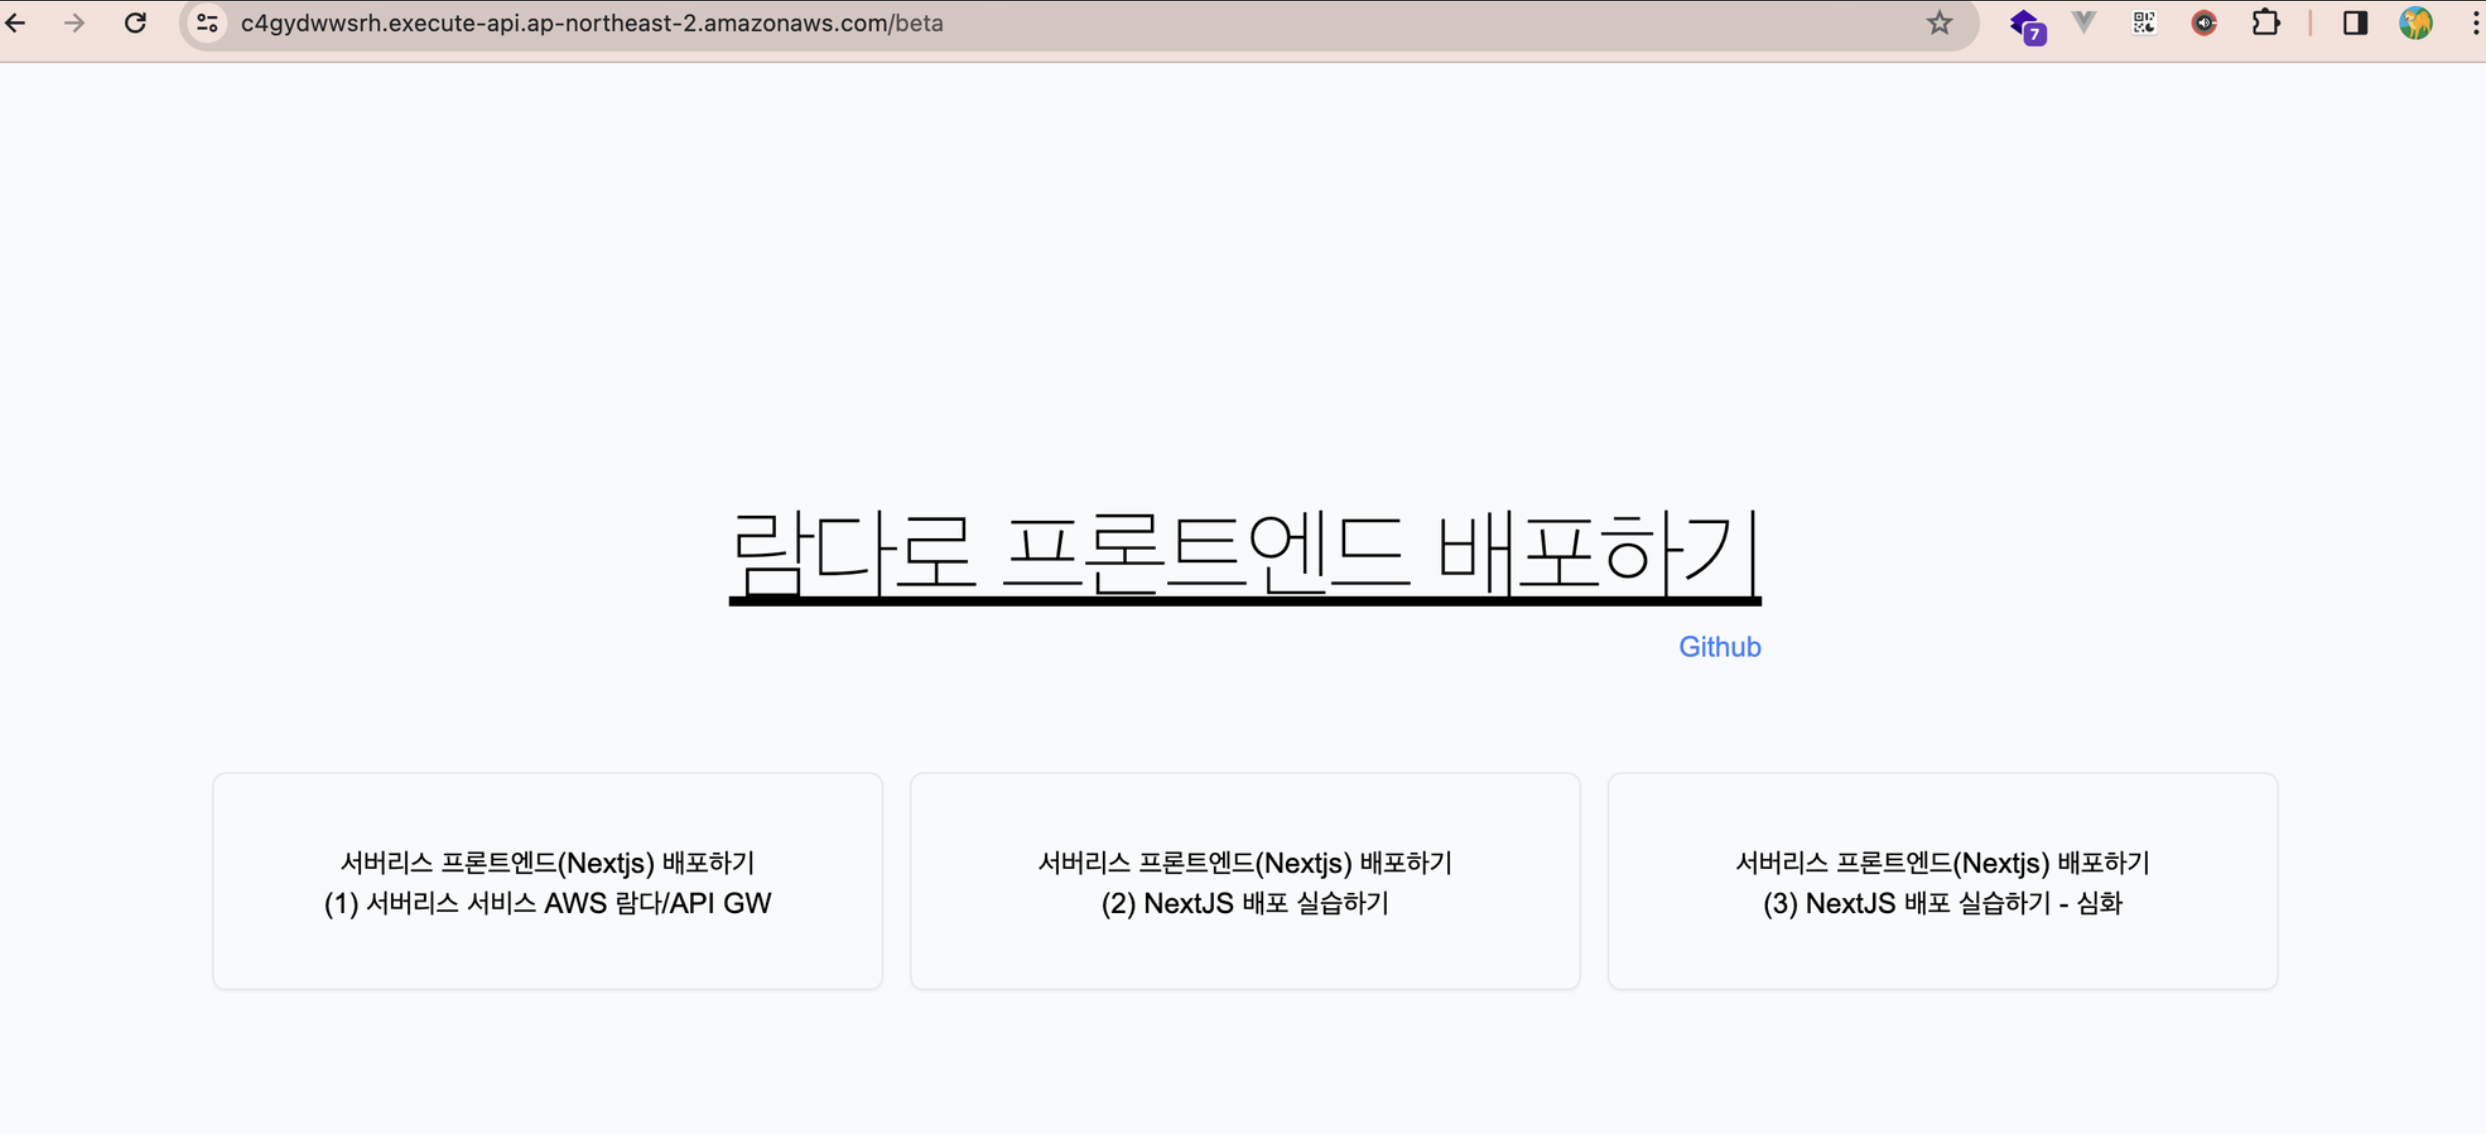
이렇게 하면, nextjs로 만든 프로젝트 화면이 보이는 것을 확인 할 수 있습니다.
