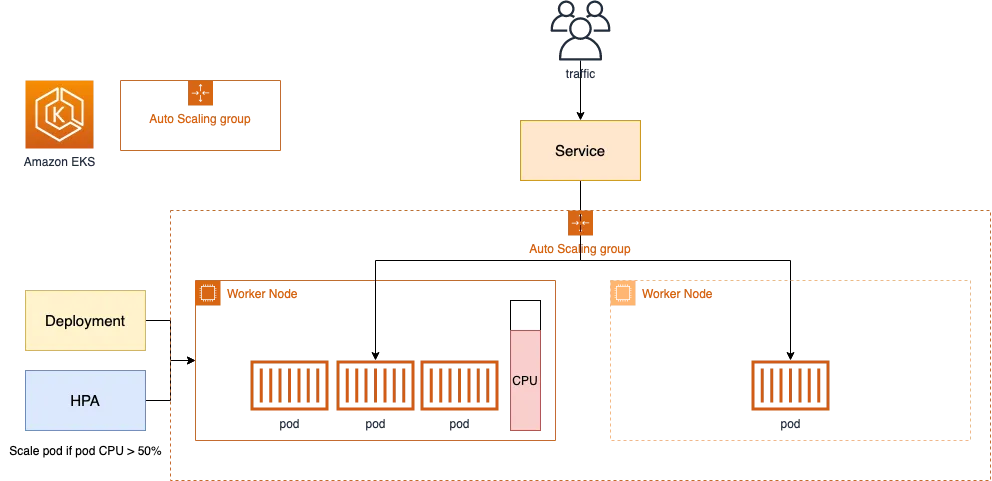
1. CAS 개요
Cluster Autoscaler (CAS)는 Kubernetes 클러스터의 워크로드 변화에 따라 노드의 개수를 자동으로 조정하는 기능을 제공합니다. 클러스터 내 자원이 부족하면 노드를 추가(Scale-out) 하고, 불필요한 노드는 제거(Scale-in) 하여 리소스를 효율적으로 운영할 수 있습니다.
- CAS 공식 문서 및 참고 자료
2. CAS 동작 방식
Cluster Autoscaler는 다음 두 가지 조건을 만족할 때 동작합니다.
-
Pod가 자원 부족으로 실행되지 못할 경우
클러스터 내에서 실행되지 못하는 Pending 상태의 Pod가 존재하면, 자동으로 새로운 노드를 추가(Scale-out)하여 Pod가 배치될 수 있도록 합니다. -
클러스터 내 저활용 노드가 존재할 경우
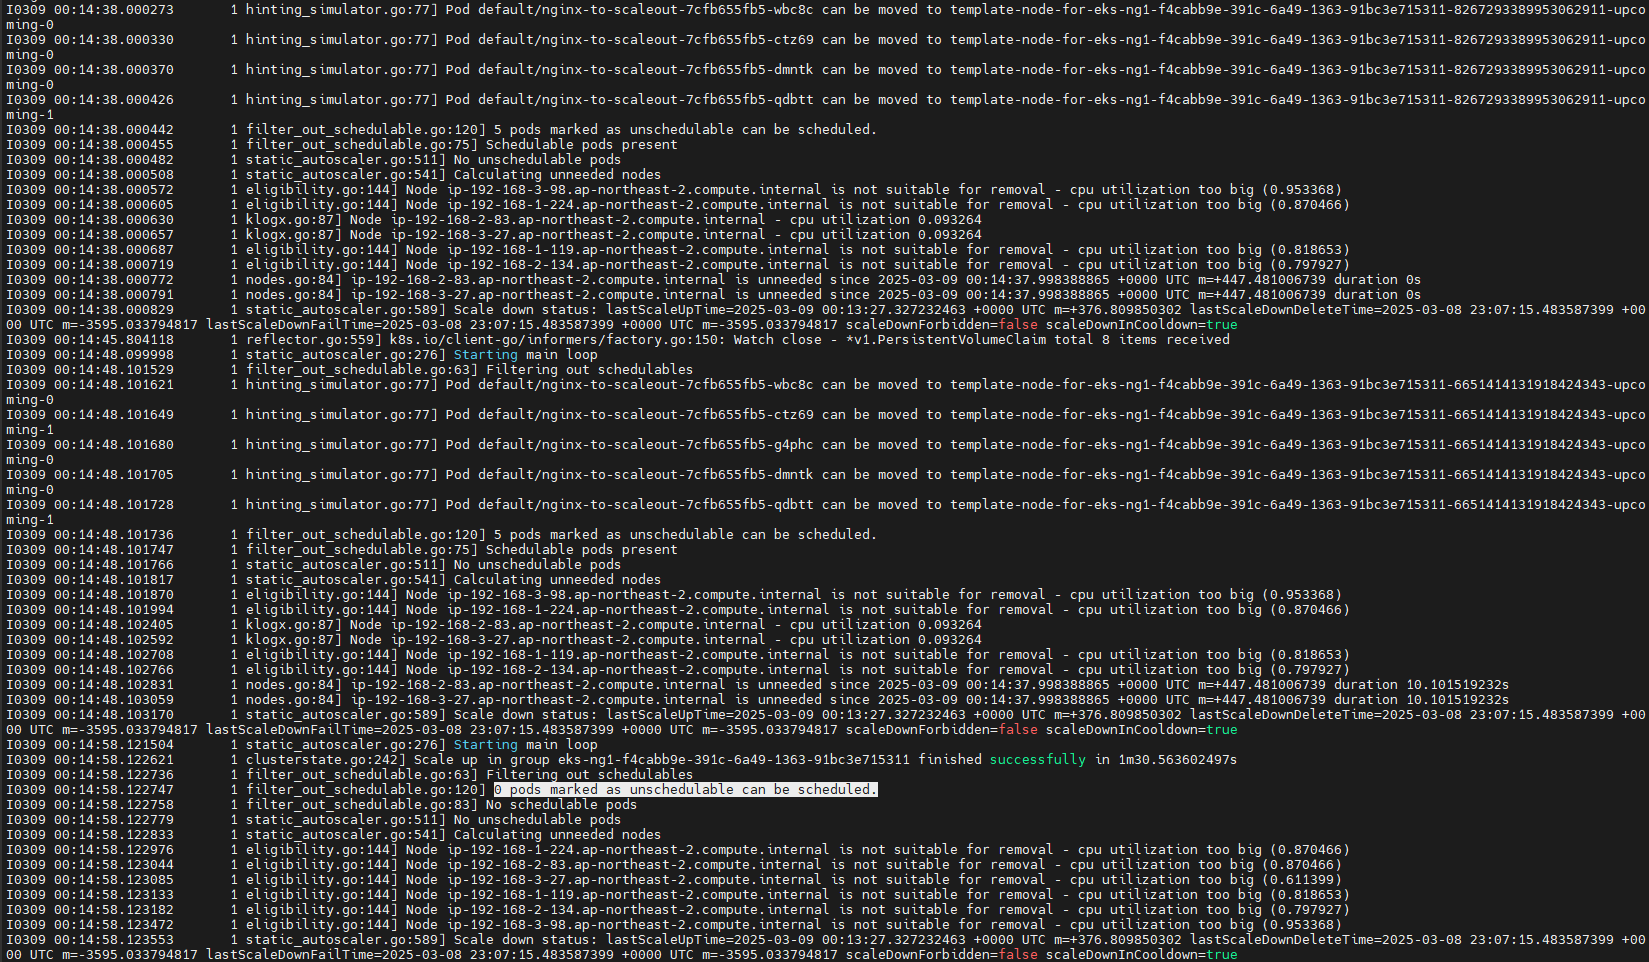
일정 시간 동안 리소스 사용률이 낮은 노드를 감지하고, 해당 노드의 Pod를 다른 노드로 이동시킨 후 노드를 제거(Scale-in) 합니다.
CAS는 AWS, GCP, Azure 등 여러 클라우드 환경을 지원하며, AWS에서는 EC2 Auto Scaling Group(ASG)을 활용하여 노드를 관리합니다.
3. CAS 설치 및 설정
Cluster Autoscaler는 Kubernetes 클러스터 내에서 Deployment 형태로 실행됩니다. AWS 환경에서는 Auto Scaling Group (ASG) 을 사용하여 노드 그룹을 자동 확장합니다.
3.1 CAS 동작을 위한 태그 설정 확인
CAS가 Auto Scaling Group과 연동되기 위해서는 특정 태그가 설정되어 있어야 합니다.
# EKS 노드에 이미 아래 tag가 들어가 있음
# k8s.io/cluster-autoscaler/enabled : true
# k8s.io/cluster-autoscaler/myeks : owned
aws ec2 describe-instances  --filters Name=tag:Name,Values=$CLUSTER_NAME-ng1-Node --query "Reservations[*].Instances[*].Tags[*]" --output json | jq
aws ec2 describe-instances  --filters Name=tag:Name,Values=$CLUSTER_NAME-ng1-Node --query "Reservations[*].Instances[*].Tags[*]" --output yaml
# 출력 예시
...
- Key: k8s.io/cluster-autoscaler/myeks
      Value: owned
- Key: k8s.io/cluster-autoscaler/enabled
      Value: 'true'
...
해당 태그가 존재해야 Cluster Autoscaler가 동작할 수 있습니다.

3.2 Auto Scaling Group (ASG) 설정
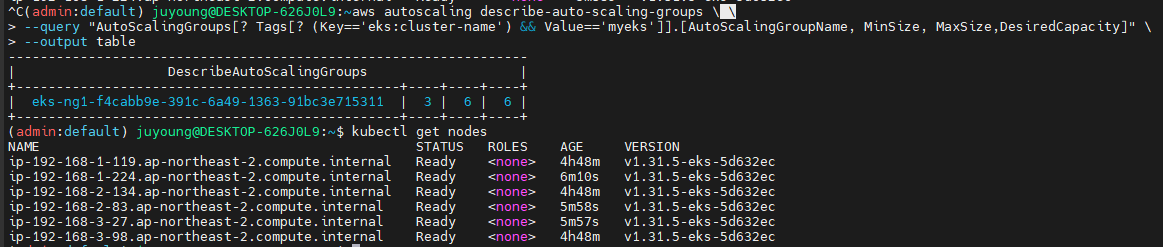
현재 클러스터의 Auto Scaling Group 정보를 확인하고, 최대 노드 개수를 조정합니다.
# 현재 autoscaling(ASG) 정보 확인
# aws autoscaling describe-auto-scaling-groups --query "AutoScalingGroups[? Tags[? (Key=='eks:cluster-name') && Value=='클러스터이름']].[AutoScalingGroupName, MinSize, MaxSize,DesiredCapacity]" --output table
aws autoscaling describe-auto-scaling-groups \
    --query "AutoScalingGroups[? Tags[? (Key=='eks:cluster-name') && Value=='myeks']].[AutoScalingGroupName, MinSize, MaxSize,DesiredCapacity]" \
    --output table
# 출력 예시
-----------------------------------------------------------------
|                   DescribeAutoScalingGroups                   |
+------------------------------------------------+----+----+----+
|  eks-ng1-44c41109-daa3-134c-df0e-0f28c823cb47  |  3 |  3 |  3 |
+------------------------------------------------+----+----+----+

# MaxSize(최대 노드 개수) 6개로 수정
export ASG_NAME=$(aws autoscaling describe-auto-scaling-groups --query "AutoScalingGroups[? Tags[? (Key=='eks:cluster-name') && Value=='myeks']].AutoScalingGroupName" --output text)
aws autoscaling update-auto-scaling-group --auto-scaling-group-name ${ASG_NAME} --min-size 3 --desired-capacity 3 --max-size 6

# 확인
aws autoscaling describe-auto-scaling-groups --query "AutoScalingGroups[? Tags[? (Key=='eks:cluster-name') && Value=='myeks']].[AutoScalingGroupName, MinSize, MaxSize,DesiredCapacity]" --output table
# 출력 예시
-----------------------------------------------------------------
|                   DescribeAutoScalingGroups                   |
+------------------------------------------------+----+----+----+
|  eks-ng1-c2c41e26-6213-a429-9a58-02374389d5c3  |  3 |  6 |  3 |
+------------------------------------------------+----+----+----+
3.3 Cluster Autoscaler 배포
# 배포 : Deploy the Cluster Autoscaler (CAS)
# Cluster Autoscaler 배포 파일 다운로드
curl -s -O https://raw.githubusercontent.com/kubernetes/autoscaler/master/cluster-autoscaler/cloudprovider/aws/examples/cluster-autoscaler-autodiscover.yaml
...
- ./cluster-autoscaler
- --v=4
- --stderrthreshold=info
- --cloud-provider=aws
- --skip-nodes-with-local-storage=false # 로컬 스토리지를 가진 노드를 autoscaler가 scale down할지 결정, false(가능!)
- --expander=least-waste # 노드를 확장할 때 어떤 노드 그룹을 선택할지를 결정, least-waste는 리소스 낭비를 최소화하는 방식으로 새로운 노드를 선택.
- --node-group-auto-discovery=asg:tag=k8s.io/cluster-autoscaler/enabled,k8s.io/cluster-autoscaler/<YOUR CLUSTER NAME>
...
# 클러스터 이름 적용
sed -i -e "s|<YOUR CLUSTER NAME>|$CLUSTER_NAME|g" cluster-autoscaler-autodiscover.yaml
# Cluster Autoscaler 배포
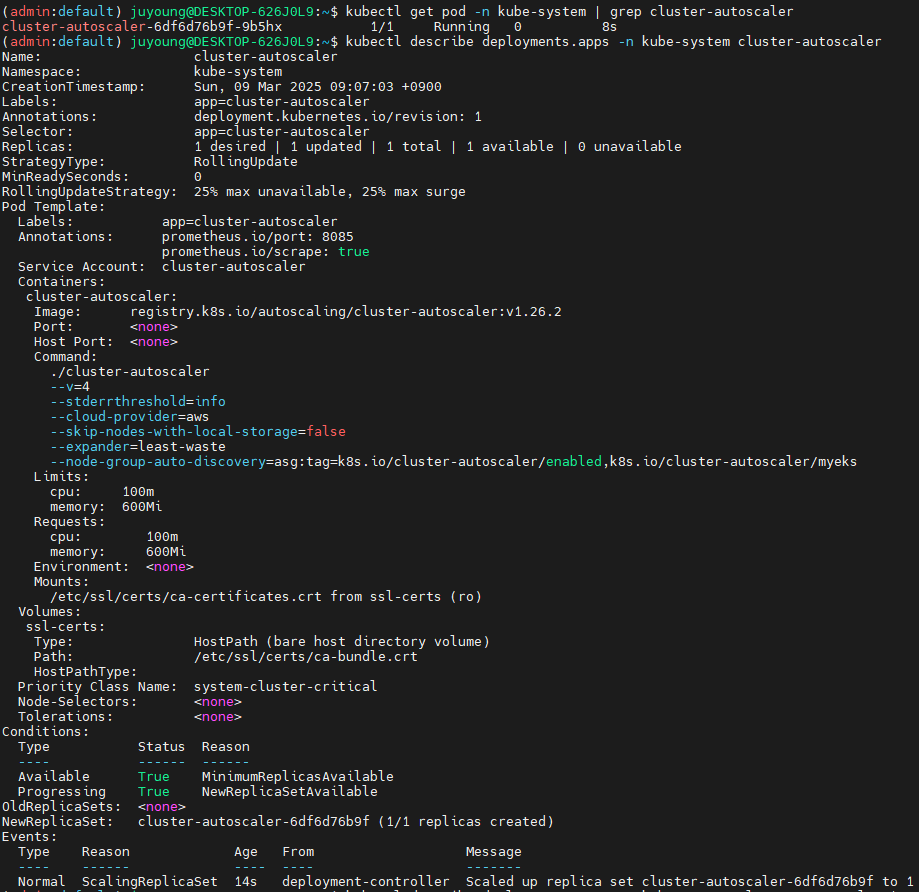
kubectl apply -f cluster-autoscaler-autodiscover.yaml
# 배포 확인
kubectl get pod -n kube-system | grep cluster-autoscaler
kubectl describe deployments.apps -n kube-system cluster-autoscaler
kubectl describe deployments.apps -n kube-system cluster-autoscaler | grep node-group-auto-discovery
--node-group-auto-discovery=asg:tag=k8s.io/cluster-autoscaler/enabled,k8s.io/cluster-autoscaler/myeks
# (옵션) cluster-autoscaler 파드가 동작하는 워커 노드가 퇴출(evict) 되지 않게 설정
kubectl -n kube-system annotate deployment.apps/cluster-autoscaler cluster-autoscaler.kubernetes.io/safe-to-evict="false"


4. CAS 스케일링 테스트
4.1 샘플 애플리케이션 배포
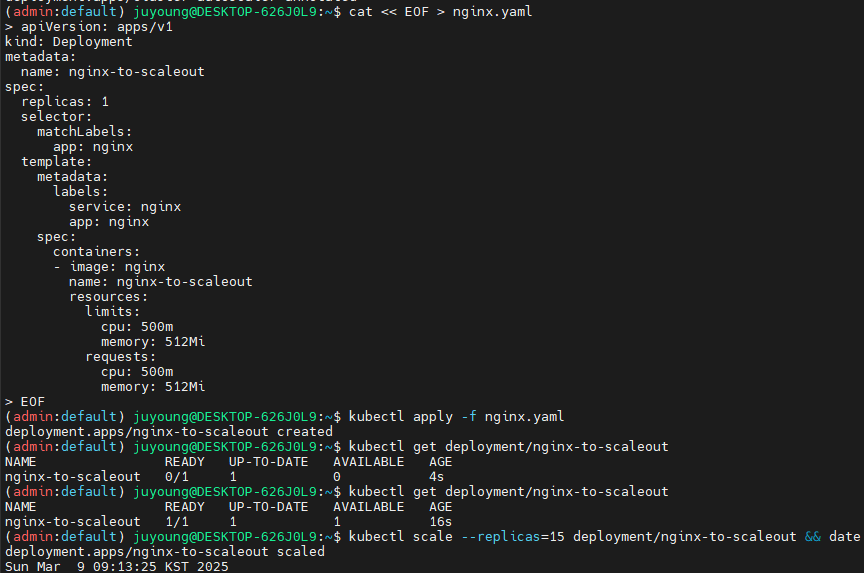
CAS가 정상적으로 동작하는지 확인하기 위해 nginx Deployment를 배포합니다.
# 모니터링
kubectl get nodes -w
while true; do kubectl get node; echo "------------------------------" ; date ; sleep 1; done
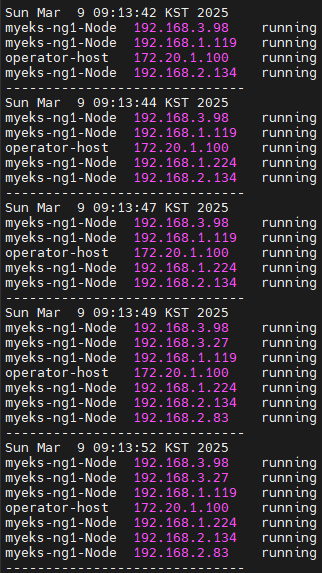
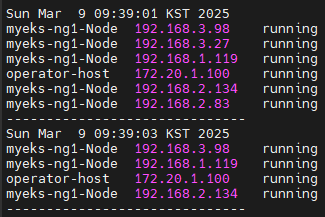
while true; do aws ec2 describe-instances --query "Reservations[*].Instances[*].{PrivateIPAdd:PrivateIpAddress,InstanceName:Tags[?Key=='Name']|[0].Value,Status:State.Name}" --filters Name=instance-state-name,Values=running --output text ; echo "------------------------------"; date; sleep 1; done
# Deploy a Sample App
# We will deploy an sample nginx application as a ReplicaSet of 1 Pod
cat << EOF > nginx.yaml
apiVersion: apps/v1
kind: Deployment
metadata:
name: nginx-to-scaleout
spec:
replicas: 1
selector:
matchLabels:
app: nginx
template:
metadata:
labels:
service: nginx
app: nginx
spec:
containers:
- image: nginx
name: nginx-to-scaleout
resources:
limits:
cpu: 500m
memory: 512Mi
requests:
cpu: 500m
memory: 512Mi
EOF
kubectl apply -f nginx.yaml
kubectl get deployment/nginx-to-scaleout-
샘플 앱 배포 전


-
샘플 앱 배포
4.2 Auto Scaling 테스트
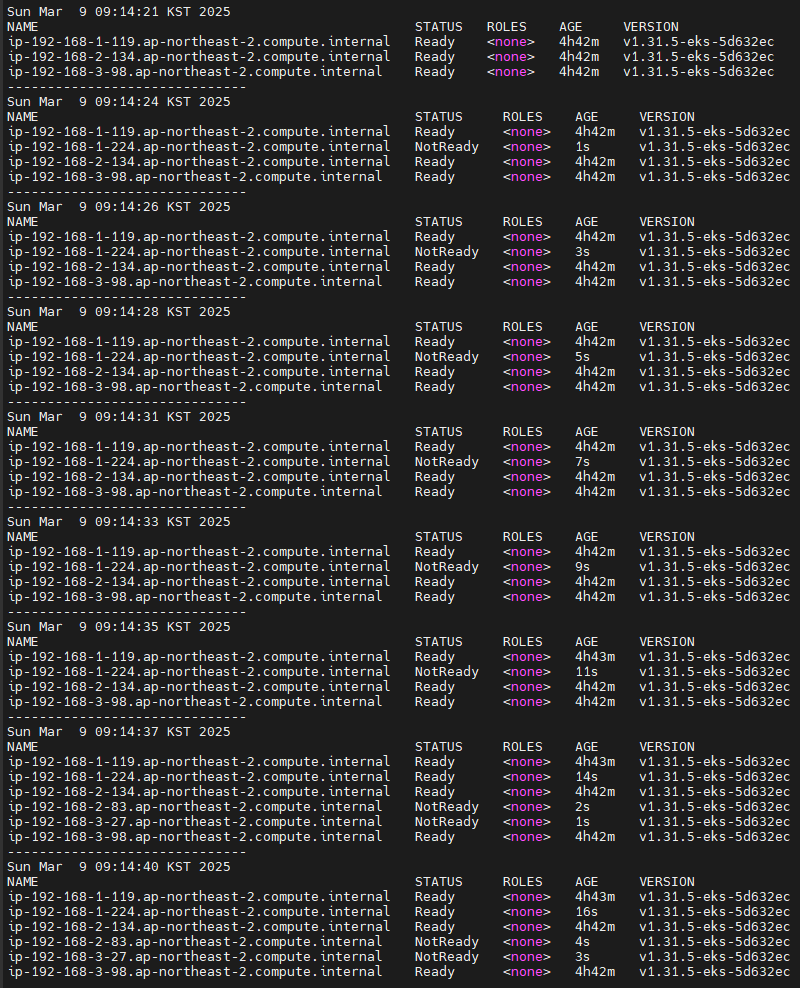
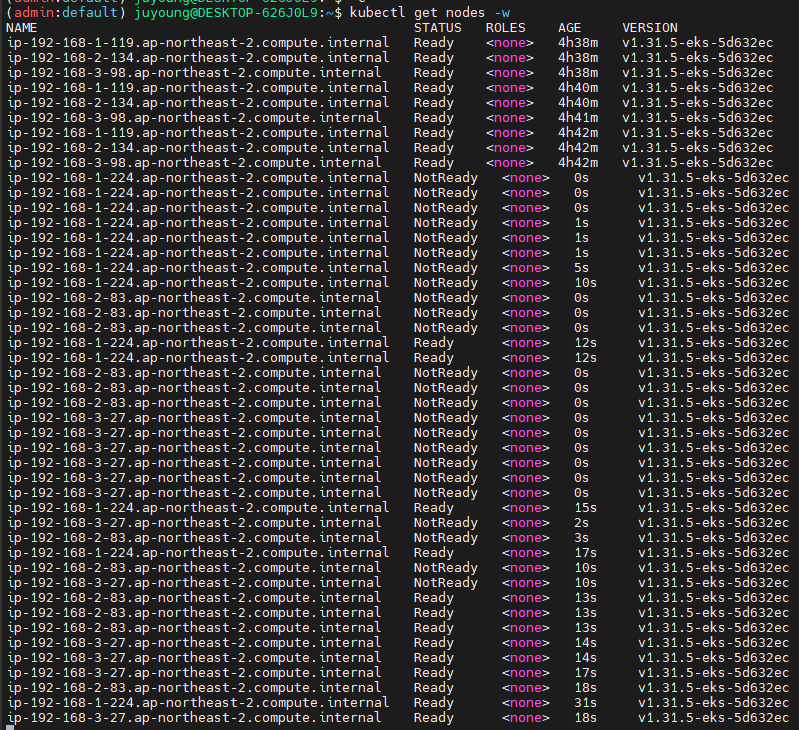
ReplicaSet을 15개로 확장하고 노드 개수 증가를 확인합니다.
# Scale our ReplicaSet
# Let’s scale out the replicaset to 15
kubectl scale --replicas=15 deployment/nginx-to-scaleout && date
# 확인
kubectl get pods -l app=nginx -o wide --watch
kubectl -n kube-system logs -f deployment/cluster-autoscaler
# 노드 개수 자동 증가 확인
kubectl get nodes
aws autoscaling describe-auto-scaling-groups \
--query "AutoScalingGroups[? Tags[? (Key=='eks:cluster-name') && Value=='myeks']].[AutoScalingGroupName, MinSize, MaxSize,DesiredCapacity]" \
--output table
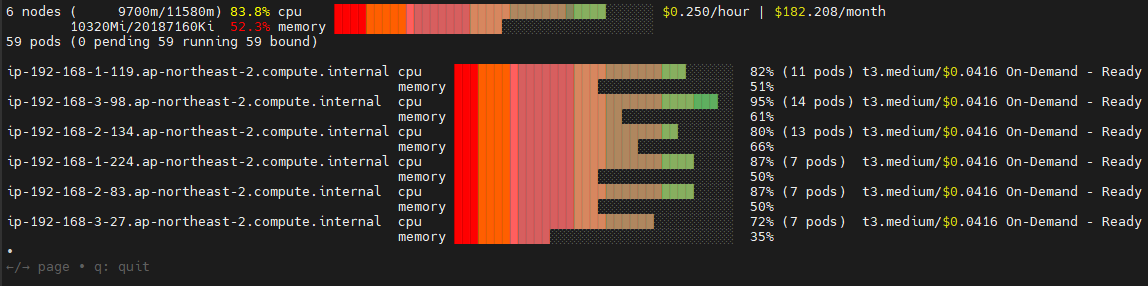
eks-node-viewer --resources cpu,memory
혹은
eks-node-viewer
# [운영서버 EC2] 최근 1시간 Fleet API 호출 확인 - Link
# https://ap-northeast-2.console.aws.amazon.com/cloudtrailv2/home?region=ap-northeast-2#/events?EventName=CreateFleet
aws cloudtrail lookup-events \
--lookup-attributes AttributeKey=EventName,AttributeValue=CreateFleet \
--start-time "$(date -d '1 hour ago' --utc +%Y-%m-%dT%H:%M:%SZ)" \
--end-time "$(date --utc +%Y-%m-%dT%H:%M:%SZ)"
# (참고) Event name : UpdateAutoScalingGroup
# https://ap-northeast-2.console.aws.amazon.com/cloudtrailv2/home?region=ap-northeast-2#/events?EventName=UpdateAutoScalingGroup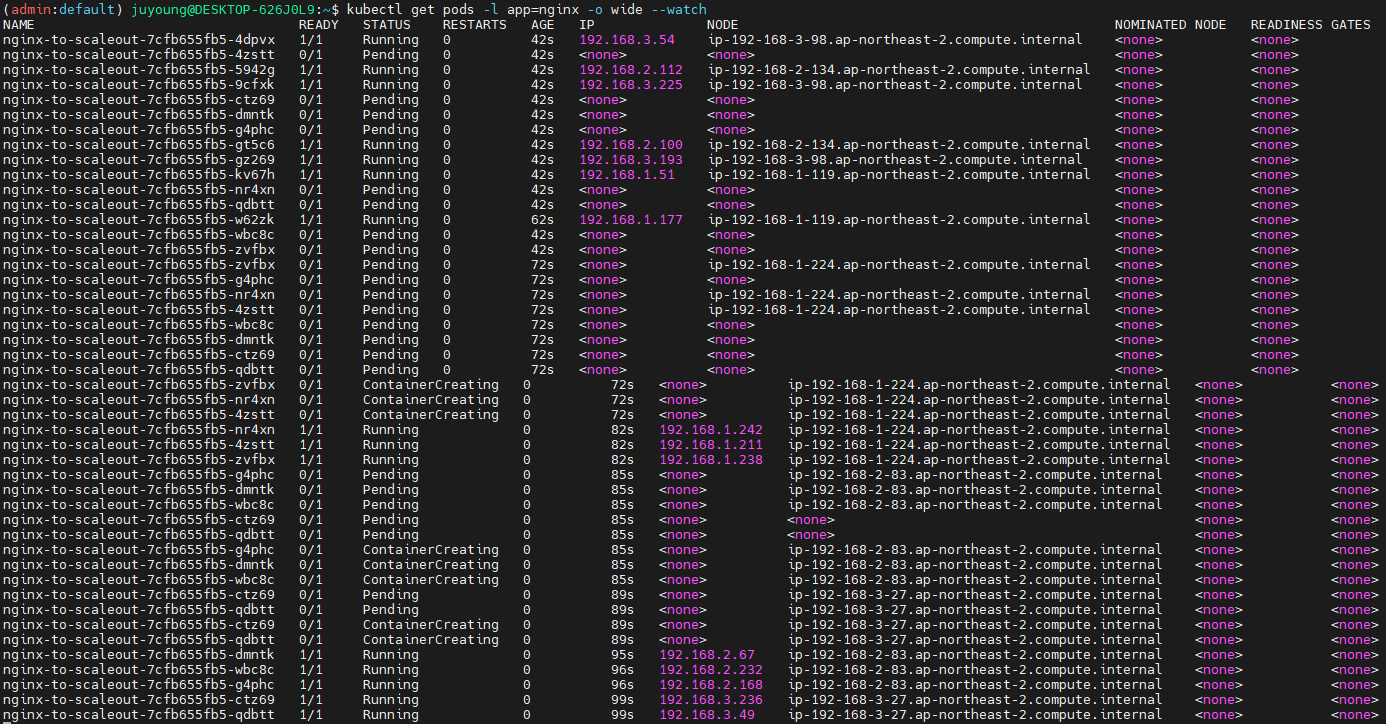

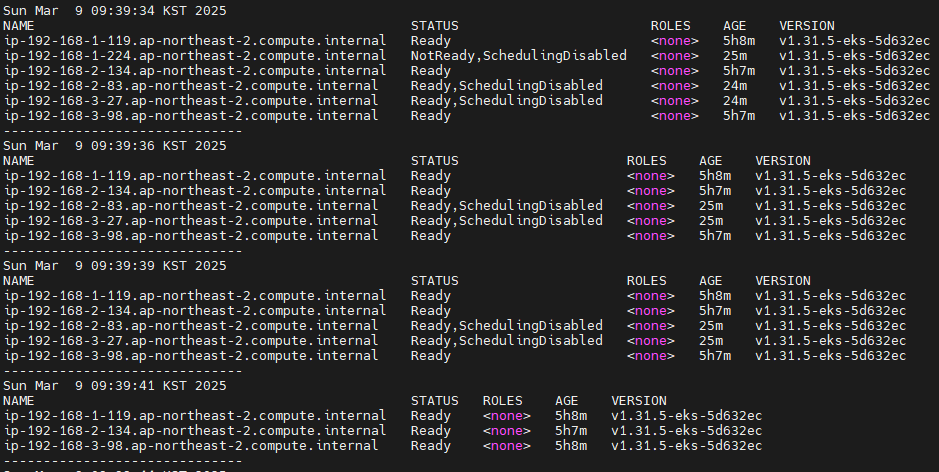
4.3 Scale-down 테스트
nginx Deployment를 삭제하고 노드 감소를 확인합니다.
Cluster Autoscaler는 기본적으로 10분 후 노드를 줄이며, 필요 시 --scale-down-delay-after-add=5m 플래그로 조정할 수 있습니다.
# 디플로이먼트 삭제
kubectl delete -f nginx.yaml && date

# [scale-down] 노드 갯수 축소 : 기본은 10분 후 scale down 됨, 물론 아래 flag 로 시간 수정 가능 >> 그러니 디플로이먼트 삭제 후 10분 기다리고 나서 보자!
# By default, cluster autoscaler will wait 10 minutes between scale down operations,
# you can adjust this using the --scale-down-delay-after-add, --scale-down-delay-after-delete,
# and --scale-down-delay-after-failure flag.
# E.g. --scale-down-delay-after-add=5m to decrease the scale down delay to 5 minutes after a node has been added.

# 터미널1
watch -d kubectl get node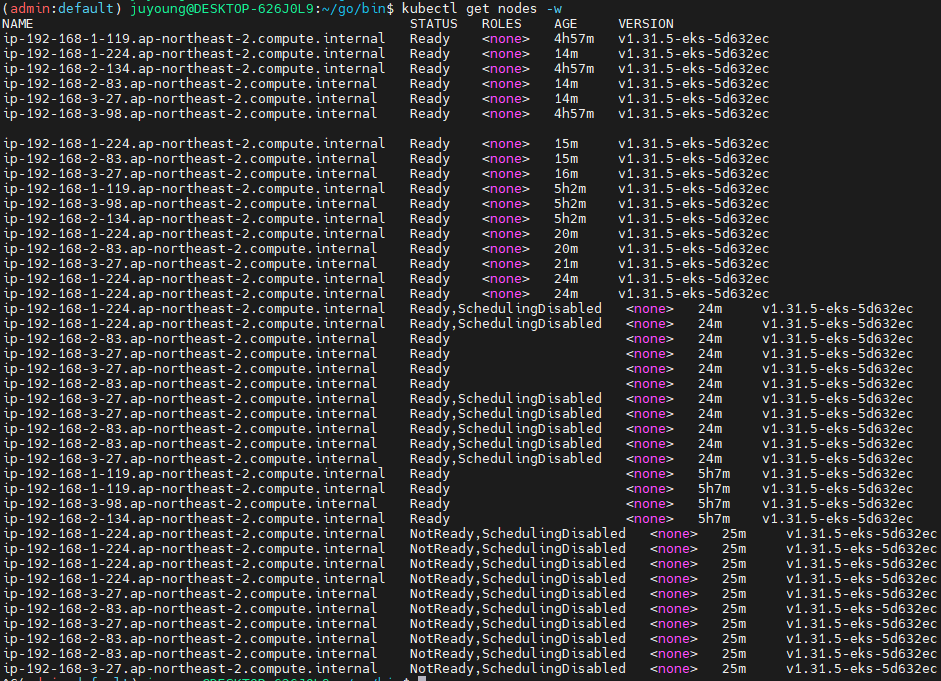
4.4 CloudTrail에 CreateFleet 이벤트 확인
# CloudTrail 에 CreateFleet 이벤트 조회 : 최근 90일 가능
aws cloudtrail lookup-events --lookup-attributes AttributeKey=EventName,AttributeValue=CreateFleet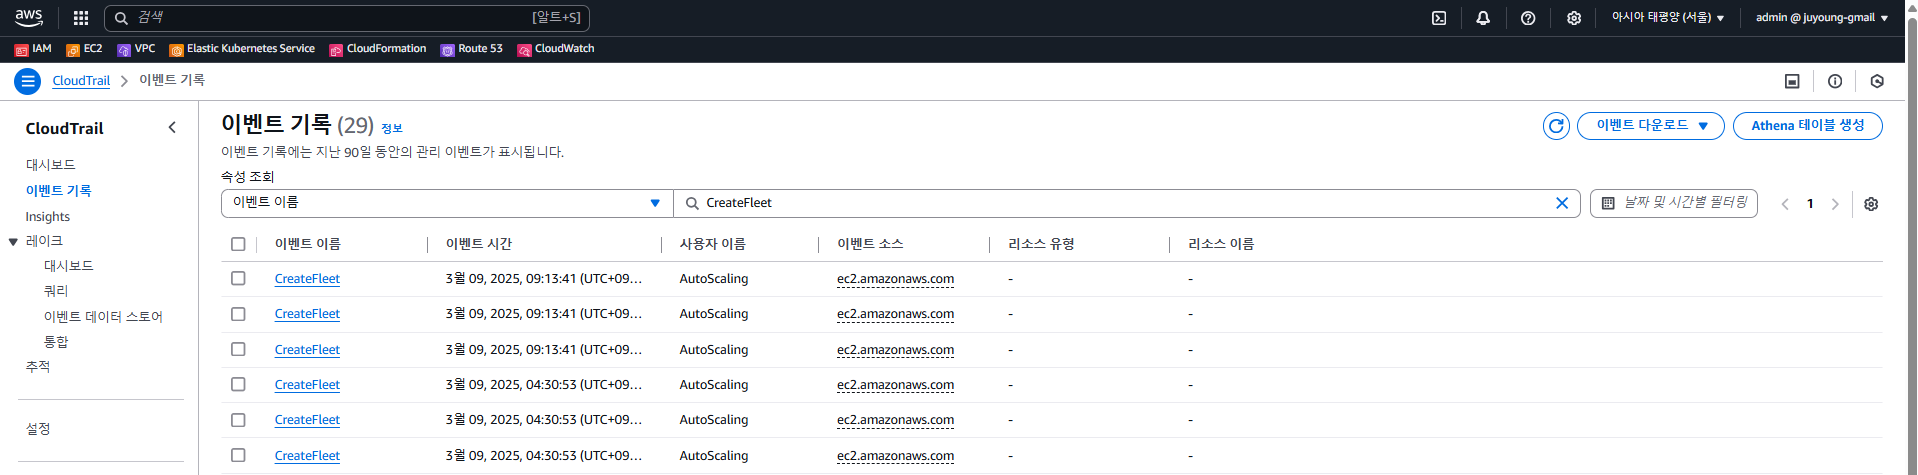
5. CAS 삭제
# 위 실습 중 디플로이먼트 삭제 후 10분 후 노드 갯수 축소되는 것을 확인 후 아래 삭제를 해보자! >> 만약 바로 아래 CA 삭제 시 워커 노드는 4개 상태가 되어서 수동으로 2대 변경 하자!
kubectl delete -f nginx.yaml

# size 수정
aws autoscaling update-auto-scaling-group --auto-scaling-group-name ${ASG_NAME} --min-size 3 --desired-capacity 3 --max-size 3
aws autoscaling describe-auto-scaling-groups --query "AutoScalingGroups[? Tags[? (Key=='eks:cluster-name') && Value=='myeks']].[AutoScalingGroupName, MinSize, MaxSize,DesiredCapacity]" --output table

# Cluster Autoscaler 삭제
kubectl delete -f cluster-autoscaler-autodiscover.yaml