An intro to modern OpenGL 을 보고 정리한 글입니다.
What is OpenGL?
OpenGL은 Programmable GPU와 상호작용하기 위한 크로스 플랫폼 라이브러리로 실시간 3D 그래픽을 렌더링 하기 위해 만들어졌다.
Graphics Pipeline
그래픽스에서 최소 렌더링 단위는 항상 삼각형이다. 이것은 몇 이유가 있는데, 우선 임의의 polygon은 항상 여러 개의 삼각형으로 분리될 수 있고, 한 평면 상에 있을지 없을지 알기 어려운 4개 점에 비해, 3개의 점은 항상 1개의 평면 위에 존재하므로 고려해야 할 것이 적다.
그래픽 파이프라인은 대략 다음과 같이 구성되어 있다.

- host program은 OpenGL이 관리하는 메모리 버퍼에 vertex의 배열을 채운다.
- vertex 들은 화면에 투사되어 삼각형으로 만들어진다.
- 삼각형들은 pixel sized fragment로 래스터화 된다.
- 각 프래그먼트는 색상을 부여받아 프레임버퍼에 그려진다.
현대 GPU는 '화면에 투사'하는 부분과 '색상을 부여'하는 부분을 쉐이더라고 부르는 uploadable한 프로그램에 위임한다.
Vertex and Element Array
Vertex Buffer는 Vertex Attributes의 배열로 채워져 있다. 이 Attribute는 Vertex Shader의 인풋으로 각 Vertex의 3D 공간에서의 좌표와, vertex를 한개 이상의 texture의 샘플 포인트에 매핑하는 texture coordinates (=uv coordinates)를 포함한다.
color나 uv coordinates를 포함하지 않는 경우, shader에서 혹은 uniform에서 계산을 수행하도록 해야 한다.
// Position (x, y, z), Color (r, g, b), UV coordinates (u, v)
float vertices[] = {
  // Positions   // Colors      // UVs
    0.5f,  0.5f,  1.0f, 0.0f, 0.0f,  1.0f, 1.0f,
   -0.5f,  0.5f,  0.0f, 1.0f, 0.0f,  0.0f, 1.0f,
   -0.5f, -0.5f,  0.0f, 0.0f, 1.0f,  0.0f, 0.0f,
    0.5f, -0.5f,  1.0f, 1.0f, 1.0f,  1.0f, 0.0f
};
이때 이 graphics hardware는 이 값들을 어떻게 읽어야할 지 알 수 없으므로 우리가 직접 값의 레이아웃을 알려주어야 한다. 이는 attribute pointers로 할 수 있다.
// Assuming VAO and VBO are already bound
// Assuming shader program is already in use

// Position attribute
glVertexAttribPointer(0, 3, GL_FLOAT, GL_FALSE, 7 * sizeof(float), (void*)0);
glEnableVertexAttribArray(0);

// Color attribute
glVertexAttribPointer(1, 3, GL_FLOAT, GL_FALSE, 7 * sizeof(float), (void*)(3 * sizeof(float)));
glEnableVertexAttribArray(1);

// UV attribute
glVertexAttribPointer(2, 2, GL_FLOAT, GL_FALSE, 7 * sizeof(float), (void*)(6 * sizeof(float)));
glEnableVertexAttribArray(2);
이 Vertex Buffer의 모음을 Vertex Array라고 하며, Element Array는 실제 렌더링에 사용될 Vertex Array의 index를 기술한다. 이 때 Element Array의 값 순서를 통해 이후에 만들어진 삼각형의 순서가 결정된다.
Uniform State and Textures
Uniform State는 각 파이프라인의 programmable한 stage에 위치한 쉐이더들이 공유할 수 있는 read only value이다. 이를 통해 쉐이더는 vertex나 fragment에 관계 없이 적용되는 파라미터를 가져올 수 있다.
// Fragment shader
uniform vec4 uniColor;

void main()
{
    gl_FragColor = uniColor;
}
// C++ OpenGL code
GLint uniColorLocation = glGetUniformLocation(shaderProgram, "uniColor");
glUniform4f(uniColorLocation, 1.0f, 0.0f, 0.0f, 1.0f); // Set color to redTexture는 3D Object에 적용할 수 있는 2D Image로, 쉐이더가 sampling할 수 있는 1/2/3차원 배열이다. 일반적으로는 texture image를 surface에 매핑하기 위해 사용된다.
Texture를 사용하는 것의 장점은, model complexity를 올리지 않으면서도 디테일을 더할 수 있다는 것이다. 예를 들면, 3D Cube 하나에 서로 다른 texture를 사용하면 wood cube가 되거나 다른 색깔의 cube가 될 수 있다.
또한, 미리 계산된 값이나 함수에 대한 lookup table로 사용되기도 한다.
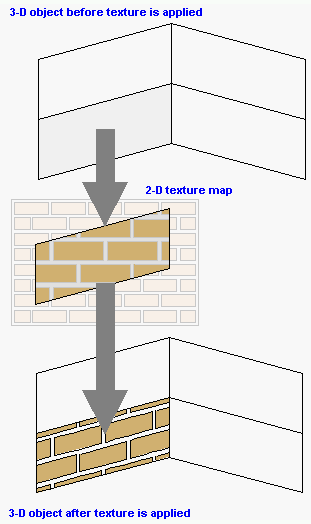
(출처: https://www.pcmag.com/encyclopedia/term/texture-mapping)
Texture mapping은 texture을 3D model에 '붙이는' 것을 의미한다. vertex의 uv coordinates가 texture의 특정 coordinate에 매핑되는 것이다. graphics hardware는 매핑되는 텍스쳐로부터 색상값을 가져와서 model의 대응되는 point에 적용한다.
Vertex Shader
GPU는 vertex array로부터, element array가 선택한 순서대로 vertex를 읽어 vertex shader를 실행한다.
vertex shader는 vertex attribute를 인풋으로 받아 새 attribute를 아웃풋으로 내놓는 프로그램이다. 이 때 아웃풋을 varying value라고 하고, 이 값은 이후에 rasterizer로 들어간다.
Vertex shader는 screen space에 project 될 position을 계산하고, color나 texture coordinates 등 rasterizer에서 사용될 다른 값들 또한 만들어낼 수 있다.
// Vertex positions (x, y)
float vertices[] = {
    0.0f,  0.5f, // Vertex 1: top of the triangle
   -0.5f, -0.5f, // Vertex 2: bottom-left corner
    0.5f, -0.5f  // Vertex 3: bottom-right corner
};

// Assume VAO and VBO are already bound, and shader program is already in use.

// Define the layout of our vertex data
glVertexAttribPointer(0, 2, GL_FLOAT, GL_FALSE, 2 * sizeof(float), (void*)0);
glEnableVertexAttribArray(0);
#version 330 core
// Input vertex attributes
// In this example, we only have the position.
layout (location = 0) in vec2 aPos;
void main()
{
// Set the vertex position. We expand the 2D position to 3D
// by setting the z-coordinate to 0 and w-coordinate to 1.
gl_Position = vec4(aPos.x, aPos.y, 0.0, 1.0);
}여기서 gl_position 은 vertex shader의 position으로 이 값에 aPos의 x, y값을 그대로 대입하고 있다. 즉 이 shader program은 vertex position을 그대로 내놓는 program이다.
Triangle Assembly
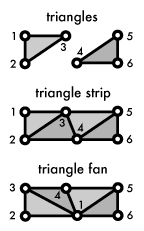
Project된 vertex를 가지고 GPU는 삼각형을 형성한다. 이 때 각 vertex는 3개씩 별도의 삼각형으로 만들어질 수도 있고, trinagle strip이나 triangle fan을 만들어 추가적인 삼각형에 대해 메모리를 아낄 수 있다.
Rasterization

Rasterizer는 각 삼각형에 대해 스크린 밖으로 나가는 부분을 자르고 버린 다음, visible한 부분들을 pixel sized fragments로 쪼갠다. 이 과정에서 vertex shader의 varying output 또한 각 삼각형의 래스터화 된 표면을 따라 보간된다.
Fragment Shader
Fragment shader는 rasterizer의 아웃풋을 받아 color와 depth value를 구한다. 이 값들은 framebuffer에서 그려지는데, 그려지는 모든 픽셀마다 shader가 돌아가므로 가장 정교한 효과를 줄 수 있지만, 동시에 성능에 가장 큰 영향을 미치는 부분이다.
#version 330 core

out vec4 FragColor;  // Output color variable

void main()
{
    FragColor = vec4(1.0, 0.0, 0.0, 1.0);  // Setting the color to red
}
Framebuffers, testing, and blending
Framebuffer는 rendering job의 마지막 종착지로 screen에 그려질 값들이 도달한다. modern OpenGL implementation은 추가적으로 Framebuffer Object를 직접 만들 수 있게 허용하는데, 이는 화면이 아니라 offscreen RenderBuffer나 Texture에 아웃풋을 그릴 수 있게 해 준다.
Framebuffer는 실제 이미지의 내용을 담는 color buffer뿐 아니라, 두개의 추가적인 버퍼를 담을 수 있다. 이 두 버퍼는 각 fragment가 그려질지 말지를 결정한다.
- Depth buffer: 이미 그려진 Fragment 뒤의 Fragment를 필터링한다.
- Setncil buffer: framebuffer의 drawable part를 제한한다.
이 두 buffer의 testing으로부터 살아남은 fragment만 그려지게 되고, 그려질 때에는 alpha blending이 사용된다.
