작성하기에 앞서, 이 포스팅은 Udemy "iOS & Swift - The Complete iOS App Development Bootcamp" 강의를 바탕으로 작성된 것이며 모든 내용의 저작권은 강의의 원작자인 Dr. Angela Yu 에게 있음을 밝힙니다.
지난 SwiftUI 에서의 MVVM 패턴에 대한 포스팅에서 디자인 패턴의 중요성과 사용해야 하는 이유, 그리고 디자인 패턴 중 MVVM 패턴에 대해 알아보았으며 실제 앱 프로젝트에 적용까지 해보았다.
이번에는, Swift(UIKit)에서 범용적으로 많이 쓰이는 MVC 디자인 패턴에 대해 알아보고 적용까지 해보려 한다.
디자인 패턴이 무엇이고 왜 사용해야 하는지에 대해서는 [SwiftUI] MVVM 패턴에 대해 포스팅을 참고바란다.
📌 MVC 디자인 패턴이란?
MVVM 디자인 패턴은 Model, View, View Model 로 구성이 되어 있었다.
그렇다면 MVC는 무엇일까?
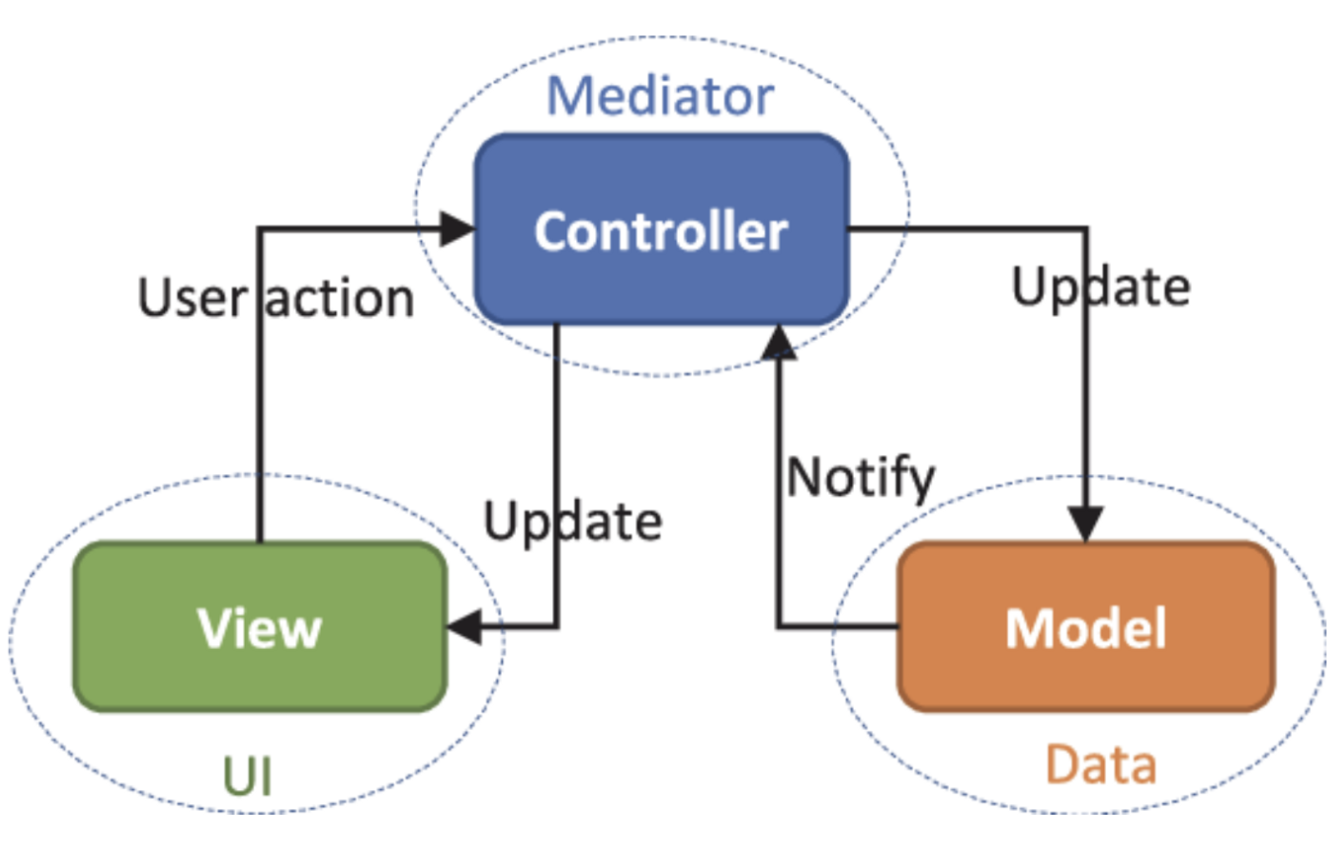
MVC는 Model, View, Controller로 구성이 된다.
MVC와 MVVM 패턴은 Model 과 View를 포함한다는 것에서는 공통점이 있지만, MVC 패턴은 View와 Model 사이의 의존성이 큰것에 비해 MVVM 패턴은 Command 패턴과 Data Binding 패턴을 이용해 그 의존성을 없앴다고 한다. (사실 이 부분에 대한 이해가 와닿지는 않는다.. 공부가 더 필요할듯)
어쨌든 각 요소의 역할을 간단하게 정리해보면, 다음과 같다.
Image Resource: https://medium.com/@rhodunda/mvc-design-pattern-fe76175a01de
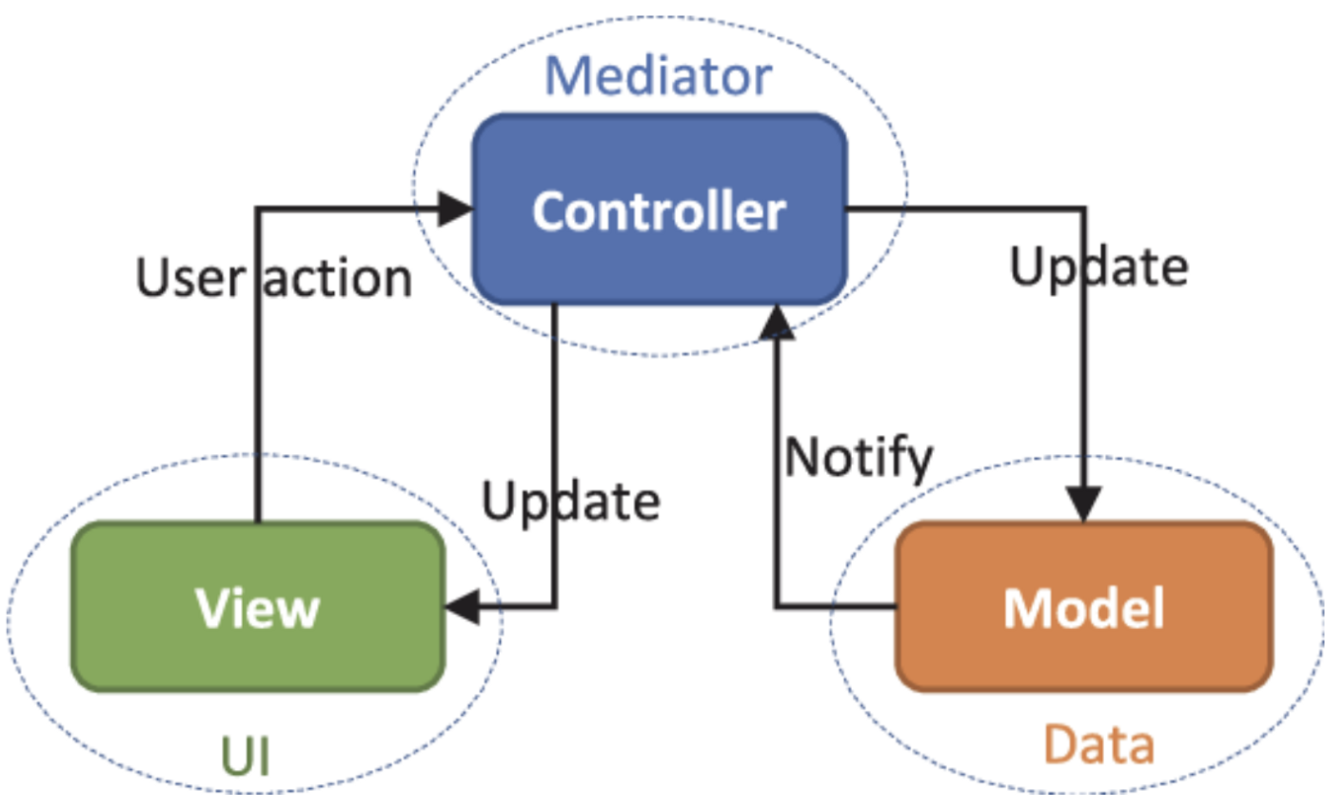
- Model: 앱에서 사용되는 데이터(Data)와 그 데이터를 처리하는 로직(Logic)을 포함
- View: 사용자에게 보여지는 화면(User Interface)을 구성
- Controller: View에서의 입력에 대해 Model의 Logic을 사용해 처리
그렇다면, 이를 실제로 코드에 적용해보도록 하자.
💻 MVC 패턴의 적용 - Quizzler
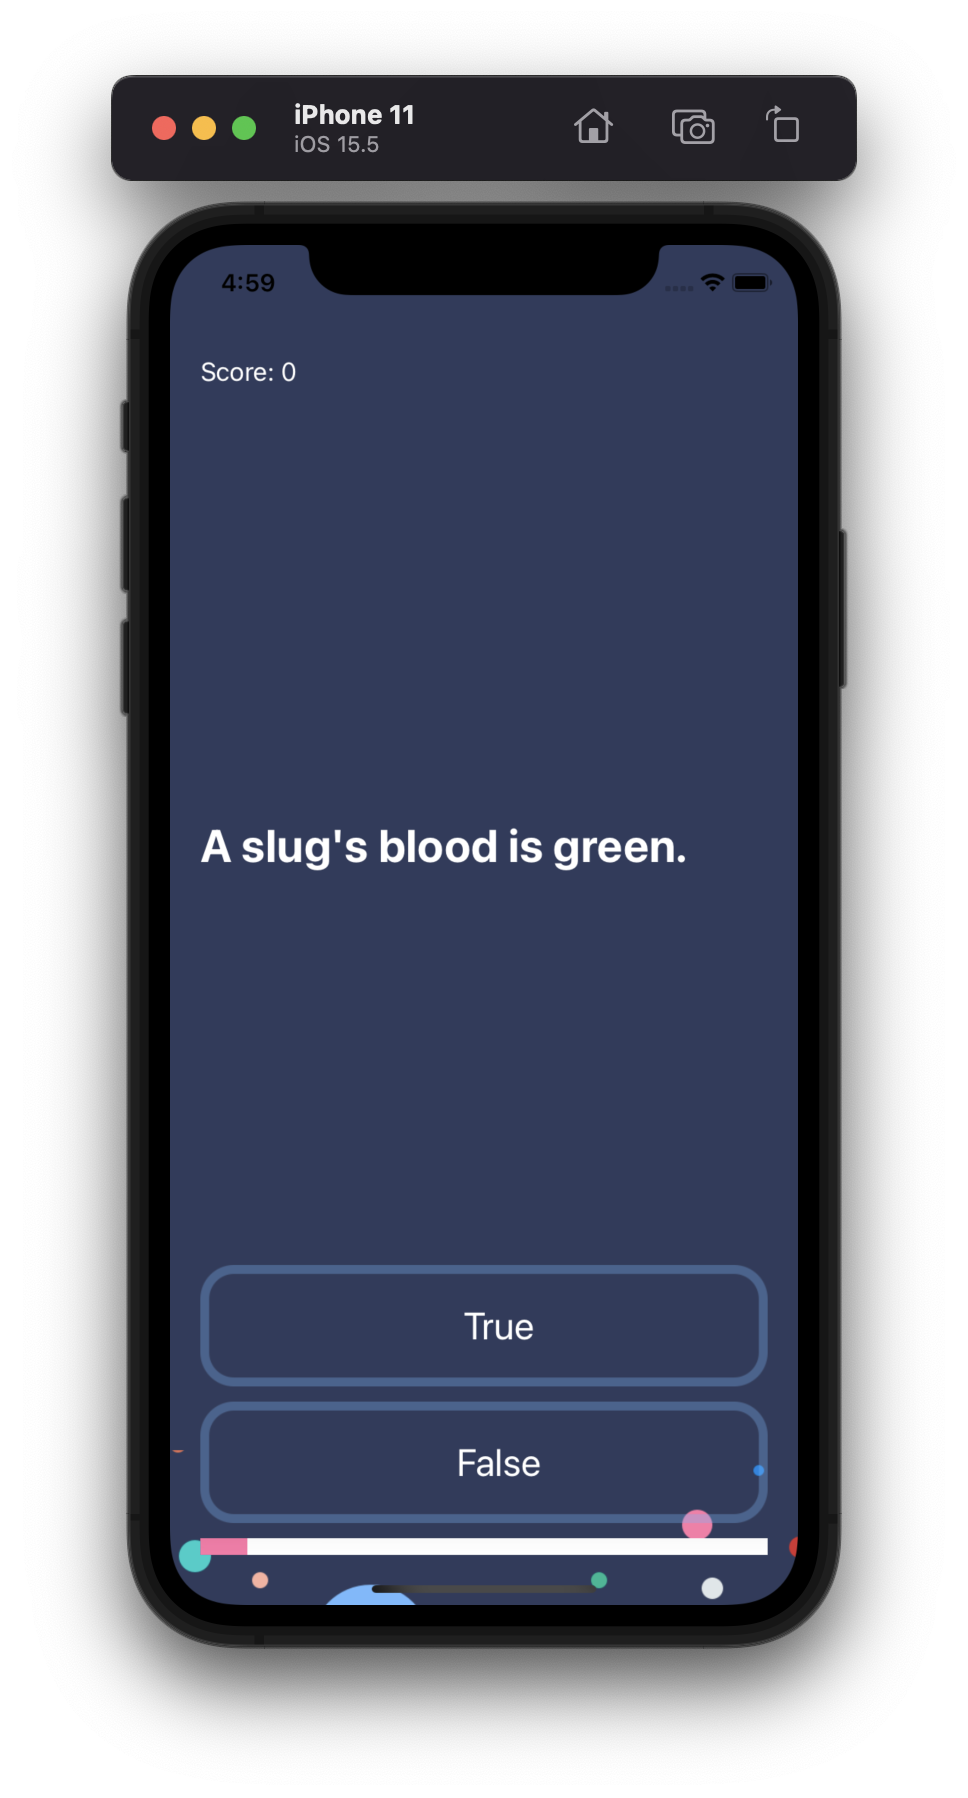
위와 같이, 간단한 True/False Quiz 앱을 MVC 패턴을 통해 구현해보자.
먼저, Model의 코드는 다음과 같다.
//  Copyright © 2022 The App Brewery. All rights reserved.
//

import Foundation

struct Question {

    let text: String
    let answer: String

    init(q: String, a: String) {
        text = q
        answer = a
    }

}

struct QuizBrain {

    let quiz = [
        Question(q: "A slug's blood is green.", a: "True"),
        Question(q: "Approximately one quarter of human bones are in the feet.", a: "True"),
        Question(q: "The total surface area of two human lungs is approximately 70 square metres.", a: "True"),
        Question(q: "In West Virginia, USA, if you accidentally hit an animal with your car, you are free to take it home to eat.", a: "True"),
        Question(q: "In London, UK, if you happen to die in the House of Parliament, you are technically entitled to a state funeral, because the building is considered too sacred a place.", a: "False"),
        Question(q: "It is illegal to pee in the Ocean in Portugal.", a: "True"),
        Question(q: "You can lead a cow down stairs but not up stairs.", a: "False"),
        Question(q: "Google was originally called 'Backrub'.", a: "True"),
        Question(q: "Buzz Aldrin's mother's maiden name was 'Moon'.", a: "True"),
        Question(q: "The loudest sound produced by any animal is 188 decibels. That animal is the African Elephant.", a: "False"),
        Question(q: "No piece of square dry paper can be folded in half more than 7 times.", a: "False"),
        Question(q: "Chocolate affects a dog's heart and nervous system; a few ounces are enough to kill a small dog.", a: "True")
    ]

    var questionNumber = 0
    var score = 0

    mutating func checkAnswer(_ userAnswer: String) -> Bool {

        var result: Bool

        if userAnswer == quiz[questionNumber].answer {
            result = true
            score += 1
        } else {
            result = false
        }

        return result
    }

    mutating func nextQuestion() {
        if questionNumber + 1 < quiz.count {
            questionNumber += 1
        } else {
            questionNumber = 0
            score = 0
        }
    }

    func getQuestionText() -> String {
        return quiz[questionNumber].text
    }

    func getProgress() -> Float {
        return Float(questionNumber + 1) / Float(quiz.count)
    }

    func getScore() -> Int {
    	return score
    }

}
코드를 보면 Question 구조체를 통해 문제와 답을 정의하고, 아래의 QuizBrain 구조체에 해당 Question의 데이터와 그 데이터들을 처리할 Logic 이 함수(메소드)로 정의되어 있는 것을 볼 수 있다.
다음으로, View는 Main.storyboard로 다음과 같이 정의된다.
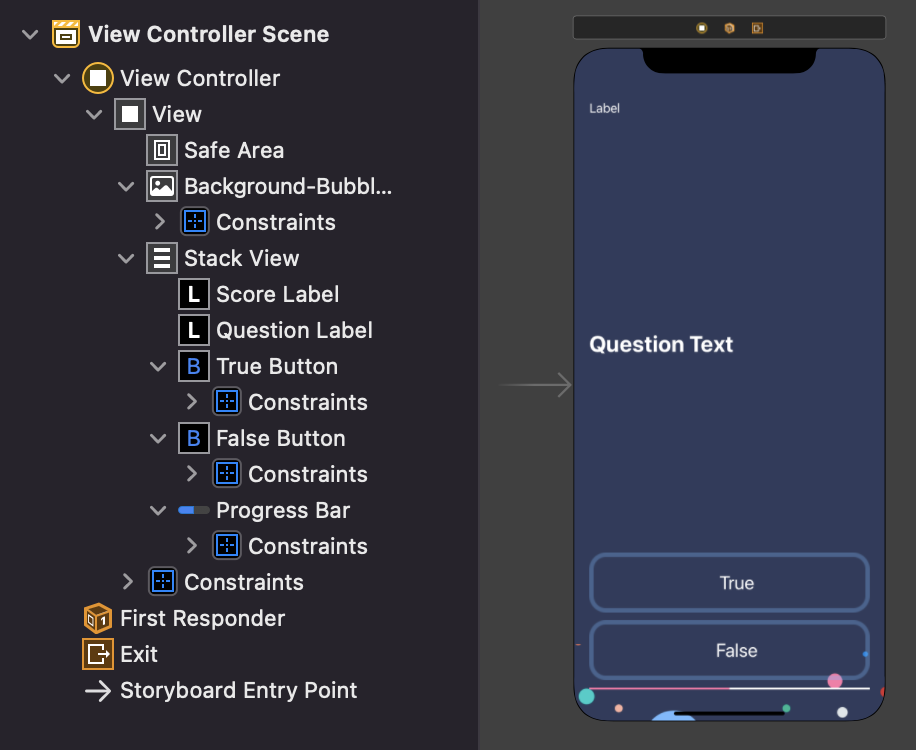
Vertical Stack View 안에 점수 Label과 Question Label, True/False Button, Progress Bar가 차례대로 위치해 있는 것을 볼 수 있다.
마지막으로, Controller의 코드를 보자.
//  Copyright © 2019 The App Brewery. All rights reserved.
//

import UIKit

class ViewController: UIViewController {

    @IBOutlet weak var scoreLabel: UILabel!
    @IBOutlet weak var questionLabel: UILabel!
    @IBOutlet weak var progressBar: UIProgressView!
    @IBOutlet weak var trueButton: UIButton!
    @IBOutlet weak var falseButton: UIButton!

    var quizBrain = QuizBrain()

    override func viewDidLoad() {
        super.viewDidLoad()

        updateUI()
    }

    @IBAction func answerButtonPressed(_ sender: UIButton) {

        let userAnswer = sender.currentTitle!

        sender.backgroundColor = quizBrain.checkAnswer(userAnswer) ? UIColor.green : UIColor.red

        quizBrain.nextQuestion()

        Timer.scheduledTimer(timeInterval: 0.2, target: self, selector: #selector(updateUI), userInfo: nil, repeats: false)
    }

    @objc func updateUI() {

        trueButton.backgroundColor = UIColor.clear
        falseButton.backgroundColor = UIColor.clear

        scoreLabel.text = "Score: \(quizBrain.getScore())"
        questionLabel.text = quizBrain.getQuestionText()
        progressBar.progress = quizBrain.getProgress()

    }
}
ViewController Class 안에는 View(Main.storyboard) 에서 정의된 컴포넌트들이 IBOutlet으로 연결되어 있고, Model(QuizBrain)을 정의하고 있다.
사용자가 True/False 버튼을 클릭하면 Model(QuizBrain) 내의 Logic(checkAnswer)을 사용하여 정답인지를 판별하고, 그 결과에 따라 View 내의 버튼의 색을 결정한다.
그 후 Logic(nextQuestion)을 사용하여 다음 문제로 Index를 넘긴 다음, View를 업데이트하는 Objective-C 함수(Timer를 위해)인 updateUI() 내에서 Model(QuizBrain)에서 제공하는 값들을 받아 화면(User Interface)을 재구성하고 업데이트하는 것을 확인할 수 있다.
📌 요약 & 마무리
Swift에서 가장 널리 쓰이는 디자인 패턴인 만큼, 여러 앱들에 적용해보며 익숙해져야 할 것 같다.
MVVM 패턴과 비교했을 때 체감상으로는 조금 더 직관적인 느낌이 있었는데, View를 가시적인 StoryBoard로 구성해서 그런것도 있었지만 무엇보다 MVVM 패턴 내의 View Model의 역할이 조금 어려워서 그랬던 것 같다.
디자인 패턴에 따라 앱을 설계하는 것이 여러가지 장점이 있지만, 무엇보다 이렇게 설계하는 것이 조금 체계적으로 느껴져서 그런지는 몰라도 "재미있다".
하나하나 알아가는 즐거움이 크다.
printf("Thank You!\n");
printf("Posted by Thirsty Developer\n");