socket.io 기본원리
소켓아이오는 이벤트를 기반으로 작동한다. 이벤트를
emit하거나listen할 수 있고, 소켓아이오에 이미 예약된 이벤트명들이 있는데,connection등이 있다.
구현할 내용
유튜브 영상을 클론코딩한 내용입니다.
- 유저가 이름과 room ID를 입력해 해당 룸으로 입장한다.
- 같은 룸에 있는 유저들끼리 채팅방에서 실시간 대화할 수 있다.
폴더구조
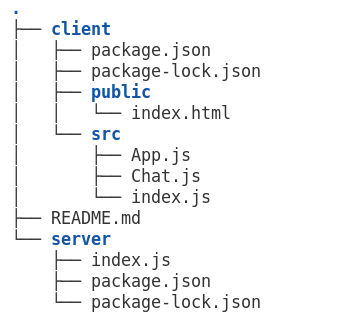
client
- npx create-react-app . (마지막 온점은 client 폴더 안에 리액트 앱을 만들겠다는 의미. 별도로 이름설정x)
- socket.io-client, react-scroll-to-bottom 설치하기
// client > src > App.js
import io from "socket.io-client"
import React, { useState } from "react";
const socket = io.connect("http://localhost:3001"); //프론트를 백과 연결하는 부분
function App(){
const [username, setUsername] = useState("");
const [room, setRoom] = useState("");
const [showChat, setShowChat] = useState(false);
const joinRoom = () => {
if(username !=="" && room!==""){
//첫번째 emit
socket.emit("join_room", room);
setShowChat(true);
}
}
return(
<div className="App">
{!showChat?
(<h3>Join A Chat</h3>
<input
type="text"
placeholder="your name..."
onChange={(e)=>{setUsername(e.target.value)}}
/>
<input
type="text"
placeholder="Room ID..."
onChange={(e)=>{setRoom(e.target.value)}}
/>
<button onClick={joinRoom}>Join A Room</button>)
:
(<Chat socket={socket} username={username} room={room}/>)}
</div>
)
}
export default App;
// client > src > Chat.js
import React, { useState, useEffect } from "react";
import ScrollToBottom from "react-scroll-to-bottom"
function Chat({socket, username, room}){
const [currentMessage, setCurrentMessage] = useState("");
const [messageList, setMessageList] = useState([]);
const sendMessage = async () => {
if(currentMessage!==""){
const messageData = {
room,
author: username,
message: currentMessage,
time: new Date(Date.now()).getHours()+":"+new Date(Date.now()).getMinutes()
};
await socket.emit("send_message", messageData);
setMessageList((list)=>[...list, messageData]);
setCurrentMessage("");
}
}
useEffect(()=>{
socket.on("receive_message", (data)=>{
setMessageList((list)=>[...list, data]);
});
}, [socket])
return(
<div className="chat-window">
<div className="chat-header">
<p>Live Chat</p>
</div>
<div className="chat-body">
<ScrollToBottom className="message-container">
{messageList.map((messageContent)=>{
return (
<div className="message" id={username===messageContent.author ? "you" : "other"}>
<div>
<div className="message-content">
<p>{messageContent.message}</p>
</div>
<div className="message-meta">
<p id="time">{messageContent.time}</p>
<p id="author">{messageContent.author}</p>
</div>
</div>
</div>
)
})}
<ScrollToBottom>
</div>
<div className="chat-footer">
<input
type="text"
value={currentMessage} //메시지 전송 후 currentMessage==="". 따라서 상태와 벨류를 일치시켜줄 수 있음.
placeholder="Hey..."
onChange={(e)=>{setCurrentMessage(e.target.value)}}
onKeyPress={(e)=>{e.key ==="Enter" && sendMessage()}}
/>
<button onClick={sendMessage}>►</button>
</div>
</div>
)
}
export default Chat;server
- express, cors, nodemon, socket.io 설치하기
//server > index.js
const express = require("express");
const app = express();
const http = require("http");
const cors = require("cors");
const { Server } = require("socket.io");
app.use(cors());

const server = http.createServer(app);
const io = new Server(server, {
  cors: {
    origin: "http://localhost:3000", //백을 프론트와 연결하는 부분
    method: ["GET", "POST"]
});

io.on("connection", (socket)=>{
  //유저를 특정 룸에 조인시키기
  socket.on("join_room", (data)=>{
    socket.join(data);
  })
  //메시지를 받아 특정 룸에 메시지 전송하기
  socket.on("send_message", (data)=>{
    socket.to(data.room).emit("receive_message"
  });
  socket.on("disconnect", ()=>{
    console.log("User Disconnected", socket.id)
  });
});

server.listen(3001, ()=>{
  console.log("SERVER RUNNING");
})
이번 프로젝트에서는 프론트 팀원과 함께 구현을 하다보니, socket.io를 사용한 서버 부분만 구현하면 되지만 socket.io-client 부분에 대한 이해도 필요해 본격적인 프로젝트의 채팅기능 구현에 앞서 클론코딩을 해보게 되었다. 그동안은 공식문서 위주로 socket.io 공부를 했는데, 클론코딩을 해보면서 전체적인 흐름을 이해할 수 있어서 도움이 많이 됐다😇

어제보다 나은 오늘을 만드는 중