
Redux 설치
자! redux를 설치 해보자
redux설치 방법은 공식 홈페이지에 자세히 나와있다.
설치
npm install redux
와우 쉽구만!
Redux 사용법
html은 이전 포스팅과 동일하다
ts가 다른데 같이 한번 확인해보자
import { createStore } from "redux";

const add = document.getElementById("add");
const minus = document.getElementById("minus");
const number = document.querySelector("span");Redux는 상태 컨테이너라고 했다! 컨테이너 만들어보자!
createStore() 를 만들면 되고 파라미터 로는 reducer라는 것을 넣어주면 된다.
자 그러면 둘다 만들어보자
import { createStore } from "redux";

const add = document.getElementById("add");
const minus = document.getElementById("minus");
const number = document.querySelector("span");

const reducer = () => {console.log("reducer")};
const countStore = createstore(reducer);
이렇게 하면 결과가 어떻게 나올까?
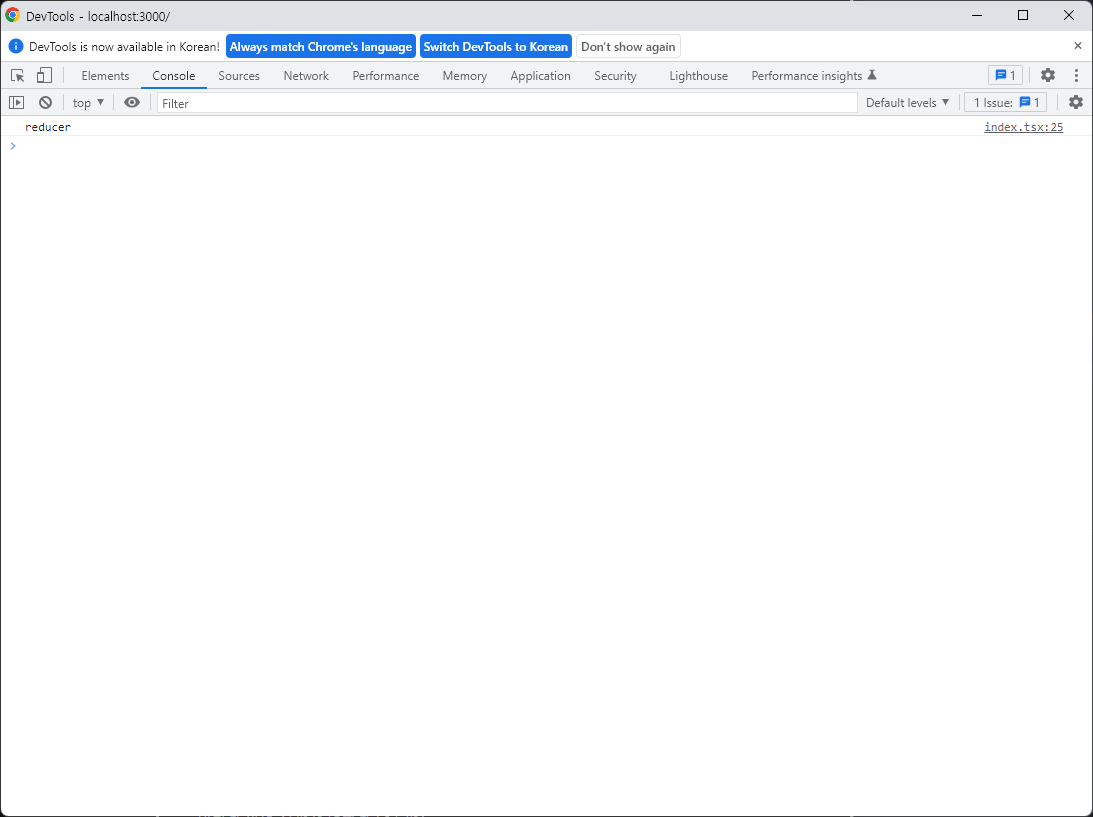
reducer가 나온다.!
countStore를 콘솔로 찍어보면 뭐가 나올까?
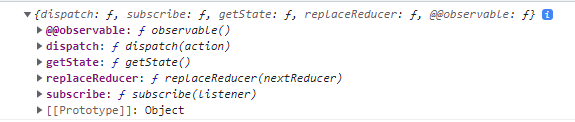
- observable
- 비동기 처리할 때 사용한다.
- dispatch
- reducer에서 데이터를 변경하는 조건을 넘겨줄 때 사용
- getState
- reducer에서 변경된 값을 가져올 때 사용
- replaceReducer
- createReducer안의 reducer를 새로운 reducer로 변경한다.
- subscribe
- reducer의 상태가 변경되면 값을 가지고 온다.
일단 observable은 패스하도록 하겠다!
getState 와 replaceReducer
일단 getState와 replaceReducer에 대해서 알아보자
import { createStore } from "redux";

const add = document.getElementById("add");
const minus = document.getElementById("minus");
const number = document.querySelector("span");

const reducer = () => {
  return `hello`;
};
const nextReducer = () => {
  return `bye`;
};

const countStore = createstore(reducer);

console.log(countStore.getState()); //getState사용
countStore.replaceReducer(nextReducer); //replaceReducer사용
console.log(countStore.getState());
결과 확인
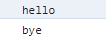
hello와 bye가 나오는 것을 확인 할 수 있다. replaceReducer로 수정했기 때문이다.
dispatch
dispatch를 사용해보자
reducer는
두개의 인자가 필요하다 하나의 인자만 넣어도 상태 컨테이너에 값이 들어가지만, 상황에 따른 값을 변경하려면 Action이라는 것을 꼭 parameter에 넣어줘야 한다.!
import { createStore } from "redux";
const add = document.getElementById("add");
const minus = document.getElementById("minus");
const number = document.querySelector("span");
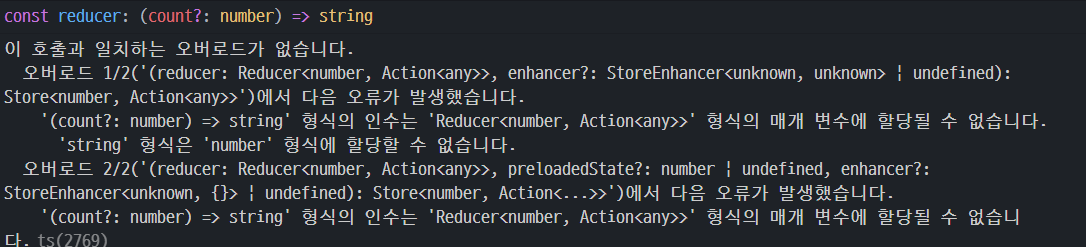
const reducer = (count = 0, action) => {
return count;
};
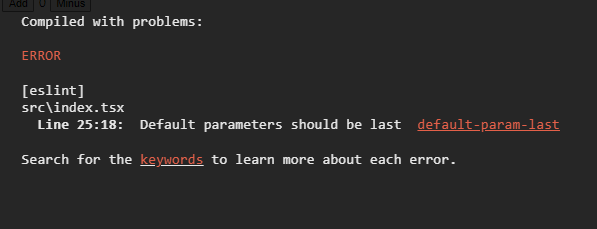
const countStore = createstore(reducer);일반 js면 위 코드와 같은 경우 오류가 나지 않는다. 하지만 나는 Typescript를 사용했고 거기에 eslint 까지 적용해서 진행하고 있었다 화려한 빨간 지옥에 빠져버렸다. 아래처럼...

첫번째 오류는 ESLint에서는 기본 값이 있는 파라미터는 항상 마지막에 와야 한다!라는 규칙이 있는듯 하다
하지만 위에 처럼 count=0를 맨뒤로 가져올 때 여러문제점이 생긴다. reducer의 파라미터는 (state, Action)으로 구성되있기 때문에! 어떻게 해결 할까 하고 Stackoverflow를 보던 중 Action parameter에도 = {} 의 빈 파라미터 값을 주라는 이야기를 보았다. 바로 적용해보자!
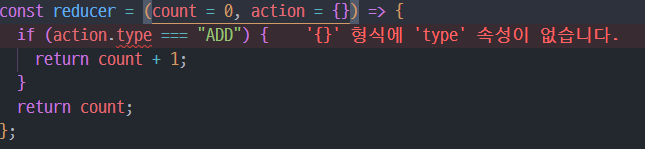
oh my~ 이번엔 type 속성이 없다고 하길래 속성을 넣어줫다!
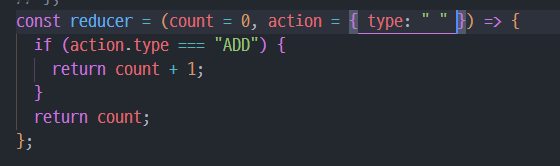
깔끔하게 해결되었다.
자 이제 dispatch를 테스트 해보자!
import { createStore } from "redux";

const add = document.getElementById("add");
const minus = document.getElementById("minus");
const number = document.querySelector("span");

const reducer = (count = 0, action = {type:" "}) => {
  if (action.type === "ADD") {
    return count + 1;
  }
  return count;
};

const countStore = createstore(reducer);

countStore.dispatch({type:"ADD"});
console.log(countStore.getState());
한다면 값은! 1이 나올 것이다.
앞에 포스팅 처럼 이제 우리는 값이 변화하는 버튼을 만들 수 있다.!
만들어보자!
import { createStore } from "redux";

const add = document.getElementById("add");
const minus = document.getElementById("minus");
const number = document.querySelector("span");

const countModifier = (count = 0, action = { type: "" }) => {
  // 1.2 강의
  switch (action.type) {
    case ADD:
      return count + 1;
    case MINUS:
      return count - 1;
    default:
      return count;
  }
};

const countStore = createstore(countModifier);
console.log(countStore.getState());

if (add instanceof HTMLButtonElement) {
  add.addEventListener("click", () => countStore.dispatch({ type: ADD }));
}
if (minus instanceof HTMLButtonElement) {
  minus.addEventListener("click", () => countStore.dispatch({ type: MINUS }));
}
이제 버튼을 클릭할 때마다 count의 값이 변경 될것이다. 하지만 이러면 이전 포스팅처럼 화면에 값은 변경되지 않을 것이다. 이때 사용하는게 state를 추적하는 subscribe이다.
subscribe
사용방법 countStore.subscribe()로 사용할 수 있는데 괄호안에 반드시 값을 집어넣야한다. subscribe의 argument로는 state가 변경될 때마다 실행할 함수를 입력해주면 된다!
자 그럼 수정된 소스코드를 보자!
import { createStore } from "redux";

const add = document.getElementById("add");
const minus = document.getElementById("minus");
const number = document.querySelector("span");

if (number instanceof HTMLSpanElement) {
  number.innerText = `0`;
}

const countModifier = (count = 0, action = { type: "" }) => {
  // 1.2 강의
  switch (action.type) {
    case ADD:
      return count + 1;
    case MINUS:
      return count - 1;
    default:
      return count;
  }
};

const countStore = createstore(countModifier);

const onChange = (): void => {
  if (number instanceof HTMLSpanElement) {
    number.innerText = `${countStore.getState()}`;
  }
};
countStore.subscribe(onChange);

if (add instanceof HTMLButtonElement) {
  add.addEventListener("click", () => countStore.dispatch({ type: ADD }));
}
if (minus instanceof HTMLButtonElement) {
  minus.addEventListener("click", () => countStore.dispatch({ type: MINUS }));
}
넘버 안의 값을 0으로 초기화 해주었다. 후후후 이제 정상적으로 add버튼 minus버튼을 클릭하면 정상적으로 작동 할 수 있다.
결론
Redux의 createState는 크게 4가지의 함수를 가지고 있으며, store를 만들때는 꼭 reducer를 만들어서 만들어주자! 4가지의 함수 잘 기억해서 사용하자,, !
참조