학습한 내용
CSS 가상 선택자
- 선택한 요소에 행동과 규칙에 의해서 디자인을 적용하는 방식
a태그에서는link로 기본 색상 변경,active로 클릭 된 색상 변경,hover로 커서 활성화 상태 색상 변경
HTML 문서
<body>
	<a href="https://www.naver.com">네이버</a>
</body>
CSS 문서
a:link {
	color: red;
}

a:active {
	color: blue;
}

a:hover {
	color: pink;
}
input태그에서는focus로 글 활성화 상태 테두리 변경
HTML 문서
<body>
	<input type="text">
</body>
CSS 문서
input:focus {
	border:  solid 10px red;
}
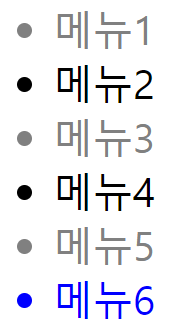
first-child로 첫번째 태그 변경,last-child로 마지막 태그 변경nth-child(n)로 n번째 태그 변경,
홀수 변경은nth-child(2n-1)짝수 변경은nth-child(2n)
HTML 문서
<body>
	<ul>
		<li>메뉴1</li>
		<li>메뉴2</li>
		<li>메뉴3</li>
		<li>메뉴4</li>
		<li>메뉴5</li>
		<li>메뉴6</li>
	</ul>
</body>
CSS 문서
li:first-child {
	color: red;
}

li:last-child {
	color: blue;
}

li:nth-child(2) {
	color: gray;
}
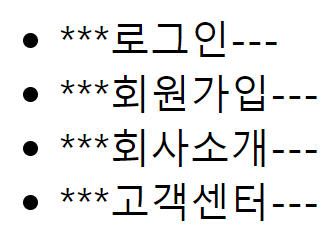
- 글자와 태그 사이 디자인은
before,
글자와 닫힌 태그 사이 디자인은after
HTML 문서
<body>
	<ul>
		<li>로그인</li>
		<li>회원가입</li>
		<li>회사소개</li>
		<li>고객센터</li>
	</ul>
</body>
CSS 문서
li:before {
	content: "***";
}

li:after {
	content: "---";
}
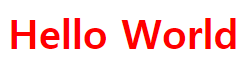
프로젝트 폴더 설정
- 웹페이지에는 많은 이미지 등이 들어가기 때문에, 파일들을 폴더로 구분해야함
- CSS 문서는 index.html 파일을 기준으로, 경로를 폴더명/파일명.확장자 로 지정
HTML 문서
<head>
	<meta charset="utf-8">
	<link rel="stylesheet" type="text/css" href="css/style.css">
</head>
<body>
	<h1>Hello World</h1>
</body>
CSS 문서
h1 {
	color: red;
}
- 이미지 파일을 CSS 문서에서 넣을 때는, 경로가 CSS 폴더 기준에서 시작되기 때문에,
../라는 경로를 넣어야 폴더 밖으로 나와짐 img태그를 쓸 때는 그대로 index.html 파일 기준
HTML 문서
<body>
	<div></div>
	<img src="img/icon.png">
</body>
CSS 문서
div {
	width: 300px;
	height: 300px;
	background-image: url(../img/icon.png);
}
호스팅 방법
- 유료 사이트나, '닷홈(dothome)' 과 같이 무료 호스팅 사이트를 이용해서 웹사이트 설정
- FTP 설정을 위해, '파일질라' 같은 프로그램 등을 이용
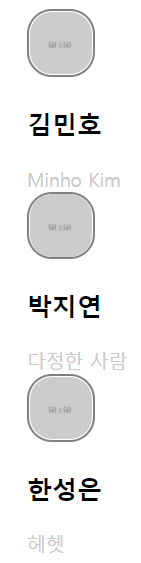
실습 1 - 카카오톡 친구 리스트 디자인
- 디자인 적용이 안 될때는, 브라우저 검사 기능을 이용해서 확인하면 좋음
HTML 문서
<!DOCTYPE html>
<html>
<head>
	<meta charset="utf-8">
	<link rel="stylesheet" type="text/css" href="css/style.css">
</head>
<body>
	<ul class="friends-lists">
		<li class="friends-list">
			<a href="#">
				<img src="https://via.placeholder.com/50" class="friend-thumbnail">

				<div class="friend-info">
					<h3 class="friend-name">김민호</h3>
					<span class="friend-intro">Minho Kim</span>
				</div>
			</a>
		</li>

		<li class="friends-list">
			<a href="#">
				<img src="https://via.placeholder.com/50" class="friend-thumbnail">

				<div class="friend-info">
					<h3 class="friend-name">박지연</h3>
					<span class="friend-intro">다정한 사람</span>
				</div>
			</a>
		</li>

		<li class="friends-list">
			<a href="#">
				<img src="https://via.placeholder.com/50" class="friend-thumbnail">

				<div class="friend-info">
					<h3 class="friend-name">한성은</h3>
					<span class="friend-intro">헤헷</span>
				</div>
			</a>
		</li>
	</ul>
</body>
</html>
CSS 문서
.friends-lists {
	list-style: none;
}

.friends-lists .friends-list a {
	color: #000000;
	text-decoration: none;
}

.friends-lists .friends-list a .friend-thumbnail {
	border: solid 2px gray;
	border-radius: 20px;
}

.friends-lists .friends-list a .friend-info .friend-name {
	font-size: 20px;
	color: #000000;
}

.friends-lists .friends-list a .friend-info .friend-intro {
	font-size: 15px;
	color: #c8c8c8;
}
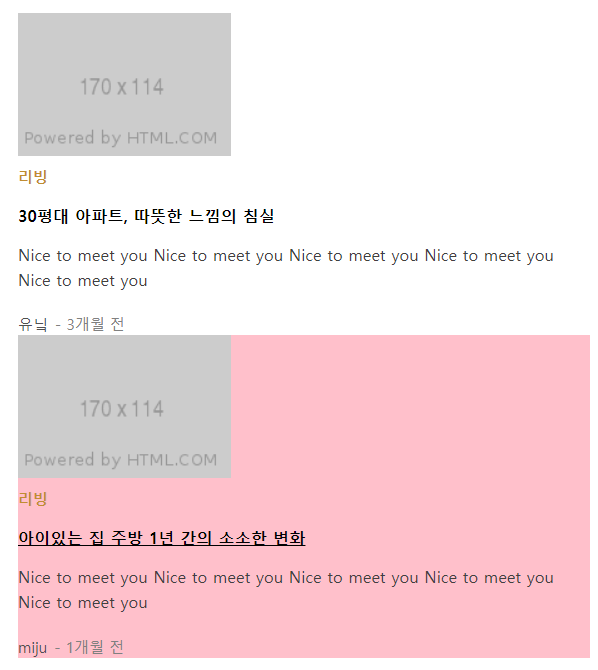
실습 2 - 네이버 홈페이지 UI 디자인
- 줄 간 높이는
line-height을 사용하여 적용
HTML 문서
<!DOCTYPE html>
<html>
<head>
	<meta charset="utf-8">
	<link rel="stylesheet" type="text/css" href="css/style.css">
</head>
<body>
	<ul class="living-lists">
		<li class="living-item">
			<a href="#">
				<img src="https://via.placeholder.com/170x114" class="living-thumbnail">
				<div class="living-info">
					<span class="type">리빙</span>
					<h3 class="title">30평대 아파트, 따뜻한 느낌의 침실</h3>
					<p class="paragraph">Nice to meet you Nice to meet you Nice to meet you Nice to meet you Nice to meet you</p>

					<div class="date-wrap">
						<span class="source">유닠</span>
						<span class="date">3개월 전</span>
					</div>
				</div>
			</a>
		</li>

		<li class="living-item">
			<a href="#">
				<img src="https://via.placeholder.com/170x114" class="living-thumbnail">
				<div class="living-info">
					<span class="type">리빙</span>
					<h3 class="title">아이있는 집 주방 1년 간의 소소한 변화</h3>
					<p class="paragraph">Nice to meet you Nice to meet you Nice to meet you Nice to meet you Nice to meet you</p>

					<div class="date-wrap">
						<span class="source">miju</span>
						<span class="date">1개월 전</span>
					</div>
				</div>
			</a>
		</li>
	</ul>
</body>
</html>
CSS 문서
.living-lists {
	list-style: none;
}

.living-lists .living-item a {
	color: #000000;
	text-decoration: none;
}

.living-lists .living-item .living-info .type {
	color: #c08d31;
	font-weight: 700;
	font-size: 12px;
}

.living-lists .living-item .living-info .title {
	font-size: 13px;
	color: #000000;
}

.living-lists .living-item .living-info .paragraph {
	font-size: 13px;
	color: #404040;
	line-height: 20px;
}

.living-lists .living-item .living-info .date-wrap .source,
.living-lists .living-item .living-info .date-wrap .date {
	font-size: 12px;
	color: #505050;
}

.living-lists .living-item .living-info .date-wrap .date {
	color: gray;
}

.living-lists .living-item .living-info .date-wrap .date:before {
	content: '- ';
}

.living-lists .living-item:hover {
	background-color: pink;
}

.living-lists .living-item a:hover .living-info .title {
	text-decoration: underline;
}
학습한 내용 중 어려웠던 점 또는 해결못한 것들
- 저번 시간에 배웠던 선택자와 가상 선택자의 차이점이 어떤것인지 조금 더 찾아봐야겠음.
해결방법
- 인터넷 검색을 통해, 저번에 배운 여러 선택자들은 일반적으로 바로 스타일을 적용하는 방식이라는 것을 알았고, 오늘 배운 가상 선택자는 어떤 행위를 하거나, 특정한 순서나 규칙을 통해 CSS문법이 적용되는 스타일이라는 것을 알게 되었다.
학습 소감
- 오늘은 크롬 브라우저 검사 기능을 통해 그 웹사이트에서 쓰여진 스타일을 보는 방법을 배웠는데, 보는 방법이 아직 익숙치 않아 웹서핑 중에도 웹사이트를 방문할 때 검사 기능을 자주 써보면 좋을듯함

안녕하세요. 맡은 업무를 확실하게 수행하는 웹 개발자가 되기 위하여 끊임없이 학습에 정진하겠습니다.