Redux 가 뭡니까?😀
- 리액트 또는 Vue 이전의 프론트엔드에서의 상태관리는 완전히 DOM 으로만 상태관리를 다루었음(document.getElementById 또는 jQuery)
- 해당하는 DOM 노드에 입력된 정보가 유일한 값이라 처리할때마다 자바스크립트를 이용하여 DOM 에 직접 접근하여 값을 얻었음 -> 이런방식으로 데이터를 얻을 때마다 쉼 없이 변하는 DOM 구조를 항상 파악하면서 구현해야하는 부담을 갖게됨 -> jQuery 를 이용하여 구현을 쉽게 할 수는 있었으나 상태관리 관점에서는 무력했으며 애플리케이션이 복잡해짐과 동시에 구현난이도가 급상승
<input id="input-text-form" type="text" value="value" />


// in js
var textFormValue = document.getElementById('input-text-form').value;

규모가 커지면서 저러한 반복되는 코드들이 점점 늘어나고
만약에 라디오버튼 및 체크박스를 처리한다면? 매번 엘리먼트를 조회하고 체크가 되어있는지 해당 라디오가 선택되어있는지 검사를 해야한다.

그리고 이 값들을 통해 어디에 값을 조회하고 DOM 을 변경하고 한다면..?
생각만해도 복잡해지지 않을까?
- 이러한 문제를 극복하고자 프론트엔드에서도 MVC 패턴을 사용 -> 그런데 이게 처음에는 좋았으나 규모가 커짐에 따라 독이되어버림
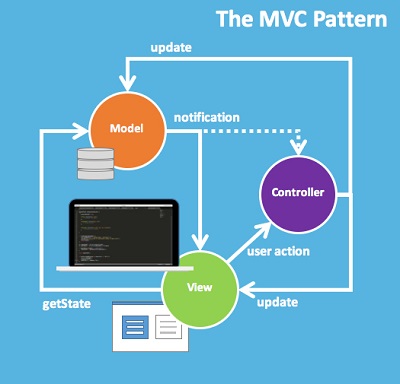
- MVC 패턴을 프론트엔드에 녹이면서 이전에 과정하나하나 구현하는 부분이 줄어들고 역할이 명확해져 좋았으나, 양방향(Two-way Binding) 사고방식을 적용해서 독이되어버림.

- View 에서 사용자가 액션을 취하면 해당 액션이 컨트롤러에게 전달
- 해당 액션을 컨트롤러가 취해서 Model 에게 전달
- Model 은 해당하는 액션에 대한 로직 처리 및 data 를 업데이트
- Model 이 처리가 완료되면 컨트롤러에게 결과를 전달 컨트롤러는 전달된 결과를 View에 전달
- Model 은 처리가 완료되면 View 에게 결과를 전달 (Model 과 View 동기화)

-> 결과는 양방향 바인딩으로 인해 데이터가 어떻게 변경이 되었는가를 알기 어렵고 규모가 큰 애플리케이션에서는 Model 전부를 제어하는것이 어려움이 문제가 되었습니다. (구조도 복잡해집니다. + 만약 이를 줄이고자 하나의 Model 로 제어를 하면 단일책임원칙 위배 및 모델이 너무 커집니다)
- 이러한 문제들에 이의있소!🤔하고 등장한 개념이 FLUX 다
FLUX 는 데이터 흐름이 단방향이다. -> View 즉 UI는 데이터를 전달받기만 해도 충분하며 데이터 내용에 따라 표현이 달라지면 된다.
- 양방향 바인딩과는 다르게 View 쪽에서 변경이 일어나면 직접 Model 과 동기화를 하는게 아닌 액션을 일으켜 Model 을 업데이트 하고 업데이트 된 Model 을 View 쪽에서 받는다.

- Action 을 일으키면 Dispatcher 는 Action 을 감지하여 Store 안의 데이터를 업데이트함
- Store 가 업데이트 되면 View 는 최신 데이터를 이용하여 다시 화면에 표시
- 이 구조의 우수한 점은 흐름이 한방향이라 추적이 쉽고, 요소 각각이 담당하는 역할이 단순하다
자 이제 먼길을 왔다.. 그래서 Redux 가 뭘까요?
- 리덕스는 FLUX 를 기반으로 한 단일 방향 데이터 흐름으로 상태를 관리하는 라이브러리 입니다.
Redux 3원칙
- Single source of truth : 믿을 수 있는 단일 소스
- State is read-only : 상태는 읽기전용
- Changes are made with pure functions : 순수함수를 이용하여 변화를 수행
이 항목들에 대한 자세한 내용은 다루지 않겠다😷
Redux 구현
- npm i -S redux react-redux
- Action 정의
export const addTodo = () = ({
	type : 'ADD_TODO',
    payload : payload
})

// type 을 상수처럼 선언

const ADD_TODO = 'ADD_TODO';
export const addTodoAction = () = ({
	type : ADD_TODO,
    payload : payload
})

- addTodoAction 함수 역할은 그저 Action 에 해당하는 객체를 생성
-
Action 은 상태를 업데이트하는 유일한 방법이다. 업데이트 의도를 나타내므로 type 속성을 가진다. 단순 객체이므로 type 은 일반적인 문자열로 정의
전달할 데이터는 상태 업데이트에 필요한 것으로만 한정 하는 것이 정석 -
Action 을 전달하려면 dispatch() 를 사용
- Reducer 정의
const initialState = {
	text : null
}

function addTodo(state = initialState, action) {

    return state;
}
- Reducer 는 Action 에 따라 어떤 상태 변화를 할 것이가를 지정
- 전달된 현재의 상태와 Action 을 이용하여 새로운 상태를 만들어냄
- 기존 state 를 사용하여 새로운 state 를 준비
const initialState = {
	text : null
}

export default function addTodo(state = initialState, action) {

    switch(action.type) {

    case 'ADD_TODO' :
    	return {
        	...state
        }
    default :
    	return state;

    }

}
- combine reducer
import { combineReducers } from 'react-redux';
import addTodo from './todoModule/index.js';

export default combineReducers({
    addTodo : addTodo
});
- combineReducers() 를 통해 여러 reducer 들을 하나의 객체로 만든다.
- create store
import {createStore} from 'redux';
import reducers from './combineReducers'

const store = createStore(reducers);
- redux 는 스토어를 무조건 1개만 생성이 가능하고, 모듈로서 분리를 하고싶다면 reducer 를 여러개로 만들어 이를 실현한다.
Redux 예제코드 살펴보기
- 참고로 CRA 를 이용해서 초기 프로젝트를 구성
- npx create-react-app
- npm i -S redux react-redux
// package.json

  {
  "name": "react-redux-example",
  "version": "0.1.0",
  "private": true,
  "dependencies": {
    "@testing-library/jest-dom": "^4.2.4",
    "@testing-library/react": "^9.5.0",
    "@testing-library/user-event": "^7.2.1",
    "react": "^16.13.1",
    "react-dom": "^16.13.1",
    "react-redux": "^7.2.0",
    "react-scripts": "3.4.1",
    "redux": "^4.0.5"
  },
  "scripts": {
    "start": "react-scripts start",
    "build": "react-scripts build",
    "test": "react-scripts test",
    "eject": "react-scripts eject"
  },
  "eslintConfig": {
    "extends": "react-app"
  },
  "browserslist": {
    "production": [
      ">0.2%",
      "not dead",
      "not op_mini all"
    ],
    "development": [
      "last 1 chrome version",
      "last 1 firefox version",
      "last 1 safari version"
    ]
  }
}
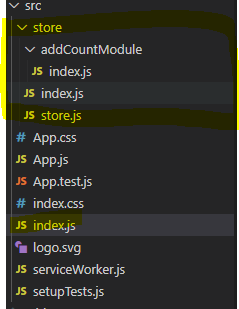
- 프로젝트 redux 구조

다른분들 코드를 살펴보면👩💻 액션과 리듀서도 분리가 되어있지만, 저는 한 모듈에있는걸 선호
// /store/addCountModule/index.js

// action type
const ADD_COUNT = 'ADD_COUNT';

// action function
export const addCountAction = () => ({
    type: ADD_COUNT
})

// state
const initialState = {
    number: 0
};

// reducer
export default function addCount(state = initialState, action) {

    switch (action.type) {

        case ADD_COUNT:
            return {
                number: state.number + 1
            }

        default:
            return state;
    }

}
// /store/index.js
import { combineReducers } from 'redux';
import addCount from './addCountModule/index';
export default combineReducers({
addCount : addCount
})
// /store/store.js

import { createStore } from 'redux';
import reducers from './index';
const store = createStore(reducers);

export default store
// /src/index.js

import React from 'react';
import ReactDOM from 'react-dom';
import './index.css';
import App from './App';

// store
import store from './store/store';
import { Provider } from 'react-redux';

ReactDOM.render(
  <React.StrictMode>
    <Provider store={store}>
      <App />
    </Provider>
  </React.StrictMode>,
  document.getElementById('root')
);
<Provider></Provider>를 이용하여 생성한 store 를 연결해준다.
아 이제 설정 끝났다.. 그럼 어떻게 사용? 👨🏫
// app.js

import React from 'react';
import { useSelector, useDispatch } from 'react-redux';
import { addCountAction } from './store/addCountModule/index';

function App() {

  const dispatch = useDispatch();
  const number = useSelector((store) => store.addCount.number);

  const addNumber = () => {
    dispatch(addCountAction());
  }

  return (
    <div>
      redux test
      <p>
        {number}
      </p>
      <button onClick={addNumber}>add number</button>
    </div>
  );
}

export default App;
- useSelector, useDispatch 훅을 이용
- dispatch 시 이용할 action 함수를 import
- dispatch 과 일어나서 store 가 업데이트가 되면 useSelector 가 해당 상태를 업데이트 후 화면에 다시 표시해준다😻

현재 Velog 는 운영하지 않습니다 :) 가끔 와서 눈팅