이번 실습은 컨테이너 이미지를 활용하여 AWS Lambda에 샘플 애플리케이션을 배포하려고합니다.
AWS Cloud9을 클라우드 기반 통합 개발 환경(IDE)으로 사용하여 샘플 애플리케이션을 생성하고, 로컬에서 테스트하고, 컨테이너 이미지를 Amazon Elastic Container Registry(Amazon ECR)에 업로드한 다음, 마지막으로 AWS Serverless Application Model(SAM)을 사용하여 AWS Lambda에 배포하고자합니다.
1. Cloud 9 시작
✅ Cloud9이란?
AWS Cloud9은 브라우저 기반의 통합 개발 환경(IDE)입니다.
개발자가 EC2 인스턴스 위에 설치된 환경에서 직접 코드를 작성하고, 터미널 명령어를 실행하고, 디버깅까지 가능하게 해줍니다.
기본적으로 EC2 인스턴스를 생성해서 거기에 IDE와 쉘(SSH)이 연결됩니다.
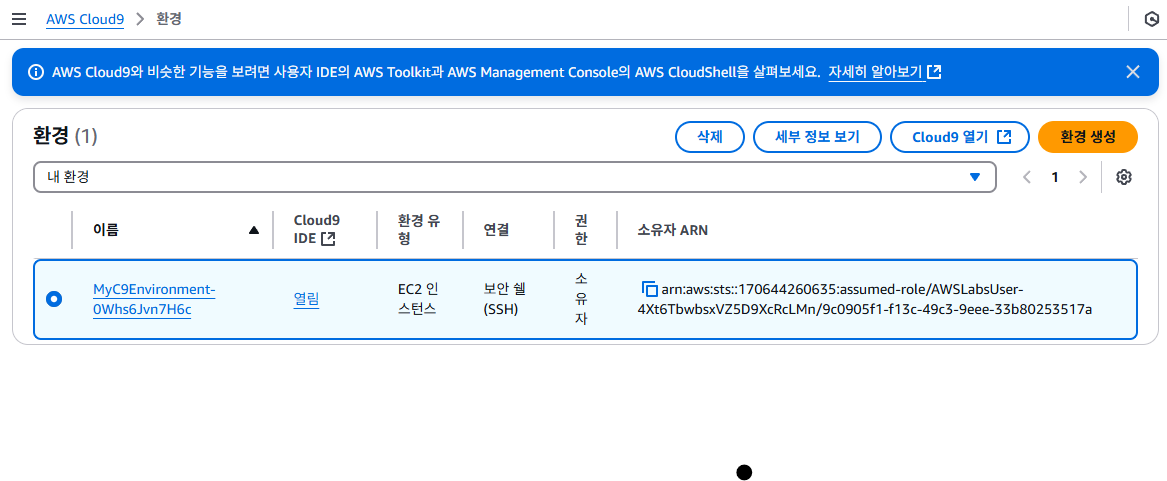
📌 지금 화면의 구성 해설:
환경 이름: MyC9Environment-OWhs6Jvn7H6c → 사용자가 만든 Cloud9 개발 환경
환경 유형: EC2 인스턴스 → Cloud9이 EC2 위에 설치됨
연결 방식: 보안 셸(SSH) → 내부적으로 SSH를 통해 EC2 인스턴스에 접속
권한: 소유자 → 이 환경을 만든 사용자
Cloud9 IDE 열기 버튼 → 클릭하면 IDE가 열림 (코딩, 명령어 입력 가능)
열림 = open을 누르게되면 밑에 사진과 같은 창이 접속이 됩니다.
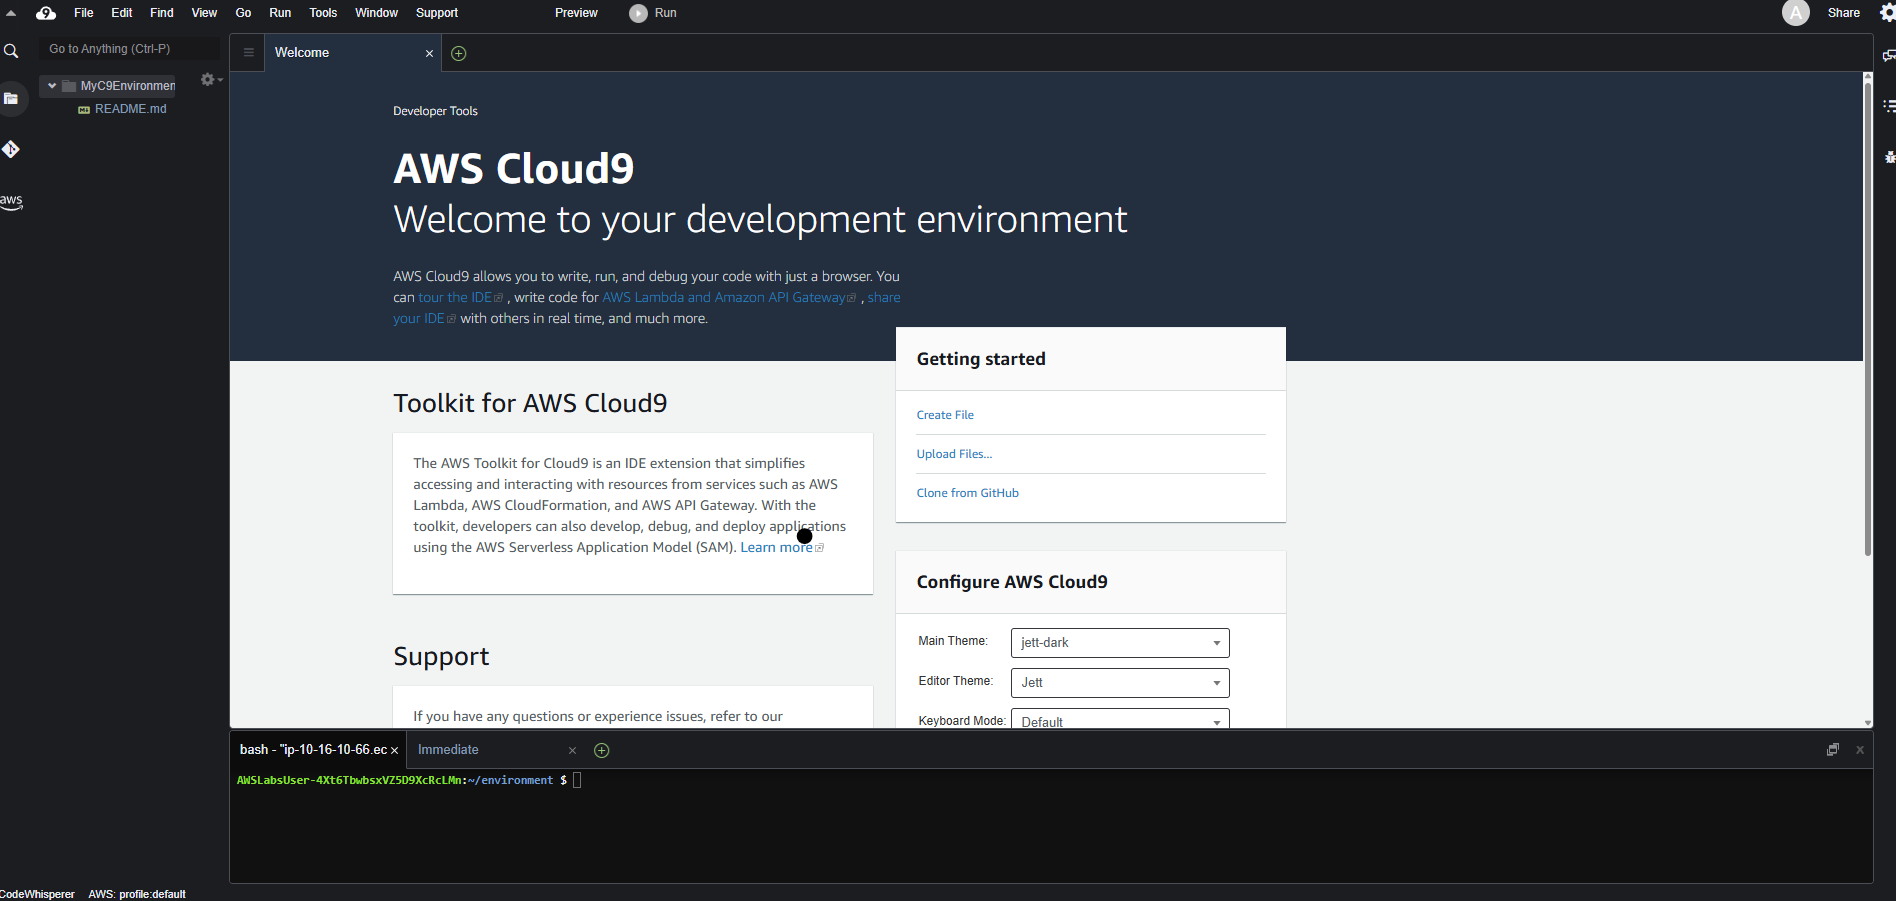
window를 클릭하여 new terminal을 들어가서 밑에 코드 입력
-> 필요한 패키지가 설치되어 있는지 확인
aws --version && sam --version && docker --version && node --version && npm --version위에 코드를 입력하면, 밑에 코드가 출력이 표시됩니다.
aws-cli/2.26.6 Python/3.13.2 Linux/6.1.132-147.221.amzn2023.x86_64 exe/x86_64.amzn.2023
SAM CLI, version 1.112.0
Docker version 25.0.8, build 0bab007
v18.20.6
10.9.2
Cloud9 환경에 필수 패키지가 설치되어 있음을 나타내는 코드가 출력
2. 새 SAM 애플리케이션을 사용하여 함수 생성
AWS SAM(AWS Serverless Application Model)은 AWS에서 서버리스 애플리케이션을 쉽게 구축할 수 있게 도와주는 오픈소스 프레임워입니다.
Cloud9에는 SAM CLI가 기본 설치되어 있어서, 별도 설치 없이 바로 작성, 테스트, 디버깅이 가능합니다.
또한 컨테이너 이미지 기반의 Lambda 함수 배포도 지원해서 유연하게 활용할 수 있습니다.
SAM을 사용하여 프로젝트를 초기화하고, 함수의 핵심 코드를 추가하겠습니다.
sam initChoice: AWS Quick Start Templates
Package type: Hello World Example
Use the most popular runtime and package type? (Python과 zip) [y/N]: N
Which runtime would you like to use?: nodejs18.x
What package type would you like to use?: Image
Would you like to enable X-Ray tracing on the function(s) in your application? [y/N]: N
Would you like to enable monitoring using CloudWatch Application Insights? [y/N]: N
Would you like to set Structured Logging in JSON format on your Lambda functions? [y/N]: N
Project name: getletter위에 코드는
-
Choice: AWS Quick Start Templates
-> SAM이 제공하는 샘플 템플릿 중 하나를 선택함.
-> AWS Quick Start Templates는 가장 기본적인 예제부터 시작할 수 있는 템플릿. -
Package type: Hello World Example
-> 기본 "Hello World" 애플리케이션 예제를 사용해서 시작. -
Use the most popular runtime and package type? (Python과 zip) [y/N]: N
-> 기본 설정(Python + zip)을 쓸 건지 묻는 질문.
-> 여기서 N을 선택했기 때문에, 아래에서 직접 런타임과 패키지 방식을 선택해야 함. -
Which runtime would you like to use?: nodejs18.x
-> 설명: Lambda 함수에 사용할 런타임 언어를 Node.js 18.x로 선택. -
What package type would you like to use?: Image
-> 설명: 코드 배포 방식을 이미지 기반(컨테이너 방식)으로 선택.
-> 이건 Docker 이미지처럼 Lambda를 컨테이너로 배포하는 방식임. -
Would you like to enable X-Ray tracing? [y/N]: N
-> 설명: AWS X-Ray를 이용해 트랜잭션 추적(분산 추적)을 할지 묻는 것.
-> 여기선 사용하지 않음. -
Enable CloudWatch Application Insights? [y/N]: N
-> 설명: Lambda 성능 모니터링을 위한 CloudWatch Application Insights 사용 여부.
-> 여기선 사용하지 않음. -
Set Structured Logging in JSON format? [y/N]: N
-> 설명: 로그를 JSON 구조화 형식으로 설정할지 여부.
-> 여기선 사용하지 않음. -
Project name: getletter
-> 설명: 생성할 SAM 애플리케이션의 프로젝트 이름을 getletter로 지정.
-> SAM 애플리케이션 마법사의 경우 다음 옵션을 선택하여,
    -----------------------
    Generating application:
    -----------------------
    Name: getletter
    Base Image: amazon/nodejs18.x-base
    Architectures: x86_64
    Dependency Manager: npm
    Output Directory: .
    Configuration file: getletter/samconfig.toml

    Next steps can be found in the README file at getletter/README.md
======
이후 template.yaml 파일에 코드 수정과
AWSTemplateFormatVersion: '2010-09-09'
Transform: AWS::Serverless-2016-10-31
Description: >
  getletter

  SAM Template for our letter writer
Globals:
  Function:
    Timeout: 5

Resources:
  GetLetter:
    Type: AWS::Serverless::Function
    Properties:
      PackageType: Image
      Role: !Sub 'arn:aws:iam::${AWS::AccountId}:role/lambda-execution-role'
    Metadata:
      DockerTag: nodejs18.x-v1
      DockerContext: ./hello-world
      Dockerfile: Dockerfile

Outputs:
  GetLetter:
    Description: "Letter Writer Lambda Function ARN"
    Value: !GetAtt GetLetter.Arn
app.mjs 안에 코드를
import PDFDocument from 'pdfkit';
import faker from 'faker';

export const lambdaHandler = async (event, context) => {

    const pdfBuffer = await new Promise(resolve => {
    const doc = new PDFDocument();

    const randomName = faker.name.findName();
    //const letterdate = new Date(faker.date.past()).toLocaleDateString('en-us');

    doc.text(randomName, { align: 'right' });
    doc.text(faker.address.streetAddress(), { align: 'right' });
    doc.text(faker.address.secondaryAddress(), { align: 'right' });
    doc.text(faker.address.zipCode() + ' ' + faker.address.city(), { align: 'right' });
    doc.moveDown();
    //doc.text(letterdate, { align: 'left' });
    //doc.moveDown();
    doc.text('Dear ' + randomName + ',');
    doc.moveDown();
    for(let i = 0; i < 3; i++) {
        doc.text(faker.lorem.paragraph());
        doc.moveDown();
    }
    doc.text(faker.name.findName(), { align: 'right' });
    doc.end();

    const buffers = []
    doc.on("data", buffers.push.bind(buffers))
    doc.on("end", () => {
      const pdfData = Buffer.concat(buffers)
      resolve(pdfData)
    })
  })

    const pdfBase64 = pdfBuffer.toString('base64');

    const response = {
        statusCode: 200,
        headers: {
            'Content-Length': Buffer.byteLength(pdfBase64),
            'Content-Type': 'application/pdf',
            'Content-disposition': 'attachment;filename=test.pdf'
        },
        isBase64Encoded: true,
        body: pdfBase64
    };
    return response;
};
로 바꿔준 후에,
cd getletter/hello-world/들어간 이후에
npm init -y && npm install pdfkit faker
npm audit fix --force
npm fund
로 바꿔주면 아래와 비슷한 출략이 나타납니다.
Wrote to /home/ec2-user/environment/getletter/hello-world/package.json:

{
  "name": "hello_world",
  "version": "1.0.0",
  "description": "hello world sample for NodeJS",
  "main": "app.js",
  "repository": {
    "type": "git",
    "url": "git+https://github.com/awslabs/aws-sam-cli.git#develop"
  },
  "author": "SAM CLI",
  "license": "MIT",
  "dependencies": {
    "axios": ">=1.6.0"
  },
  "scripts": {
    "test": "mocha tests/unit/"
  },
  "devDependencies": {
    "chai": "^4.3.6",
    "mocha": "^10.1.0"
  },
  "directories": {
    "test": "tests"
  },
  "keywords": [],
  "bugs": {
    "url": "https://github.com/awslabs/aws-sam-cli/issues"
  },
  "homepage": "https://github.com/awslabs/aws-sam-cli/tree/develop#readme"
}


npm warn deprecated glob@8.1.0: Glob versions prior to v9 are no longer supported
npm warn deprecated inflight@1.0.6: This module is not supported, and leaks memory. Do not use it. Check out lru-cache if you want a good and tested way to coalesce async requests by a key value, which is much more comprehensive and powerful.

added 122 packages, and audited 123 packages in 10s

27 packages are looking for funding
  run `npm fund` for details

1 high severity vulnerability

To address all issues, run:
  npm audit fix

Run `npm audit` for details.


npm warn using --force Recommended protections disabled.
npm warn audit Updating faker to 5.5.3, which is a SemVer major change.

changed 1 package, and audited 123 packages in 3s

27 packages are looking for funding
  run `npm fund` for details

found 0 vulnerabilities


hello_world@1.0.0
├── https://github.com/sponsors/RubenVerborgh
│   └── follow-redirects@1.15.9
├── https://github.com/sponsors/ljharb
│   └── get-intrinsic@1.3.0, function-bind@1.1.2, gopd@1.2.0, has-symbols@1.1.0, has-tostringtag@1.0.2
├── https://github.com/sponsors/feross
│   └── base64-js@1.5.1, safe-buffer@5.2.1
├─┬ https://paulmillr.com/funding/
│ │ └── chokidar@3.6.0
│ ├── https://github.com/sponsors/jonschlinkert
│ │   └── picomatch@2.3.1
│ └── https://github.com/sponsors/sindresorhus
│     └── binary-extensions@2.3.0, escape-string-regexp@4.0.0, find-up@5.0.0, locate-path@6.0.0, p-locate@5.0.0, p-limit@3.1.0, yocto-queue@0.1.0, log-symbols@4.1.0, is-unicode-supported@0.1.0, strip-json-comments@3.1.1, camelcase@6.3.0, decamelize@4.0.0
├── https://github.com/sponsors/isaacs
│   └── glob@8.1.0
├── https://github.com/chalk/supports-color?sponsor=1
│   └── supports-color@8.1.1
└── https://github.com/chalk/wrap-ansi?sponsor=1
    └── wrap-ansi@7.0.0
이제 함수가 생성되었습니다. 다음으로 Docker를 사용하여 함수를 컨테이너화하고 AWS Lambda에 배포할 준비를 합니다. Docker에는 Dockerfile이라는 템플릿 파일이 필요합니다. 이 파일은 사용자가 명령줄에서 호출하여 이미지를 어셈블할 수 있는 모든 명령이 포함된 텍스트 문서입니다.
3. Docker 이미지 생성
AWS SAM CLI를 사용하여 Image 패키지 유형으로 SAM 애플리케이션을 초기화했습니다. 이를 통해 템플릿이 구성되었고, 컨테이너 생성에 필요한 Dockerfile도 생성되었습니다.
Dockerfile을 열고 추가된 코드를 검토합니다. Docker가 컨테이너 이미지를 생성하려면 Dockerfile 템플릿에 이 4개의 간단한 줄만 있으면 됩니다.
FROM public.ecr.aws/lambda/nodejs:18
COPY app.mjs package.json ./
RUN npm install
CMD [ "app.lambdaHandler" ]
Dockerfile의 첫 번째 줄(FROM)은 Docker가 사용할 기본 실행 환경 이미지를 지정하는 부분이며,
Amazon ECR의 기본 이미지를 사용하는 경우 public.ecr.aws/lambda/nodejs:18와 같이 작성하며, Docker Hub에서 이미지를 가져오고 싶다면 FROM amazon/aws-lambda-nodejs:18로 변경할 수 있습니다.
이후 COPY, RUN, CMD 명령어를 통해 컨테이너 이미지의 내용을 구성한다.
COPY는 app.mjs, package.json과 같은 애플리케이션 파일을 이미지에 복사하고,
RUN은 npm install 등을 실행하여 필요한 종속성을 설치한다.
CMD는 Lambda 함수의 핸들러(entry point) 를 지정하는 역할을 한다.
이 과정을 통해 완성된 Docker 이미지는 AWS Lambda에 배포 가능한 컨테이너 형태로 사용될 수 있다.
터미널 창에서 다음 명열을 실행해서 Docker 컨테이너 이미지에 Dockerfile을 포함합니다.
docker build -t getletter .Successfully tagged getletter:latest 메시지가 표시되면 Docker 이미지에 로컬 앱이 성공적으로 포함된 것입니다.
docker imagesDocker 이미지가 생성되었으므로 이제 이미지에서 새 Docker 컨테이널르 실행 할 수 있습니다.
docker run -p 9000:8080 getletter:latest명령어는 로컬 환경에서 컨테이너 이미지를 실행하는 명령입니다. 이 명령을 입력하면 컨테이너가 실행 중인 상태로 유지되기 때문에, 터미널은 대기 상태로 전환됩니다.
해당 컨테이너는 AWS에서 제공하는 Lambda 기본 이미지를 기반으로 만들어졌으며, 이 기본 이미지에는 AWS Lambda Runtime Interface Emulator(RIE) 라는 구성 요소가 포함되어 있습니다.
Lambda RIE는 로컬 환경에서 Lambda 함수가 포함된 컨테이너 이미지를 테스트할 수 있도록 도와주는 도구입니다. 이 에뮬레이터는 HTTP 요청을 Lambda 함수가 이해할 수 있는 JSON 이벤트 형식으로 변환하고, 그 결과를 다시 HTTP 응답으로 돌려주는 경량 웹 서버 역할을 합니다.
만약 AWS에서 제공하는 기본 이미지가 아닌 대체 이미지를 사용하는 경우에는, Lambda RIE가 포함되어 있지 않을 수 있습니다. 이 경우에는 RIE를 직접 Dockerfile에 추가하거나 별도로 설치해주셔야 합니다. AWS에서는 Lambda RIE를 오픈소스로 GitHub에 공개하고 있기 때문에, 누구나 자유롭게 사용할 수 있습니다.
Docker 컨테이너가 실행 중이고 기본 이미지에 포함된 Lambda RIE도 실행 중이므로 AWS Lambda 서비스에서 테스트할 필요 없이 로컬에서 함수를 테스트할 수 있습니다.
curl -XPOST "http://localhost:9000/2015-03-31/functions/function/invocations" -d '{}'{“statusCode”:200} 로 시작하는 인코딩된 응답을 볼 수 있습니다
다음 명령을 사용하여 getletter 디렉터리로 이동하고 AWS SAM을 사용하여 컨테이너 이미지를 다시 빌드합니다.
cd /home/ec2-user/environment/getletter
sam build
다음 명령을 사용하여 AWS SAM CLI로 함수를 테스트할 수도 있습니다.
sam local invoke GetLetter이 경우에도 {“statusCode”:200} 로 시작하는 인코딩된 응답을 볼 수 있습니다
4. 앱 배포 및 테스트
Lambda 서비스를 사용하여 호출할 수 있는 Lambda 함수에 배포할 준비를 하겠습니다. 먼저 Lambda가 참조할 수 있도록 로컬 컨테이너 이미지의 복사본을 호스팅할 리포지토리를 생성합니다.
aws ecr create-repository \
    --repository-name getletter \
    --image-scanning-configuration scanOnPush=true
다음 코드를 실행하여 Amazon Elastic Container Registry(ECR) 리포지토리를 생성합니다.
{
    "repository": {
        "repositoryArn": "arn:aws:ecr:us-west-2:174972297471:repository/getletter",
        "registryId": "174972297471",
        "repositoryName": "getletter",
        "repositoryUri": "174972297471.dkr.ecr.us-west-2.amazonaws.com/getletter",
        "createdAt": "2025-04-24T10:46:19.719000+00:00",
        "imageTagMutability": "MUTABLE",
        "imageScanningConfiguration": {
            "scanOnPush": true
        },
        "encryptionConfiguration": {
            "encryptionType": "AES256"
        }
    }
}
Docker 명령어를 통해 로컬에서 생성한 컨테이너 이미지에 Amazon ECR에 푸시할 수 있도록 태그를 지정할 수 있습니다.
여기서 repositoryUri는 이전 단계에서 생성한 ECR 리포지토리 URI로 바꾸어 사용하셔야 합니다.
docker tag getletter:latest 174972297471.dkr.ecr.us-west-2.amazonaws.com/getletter이미지를 태깅한 후에는 Docker CLI가 Amazon ECR에 접근할 수 있도록 인증을 진행해야 합니다.
AWS CLI는 이 과정을 간단하게 처리할 수 있도록 get-login-password 명령어를 제공합니다.
아래 명령어는 Bash의 파이프(|) 연산자를 사용하여 aws ecr get-login-password 명령어의 출력을 docker login 명령어에 표준 입력(stdin) 으로 넘기는 방식입니다:
aws ecr get-login-password \
    | docker login \
    --username AWS \
    --password-stdin 174972297471.dkr.ecr.us-west-2.amazonaws.com/getletter
Login Succeeded 메시지가 표시됩니다.
이 과정을 통해 Docker가 Amazon ECR과 정상적으로 인증되며, 이후 docker push 명령어를 사용하여 이미지를 업로드할 수 있습니다.
docker push 174972297471.dkr.ecr.us-west-2.amazonaws.com/getletter:latest출력이 다음과 비슷하다면 컨테이너를 ECR 레지스트리에 성공적으로 푸시한 것이며, 이제 Lambda 함수에 컨테이너를 사용할 수 있습니다.
SAM을 사용하여 ECR 이미지 업로드 및 Lambda 함수 배포를 하려고합니다.
컨테이너 이미지를 수동으로 Amazon ECR 레지스트리에 푸시할 수도 있지만, AWS SAM을 사용하는 경우에는 이 과정을 직접 수행할 필요가 없습니다.
AWS SAM CLI는 컨테이너 이미지에 대한 태깅, 리포지토리 지정, 푸시, 배포를 포함한 전 과정을 자동으로 처리해 줍니다.
즉, 로컬에서 애플리케이션을 빌드하고, 컨테이너 이미지를 위한 ECR 리포지토리를 생성한 뒤에는, 단순히 sam deploy 명령만 실행하면 AWS SAM이 이미지 빌드부터 배포까지 알아서 처리해 줍니다.
이를 통해 복잡한 Docker 명령어 없이도 간단하고 일관된 방식으로 서버리스 애플리케이션을 배포할 수 있습니다.
samconfig.toml 파일안에
confirm_changeset = false
resolve_s3 = false
resolve_image_repos = false
부분을 true -> false로 만들어줍니다.
sam deploy \
	--stack-name getletter \
	--s3-bucket my-sam-deploy-bucket \
	--capabilities CAPABILITY_NAMED_IAM CAPABILITY_AUTO_EXPAND \
	--image-repository 174972297471.dkr.ecr.us-west-2.amazonaws.com/getletter
이렇게 하였지만, edu
AWSLabsUser-8tVxaWiC1h3R4pYEyHw4Uy:~/environment/getletter $ sam deploy \
> --stack-name getletter \
> --s3-bucket my-sam-deploy-bucket \
> --capabilities CAPABILITY_NAMED_IAM CAPABILITY_AUTO_EXPAND \
> --image-repository 174972297471.dkr.ecr.us-west-2.amazonaws.com/getletter
30ef59629ce6: Layer already exists
fe695cf0794b: Layer already exists
d95f86b14dbf: Layer already exists
935b16bf9389: Layer already exists
b5da4b018965: Layer already exists
76bc5c0a0181: Layer already exists
378937a27714: Layer already exists
cc6af1d1cdea: Layer already exists
getletter-02dc36b7e463-nodejs18.x-v1: digest: sha256:c94a5310c5e2e7cd08096e800127a82397fa1bd4a9094587868afaaf6544c49a size: 2001

        Deploying with following values
        ===============================
        Stack name                   : getletter
        Region                       : us-west-2
        Confirm changeset            : False
        Disable rollback             : False
        Deployment image repository  :
                                       174972297471.dkr.ecr.us-west-2.amazonaws.com/getletter
        Deployment s3 bucket         : my-sam-deploy-bucket
        Capabilities                 : ["CAPABILITY_NAMED_IAM", "CAPABILITY_AUTO_EXPAND"]
        Parameter overrides          : {}
        Signing Profiles             : {}

Initiating deployment
=====================

        Uploading to bf4ec8f436892426ff9aad8bd73e7e09.template  783 / 783  (100.00%)
Error: Failed to create/update the stack: getletter, An error occurred (AccessDenied) when calling the PutObject operation: Access Denied
배포 명령어 실행 결과, 다음과 같은 오류 메시지가 발생했습니다:
Error: Failed to create/update the stack: getletter,
An error occurred (AccessDenied) when calling the PutObject operation: Access Denied
이 오류는 AWS SAM이 CloudFormation 스택을 생성하는 과정에서 템플릿 파일(.template)을 S3 버킷(my-sam-deploy-bucket)에 업로드하려고 시도했지만, 해당 S3 버킷에 대한 PutObject 권한이 없어서 거부되었기 때문에 발생한 것입니다.
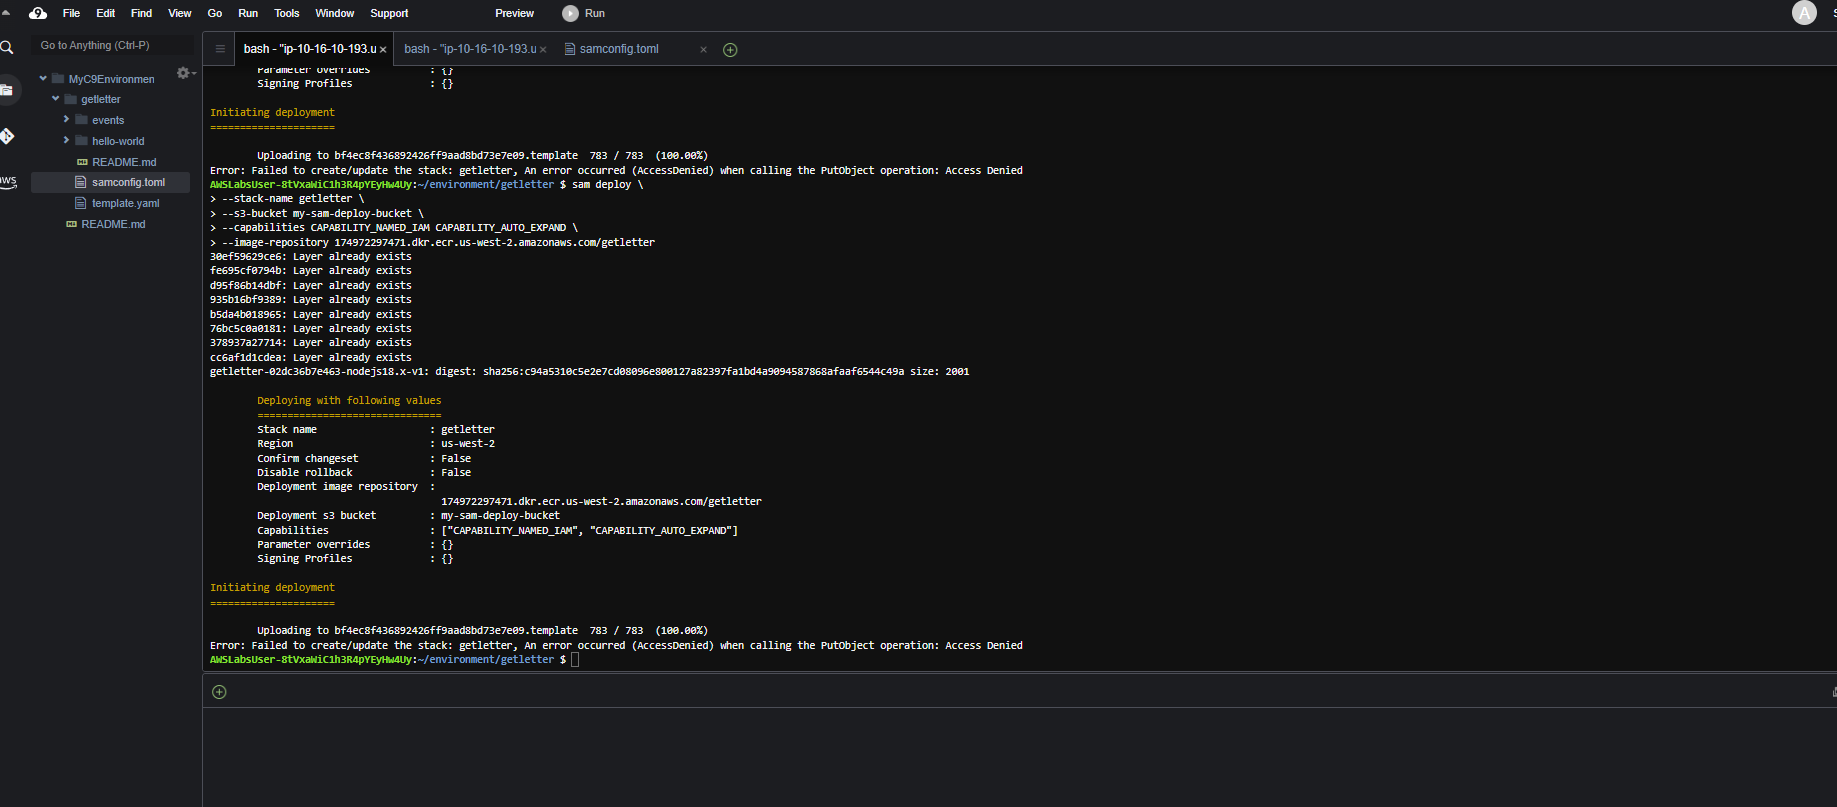
AWS Educate 계정 구조의 한계입니다.
실습용 계정에선 권한이 막혀 있어서 이런 배포는 안 됩니다.
