두 가지 필터를 적용하는 방법에 대해 공부하였다.
먼저, Hole Filling Filter를 적용한 후 Temporal Filter를 적용하는 방법에 대한 내용이다.
적용한 방법
Temporal filtering에 대한 코드가 적힌Temporal.shader내 에서 Hole Filling Filter를 적용했다.
Hole Filling Filter를 적용시키는 함수인 GetValidDepth를 만들어서 받아온 깊이값의 평균값을 계산하기 전에 Hole Filling 함수에 적용시키도록 하였다.
Shader "Custom/TH_Depth"
{
    Properties
    {
        [PerRendererData]
        _MainTex("MainTex", 2D) = "black" {}
        _OutputTex("Output Texture", 2D) = "black" {}

        [HideInInspector]
        _Colormaps("Colormaps", 2D) = "" {}

        _DepthScale("Depth Multiplier Factor to Meters", float) = 0.001

        _MinRange("Min Range (m)", Range(0, 10)) = 0.15
        _MaxRange("Max Range (m)", Range(0, 20)) = 10.0

        [KeywordEnum(Viridis, Plasma, Inferno, Jet, Rainbow, Coolwarm, Flag, Gray)]
        _Colormap("Colormap", Float) = 0
    }
    SubShader
    {
        Tags { "QUEUE" = "Transparent" "IGNOREPROJECTOR" = "true" "RenderType" = "Transparent" "PreviewType" = "Plane" }
        Pass
        {
            ZWrite Off
            Cull Off
            Fog { Mode Off }

            CGPROGRAM
            #pragma vertex vert_img
            #pragma fragment frag

            #include "UnityCG.cginc"

            sampler2D _Colormaps;
            float4 _Colormaps_TexelSize;

            // 최대 10개의 깊이 텍스처
            sampler2D _DepthTex1;
            sampler2D _DepthTex2;
            sampler2D _DepthTex3;
            sampler2D _DepthTex4;
            sampler2D _DepthTex5;
            sampler2D _DepthTex6;
            sampler2D _DepthTex7;
            sampler2D _DepthTex8;
            sampler2D _DepthTex9;
            sampler2D _DepthTex10;

            float _Colormap;
            float _MinRange;
            float _MaxRange;
            float _DepthScale;

            // 유효한 깊이 값을 얻기 위한 함수
            float GetValidDepth(sampler2D tex, float2 uv)
            {
                float depth = tex2D(tex, uv).r;

                // 현재 픽셀의 깊이 값이 유효하지 않을 경우
                if (depth <= 0)
                {
                    // 왼쪽으로 이동할 offset 설정
                    float offset = _Colormaps_TexelSize.x;
                    int maxSamples = 50; // 최대 샘플링 횟수 (너무 많이 샘플링하지 않도록 제한)

                    // 유효한 값을 찾기 위해 왼쪽 이웃 픽셀 값을 확인
                    for (int i = 0; i < maxSamples; i++)
                    {
                        // 왼쪽 이웃 픽셀에서 깊이 값 샘플링
                        float neighborDepth = tex2D(tex, uv + float2(-offset, 0)).r;

                        // 유효한 깊이 값이 존재하면 반환
                        if (neighborDepth > 0)
                        {
                            return neighborDepth;
                        }

                        // offset 증가 (더 왼쪽 픽셀로 이동)
                        offset += _Colormaps_TexelSize.x;
                    }

                    // 유효한 값을 찾지 못한 경우 기본값 반환 (예: -1 또는 0)
                    return 0;
                }

                // 현재 픽셀의 깊이 값이 유효하다면 그대로 반환
                return depth;
            }

            half4 frag(v2f_img pix) : SV_Target
            {
                float totalDepth = 0;
                int count = 0;

                // 깊이 텍스처에서 유효한 픽셀 값 가져오기 (hole filling 적용)
                float depth1 = GetValidDepth(_DepthTex1, pix.uv);
                if (depth1 > 0) { totalDepth += depth1; count++; }

                float depth2 = GetValidDepth(_DepthTex2, pix.uv);
                if (depth2 > 0) { totalDepth += depth2; count++; }

                float depth3 = GetValidDepth(_DepthTex3, pix.uv);
                if (depth3 > 0) { totalDepth += depth3; count++; }

                float depth4 = GetValidDepth(_DepthTex4, pix.uv);
                if (depth4 > 0) { totalDepth += depth4; count++; }

                float depth5 = GetValidDepth(_DepthTex5, pix.uv);
                if (depth5 > 0) { totalDepth += depth5; count++; }

                float depth6 = GetValidDepth(_DepthTex6, pix.uv);
                if (depth6 > 0) { totalDepth += depth6; count++; }

                float depth7 = GetValidDepth(_DepthTex7, pix.uv);
                if (depth7 > 0) { totalDepth += depth7; count++; }

                float depth8 = GetValidDepth(_DepthTex8, pix.uv);
                if (depth8 > 0) { totalDepth += depth8; count++; }

                /*float depth9 = GetValidDepth(_DepthTex9, pix.uv);
                if (depth9 > 0) { totalDepth += depth9; count++; }

                float depth10 = GetValidDepth(_DepthTex10, pix.uv);
                if (depth10 > 0) { totalDepth += depth10; count++; }*/

                // 평균 깊이 값 계산
                float averageDepth = (count > 0) ? (totalDepth / count) : 0;

                // 깊이 값을 정규화
                float normalizedDepth = averageDepth * 0xffff * _DepthScale;
                normalizedDepth = (normalizedDepth - _MinRange) / (_MaxRange - _MinRange);

                return tex2D(_Colormaps, float2(normalizedDepth, 1 - (_Colormap + 0.5) * _Colormaps_TexelSize.y)); // 최종 색상 반환
            }
            ENDCG
        }
    }
    FallBack Off
}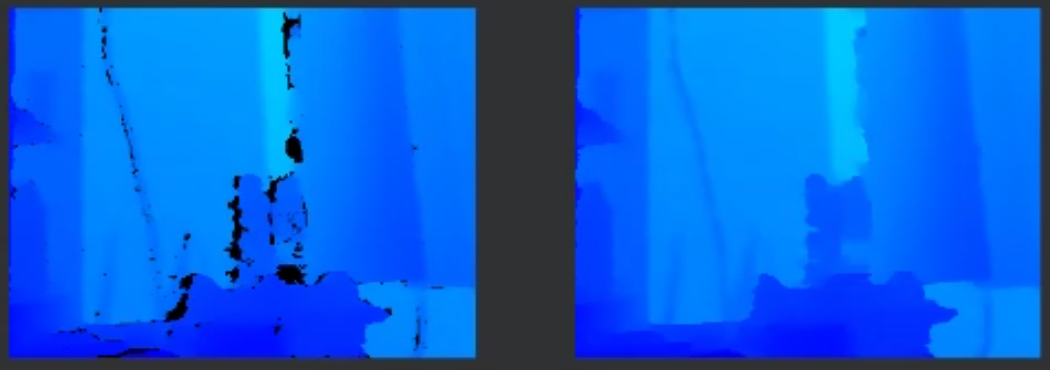
결과가 위와 같이 나오는데
Hole Filling Filter를 적용한 후 Temporal Filter를 적용한 상태이다.
셰이더 분리
지금 저 코드는 Temporal Filter와 Hole Filling Filter가 합쳐진 셰이더이다.
근데 저렇게 할 경우
Hole Filling Filter만 적용하고 싶을 때
Temporal Filter만 적용하고 싶을 때
Temporal Filter -> Hole Filling Filter 순으로 적용하고 싶을 때
Hole Filling Filter -> Temporal Filter 순으로 적용하고 싶을 때
위와 같은 경우와 여러 필터링 기법과 같이 쓰려는 경우
저 혼합 셰이더는 매우 비효율적인 셰이더이다.
저렇게 할 경우 추가해야하는 필터링 기법이 생길 때마다 셰이더 스크립트는 늘어날 것이다.
그래서 DepthManager라는 스크립트를 이용하여 분리한 셰이더를 혼합할 수 있도록 하였다.
using System;
using UnityEngine;
using UnityEngine.UI;

public class DepthProcessing : MonoBehaviour
{
    // Data Receiver
    public CustomFrameManager frameManager;

    // Save result
    private RenderTexture result;
    private RenderTexture tempResult;
    private RenderTexture tempResult2;

    // Output result Image
    public RawImage outputRawImage;

    public int select;

    // Shader Material
    public Material holeM;
    public Material temporalM;
    public Material originalM;

    void Start()
    {
        result = new RenderTexture(Screen.width, Screen.height, 0, RenderTextureFormat.ARGB32);
        tempResult = new RenderTexture(Screen.width, Screen.height, 0, RenderTextureFormat.ARGB32);
        tempResult2 = new RenderTexture(Screen.width, Screen.height, 0, RenderTextureFormat.ARGB32);
    }

    void Update()
    {
        if (select == 0)
        {
            Debug.Log("Select H");
            Graphics.Blit(frameManager.depthTexture, tempResult, holeM);
            Graphics.Blit(tempResult, result, originalM);
        }
        else if (select == 1)
        {
            Debug.Log("Select T");
            Graphics.Blit(frameManager.depthTexture, tempResult, temporalM);
            Graphics.Blit(tempResult, result, originalM);
        }
        else if (select == 2)
        {
            Debug.Log("Select T->H");
            Graphics.Blit(frameManager.depthTexture, tempResult, temporalM);
            Graphics.Blit(tempResult, tempResult2, holeM);
            Graphics.Blit(tempResult2, result, originalM);
        }
        else if (select == 3)
        {
            Debug.Log("Select H->T");
            Graphics.Blit(frameManager.depthTexture, tempResult, holeM);
            Graphics.Blit(tempResult, tempResult2, temporalM);
            Graphics.Blit(tempResult2, result, originalM);
        }

        outputRawImage.texture = result;
    }
}
DepthManager에서 많이 사용한 메서드인 Graphics.Blit()에 대해서 알아보겠다.
Graphics.Blit()
유니티에서 두 텍스쳐 간의 데이터를 복사하거나, 텍스처에 셰이더를 적용하여
그 결과를 다른 텍스쳐에 출력할 때 사용하는 메서드이다.
주로, 후처리 효과(Post-processing), 렌더링 파이프라인 등에 많이 사용된다.
기본 구조
Graphics.Blit(sourceTexture, destinationTexture, material);sourceTexture : 입력으로 사용할 원본 텍스처
destinationTexture : 출력으로 사용할 목적지 텍스처
material :material에 설정된 셰이더를 통해sourceTexture의 데이터에 변형을 가진 후destinationTexture로 출력
이 메서드는 원본 텍스처 데이터를 목적지 텍스처로 복사하거나,
원본 텍스처에 셰이더 효과를 적용해 결과를 목적지 텍스처에 저장할 수 있다.
즉, 이 메서드를 이용하여 연속적인 렌더링 결과를 유지할 수 있다.
originalM을 쓴 이유
기존에 Hole Filling과 Temporal에서 사용했던 정규화를 모두 originalM을 이용해서 해주는 것이다.
즉, originalM에 설정된 셰이더를 통해 sourceTexture의 데이터에 변형을 가진 후 destinationTexture로 출력하는 것이다.
문제 발생
결과가 다음과 같이 나오는 것이다.
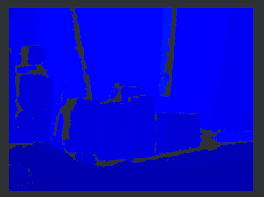
즉, Hole Filling -> Temporal이 적용이 되지 않았다.
내가 생각한 바에 따르면 Hole Filling Filter와 Temporal Filter는
서로 다른 텍스처를 사용해 깊이 값을 주고받기 때문에 값이 제대로 전달되지 않는다는 것이다.
Hole Filling Filter는 _MainTex를 통해 데이터를 주고받지만, Temporal Filter는 _DepthTex를 사용한다.
이러한 깊이 값 텍스처 이름의 불일치로 인해 각 필터가 필요한 데이터를 참조하지 못하고 있어,
필터링이 올바르게 적용되지 않고 있다고 나는 추측한다.
이에 대한 내용은 Temporal -> Hole Fillling 포스팅에서 다루겠다.
