
스프링 시큐리티에 대해서 공부를 하면서, Authentication Provider, Manager?? UserDetail? Filter Chain등 여러가지 생소한 개념들을 처음 듣게 되면서 스프링 시큐리티에 잔뜩 쫄아있었다. 사실 아직도 좀 쫄아있긴 하다.

그래서 나는 정면돌파 해보기로 하였다. 유저가 로그인을 하였을 때 어떤 Flow로 Spring Security가 동작하는지를 직접 하나하나 코드들을 뜯어보면서, 공부를 해보았고, 이를 통해서 나름대로의 공포를 극복한 것 같아서 나 처럼 스프링 시큐리티에 막연하게 겁을 먹은 사람들을 위해 이렇게 글로 남기고자 한다.

세상 모든 겁쟁이들 파이팅!!
1. Tomcat의 내부 구조
먼저 흐름을 파악하기 위해서는 Tomcat의 내부 구조에 대해서 살펴볼 필요가 있다.
Tomcat의 내부 구조를 살펴보는 이유는 Browser가 로그인 Request를 보내면서 아이디, 비밀번호를 Server에게 보냈을 때 Spring Security Filter까지 도달하는 과정에 대해서 살펴보기 위함이다.
이제부터 우리는 몇 백, 몇 천번도 넘게 해보았던 로그인을 한다고, 가정해보자. 여러분은 아이디와 비밀번호를 웹 브라우져에게 현재 입력을 한 상황이다.
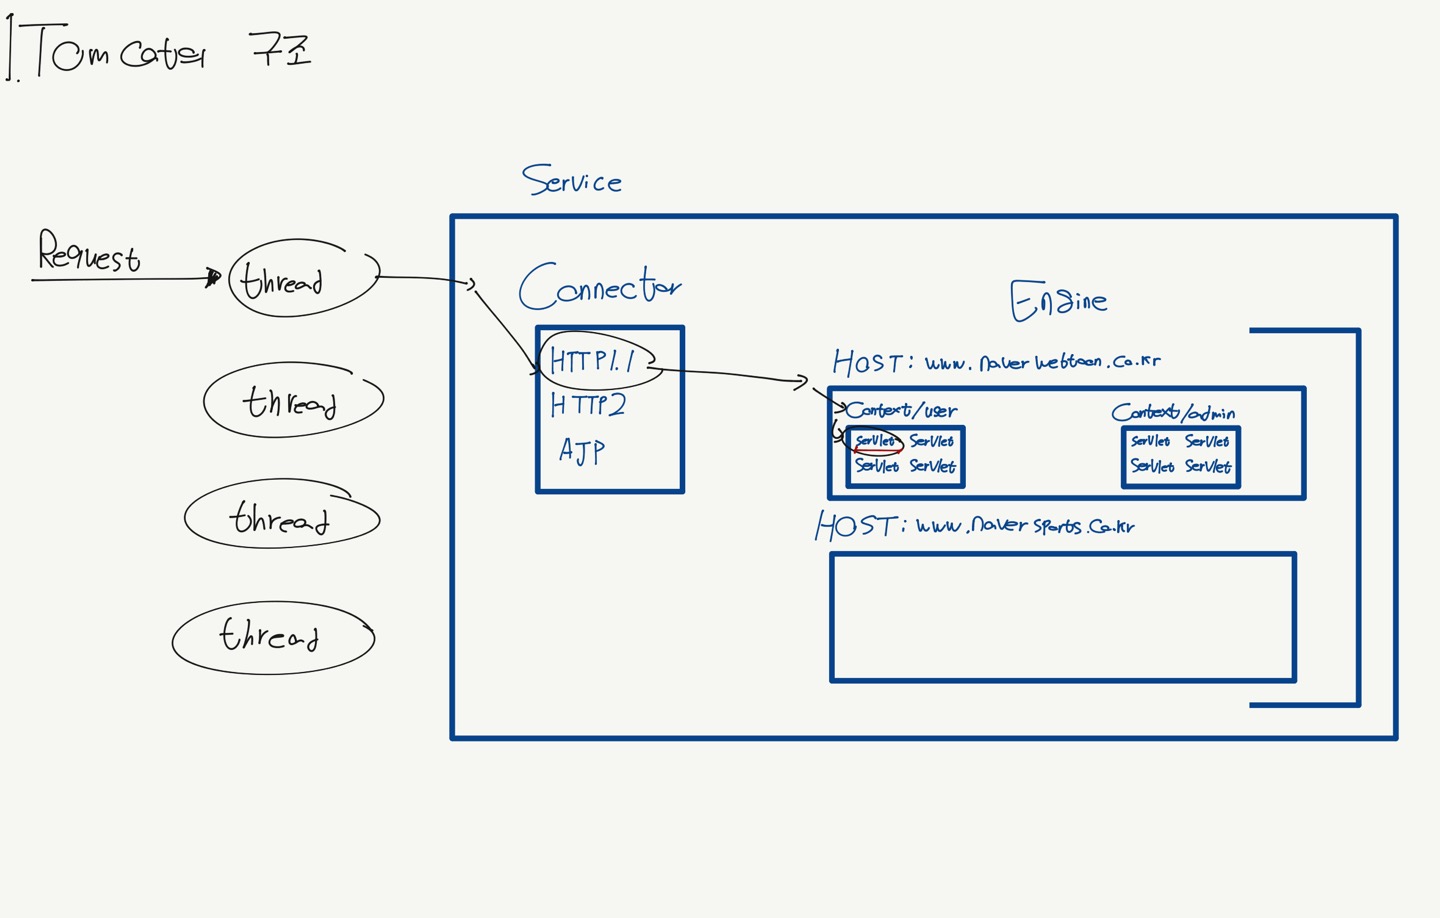
위 사진의 Flow를 잘 살펴보자 똥손이라 죄송합니다…
제일 첫번째로 Server는 브라우저로부터 아이디, 비밀번호를 Request로 받게 될 것이다.
이 때 Tomcat 내부에서는 Thread들(=Thread Pool)이 클라이언트의 요청을 기다리고 있다.
- Thread Pool이란 미리 여러개의 Thread들을 만들어 놓은 것이다.
Request는 Thread를 거쳐 Service내의 Connector로 이동한다. Connector는 프로토콜에 따라 특정 Connect로 Request를 처리한다. 우리가 하는 것은 HTTP 프로토콜이기에 HTTP 프로토콜 Connect로 처리된다.
특정 커넥터를 거친 후에 Request는 Engine 내의 Host로 이동하게 된다. Host란 네트워크 연결 주소라고 생각하면 된다.
그 후 Request는 HOST에서 Context로 이동한다. Context는 우리가 Spring으로 개발을 할 때 접하게 되는 애플리케이션이다. 하나의 모듈이라고 생각을 하면 편할 것 같다.
Context는 여러개의 Servlet으로 이루어져있으며, Servlet은 각각 Controller, Service들이 하나의 Servlet이라고 생각하면 된다.
Spring Security는 바로 이 Servlet 내에서 동작하며, 우리가 입력했던 아이디, 비밀번호의 Request는 위의 단계들을 거쳐서 Servlet까지 동작하게 된다.
Tomcat 내부 구조 용어 정리
Service→ 서비스는 서버 내부에 있는 중간 구성 요소이며,하나 이상의 Connect를 정확히 하나의 엔진에 연결한다.Connector→ 커넥터는프로토콜에 따라서 특정 Connect로 클라이언트와의 통신을 처리합니다.Tomcat에는 여러 커넥터를 사용할 수 있으며, 특히 Tomcat을 독립 실행형 서버로 실행할 때 대부분의 HTTP 트래픽에 사용되는 HTTP 커넥터와 Apache HTTPD 서버와 같은 웹 서버에 Tomcat을 연결할 때 사용되는 AJP 프로토콜을 구현하는 AJP 커넥터가 포함된다.Engine→ 엔진은특정 서비스에 대한 요청 처리 파이프라인을 나타낸다.서비스에 여러 커넥터가 있을 수 있으므로 엔진은 이러한 커넥터에서 모든 요청을 수신하고 처리하여 응답을 클라이언트로 전송하기 위해 적절한 커넥터로 다시 전달한다.Host→ 호스트는쉽게 생각하면 네트워크 연결 주소이다. ex: http://localhost:8080/www.yourcompany.com, Tomcat 서버에. 엔진에는 여러 호스트가 포함될 수 있으며 호스트 요소는 yourcompany.com 및 abc.yourcompany.com과 같은 네트워크 별칭도 지원한다.Context→ 컨텍스트는하나의 별도의 웹 애플리케이션이다.쉽게 생각하면 하나의 Spring Project라고 생각할 수 있고, api/hello, admin/hello 두 개의 url이 있다고 하자. 이 때 api와 admin이 Context라고 생각할 수 있다.Servlet→작은 Server 프로그램이며, 쉽게 생각하면 Spring 내의 Controller, Service, Repository는 각각 하나의 Servlet이라고 생각할 수 있고, 이들은 하나의 컨텍스트에 존재한다.DisPatcherServlet→** Controller의 main() 메서드를 호출하는 서블릿
2. 서블릿의 내부 구조

우리의 Request가 무사히 Servlet으로 잘 도착하였다!!!
우리의 Request가 최종 도착지인 로그인 Controller의 메서드까지 도착을 하기 위해서는 DispatchServlet의 도움을 받아야 하는데, DispatchServlet은 등록된 컨트롤러의 메서드들 내에서 url과 매칭이 되는 메서드를 찾아서 매핑 시켜주는 역할을 가지고 있다.
우리의 Request는 DispatchServlet 로 가기 위해서 여러개의 Filter를 거친 후에 도착하게 된다.
우리의 Request는 여러 개의 filter로 이루어진 필터 체인 을 반드시 거쳐야만 서블릿 서비스(=DispatchServlet)에 도착하게 된다.
3. 스프링 시큐리티가 동작하는 구조
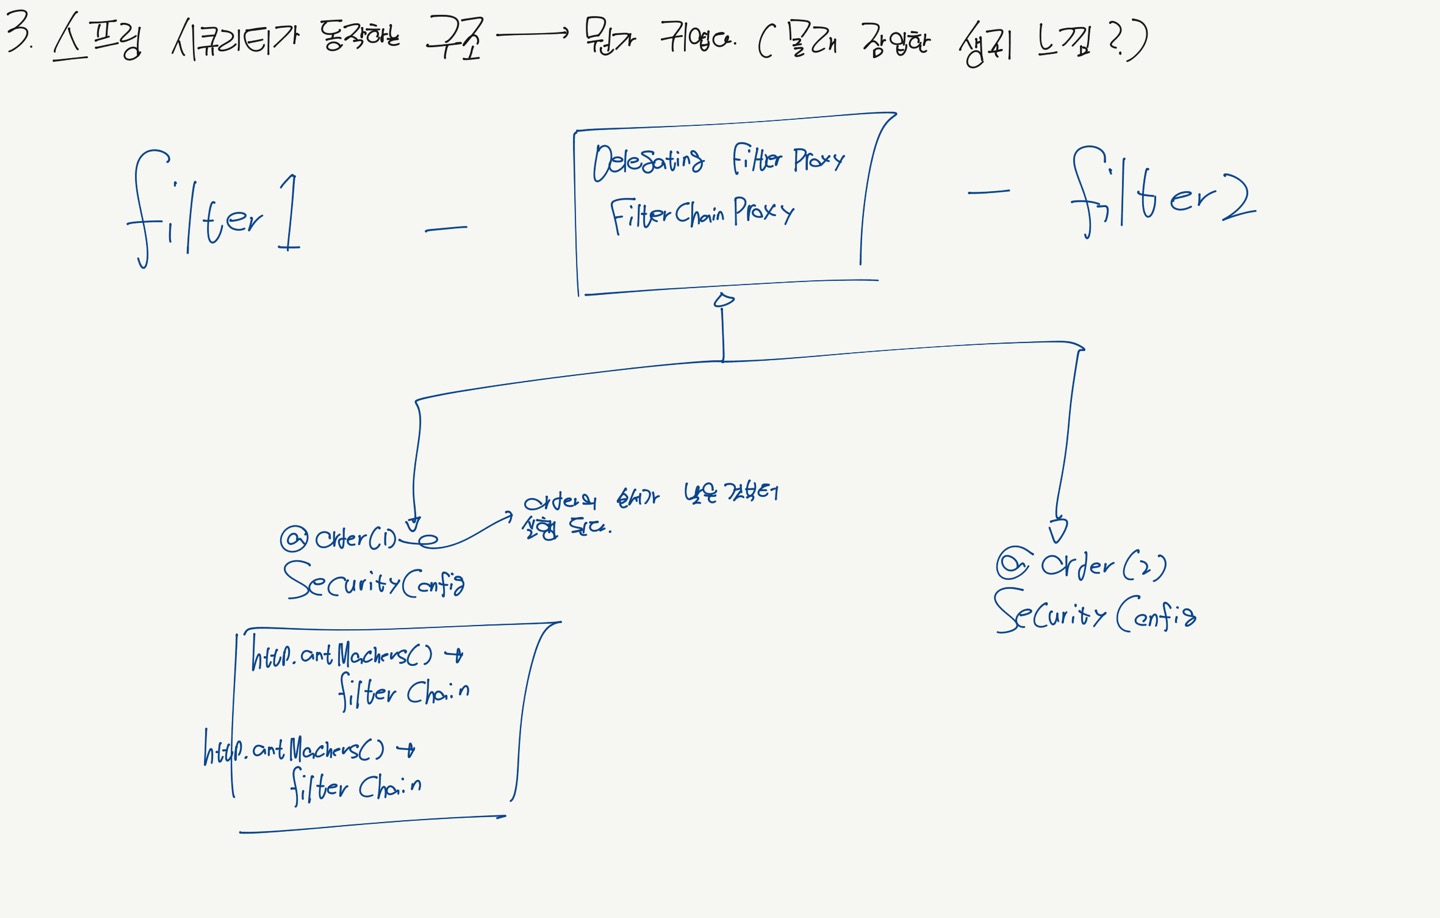
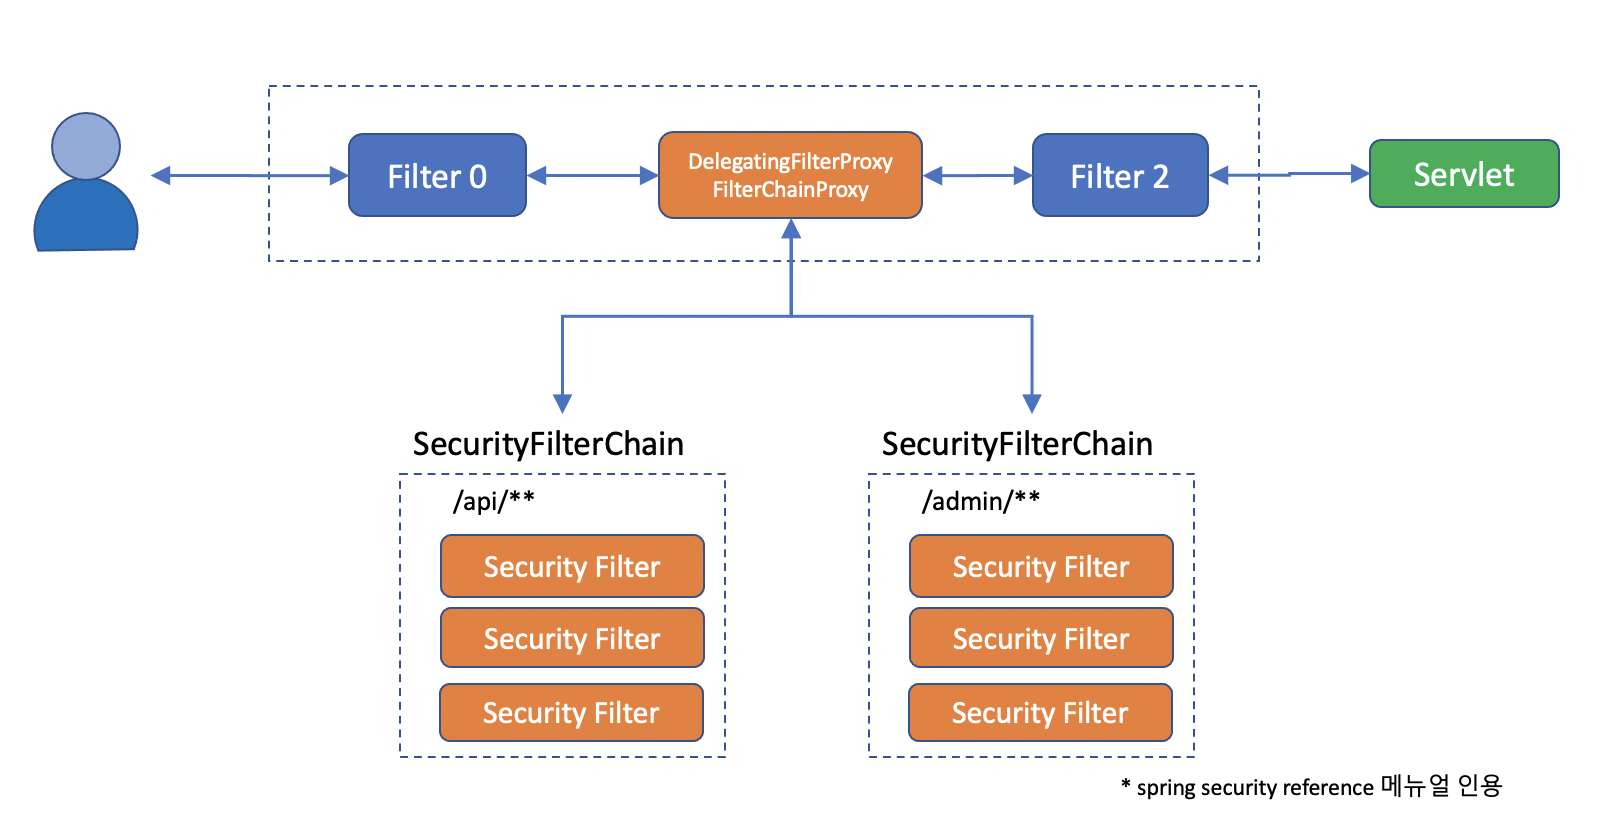
스프링 시큐리티는 DelegatingFilterProxy라는 필터를 만들어 메인 필터체인에 끼워넣고, 그 아래 다시 SecurityFilterChain그룹을 등록한다. 이 과정이 뭔가 귀엽지 않은가?? 몰래 잠입한 생쥐 느낌이다.
이렇게 사이에 DelegatingFilterProxy Filter를 사이에 껴놓으므로, Request는 LoginController의 메서드에 도착하기 이전에 Spring Security를 거치게 된다.
4. 스프링 시큐리티 처리 과정
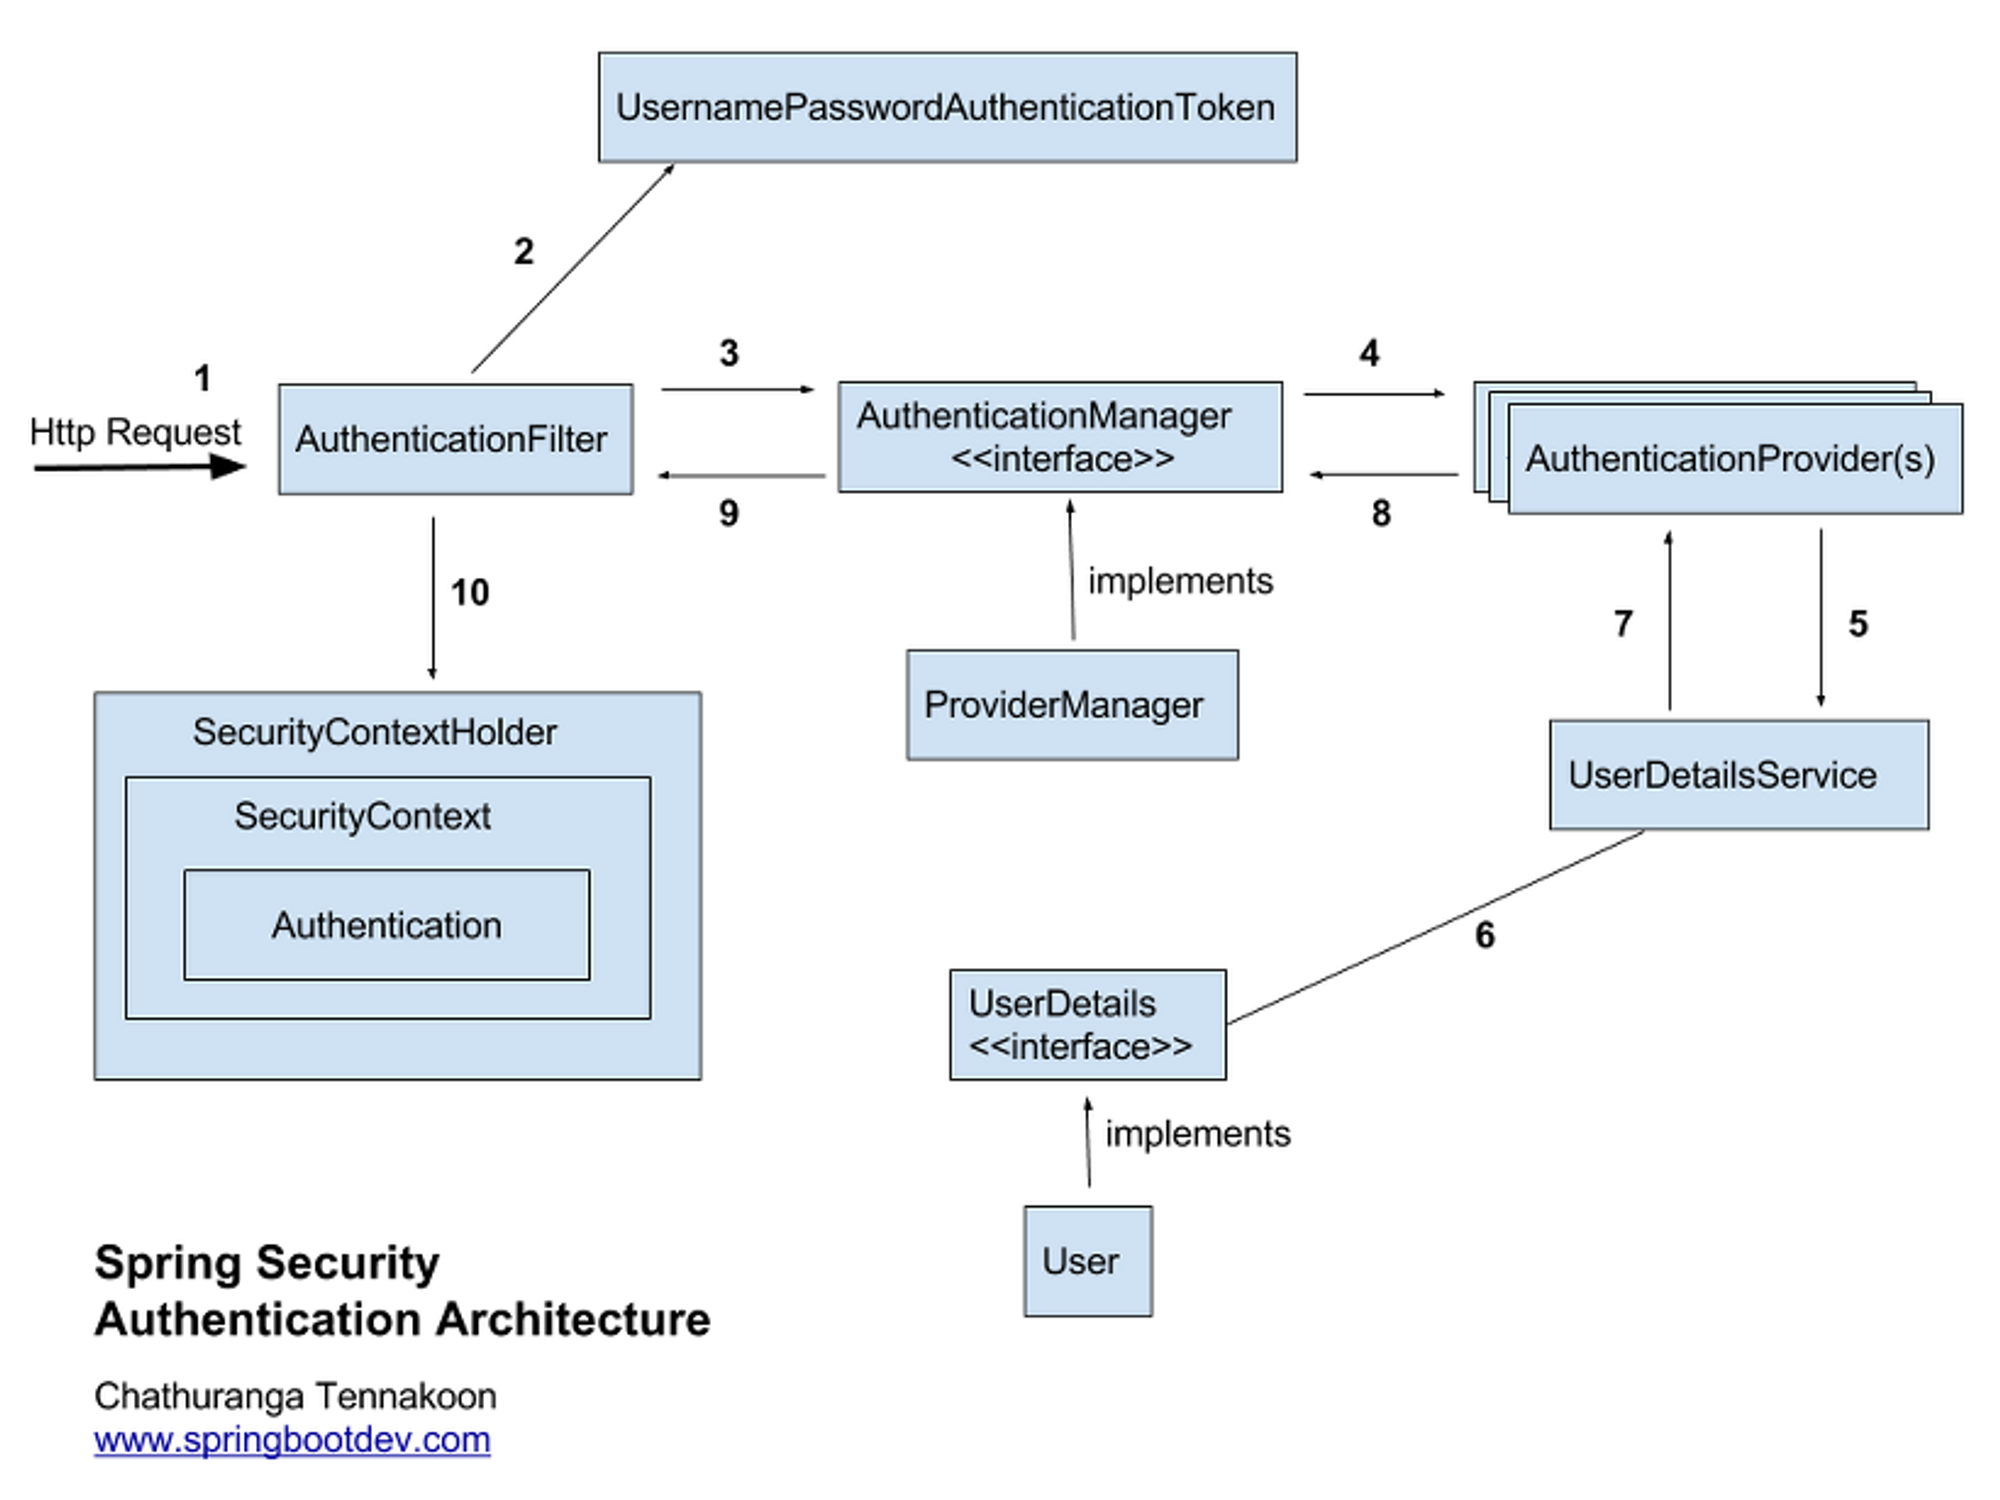
스프링 시큐리티 로그인 과정이라고 쳤을 때 많은 블로그에서 사용하는 사진이며, 로그인시 Spring Security가 Authentication을 생성하는 Flow에 대해서 설명하고 있다. 그리고 대부분의 블로그에서 아래와 같은 한글로 된 Flow 설명도 함께 첨부하는 것을 볼 수 있었다.
- 사용자가 로그인 정보와 함께 인증 요청을 한다.(Http Request)
- AuthenticationFilter가 요청을 가로채고, 가로챈 정보를 통해 UsernamePasswordAuthenticationToken의 인증용 객체를 생성한다.(Authentication 인터페이스의 구현체다.)
- AuthenticationManager의 구현체인 ProviderManager에게 생성한 UsernamePasswordToken 객체를 전달한다.
- AuthenticationManager는 등록된 AuthenticationProvider(들)을 조회하여 인증을 요구한다.
- 실제 DB에서 사용자 인증정보를 가져오는 UserDetailsService로부터 사용자 정보를 받아온다.
- 넘겨받은 사용자 정보를 통해 DB에서 찾은 사용자 정보인 UserDetails 객체를 만든다.
- AuthenticationProvider(들)은 UserDetails를 넘겨받고 사용자 정보를 비교한다.
- 인증이 완료되면 권한 등의 사용자 정보를 담은 Authentication 객체를 반환한다.
- 다시 최초의 AuthenticationFilter에 Authentication 객체가 반환된다.
- Authenticaton 객체를 SecurityContext에 저장한다.

엥 여러분은 글들을 보고 바로 이해할 수 있었는가??
본인은 감자 중에 감자라 그런가 도무지 이해를 할 수 없었다…
Authentication이 무엇인지, AuthenticationProvider, AuthenticationManager가 무엇인지가 도무지 감을 잡을 수 없었다.. 그래서 직접 코드들을 작성하고, 뜯어보기로 결정하였다…!!
위에 적힌 한글 Flow의 번호에 맞게 설명과 코드를 적어놓았다.
위의 Flow를 보면 알다시피 Filter로 시작해 Filter에서 마무리되는 Flow이기에 번호가 왔다 갔다 할 수 있다. 여러분은 그 다음 번호에만 신경을 써주면 고맙겠다..!!!
5. 코드와 함께 하는 스프링 시큐리티 처리 과정
1. 사용자가 로그인 정보와 함께 인증 요청을 한다.(Http Request)
- 이 때 로그인 정보는 Tomcat의 내부 구조들을 거쳐 Servelt까지 도착한다.
- Servlet에서 DispatcherServlet으로 가기 위해서 filter chain들을 거치는 중에 Spring Security의 DelegatingFilterProxy라는 필터에서 Request를 가져온다.
2. DelegatingFilterProxy에 연결된 SecurityFilterChain의 AuthenticationFilter가 요청을 가로채고, 가로챈 정보를 통해 UsernamePasswordAuthenticationToken의 인증용 객체를 생성한다.(Authentication 인터페이스의 구현체다.)
아래 코드는 AuthenticationFilter중 하나인 UsernamePasswordAuthenticationFilter에서 UsernamePasswordAuthenticationToken의 인증용 객체를 생성하는 메서드
public class MyAuthenticationFilter extends AbstractAuthenticationProcessingFilter {

	@Override
	public Authentication attemptAuthentication(HttpServletRequest request, HttpServletResponse response)
			throws AuthenticationException {
		if (this.postOnly && !request.getMethod().equals("POST")) {
			throw new AuthenticationServiceException("Authentication method not supported: " + request.getMethod());
		}
		String username = obtainUsername(request);
		username = (username != null) ? username : "";
		username = username.trim();
		String password = obtainPassword(request);
		password = (password != null) ? password : "";
		UsernamePasswordAuthenticationToken authRequest = new UsernamePasswordAuthenticationToken(username, password);
		// Allow subclasses to set the "details" property
		setDetails(request, authRequest);

		// 인증이 성공한 경우 Authentication 객체를 생성합니다.
    Authentication authenticated = this.getAuthenticationManager().authenticate(authRequest);

		// successfulAuthentication 메서드를 호출하여 인증 성공 후의 추가 동작을 처리합니다.
    successfulAuthentication(request, response, getFilterChain(), authenticated);

    // 인증 성공 후의 추가 동작이 완료되었으므로, Authentication 객체를 반환합니다.
    return authenticated;
	}
}- 우리가 보냈던 request는 username과 password가 같이 날라온다.
- UsernamePasswordAuthenticationToken 이라는 통행증을 미리 만들어둔다.
- Token내의 Authentication이 인증을 받지 못했기 때문에 아직은 false이다.
-
UsernamePasswordAuthenticationToken 객체의 생성자에서 초기 setAuthenticated 를 false로 지정하기 떄문이다.
public UsernamePasswordAuthenticationToken(Object principal, Object credentials) {
		super(null);
		this.principal = principal;
		this.credentials = credentials;
		setAuthenticated(false);
	}
-
- Token내의 Authentication이 인증을 받지 못했기 때문에 아직은 false이다.
3. AuthenticationManager의 구현체인 ProviderManager에게 생성한 UsernamePasswordToken 객체를 전달한다.
UsernamePasswordAuthenticationToken을 가지고AuthenticationManager에게 인증을 처리해달라고 요청한다.-
AuthenticationManager가 인증을 처리할 때 detail 정보가 필요할 수도 있기에 미리 request 정보들(IP etc..) setDetails를 한다.
return this.getAuthenticationManager().authenticate(authRequest); -
UsernamePasswordAuthenticationFilter의 부모 객체인
AbstractAuthenticationProcessingFilter에서는 AuthenticationManager를 의존하고 있기에 위와 같이 this를 통한 AuthenticationManager 객체의 메서드를 호출하는 코드가 가능하다.
-
9. 다시 최초의 AuthenticationFilter에 Authentication 객체가 반환된다.
Authentication authenticated = this.getAuthenticationManager().authenticate(authRequest);- 이 코드를 통해서
AuthenticationFilter의private AuthenticationManager authenticationManager;에 객체를 저장하게 된다.protected AuthenticationManager getAuthenticationManager() { return this.authenticationManager; }
10. Authenticaton 객체를 SecurityContext에 저장한다.
// successfulAuthentication 메서드를 호출하여 인증 성공 후의 추가 동작을 처리합니다.
successfulAuthentication(request, response, getFilterChain(), authenticated);authenticate(authRequest)메서드는AuthenticationManager를 통해authRequest객체를 전달하여 실제 인증을 수행하고, 인증된Authentication객체를 반환한다. 반환된 Authentication 객체는attemptAuthentication메서드의 리턴값으로 사용된다.- Authentication 객체가 반환되면, AuthenticationFilter는 이를 SecurityContext에 저장한다.
- 이 과정은
AbstractAuthenticationProcessingFilter의successfulAuthentication메서드에서 처리된다. successfulAuthentication `` 메서드는 인증이 성공한 경우 호출되는 메서드로, SecurityContext에 Authentication 객체를 저장하는 역할을 수행한다.- successfulAuthentication 메서드
protected void successfulAuthentication(HttpServletRequest request, HttpServletResponse response, FilterChain chain, Authentication authResult) throws IOException, ServletException { SecurityContextHolder.getContext().setAuthentication(authResult); if (this.logger.isDebugEnabled()) { this.logger.debug(LogMessage.format("Set SecurityContextHolder to %s", authResult)); } this.rememberMeServices.loginSuccess(request, response, authResult); if (this.eventPublisher != null) { this.eventPublisher.publishEvent(new InteractiveAuthenticationSuccessEvent(authResult, this.getClass())); } this.successHandler.onAuthenticationSuccess(request, response, authResult); } - SecurityContext에 Authentication 객체를 저장하는 부분
SecurityContextHolder.getContext().setAuthentication(authResult);
- successfulAuthentication 메서드
- 따라서, AuthenticationFilter의 attemptAuthentication 메서드에서 getAuthenticationManager().authenticate(authRequest)를 호출하여 인증을 수행하고 반환된 Authentication 객체가 SecurityContext에 저장되는 과정이 이루어진다.
4. AuthenticationManager는 등록된 AuthenticationProvider(들)을 조회하여 인증을 요구한다.
public class CustomAuthenticationManager implements AuthenticationManager {

    private List<AuthenticationProvider> authenticationProviders;

    public CustomAuthenticationManager(List<AuthenticationProvider> authenticationProviders) {
        this.authenticationProviders = authenticationProviders;
    }

    @Override
    public Authentication authenticate(Authentication authentication) throws AuthenticationException {
        AuthenticationException lastException = null;

        for (AuthenticationProvider provider : authenticationProviders) {
            try {
                // 각각의 AuthenticationProvider에게 인증을 위임합니다.
                Authentication result = provider.authenticate(authentication);

                if (result != null) {
                    // 인증이 성공한 경우 결과를 반환합니다.
                    return result;
                }
            } catch (AuthenticationException e) {
                // 인증이 실패한 경우 예외를 저장합니다.
                lastException = e;
            }
        }

        // 모든 AuthenticationProvider에서 인증을 실패한 경우 예외를 던집니다.
        throw lastException != null ? lastException : new ProviderNotFoundException("No AuthenticationProvider found for the given authentication");
    }
}-
AuthenticationManager는 자신이 물어볼 수 있는AuthenticationProvider들에게 인증을 체크해 줄 수 있는지 다 물어본다. 그 중에 인증을 체크해줄 수 있으면 누구든 통행증을 리턴함으로써 서버에 통과된다. -
AuthenticationProvider는 그러면 어떻게 생성을 해줘야 하는 걸까??-
SecurityConfig에서 생성을 해준다.@Configuration @EnableWebSecurity public class SecurityConfig extends WebSecurityConfigurerAdapter { @Autowired private UserDetailsService userDetailsService; // 사용자 정보를 제공하는 UserDetailsService 구현체 @Override protected void configure(AuthenticationManagerBuilder auth) throws Exception { // DaoAuthenticationProvider를 생성하고 UserDetailsService를 설정합니다. DaoAuthenticationProvider authenticationProvider = new DaoAuthenticationProvider(); authenticationProvider.setUserDetailsService(userDetailsService); // CustomAuthenticationManager를 생성하고 DaoAuthenticationProvider를 등록합니다. CustomAuthenticationManager authenticationManager = new CustomAuthenticationManager(authenticationProvider); // AuthenticationManager를 설정합니다. auth.authenticationProvider(authenticationManager); } }
- 등록할
AuthenticationProvider객체를 생성하고, UserDetailsService를 설정해준다. - 그 다음 Authentication Manager 객체를 생성하고, 생성 인자로 AuthenticationProvider 객체를 넣어줌으로써 등록해준다.
- AuthenticationManager를 설정한다.
-
// 각각의 AuthenticationProvider에게 인증을 위임합니다.
Authentication result = provider.authenticate(authentication);- 위 코드를 통해 AuthenticationProvider 객체는 UsernamePasswordAuthenticationToken(아직은 Authentication이 false이다.)을 인자로 넘겨받아 옳바른 유저인지 인증하고, 옳바른 유저이면 UsernamePasswordAuthenticationToken를 생성하여서, AuthenticationManager에게 전달하는 책임을 가진다.
5. 실제 DB에서 사용자 인증정보를 가져오는 UserDetailsService로부터 사용자 정보를 받아온다.
public class CustomAuthenticationProvider implements AuthenticationProvider {

    private UserDetailsService userDetailsService;

    public CustomAuthenticationProvider(UserDetailsService userDetailsService) {
        this.userDetailsService = userDetailsService;
    }

    @Override
    public Authentication authenticate(Authentication authentication) throws AuthenticationException {
        String username = authentication.getName();
        String password = authentication.getCredentials().toString();

        // UserDetailsService를 통해 사용자 정보를 가져옵니다.
        UserDetails userDetails = userDetailsService.loadUserByUsername(username);

        if (userDetails == null) {
            throw new UsernameNotFoundException("User not found");
        }

        // 사용자 정보와 입력된 인증 정보를 비교하여 인증을 수행합니다.
        if (password.equals(userDetails.getPassword())) {
            // 인증이 성공한 경우 UsernamePasswordAuthenticationToken을 생성하여 반환합니다.
            return new UsernamePasswordAuthenticationToken(userDetails, null, userDetails.getAuthorities());
        } else {
            throw new BadCredentialsException("Invalid credentials");
        }
    }

    @Override
    public boolean supports(Class<?> authentication) {
        return authentication.equals(UsernamePasswordAuthenticationToken.class);
    }
}AuthenticationProvider는userDetailsService에 대한 의존성을 주입받는다.- UserDetailsService는 사용자 정보를 제공하고, AuthenticationProvider는 인증을 처리합니다. 이 두 가지를 조합하여 스프링 시큐리티의 인증 로직을 구성할 수 있습니다.
7. AuthenticationProvider(들)은 UserDetails를 넘겨받고 사용자 정보를 비교한다.
// 사용자 정보와 입력된 인증 정보를 비교하여 인증을 수행합니다.
        if (password.equals(userDetails.getPassword())) {
            // 인증이 성공한 경우 UsernamePasswordAuthenticationToken을 생성하여 반환합니다.
            return new UsernamePasswordAuthenticationToken(userDetails, null, userDetails.getAuthorities());
        } else {
            throw new BadCredentialsException("Invalid credentials");
        }
    }
8. 인증이 완료되면 권한 등의 사용자 정보를 담은 Authentication 객체를 반환한다.
userDetailsService는 DB에서 유저 정보를 가져오는 책임을 가지고 있다. 이러한 userDetailsService, 즉 DB에 저장된 유저의 아이디, 비밀번호를 가지고 와서 인자로 넘겨받았던UsernamePasswordAuthenticationToken에 있는 아이디와 비밀번호를 비교한다.- 만약 둘의 아이디 , 비밀번호가 같으면 UsernamePasswordAuthenticationToken에 DB에서 가져온 유저 객체와 유저가 가진 권한들을 넘겨서 생성해준다.
- UsernamePasswordAuthenticationToken을 생성해줄 때 권한들도 같이 넘겨주면, 생성자 오버로딩을 통해서
setAuthenticated(true)코드가 실행된다.public UsernamePasswordAuthenticationToken(Object principal, Object credentials, Collection<? extends GrantedAuthority> authorities) { super(authorities); this.principal = principal; this.credentials = credentials; super.setAuthenticated(true); // must use super, as we override }
6. 넘겨받은 사용자 정보를 통해 DB에서 찾은 사용자 정보인 UserDetails 객체를 만든다.
@Service
@Transactional
public class SpUserService implements UserDetailsService {

    private final SpUserRepository spUserRepository;

    public SpUserService(SpUserRepository spUserRepository) {
        this.spUserRepository = spUserRepository;
    }

    @Override
    public UserDetails loadUserByUsername(String username) throws UsernameNotFoundException {
        return spUserRepository.findSpUserByEmail(username)
                .orElseThrow(() -> new UsernameNotFoundException(username));
    }

    public Optional<SpUser> findUser(String email){
        return spUserRepository.findSpUserByEmail(email);
    }

    public SpUser save(SpUser user){
        return spUserRepository.save(user);
    }

    public void addAuthority(Long userId, String authority){
        spUserRepository.findById(userId).ifPresent(user -> {
            SpAuthority newRole = new SpAuthority(user.getUserId(), authority);
            if(user.getAuthorities() == null){
                HashSet<SpAuthority> authorities = new HashSet<>();
                authorities.add(newRole);
                user.setAuthorities(authorities);
                save(user);
            } else if(!user.getAuthorities().contains(newRole)){
                HashSet<SpAuthority> authorities = new HashSet<>();
                authorities.addAll(user.getAuthorities());
                authorities.add(newRole);
                user.setAuthorities(authorities);
                save(user);
            }
        });
    }

    public void removeAuthority(Long userId, String authority){
        spUserRepository.findById(userId).ifPresent(user -> {
            if(user.getAuthorities()==null) return;
            SpAuthority targetRole = new SpAuthority(user.getUserId(), authority);
            if(user.getAuthorities().contains(targetRole)){
                user.setAuthorities(
                        user.getAuthorities().stream().filter(auth -> !auth.equals(targetRole))
                                .collect(Collectors.toSet())
                );
                save(user);
            }
        });
    }
}- userDetailService는 Spring Security에서 유저의 정보를 가져오는 인터페이스이다. → 즉 UserDetail을 가져온다.
// UserDetailsService를 통해 사용자 정보를 가져옵니다.
UserDetails userDetails = userDetailsService.loadUserByUsername(username);- 위 코드를 통해 넘겨받은 username으로 Repository에서 UserDetail 객체를 가져온 후에 리턴해준다.
-
Repository에서는 DB로부터 해당하는 username의 데이터를 가져와 UserDetail 객체로 만들어준다.
public interface SpUserRepository extends JpaRepository<SpUser, Long> {

    Optional<SpUser> findSpUserByEmail(String email);

}
-
- UserDetail은 User객체라고 생각하면 된다.
@Entity @Table(name="sp_user") public class SpUser implements UserDetails { @Id @GeneratedValue(strategy = GenerationType.IDENTITY) private Long userId; private String email; private String password; @OneToMany(fetch = FetchType.EAGER, cascade = CascadeType.ALL) @JoinColumn(name = "user_id", foreignKey = @ForeignKey(name="user_id")) private Set<SpAuthority> authorities; private boolean enabled; @Override public String getUsername() { return email; } @Override public boolean isAccountNonExpired() { return enabled; } @Override public boolean isAccountNonLocked() { return enabled; } @Override public boolean isCredentialsNonExpired() { return enabled; } }- UserDetail은 여러 권한들을 가지고있고, 해당 권한들은 GrantedAuthority를 구현한 Authority 객체들이다.
- GrantedAuthority를 구현한 Authority 객체
@Entity @Table(name="sp_user_authority") @IdClass(SpAuthority.class) public class SpAuthority implements GrantedAuthority { @Id @Column(name="user_id") private Long userId; @Id private String authority; }- UserService에서 addAuthority 메서드를 통해 해당 유저에게 SpAuthority 객체를 추가할 수 있다.
public void addAuthority(Long userId, String authority){ spUserRepository.findById(userId).ifPresent(user -> { SpAuthority newRole = new SpAuthority(user.getUserId(), authority); if(user.getAuthorities() == null){ HashSet<SpAuthority> authorities = new HashSet<>(); authorities.add(newRole); user.setAuthorities(authorities); save(user); } else if(!user.getAuthorities().contains(newRole)){ HashSet<SpAuthority> authorities = new HashSet<>(); authorities.addAll(user.getAuthorities()); authorities.add(newRole); user.setAuthorities(authorities); save(user); } }); } ```
- UserService에서 addAuthority 메서드를 통해 해당 유저에게 SpAuthority 객체를 추가할 수 있다.