Passing Props
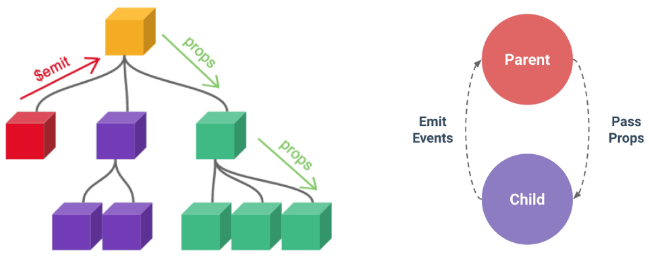
- 부모는 자식에게 데이터를 전달(Pass Props)하며, 자식은 자신에게 일어난 일을 부모에게 알림(Emit Event)
Props
- 부모 컴포넌트로부터 자식 컴포넌트로 데이터를 전달하는데 사용되는 속성
Props 특징
- 부모 속성이 업데이트되면 자식으로 전달되지만 그 반대는 안됨
- 즉, 자식 컴포넌트 내부에서 props를 변경하려고 시도해서는 안되며 불가능
- 또한 부모 컴포넌트가 업데이트될 때마다 이를 사용하는 자식 컴포넌트의 모든 props가 최신 값으로 업데이트됨
부모 컴포넌트에서만 변경하고 이를 내려받는 자식 컴포넌트는 자연스럽게 갱신
One-Way Data Flow
- 모든 props는 자식 속성과 부모 속성 사이에 하향식 단방향 바인딩을 형성
- one-way-down binding
- 단방향인 이유 : 하위 컴포넌트가 실수로 상위 컴포넌트의 상태를 변경하여 앱에서의 데이터 흐름을 이해하기 어렵게 만드는 것을 방지하기 위함
데이터 흐름의 "일관성" 및 "단순화"
Declaring Props
Props 선언
- 부모 컴포넌트에서 내려 보낸 props를 사용하기 위해서는 자식 컴포넌트에서 명시적인 props 선언이 필요
- defineProps()를 사용하여 props를 선언
- defineProps()에 작성하는 인자의 데이터 타입에 따라 선언 방식이 나뉨
- "문자열 배열"을 사용한 선언
- 배열의 문자열 요소로 props 선언
- 문자열 요소의 이름은 전달된 props의 이름
ParentChild.vue
<script setup>
defineProps(['myMsg'])
</script>- "객체"를 사용한 선언
- 각 객체 속성의 키가 전달받은 props 이름이 되며, 객체 속성 값은 값이 될 데이터의 타입에 해당하는 생성자 함수(Number, String...)여야 함
- 객체 선언 문법 사용 권장
ParentChild.vue
<script setup>
defineProps({
  myMsg: String
})
</script>
props 데이터 사용
- props 선언 후 템플릿에서 반응형 변수와 같은 방식으로 사용
ParentChild.vue
<div>
  <p>{{ myMsg }}</p>
</div>

- props를 객체로 반환하므로 필요한 경우 JavaScript에서 접근 가능
```html
<script setup>
const props = defineProps({ myMsg: String })
console.log(props)  // {myMsg: 'message'}
console.log(props.myMsg)  // 'message'
</script>
선언 사전과정
- vue 프로젝트 생성
- 초기 생성된 컴포넌트 모두 삭제 (App.vue 제외)
- src/assets 내부 파일 모두 삭제
- main.js 해당 코드 삭제
import './assets/main.css' - App > Parent > ParentChild 컴포넌트 관계 작성
App 컴포넌트 작성
App.vue
<template>
	<div>
    	<Parent />
    </div>
</template>

<script setup>
import Parent from '@/components/Parent.vue'
</script>
Parent 컴포넌트 작성
Parent.vue
<template>
	<div>
    	<ParentChild />
    </div>
</template>

<script setup>
import ParentChild from '@/components/ParentChild.vue'
</script>
ParentChild 컴포넌트 작성
ParentChild.vue
<template>
	<div></div>
</template>

<script setup>
</script>
Props 작성
- 부모 컴포넌트 Parent에서 자식 컴포넌트 ParentChild에 보낼 props 작성
my-msg = "message"
Parent..vue
<template>
  <div>
    <ParentChild my-msg="message">
  </div>
</template>
Props Details
- Props Name Casing (Props 이름 컨벤션)
- 자식 컴포넌트로 전달시 (-> kebab-case)
<ParentChild my-msg="message" />
- 자식 컴포넌트로 전달시 (-> kebab-case)
- 선언 및 템플릿 참조시 (-> camelCase)
defineProps({
	myMsg: String
)}
<p>{{ myMsg }}</p>
- Static Props와 Dynamic Props
- 지금까지 작성한 것은 Static(정적) props
- v-bind를 사용하여 동적으로 할당된 props를 사용할 수 있음
2-1. Dynamic props 정의
Parent.vue
js
import { ref } from 'vue'

const name = ref('Alice')
html
<ParentChild my-msg="message" :dynamic-props="name" />2-2. Dynamic props 선언 및 출력
ParentChild.vue
js
defineProps({
  myMsg: String,
  dynamicProps: String,
})
html
<p>{{ dynamicProps }}</p>Utilizing Props
- v-for와 함께 사용하여 반복되는 요소를 props로 전달하기
- ParentItem 컴포넌트 생성 및 Parent의 하위 컴포넌트로 등록
ParentItem.vue
<template>
  <div>
    <p>{{ myProp }}</p>
  </div>
</template>

<script setup>
defineProps({
  myProp: Object,
})
</script>

<style scoped></style>
Parent.vue
<template>
  <div>
    <ParentChild my-msg="message" :dynamic-props="name" />
    <ParentItem v-for="item in items" :key="item - id" :my-prop="item" />
  </div>
</template>

<script setup>
import { ref } from 'vue'
import ParentChild from '@/components/ParentChild.vue'
import ParentItem from '@/components/ParentItem.vue'

const items = ref([
  { id: 1, name: '사과' },
  { id: 2, name: '바나나' },
  { id: 3, name: '딸기' },
])

const name = ref('Alice')
</script>

<style scoped></style>
Component Events
Emit
- 부모는 자식에게 데이터를 전달(Pass Props)하며, 자식은 자신에게 일어난 일을 부모에게 알림(Emit Event)
부모가 props 데이터를 변경하도록 소리쳐야 함
$emit()
- 자식 컴포넌트가 이벤트를 발생시켜 부모 컴포넌트로 데이터를 전달하는 역할의 메서드
$표기는 Vue 인스턴스의 내부 변수들을 가리킴- Life cycle hooks, 인스턴스 메서드 등 내부 특성 속성에 접근할 때 사용
emit 메서드 구조
$emit(event, ...args)
- event
- 커스텀 이벤트 이름
- args
- 추가 인자
Event Emission and Reception
$emit을 사용하여 템플릿 표현식에서 직접 사용자 정의 이벤트를 발신
button @click="$emit('someEvent')">클릭</button>- 그런 다음 부모는 v-on을 사용하여 수신할 수 있음
<ParentComp @some-event="someCallback" />- ParentChild에서 someEvent라는 이름의 사용자 정의 이벤트를 발신
ParentChild.vue
<button @click="$emit('someEvent')">클릭</button>- ParentChild의 부모 Parent는 v-on을 사용하여 발신된 이벤트를 수신
- 수신 후 처리할 로직 및 콜백함수 호출
Parent.vue
<ParentChild @some-event="someCallback" my-msg="message" :dynamic-props="name" />Parent.vue
const someCallback = function () {
  console.log('ParentChild가 발신한 이벤트를 수신했어요.')
}
Declaring Emit Events
- defineEmits()를 사용하여 발신할 이벤트를 선언
- props와 마찬가지로 defineEmits()에 작성하는 인자의 데이터 타입에 따라 선언 방식이 나뉨 (배열, 객체)
- defineEmits()는 $emit 대신 사용할 수 있는 동등한 함수를 반환 (script에서는 $emit 메서드를 접근할 수 없기 때문)
js
<script setup>
defineEmits()
</script>
js
<script setup>
const emit = defineEmits(['someEvent', 'myFocus'])

const buttonClick = function () {
  emit('someEvent')
}
</script>
이벤트선언 활용
- 이벤트 선언 방식으로 추가 버튼 작성 및 결과 확인
ParentChild.vue
js
<script setup>
const emit = defineEmits(['someEvent'])

const buttonClick = function () {
  emit('someEvent')
}
</script>
html
<button @click="buttonClick">클릭</button>Passing Events
Event Arguments
-
이벤트 인자
-
이벤타 발신 시 추가 인자를 전달하여 값을 제공할 수 있음
-
ParentChild에서 이벤트를 발신하여 Parent로 추가 인자 전달하기
-
ParentChild에서 발신한 이벤트를 Parent에서 수신
html
<ParentChild my-msg="message"
:dynamic-props="name"
@some-event="someCallback"
@my-focus="someCallback2"
@emit-args="getNumbers"/>
js
const getNumbers = function (...args) {
    console.log(args)
}
Event Details
Event Name Casing
- 선언 및 발신시 (-> camelCase)
html
<button @click="$emit('someEvent')">클릭</butotn>js
const emit = defineEmits(['someEvent'])

emit('someEvent')- 부모 컴포넌트에서 수신시 (-> kebab-case)
html
<ParentChild @some-event="..." />Utilizing Emit Events
- 최하단 ParentGrandChild에서 Parent 컴포넌트의 name 변수 변경 요청하기
- ParentGrandChild에서 이름 변경을 요청하는 이벤트 발신
ParentGrandChild.vue
js
const emit = defineEmits(['updateName'])

const updateName = function () {
  emit('updateName')
}
html
<button @click="updateName">이름 변경</button>- 이벤트 수신 후 이름 변경을 요청하는 이벤트 발신
ParentChild.vue
js
const emit = defineEmits(['someEvent, 'emitArgs', updateName'])

const updateName = function () {
  emit('updateName')
}
html
<ParentGrandChild :my-msg="myMsg" @update-name="updateName" />- 이벤트 수신 후 이름 변수 변경 메서드 호출
- 해당 변수를 props로 받는 모든 곳에서 자동 업데이트
Parent.vue
<ParentChild @update-name="updateName" />const updatename = function () {
name.value = 'Bella'
}참고
- 주의 정적 & 동적 props
- 첫 번째는 정적 props로 문자열 "1" 전달
- 두 번째는 동적 props로 숫자 1을 전달
<SomeComponent num-props="1" />

<SomeComponent :num-props="1' />- Props 선언시 "객체 선언 문법"을 권장하는 이유
- 컴포넌트를 가독성이 좋게 문서화하는 데 도움이 되며, 다른 개발자가 잘못된 유형을 전달할 때에 브라우저 콘솔에 경고를 출력하도록 함
- 추가로 props에 대한 유효성 검사로써 활용 가능
defineProps({
  // 여러 타입 허용
  propB: [String, Number],
  // 문자열 필수
  propC: {
    type: String,
    required: true
  },
  // 기본 값을 가지는 숫자형
  propD: {
    type: Number,
    default: 10
  },
...
emit 이벤트도 "객체 선언 문법"으로 작성 가능
- emit 이벤트 또한 객체 구문으로 선언된 경우 유효성을 검사할 수 있음
- emit 이벤트 또한 객체 구문으로 선언된 경우 유효성을 검사할 수 있음
const emit = defineEmits({
  // 유효성 검사 없음
  click: null,
  // submit 이벤트 유효성 검사
  submit: ({email, password }) => {
    if (email && password) {
      return true
    } else {
      console.warn('submit 이벤트가 옳지 않음')
      return false
    }
  }
})
const submitForm = function (email, password) {
  emit('submit', { email, password })
}