가시다님의 T101 [4기] 스터디 내용을 정리한 포스트 입니다.
YES24 해당 도서로 가보기
블로그의 실습 내용들은 ‘테라폼으로 시작하는 IaC’ 책을 기준하여 정리하였습니다.

실습 환경 구성
Mac OS에 실습 환경을 구성하였고 이후에도 Mac OS를 기준으로 실습을 진행하겠습니다.
Terraform 환경 구성
- brew, tfenv를 사용
# tfenv 설치
brew install tfenv

# 설치 가능 버전 리스트 확인
tfenv list-remote

# 테라폼 1.8.5 버전 설치
tfenv install 1.8.5

# 테라폼 1.5.1 버전 사용 설정
tfenv use 1.8.5

# tfenv로 설치한 버전 확인
tfenv list

# 테라폼 버전 정보 확인
terraform version

# 자동완성
terraform -install-autocomplete
## 참고 .zshrc 에 아래 추가됨
cat ~/.zshrc
autoload -U +X bashcompinit && bashcompinit
complete -o nospace -C /usr/local/bin/terraform terraform
IDE 구성
IDE는 비주얼 스튜디오 코드 Visual Studio Code (VS Code)를 설치 후 실습에 사용
- Extentions (확장) 설치
- HashiCorp HCL
- 설정 → 일반적으로 사용되는 설정 ⇒ Files: Auto Save 값을 afterDelay 선택
- HashiCorp Terraform
- HashiCorp HCL
실습1: AWS CLI 설치 및 자격증명
AWS CLI 설치
# awscli 설치
$ brew install awscli

# aws cli 버전 확인
aws --version
aws-cli/2.7.31 Python/3.10.7 Darwin/21.6.0 source/x86_64 prompt/off

# aws configure 로 자격증명 설정
aws configure
      Name                    Value             Type    Location
      ----                    -----             ----    --------
   profile                <not set>             None    None
access_key     ****************Y6GM shared-credentials-file
secret_key     ****************Ifqm shared-credentials-file
    region           ap-northeast-2      config-file    ~/.aws/config

# 페이저 사용 비활성화
export AWS_PAGER=""
실습에 필요한 utils 설치
brew install tree jq watchdefault VPC 생성(없는 경우)
# default VPC를 생성
aws ec2 create-default-vpc

# default Subnet 생성
aws ec2 create-default-subnet --availability-zone ap-northeast-2a
aws ec2 create-default-subnet --availability-zone ap-northeast-2b
aws ec2 create-default-subnet --availability-zone ap-northeast-2c
aws ec2 create-default-subnet --availability-zone ap-northeast-2d
실습2: EC2 1대 배포
Amazon Linux 2 최신 ami id 찾기
aws ec2 describe-images --owners amazon --filters "Name=name,Values=amzn2-ami-hvm-2.0.*-x86_64-gp2" "Name=state,Values=available" --query 'Images|sort_by(@, &CreationDate)[-1].[ImageId, Name]' --output text
ami-0d1530d2e1de1db7c   amzn2-ami-hvm-2.0.20240529.0-x86_64-gp2

AL2ID=`aws ec2 describe-images --owners amazon --filters "Name=name,Values=amzn2-ami-hvm-2.0.*-x86_64-gp2" "Name=state,Values=available" --query 'Images|sort_by(@, &CreationDate)[-1].[ImageId]' --output text`
echo $AL2ID
ami-0d1530d2e1de1db7c
EC2 1대 배포 실행
- 코드 파일 작성
cat <<EOT > main.tf
provider "aws" {
  region = "ap-northeast-2"
}

resource "aws_instance" "example" {
  ami           = "$AL2ID"
  instance_type = "t2.micro"
}
EOT- 배포 실행
# 초기화
terraform init
ls -al
tree .terraform

.terraform
└── providers
    └── registry.terraform.io
        └── hashicorp
            └── aws
                └── 5.53.0
                    └── darwin_arm64
                        ├── LICENSE.txt
                        └── terraform-provider-aws_v5.53.0_x5

# plan 확인
terraform plan
Terraform used the selected providers to generate the following execution plan. Resource actions are indicated with the following symbols:
  + create

Terraform will perform the following actions:

  # aws_instance.example will be created
  + resource "aws_instance" "example" {
      + ami                                  = "ami-0d1530d2e1de1db7c"
      + arn                                  = (known after apply)
      + associate_public_ip_address          = (known after apply)
      + availability_zone                    = (known after apply)
      + cpu_core_count                       = (known after apply)
      + cpu_threads_per_core                 = (known after apply)
      + disable_api_stop                     = (known after apply)
      + disable_api_termination              = (known after apply)
      + ebs_optimized                        = (known after apply)
      + get_password_data                    = false
      + host_id                              = (known after apply)
      + host_resource_group_arn              = (known after apply)
      + iam_instance_profile                 = (known after apply)
      + id                                   = (known after apply)
      + instance_initiated_shutdown_behavior = (known after apply)
      + instance_lifecycle                   = (known after apply)
      + instance_state                       = (known after apply)
      + instance_type                        = "t2.micro"
      + ipv6_address_count                   = (known after apply)
      + ipv6_addresses                       = (known after apply)
      + key_name                             = (known after apply)
      + monitoring                           = (known after apply)
      + outpost_arn                          = (known after apply)
      + password_data                        = (known after apply)
      + placement_group                      = (known after apply)
      + placement_partition_number           = (known after apply)
      + primary_network_interface_id         = (known after apply)
      + private_dns                          = (known after apply)
      + private_ip                           = (known after apply)
      + public_dns                           = (known after apply)
      + public_ip                            = (known after apply)
      + secondary_private_ips                = (known after apply)
      + security_groups                      = (known after apply)
      + source_dest_check                    = true
      + spot_instance_request_id             = (known after apply)
      + subnet_id                            = (known after apply)
      + tags_all                             = (known after apply)
      + tenancy                              = (known after apply)
      + user_data                            = (known after apply)
      + user_data_base64                     = (known after apply)
      + user_data_replace_on_change          = false
      + vpc_security_group_ids               = (known after apply)
    }

Plan: 1 to add, 0 to change, 0 to destroy.


# apply 실행
terraform apply
 Enter a value: yes 입력

Terraform used the selected providers to generate the following execution plan. Resource actions are indicated with the following symbols:
  + create

Terraform will perform the following actions:

  # aws_instance.example will be created
  + resource "aws_instance" "example" {
      + ami                                  = "ami-0d1530d2e1de1db7c"
      + arn                                  = (known after apply)
      + associate_public_ip_address          = (known after apply)
      + availability_zone                    = (known after apply)
      + cpu_core_count                       = (known after apply)
      + cpu_threads_per_core                 = (known after apply)
      + disable_api_stop                     = (known after apply)
      + disable_api_termination              = (known after apply)
      + ebs_optimized                        = (known after apply)
      + get_password_data                    = false
      + host_id                              = (known after apply)
      + host_resource_group_arn              = (known after apply)
      + iam_instance_profile                 = (known after apply)
      + id                                   = (known after apply)
      + instance_initiated_shutdown_behavior = (known after apply)
      + instance_lifecycle                   = (known after apply)
      + instance_state                       = (known after apply)
      + instance_type                        = "t2.micro"
      + ipv6_address_count                   = (known after apply)
      + ipv6_addresses                       = (known after apply)
      + key_name                             = (known after apply)
      + monitoring                           = (known after apply)
      + outpost_arn                          = (known after apply)
      + password_data                        = (known after apply)
      + placement_group                      = (known after apply)
      + placement_partition_number           = (known after apply)
      + primary_network_interface_id         = (known after apply)
      + private_dns                          = (known after apply)
      + private_ip                           = (known after apply)
      + public_dns                           = (known after apply)
      + public_ip                            = (known after apply)
      + secondary_private_ips                = (known after apply)
      + security_groups                      = (known after apply)
      + source_dest_check                    = true
      + spot_instance_request_id             = (known after apply)
      + subnet_id                            = (known after apply)
      + tags_all                             = (known after apply)
      + tenancy                              = (known after apply)
      + user_data                            = (known after apply)
      + user_data_base64                     = (known after apply)
      + user_data_replace_on_change          = false
      + vpc_security_group_ids               = (known after apply)
    }

Plan: 1 to add, 0 to change, 0 to destroy.

Do you want to perform these actions?
  Terraform will perform the actions described above.
  Only 'yes' will be accepted to approve.

  Enter a value: yes

aws_instance.example: Creating...
aws_instance.example: Still creating... [10s elapsed]
aws_instance.example: Still creating... [20s elapsed]
aws_instance.example: Still creating... [30s elapsed]
aws_instance.example: Creation complete after 32s [id=i-04cd7aed3818fe784]

Apply complete! Resources: 1 added, 0 changed, 0 destroyed.

# ec2 생성 확인 : aws 웹 관리 콘솔에서도 확인 - 서울 리전 선택
export AWS_PAGER=""
aws ec2 describe-instances --output table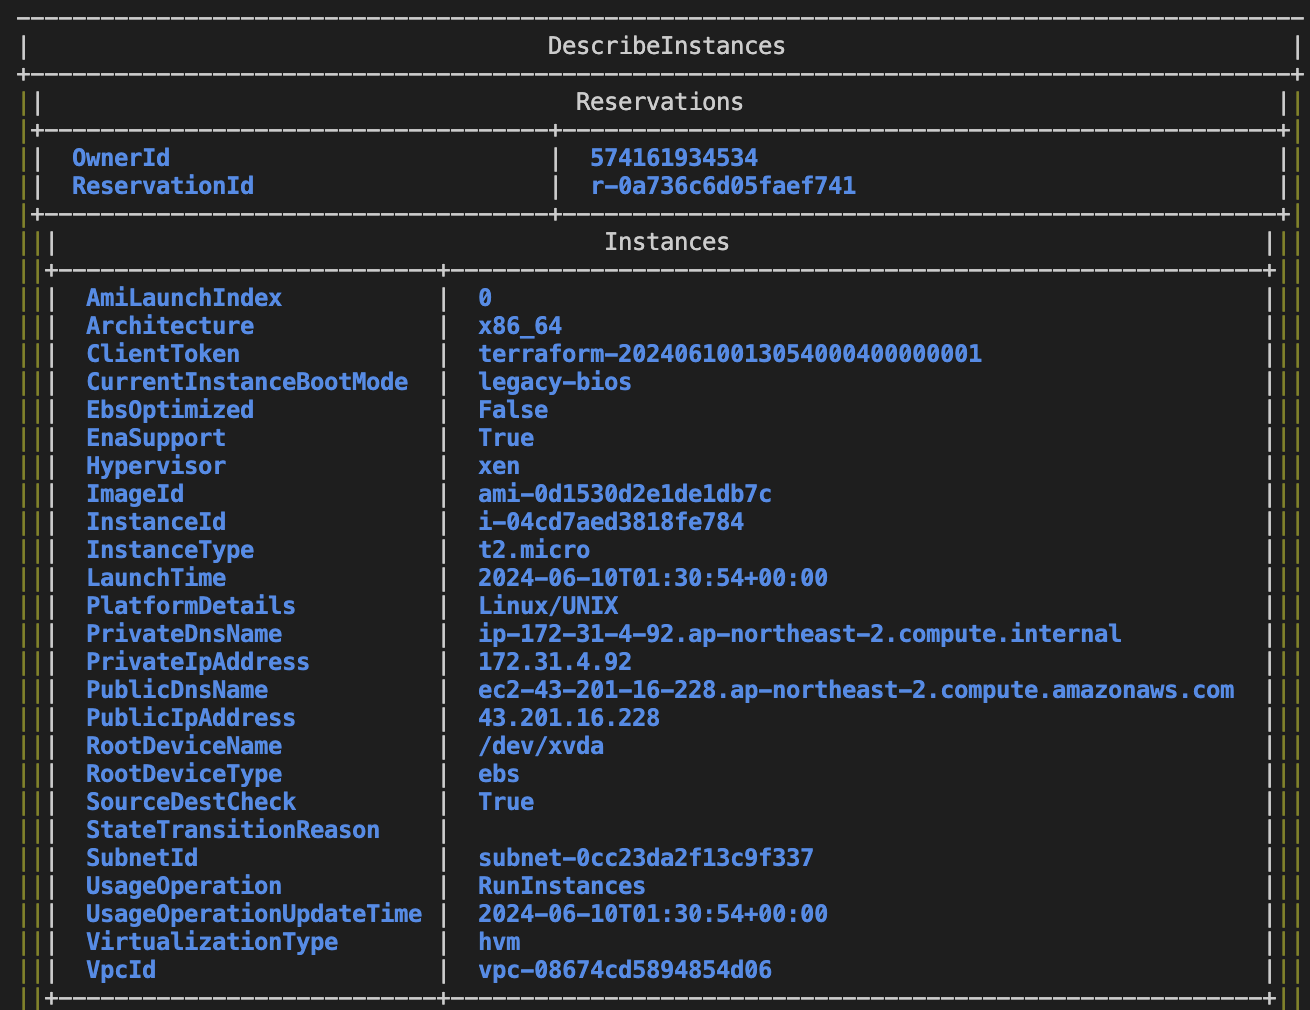
Name이 공란인 EC2 인스턴스 1대가 생성되었습니다.

- 코드 파일 수정
앞서 생성된 EC2 인스턴스의 Name을 추가해 줍니다.
cat <<EOT > main.tf
provider "aws" {
  region = "ap-northeast-2"
}

resource "aws_instance" "example" {
  ami           = "$AL2ID"
  instance_type = "t2.micro"

#추가함
  tags = {
    Name = "t101-study"
  }

}
EOT
Name이 추가되었습니다.

- EC2 삭제
terraform destroy -auto-approve실습3: EC2 1대 배포 & 웹 서버 설정
Ubuntu 22.04 LTS를 사용하는 EC2 생성 및 웹 서버 설정
# Ubuntu 22.04 최신 AMI ID 확인
aws ec2 describe-images --owners 099720109477 \
    --filters "Name=name,Values=ubuntu/images/hvm-ssd/ubuntu-jammy-22.04-amd64-server-*" "Name=state,Values=available" \
    --query 'Images|sort_by(@, &CreationDate)[-1].[ImageId, Name]' --output text

# 변수 지정
UBUNTUID=ami-0572f73f0a5650b33

# Main.tf 작성
cat <<EOT > main.tf
provider "aws" {
  region = "ap-northeast-2"
}

resource "aws_instance" "example" {
  ami                    = "$UBUNTUID"
  instance_type          = "t2.micro"

  user_data = <<-EOF
              #!/bin/bash
              echo "Hello, T101 Study" > index.html
              nohup busybox httpd -f -p 8080 &
              EOF

  tags = {
    Name = "terraform-Study-101"
  }
}
EOT
배포 실행
# init
terraform init
# plan
terraform plan
+ user_data = "d91ca31904077f0b641b5dd5a783401396ffbf3f"
# apply 실행
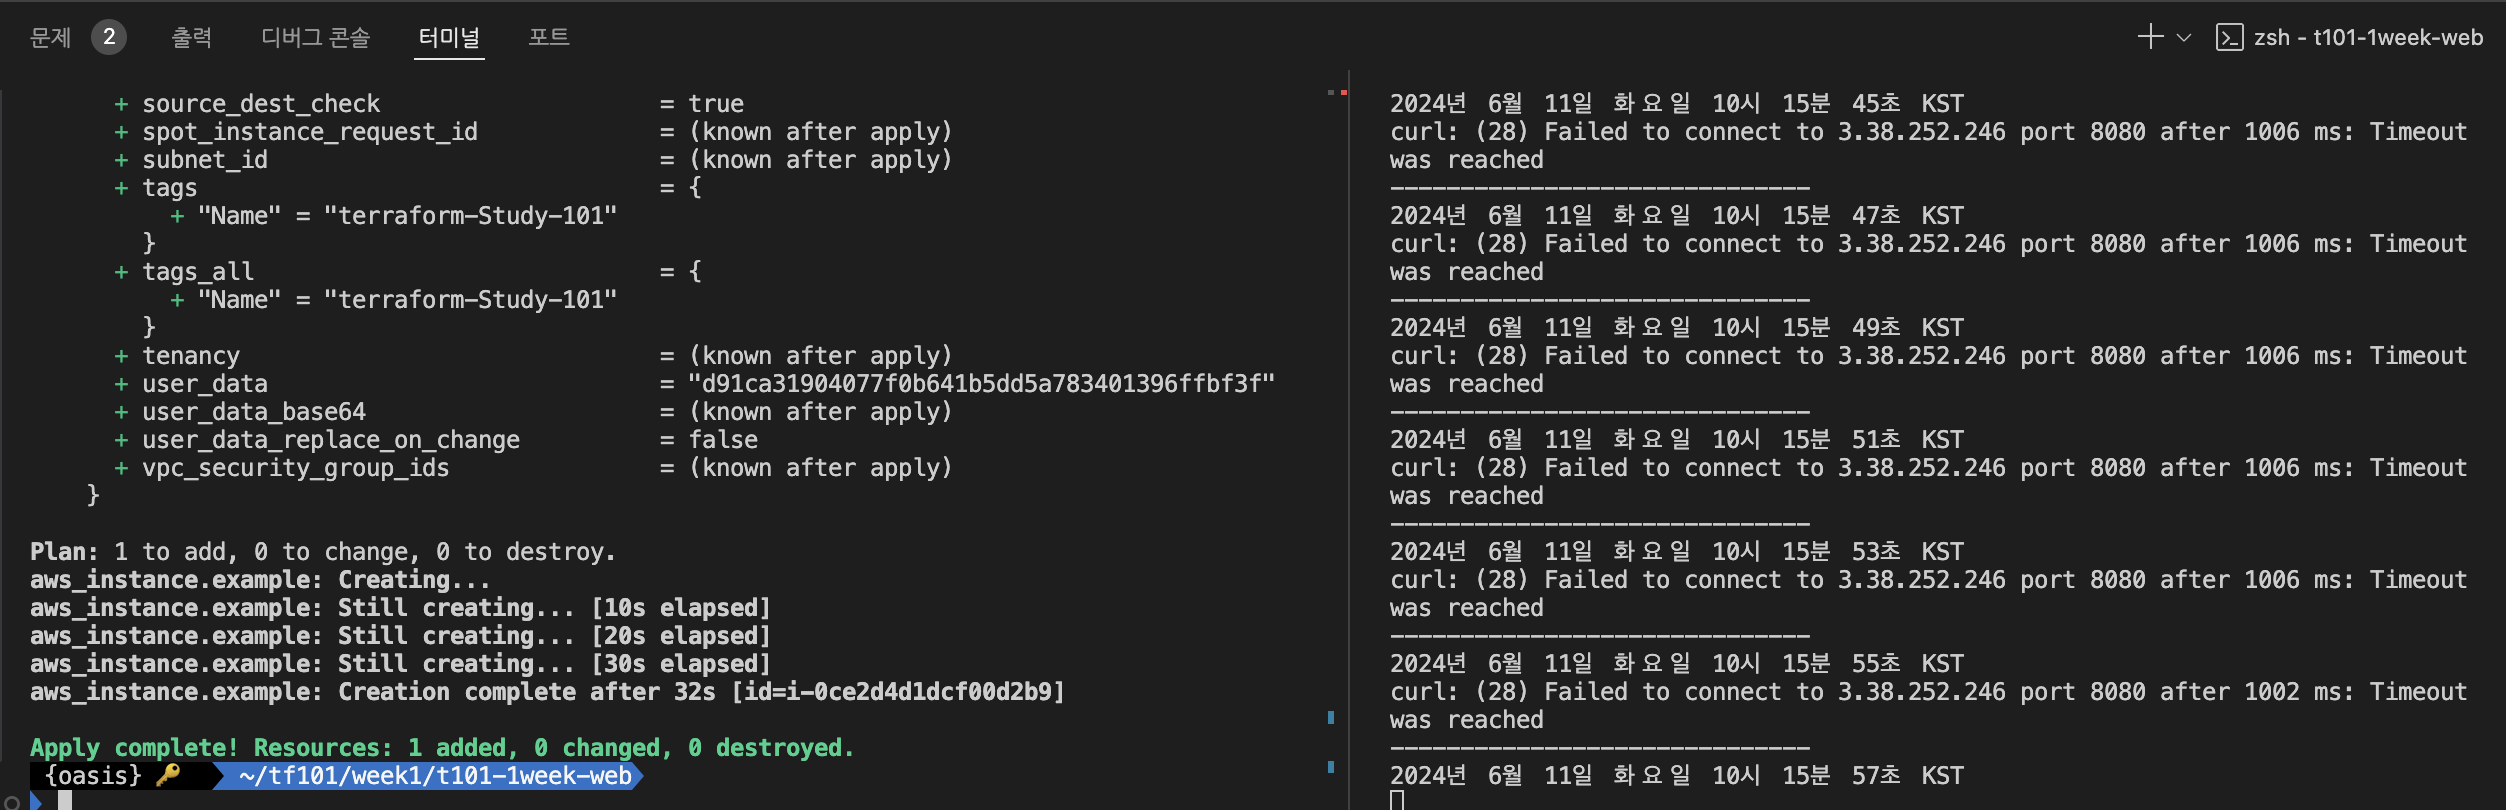
terraform apply -auto-approve웹 서버 접속 시도
PIP=43.201.86.40
while true; do curl --connect-timeout 1  http://$PIP:8080/ ; echo "------------------------------"; date; sleep 1; done
apply가 정상 수행되어 웹서버가 정상 생성되었으나 웹 서버 접속은 안되고 있습니다.
이유는 8080 포트에 대한 접근이 안되기 때문입니다. 접근을 위해서 main.tf에 8080 포트 연결을 허용하는 정책을 작성해 줍니다.
cat <<EOT > main.tf
provider "aws" {
region = "ap-northeast-2"
}
resource "aws_instance" "example" {
ami = "$UBUNTUID"
instance_type = "t2.micro"
vpc_security_group_ids = [aws_security_group.instance.id] #추가
user_data = <<-EOF
#!/bin/bash
echo "Hello, T101 Study" > index.html
nohup busybox httpd -f -p 8080 &
EOF
tags = {
Name = "Single-WebSrv"
}
}
#추가
resource "aws_security_group" "instance" {
name = var.security_group_name
ingress {
from_port = 8080
to_port = 8080
protocol = "tcp"
cidr_blocks = ["0.0.0.0/0"]
}
}
#추가
variable "security_group_name" {
description = "The name of the security group"
type = string
default = "terraform-example-instance"
}
#추가
output "public_ip" {
value = aws_instance.example.public_ip
description = "The public IP of the Instance"
}
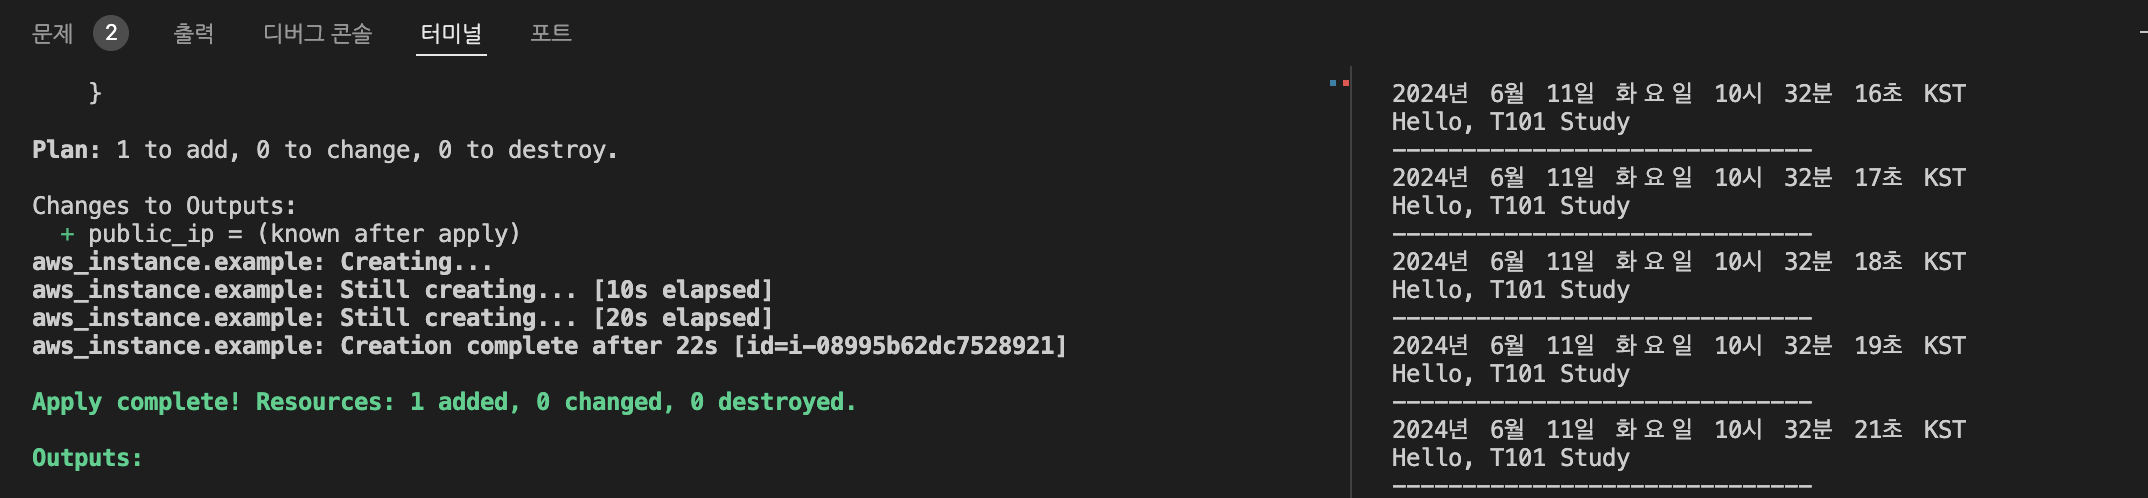
EOTapply 수행 후 웹서버에 정상 접속되는 것을 확인 할 수 있습니다.
웹서버 포트(8080 -> 9090) 및 user data 내용 변경
cat <<EOT > main.tf
provider "aws" {
region = "ap-northeast-2"
}
resource "aws_instance" "example" {
ami = "$UBUNTUID"
instance_type = "t2.micro"
vpc_security_group_ids = [aws_security_group.instance.id]
user_data = <<-EOF
#!/bin/bash
echo "Hello, T101 Study 9090" > index.html
nohup busybox httpd -f -p 9090 &
EOF
# userdata 값을 변경 시에는 아래 코드를 추가함
user_data_replace_on_change = true
tags = {
Name = "Single-WebSrv"
}
}
resource "aws_security_group" "instance" {
name = var.security_group_name
ingress {
from_port = 9090
to_port = 9090
protocol = "tcp"
cidr_blocks = ["0.0.0.0/0"]
}
}
variable "security_group_name" {
description = "The name of the security group"
type = string
default = "terraform-example-instance"
}
output "public_ip" {
value = aws_instance.example.public_ip
description = "The public IP of the Instance"
}
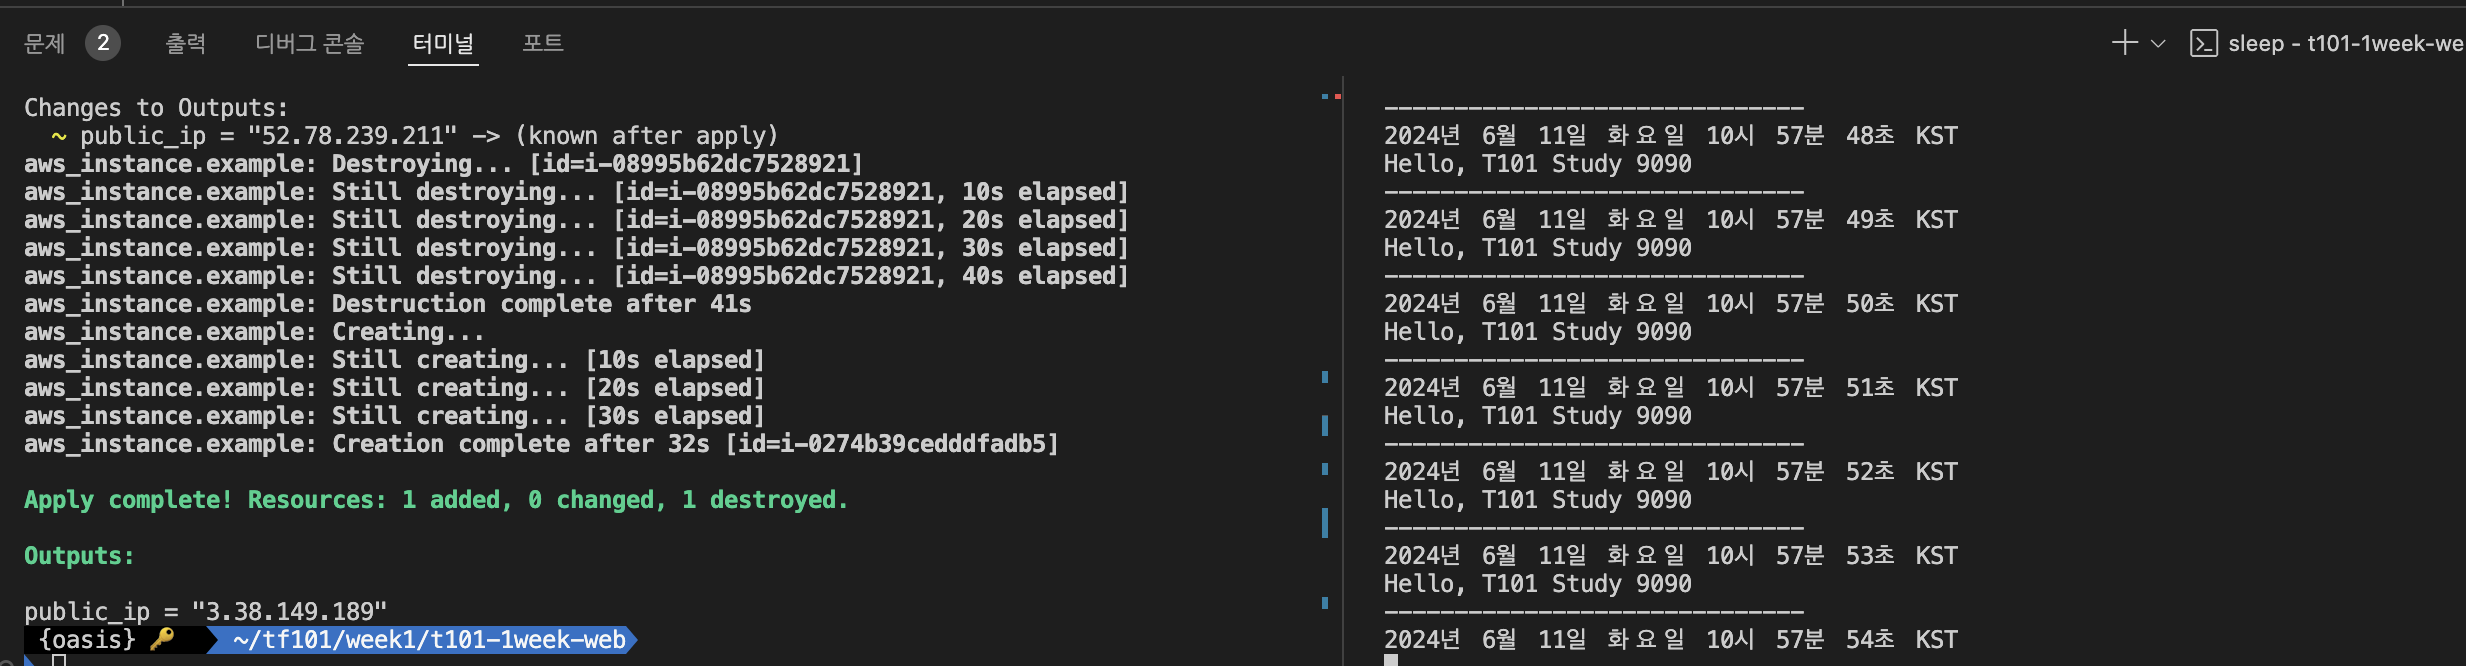
EOT보안그룹의 허용 포트 정보와 유저데이터의 내용을 변경 후("user_data_replace_on_change = true" 추가)에 apply하였고 이후 웹서버에 정상 접속되는 것을 확인하였습니다.
- 삭제
terraform destroy --auto-approve테라폼 블록
테라폼 블록이란 필요 조건들을 입력하여, 실행오류를 최소화 하기 위해 사용됩니다. 테라폼 내에서 버전이 명시되는 부분은 (테라폼, 프로바이더, 모듈) 3군데 인데, 버전 체계는 시멘틱 버전 관리 방식을 따릅니다.
- 시맨틱 버전 관리 방식
- Major 버전 : 내부 동작의 API가 변경 또는 삭제되거나 하위 호환이 되지 않는 버전
- Minor 버전 : 신규 기능이 추가되거나 개선되고 하위 호환이 가능한 버전
- Patch 버전 : 버그 및 일부 기능이 개선된 하위 호환이 가능한 버전
- 버전 제약 구문은 다른 프로그램 언어에서의 종속성 관리 시스템과 흡사하다.
=또는 연산자 없음 : 지정된 버전만을 허용하고 다른 조건과 병기할 수 없다.!=: 지정된 버전을 제외한다.>, >=, <, <=: 지정된 버전과 비교해 조건(부등호)에 맞는 경우 허용한다.~>: 지정된 버전에서 가장 자리수가 낮은 구성요소만 증가하는 것을 허용한다.~> x.y인 경우 y 버전에 대해서만,~> x.y.z인 경우 z 버전에 대해서만 보다 큰 버전을 허용한다
실습1: 테라폼 버젼 제한
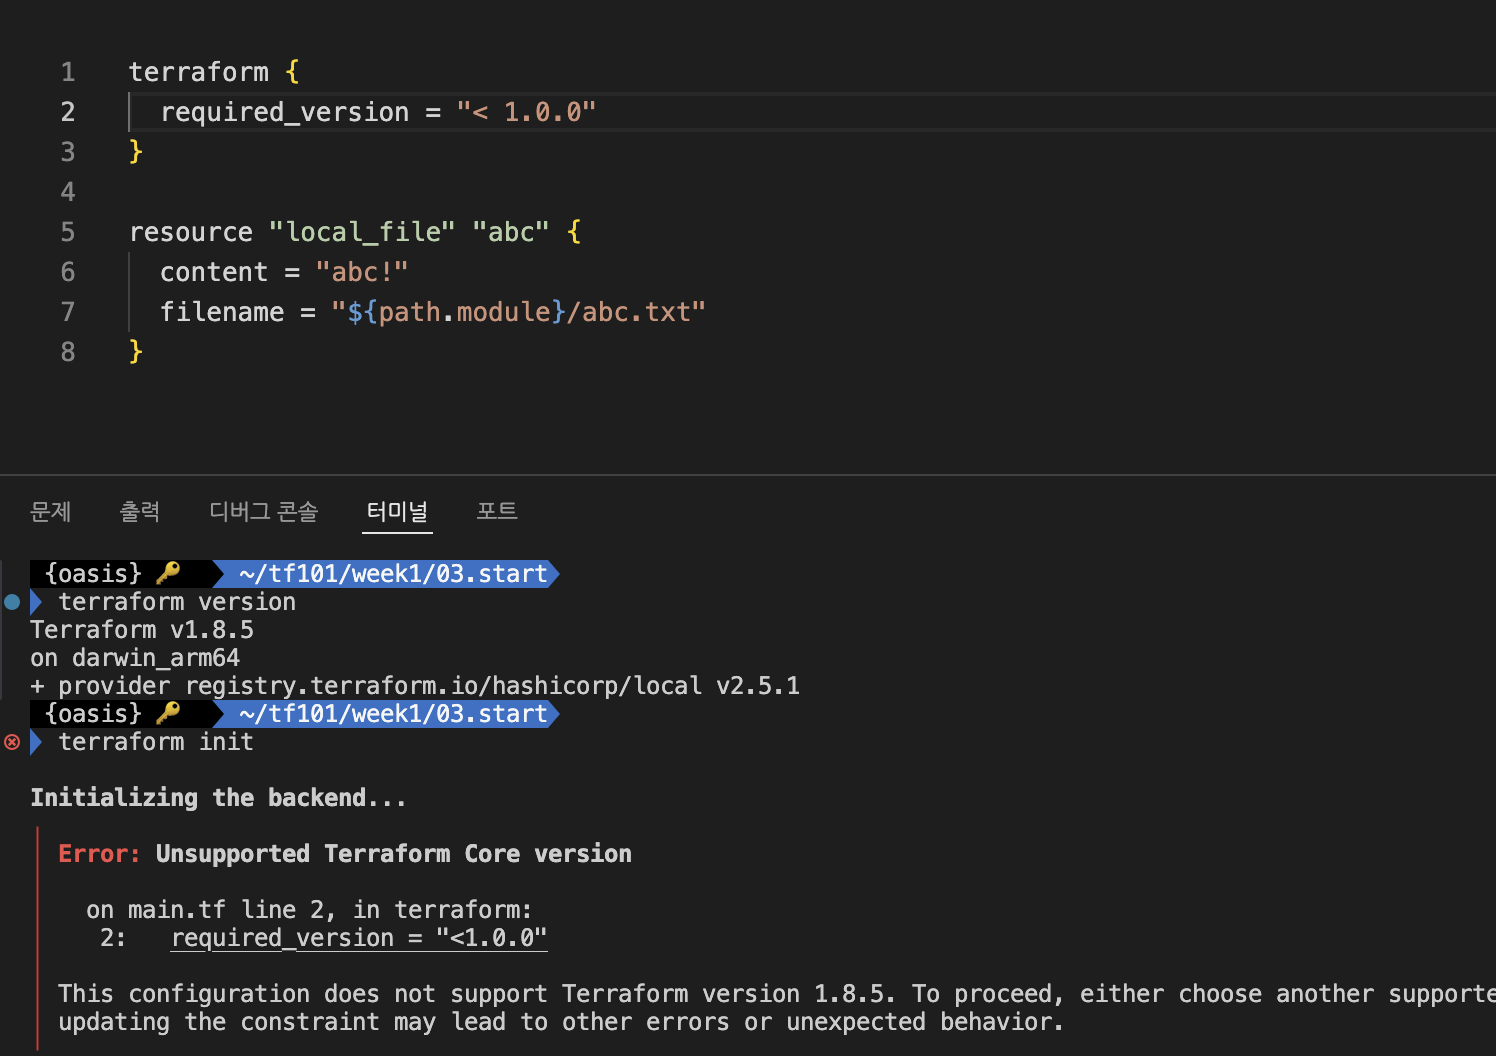
설치된 테라폼 버젼(v1.8.5) 보다 하위 버젼으로 제한을 조건을 걸었을 때 수행이 안되는 것을 확인 할 수 있습니다.
- main.tf
#1.0.0 버젼 이하면 수행되도록 조건을 지정함
terraform {
  required_version = "< 1.0.0"
}

resource "local_file" "abc" {
  content = "abc!"
  filename = "${path.module}/abc.txt"
}
terraform init을 수행하면 아래와 같은 에러 메세지와 함께 수행되지 않습니다.
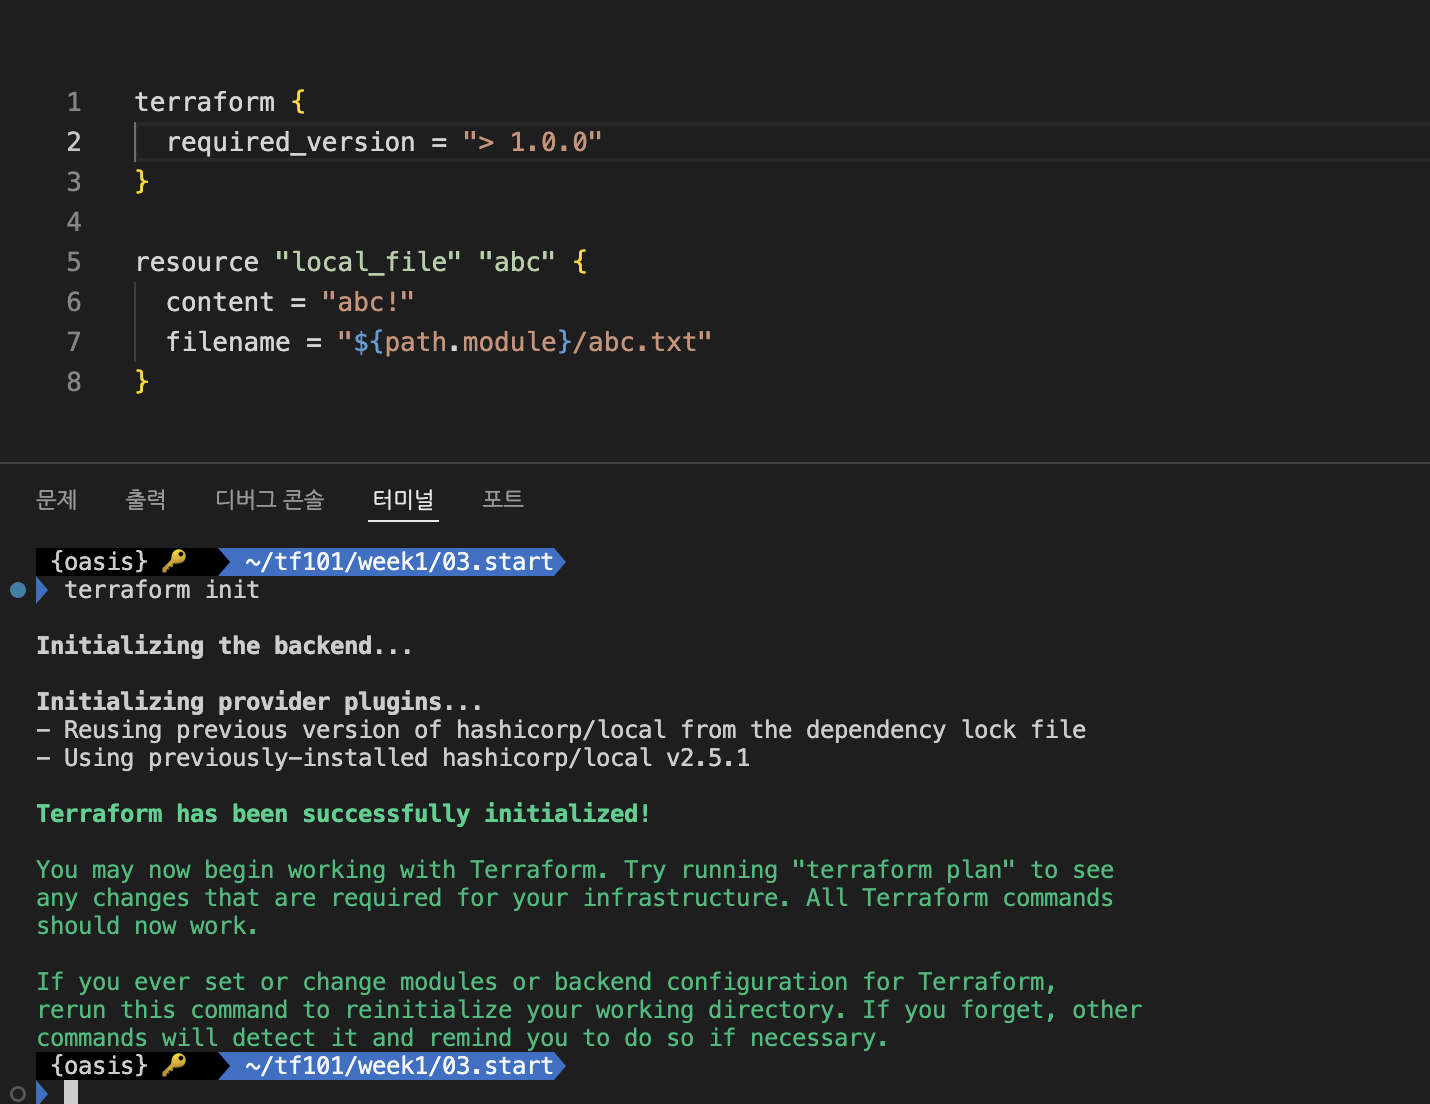
- main.tf code 수정
terraform {
  required_version = "> 1.0.0"
}

resource "local_file" "abc" {
  content = "abc!"
  filename = "${path.module}/abc.txt"
}
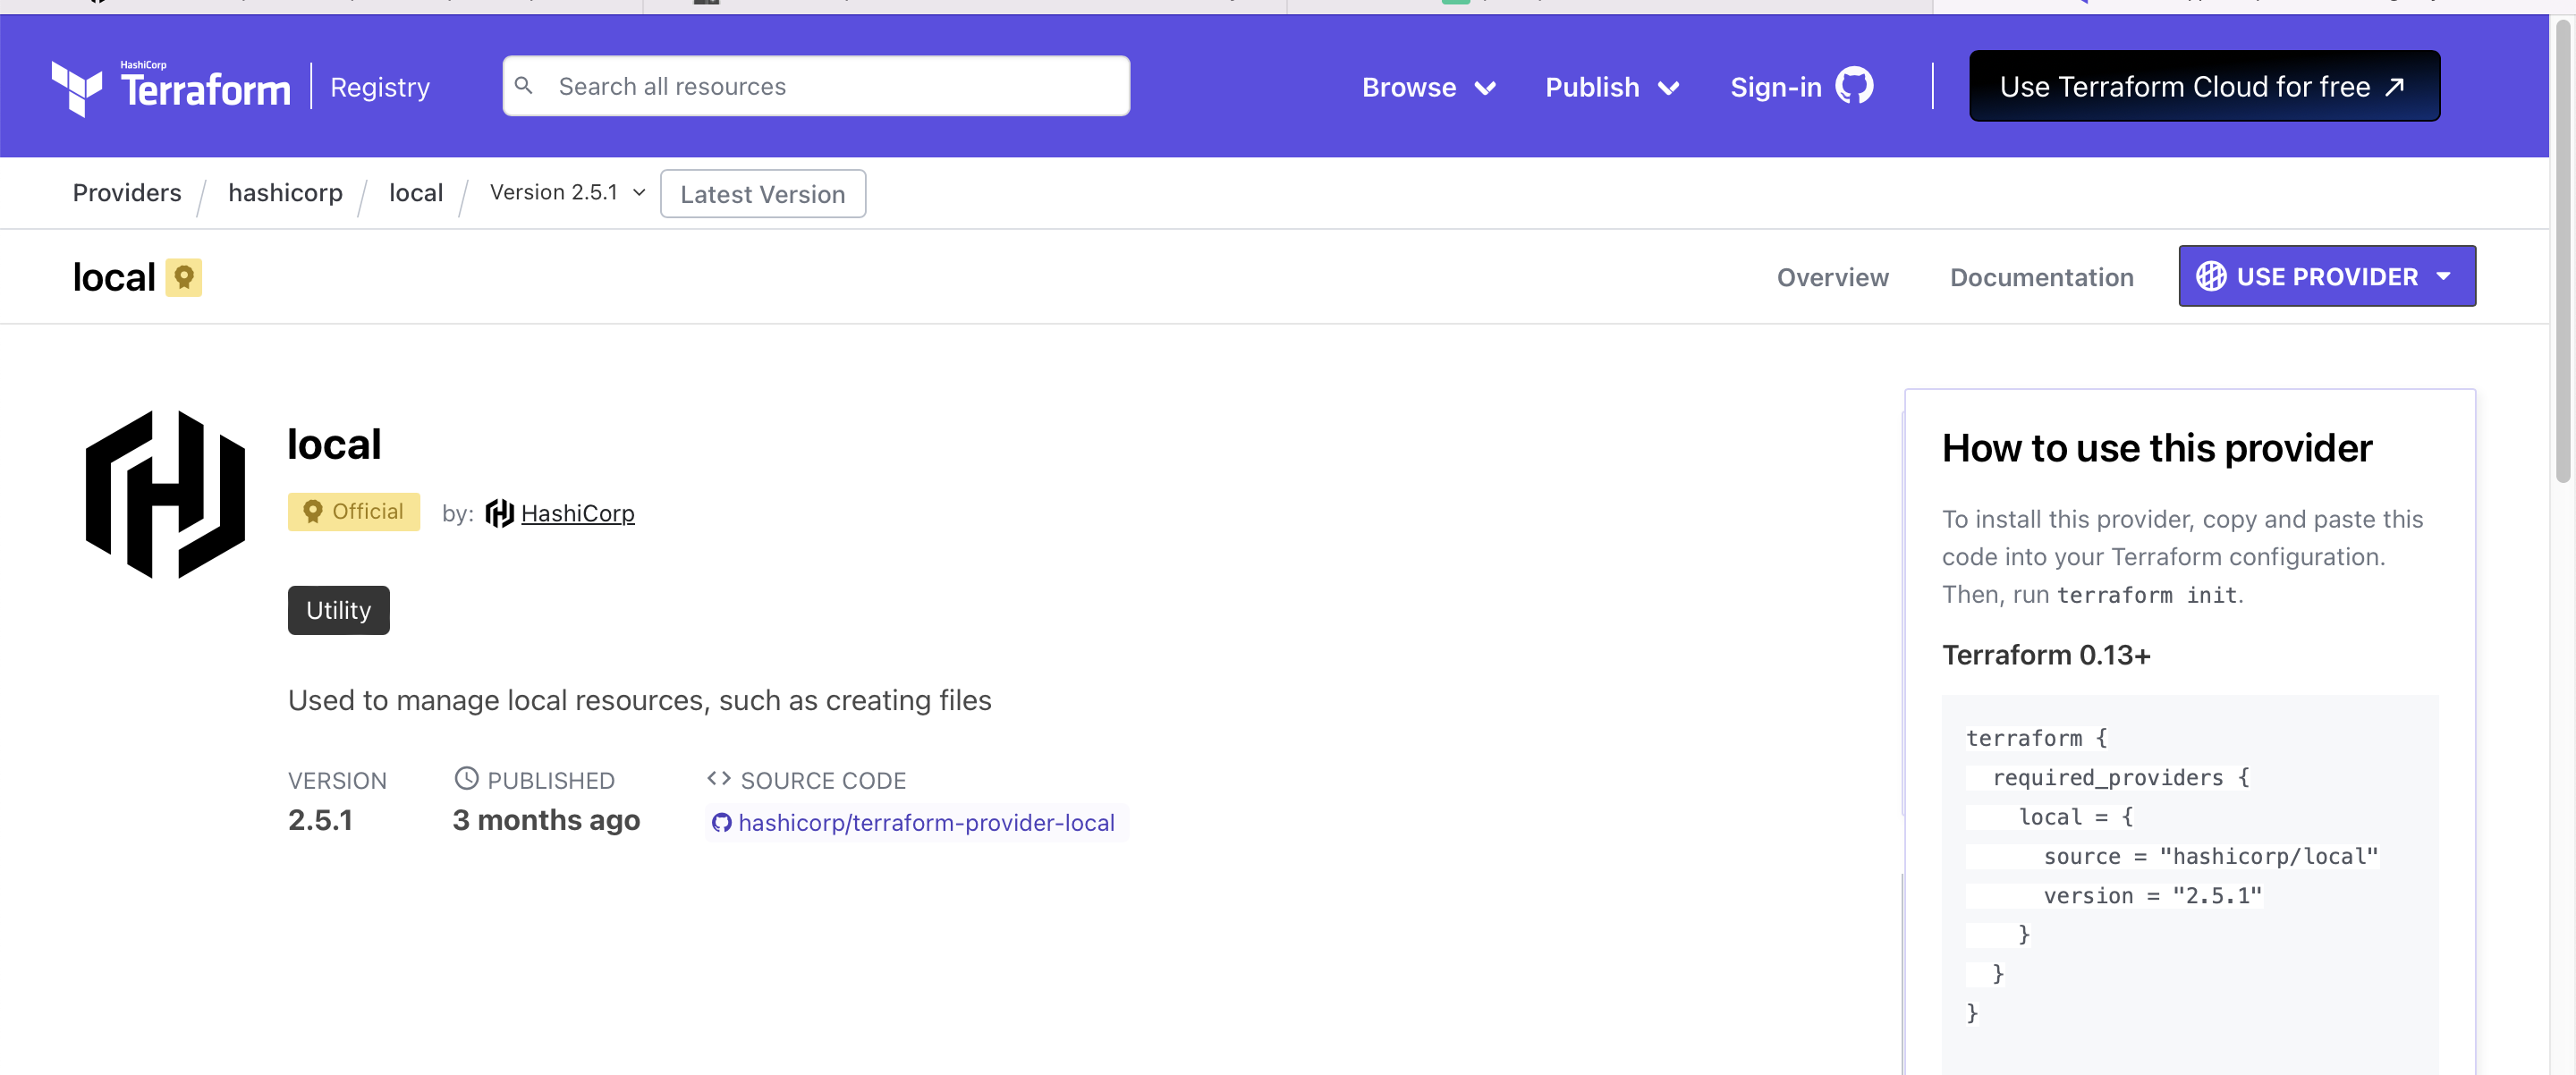
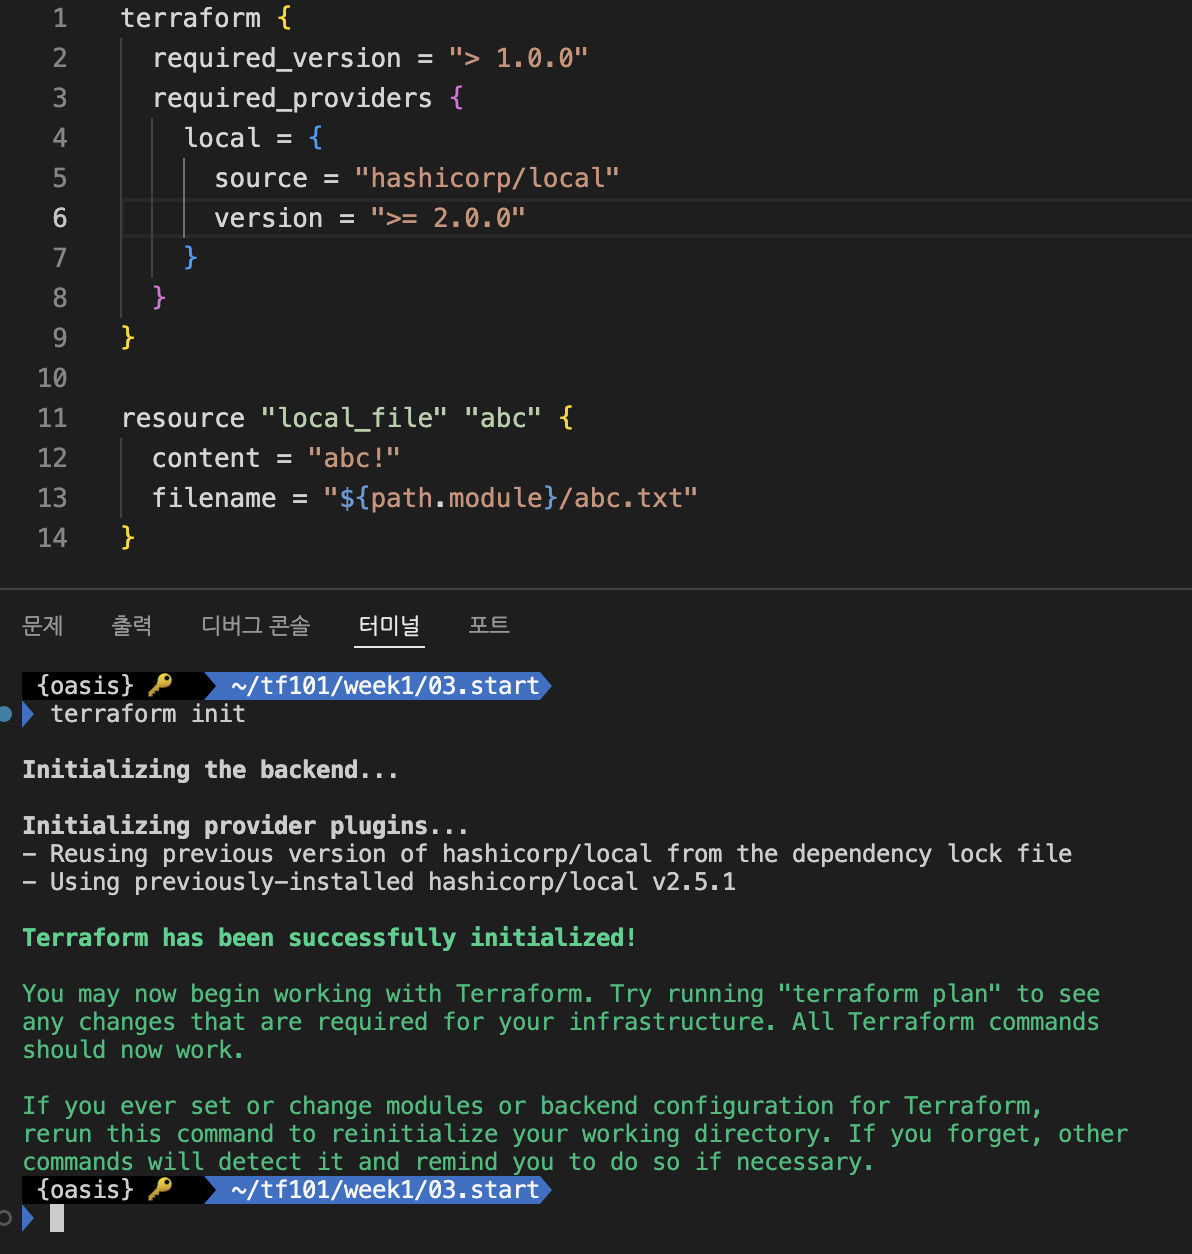
실습2: 프로바이더 버젼 제한
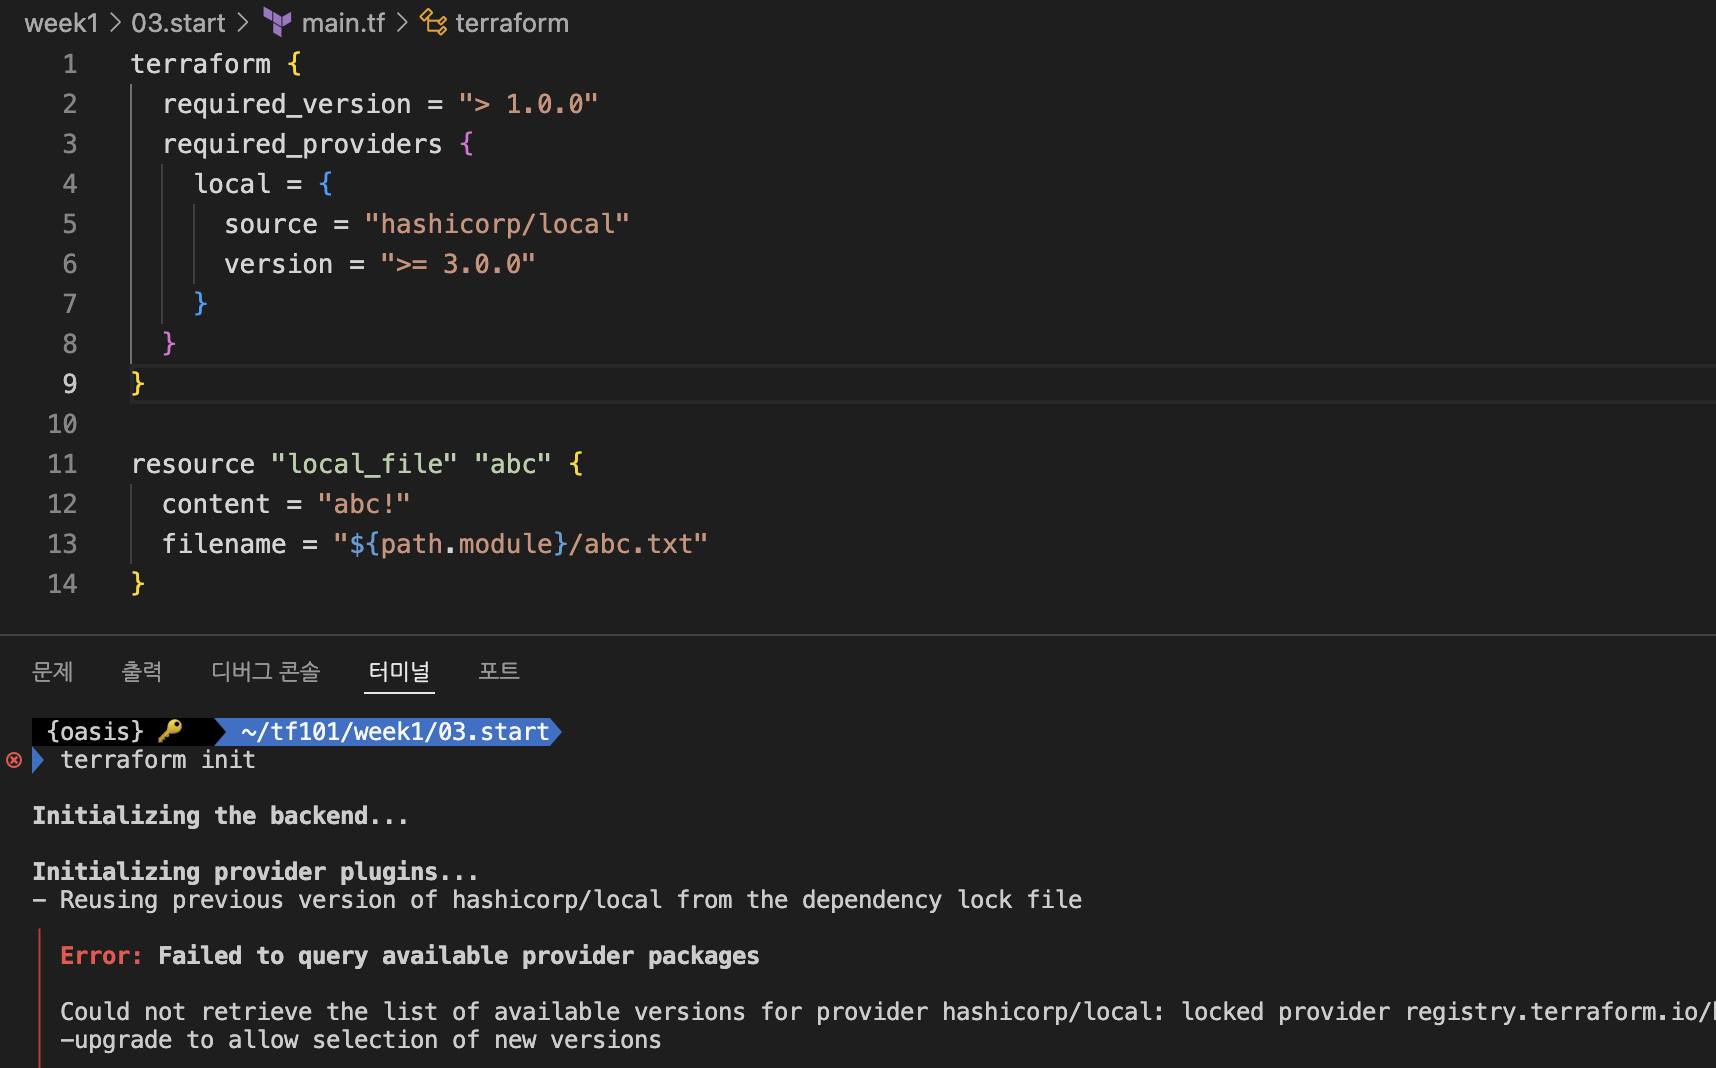
local 프로바이더의 버젼은 현재 2.5.1 입니다. main.tf에서 3.0.0 버젼 이상으로 조건을 걸고 terraform init을 수행하여 실행 여부를 확인해 보겠습니다.
terraform {
  required_version = "> 1.0.0"
  required_providers {
    local = {
      source = "hashicorp/local"
      version = ">= 3.0.0"
    }
  }
}

resource "local_file" "abc" {
  content = "abc!"
  filename = "${path.module}/abc.txt"
}
버젼을 2.0.0 이상으로 변경후 다시 실행해 보겠습니다.
terraform {
  required_version = "> 1.0.0"
  required_providers {
    local = {
      source = "hashicorp/local"
      version = ">= 2.0.0"
    }
  }
}

resource "local_file" "abc" {
  content = "abc!"
  filename = "${path.module}/abc.txt"
}
정상 실행되는 것을 확인하였습니다.
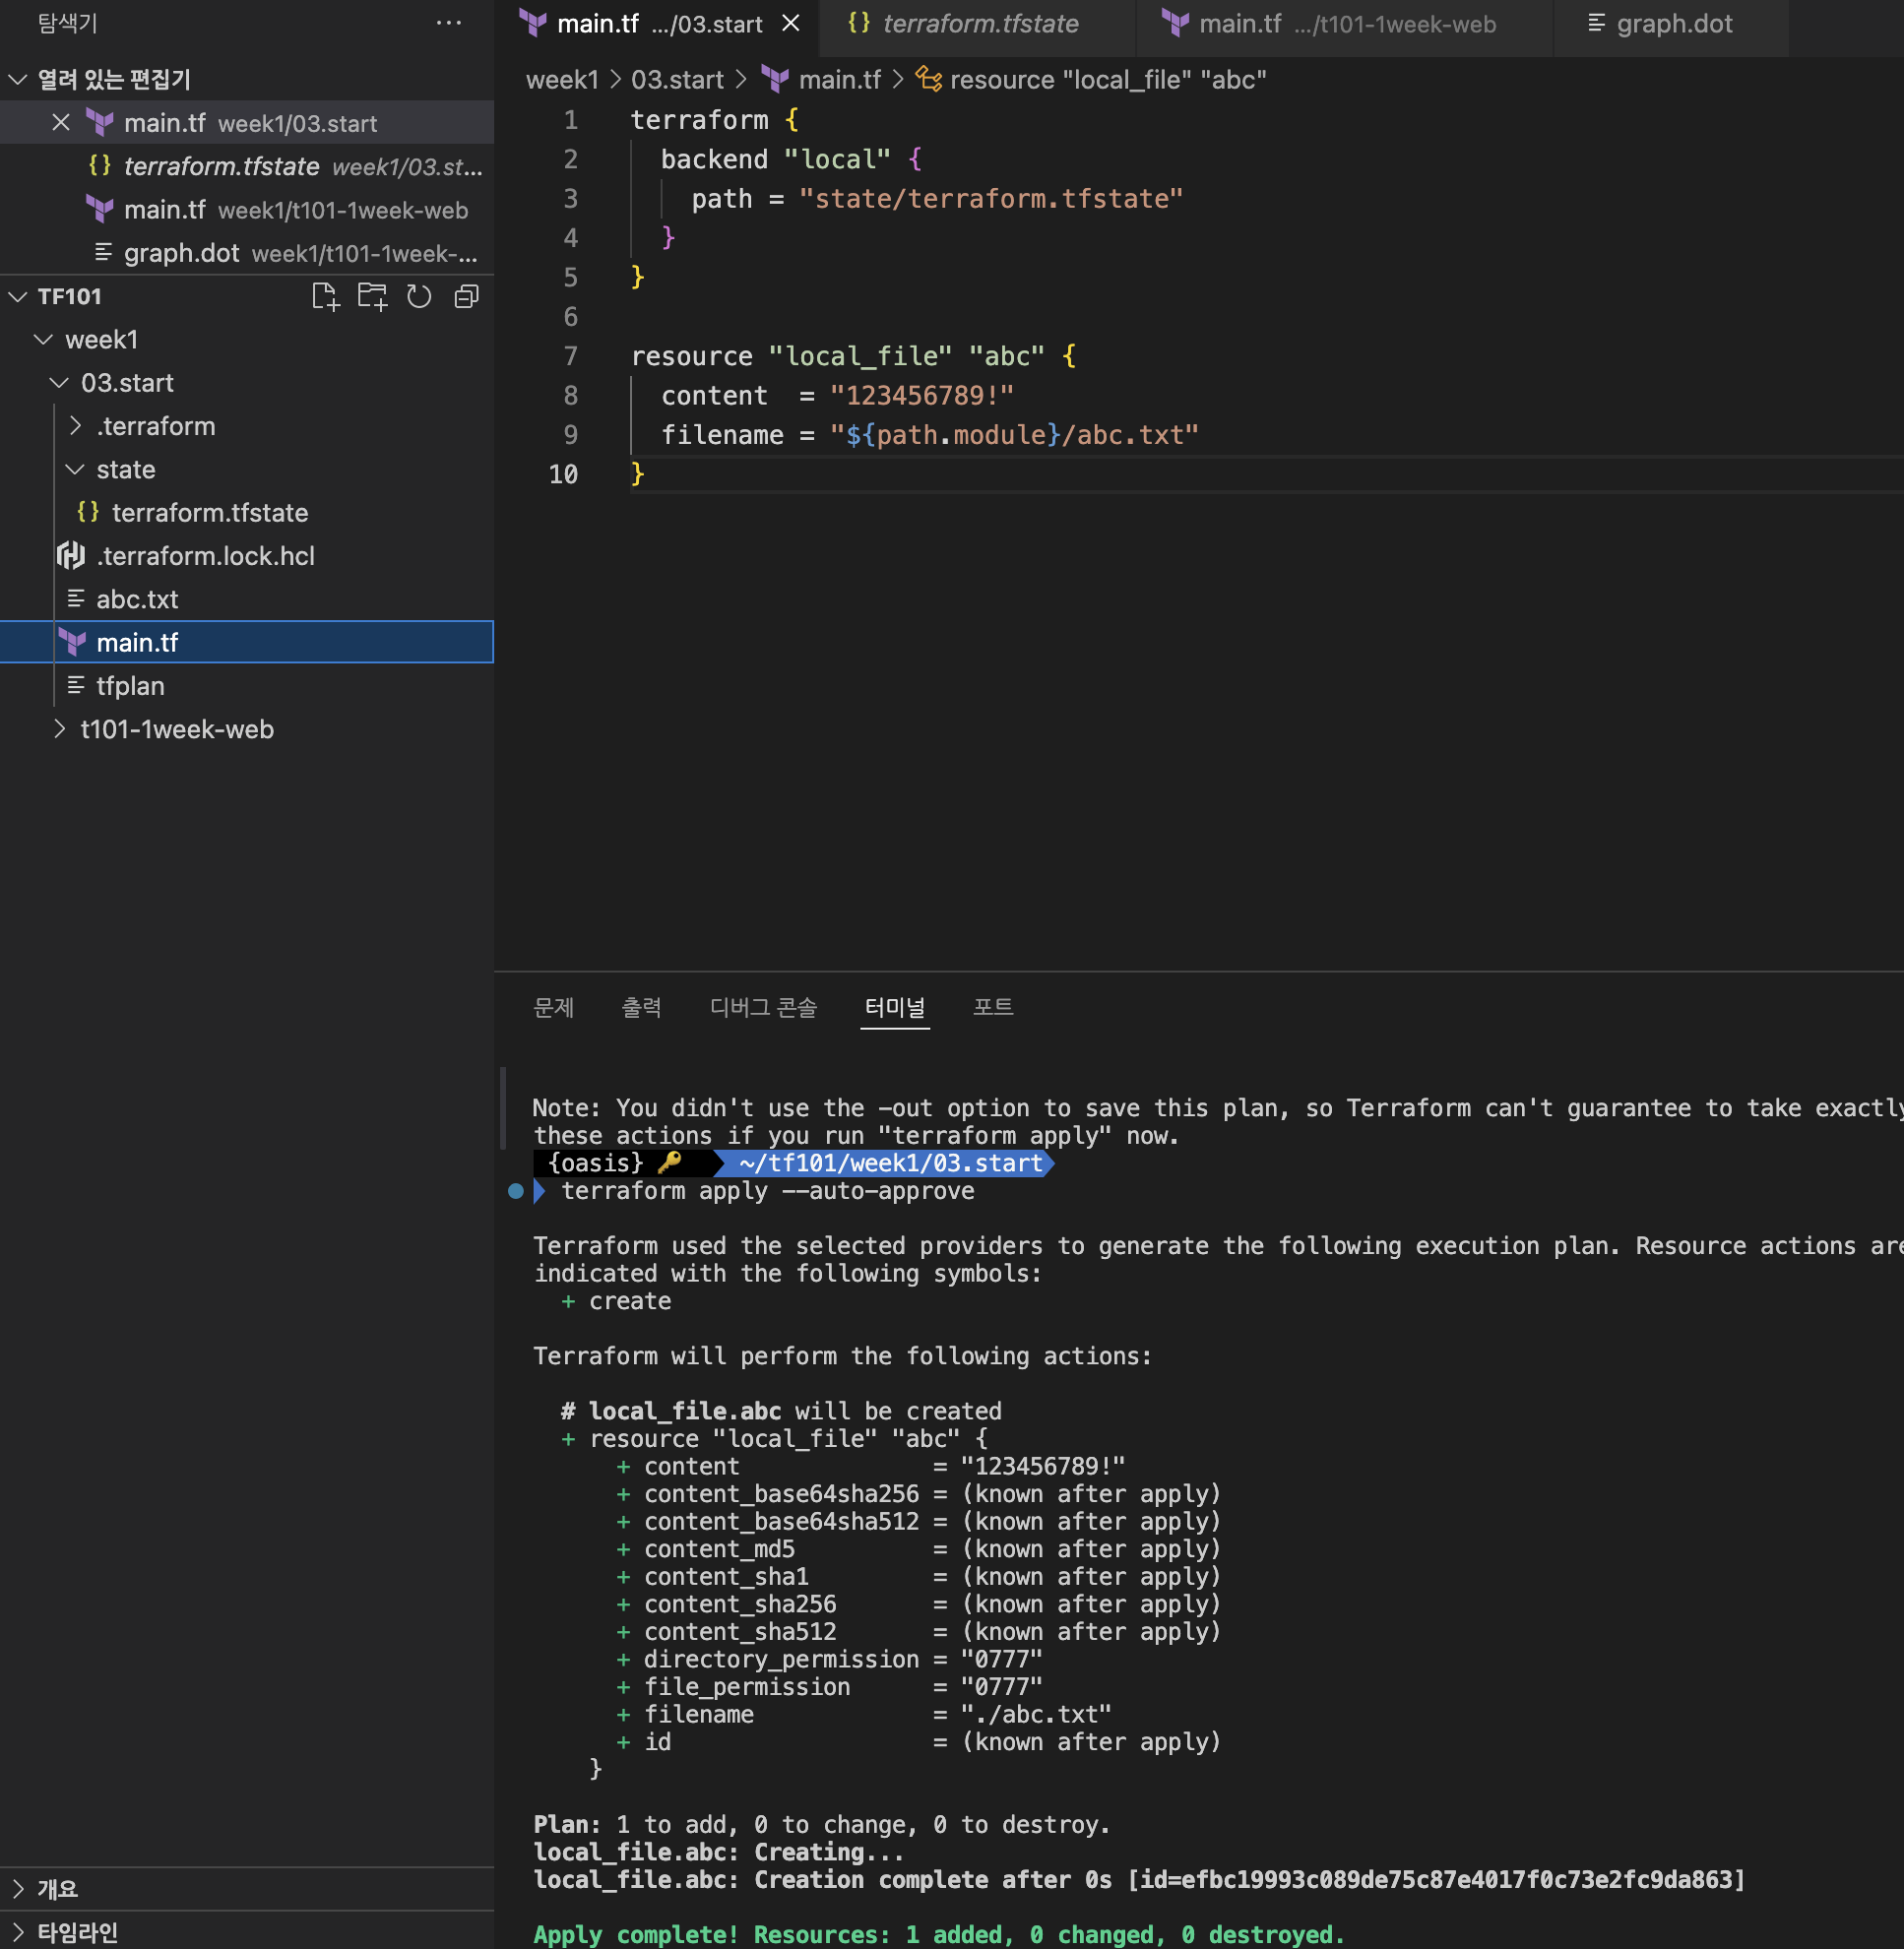
실습3: 백엔드 블록
백엔드 블록의 구성은 테라폼 실행 시 저장되는 State(상태 파일)의 저장 위치를 선언합니다. state 상태 파일은 로컬 환경에 저장되지만 여러사용자가 접근할 수 있도록 공유 스토리지 같은 외부 벡엔드 저장소에도 저장하게 됩니다.
- 백엔드 블록에 local을 정의해 terraform init을 수행해봅니다.
terraform {
backend "local" {
path = "state/terraform.tfstate"
}
}
resource "local_file" "abc" {
content = "123456!"
filename = "${path.module}/abc.txt"
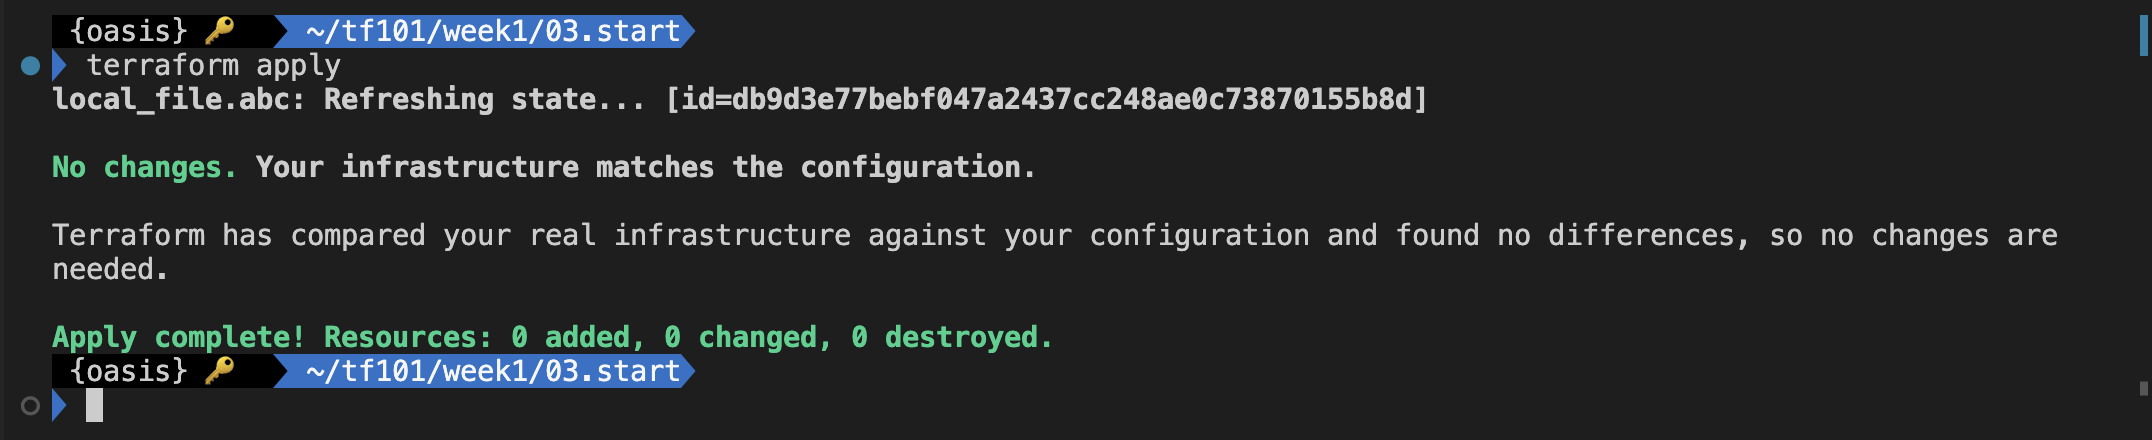
}terraform approve를 수행한 후 ./state/terraform.tfstate 파일이 생성된 것을 확인 할 수 있습니다.
./state/terraform.tfstate 파일을 강제로 삭제하여도 다시 terraform plan & approve를 수행하면서 생성되는 것을 확인 할 수 있습니다.
리소스
리소스 블록은 선언된 항목을 생성하는 동작을 수행합니다. 동작을 보조하기 위한 추가 메타인수를 정의할 수 있습니다. 본 글에서는 종속성과 관련된 "depends_on"과 수명주기와 관련된 "lifecycle"을 실습해 봅니다.
- 리소스 구성
리소스 블록은 resource로 시작하며 리소스 선언은 리소스 유형과 이름, 구성 인수들이 중괄호 내에 선언됩니다.
resource "<리소스 유형>" "<이름>" {
  <인수> = <값>
}

resource "local_file" "abc" {
  content  = "123"
  filename = "${path.module}/abc.txt"
}
실습1: 종속성
테라폼 종속성은 resource, module 선언으로 프로비저닝되는 각 요소의 생성 순서를 구분짓습니다.기본적으로 다른 리소스에서 값을 참조해 불러올 경우 생성 선후 관계에 따라 작업자가 의도하지는 않았지만 자동으로 연관 관계가 정의되는 암시적 종속성을 갖게 되고, 강제로 리소스 간 명시적 종속성을 부여할 경우에는 메타인수인 depends_on을 활용합니다.
- 암시적 종속성 부여
resource "local_file" "abc" {
  content  = "123!"
  filename = "${path.module}/abc.txt"
}

resource "local_file" "def" {
  content  = local_file.abc.content   # 123!
  filename = "${path.module}/def.txt"
}
terraform graph > graph.dot을 수행하여 리소스간 관계를 시각화 할 수 있습니다. local_file.abc 생성 후에 local_file.def가 생성된 것을 알 수 있습니다.

- depends_on 선언으로 종속성 부여
resource "local_file" "abc" {
  content  = "123!"
  filename = "${path.module}/abc.txt"
}

resource "local_file" "def" {
  depends_on = [
    local_file.abc
  ]

  content  = "456!"
  filename = "${path.module}/def.txt"
}
main.tf에 명시된 것처럼 종속성 관계를 확인 할 수 있습니다.
실습2: 수명주기
lifecycle은 리소스의 기본 수명주기를 작업자가 의도적으로 변경하는 메타인수다. 메타인수 내에는 아래 선언이 가능합니다.
- create_before_destroy
- prevent_destroy
- ignore_changes
- precondition
- postcondition
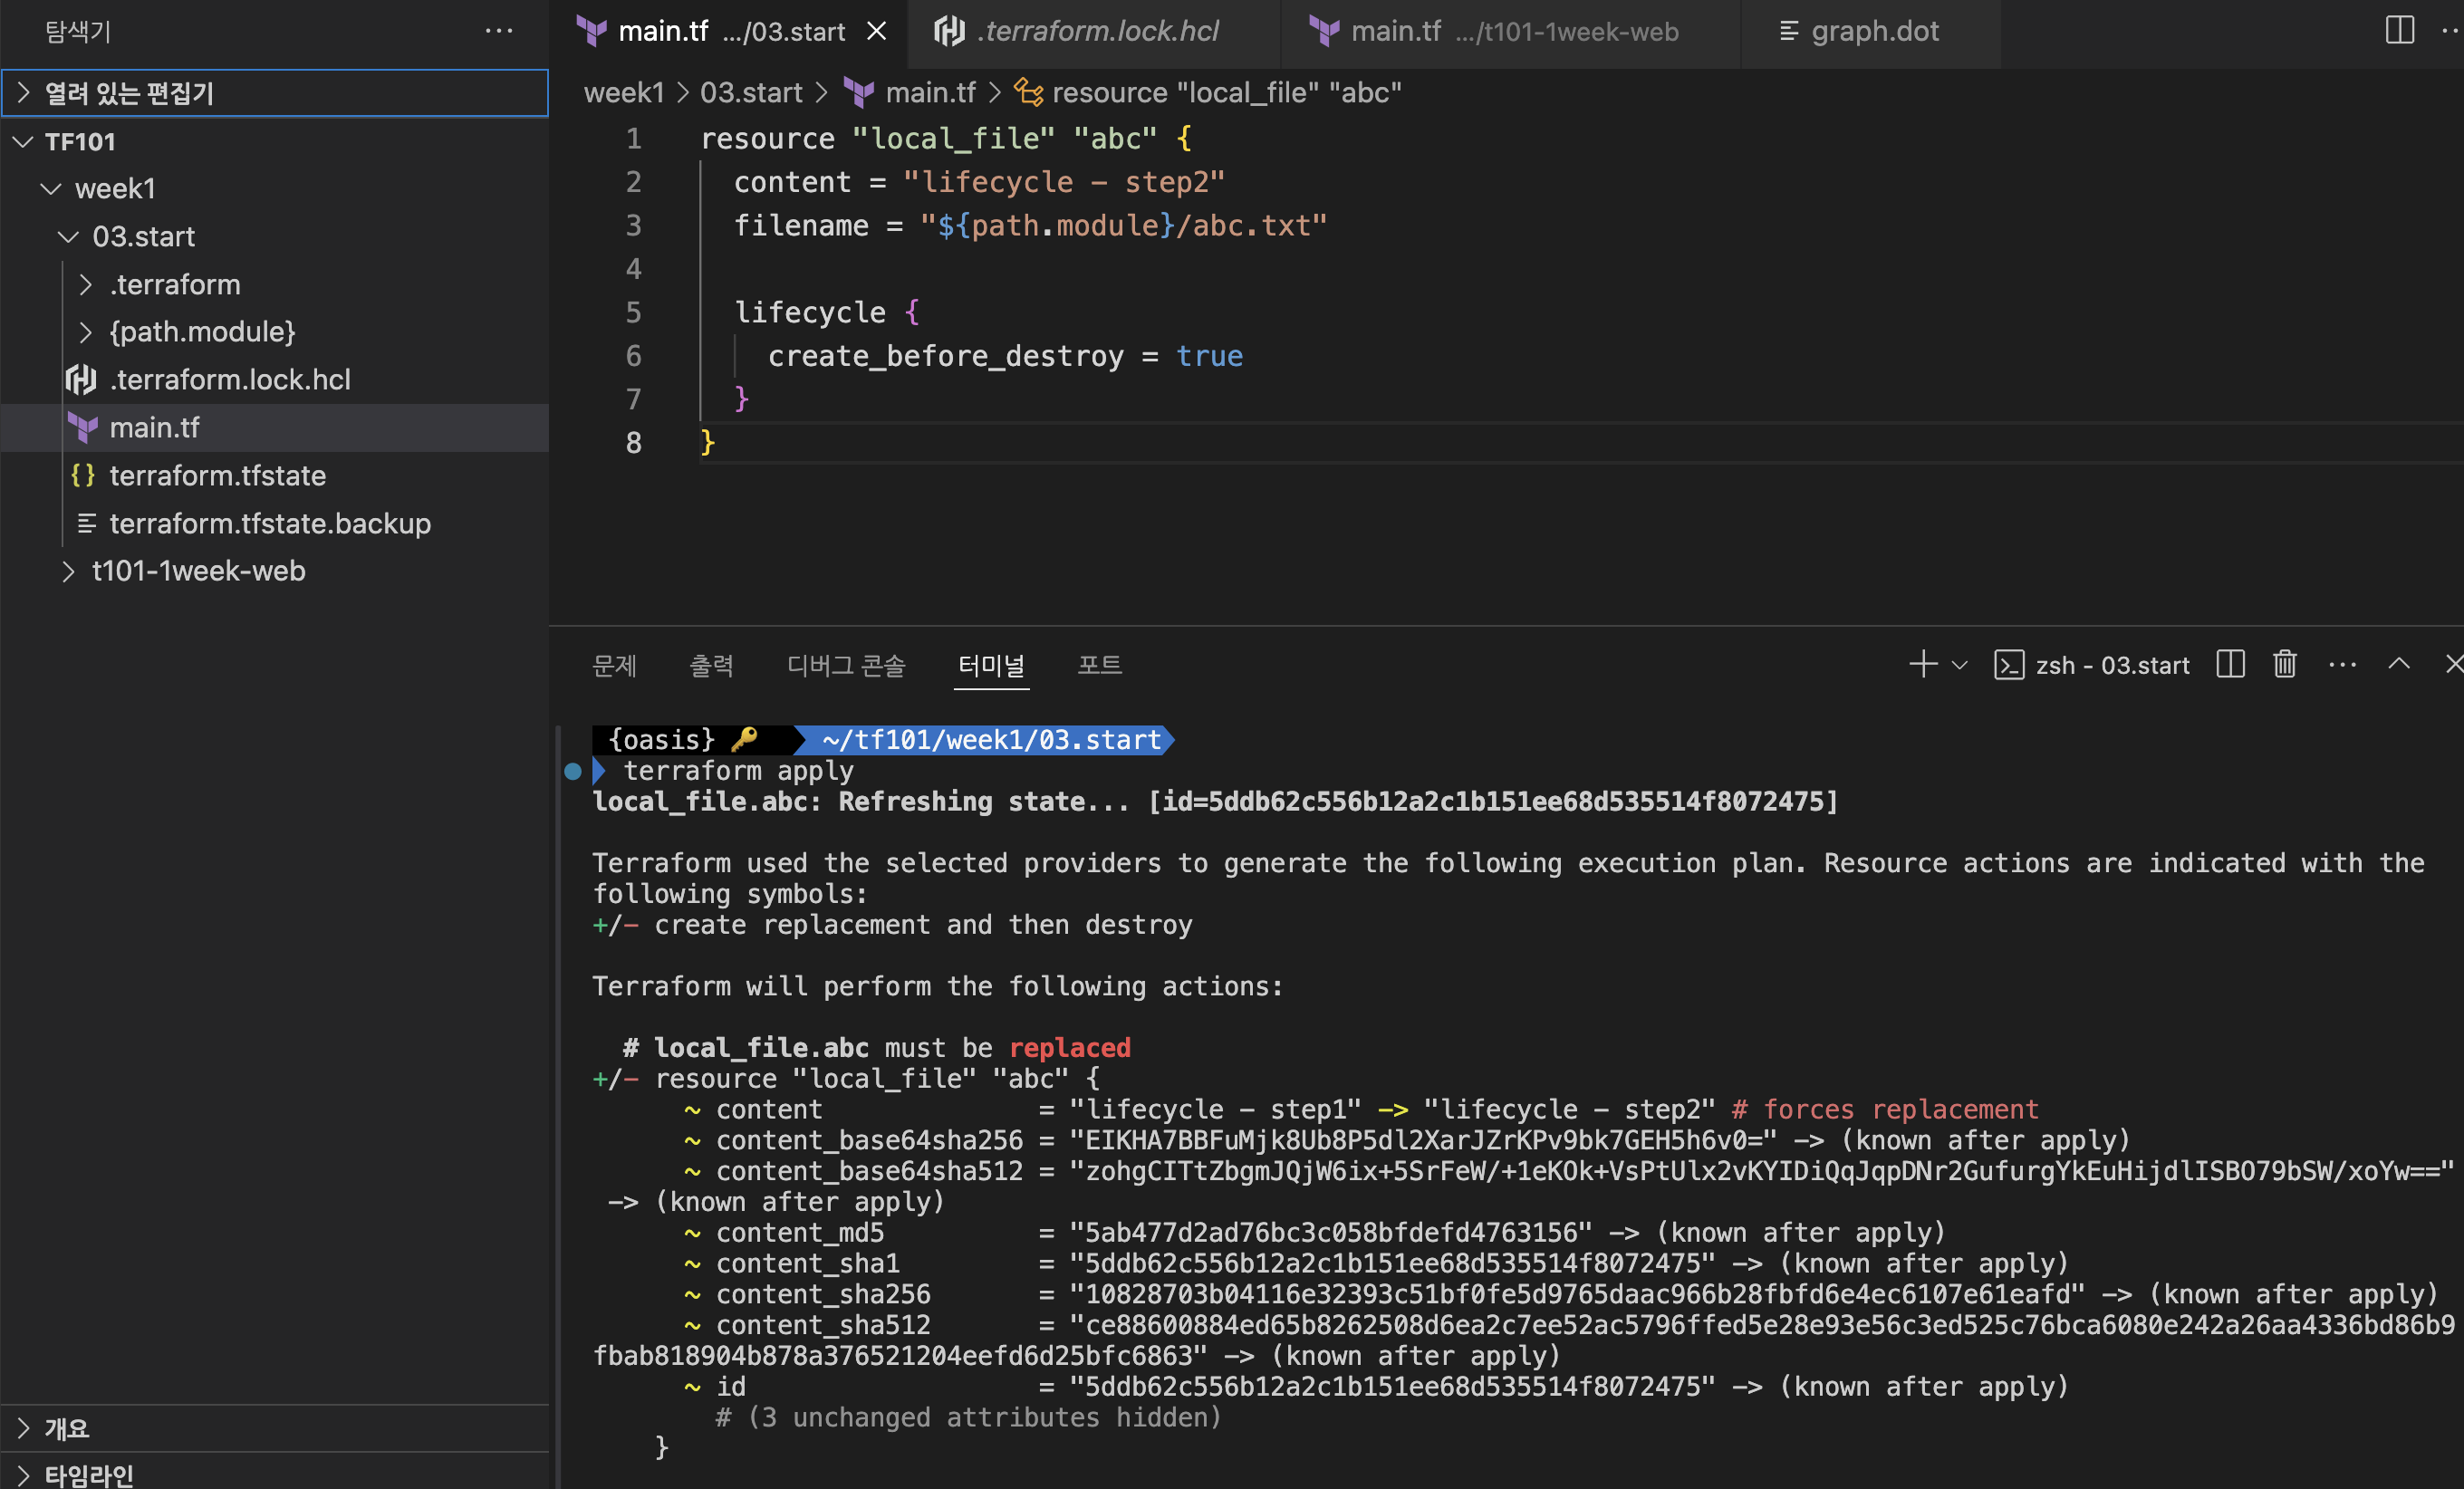
create_before_destroy
기본은 리소스를 먼저 지우고 생성하는 것이나 이 옵션을 선언하면 반대로 수행한다. 웹 VM등의 설정을 변경하고 재배포할 때 기본으로 수행하면 삭제가 먼저되므로 해당 시간동안 장애가 발생된다. 이럴때 이 옵션을 사용하여 변경된 VM을 먼저 배포하고 이후 기존 VM을 삭제하는 것으로 활용할 수 있다.
#abc.txt 최초 생성
resource "local_file" "abc" {
  content = "lifecycle - step1"
  filename = "${path.module}/abc.txt"

  lifecycle {
    create_before_destroy = false
  }
}

$terraform apply

#create_before_destroy = true로 변경
resource "local_file" "abc" {
  content = "lifecycle - step2"
  filename = "${path.module}/abc.txt"

  lifecycle {
    create_before_destroy = true
  }
}

$erraform apply
create_before_destroy = true로 설정후 apply를 수행하게되면 "abc.txt"의 content는 변경되나 파일명이 동일하기 때문에 삭제가 되는 것을 확인할 수 있는데 이런 경우는 우리가 원하는 경우아니므로 해당 옵션을 사용하게되면 수행되는 과정을 이해하고 혹시라도 이련 결과가 발생되므로 terraform code를 작성할 수 있도록 하자.
prevent_destory
이 옵션은 해당 리소스가 삭제되지 않도록 해준다.
resource "local_file" "abc" {
  content = "lifecycle - step3"
  filename = "${path.module}/abc.txt"

  lifecycle {
    prevent_destroy = true
  }
}
apply를 실행하면 해당 리소스를 삭제할 수 없다는 에러 메세지를 출력하면서 실행되지 않는다.

ignore_changes
리소스의 특정 인수의 값이 변경되지 않도록 해준다.
resource "local_file" "abc" {
  content = "lifecycle - step5"  #<-- step4에서 step5로 변경
  filename = "${path.module}/abc.txt"

  lifecycle {
    ignore_changes = [
      content
     ]
  }
}
수정된 content가 반영되지 않는것을 확인할 수 있다.
precondition
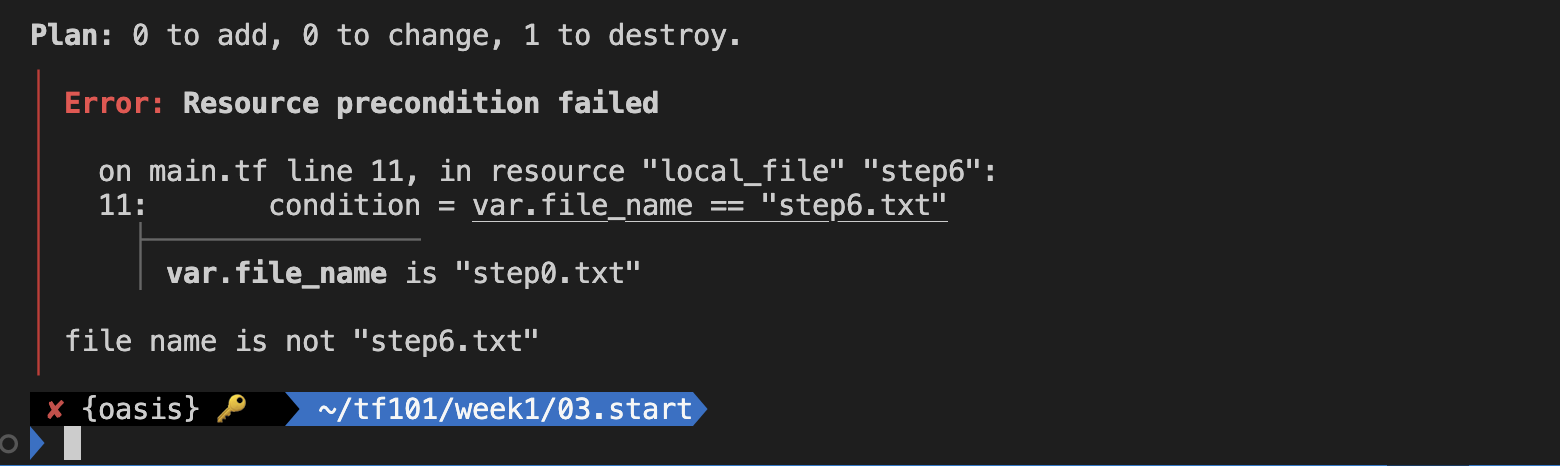
리소스 생성 이전에 입력된 인수 값을 검증하여 부합하지 않을 경우 프로비져닝 되지 않도록 한다.
variable "file_name" {
  default = "step0.txt"
}

resource "local_file" "step6" {
  content = "lifecycle - step 6"
  filename = "${path.module}/${var.file_name}"

  lifecycle {
    precondition {
      condition = var.file_name == "step6.txt"
      error_message = "file name is not \"step6.txt\""
    }
  }
}
파일의 이름이 조건과 맞지 않아 수행되지 않는 것을 확인 할 수 있다.
postcondition
리소스 생성 후에 원하는 속성값에 부합하지 않으면 실행되지 않도록 하여 종속성을 가진 다른 리소스가 생성되지 않도록 할 수 있다.
resource "local_file" "step7" {
  content = ""
  filename = "{path.module}/step7.txt"

  lifecycle {
    postcondition {
      condition = self.content != ""
      error_message = "content cannot empty!"
    }
  }
}
content가 empty 상태이자 에러 메세지와 함께 수행되지 않음을 확인할 수 있다.

