가시다님의 T101 [4기] 스터디 내용을 정리한 포스트 입니다.
블로그의 실습 내용들은 ‘테라폼으로 시작하는 IaC’ 책을 기준하여 정리하였습니다.
3.5 데이터 소스
데이터 소스는 테라폼으로 정의되지 않은 외부 리소스 또는 저장된 정보를 테라폼 내에서 참조할 때 사용한다
실습: vpc 및 subnet 생성
- vpc 생성
- subnet 생성
- 데이터 소스 블록으로 "aws_available_zones"를 정보를 불러와 primary와 secondary 2개의 subnet을 생성
#data source block으로 가용한 zone 정보를 불러옴
data "aws_availability_zones" "available" {
  state = "available"
}
$terraform apply --auto-approve

#console을 통해 불러온 정보를 확인
$terraform console
> data.aws_availability_zones.available.names
tolist([
  "ap-northeast-2a",
  "ap-northeast-2b",
  "ap-northeast-2c",
  "ap-northeast-2d",
])
subnet으로 "ap-northeast-2a"와 "ap-northeast-2b"를 사용하고 코드에는 데이타 소스 인수를 통해 값을 불러오도록 한다.
- main.tf
data "aws_availability_zones" "available" {
  state = "available"
}

resource "aws_vpc" "kgetall_vpc" {
  cidr_block       = "10.10.0.0/16"
  enable_dns_hostnames = true
  enable_dns_support =  true

  tags = {
    Name = "kgetall_vcp"
  }
}

resource "aws_subnet" "kgetall_subnet_primary" {
  vpc_id = resource.aws_vpc.kgetall_vpc.id
  availability_zone = data.aws_availability_zones.available.names[0]
  cidr_block = "10.10.1.0/24"
}

resource "aws_subnet" "kgetall_subnet_secondary" {
  vpc_id = resource.aws_vpc.kgetall_vpc.id
  availability_zone = data.aws_availability_zones.available.names[1]
  cidr_block = "10.10.2.0/24"
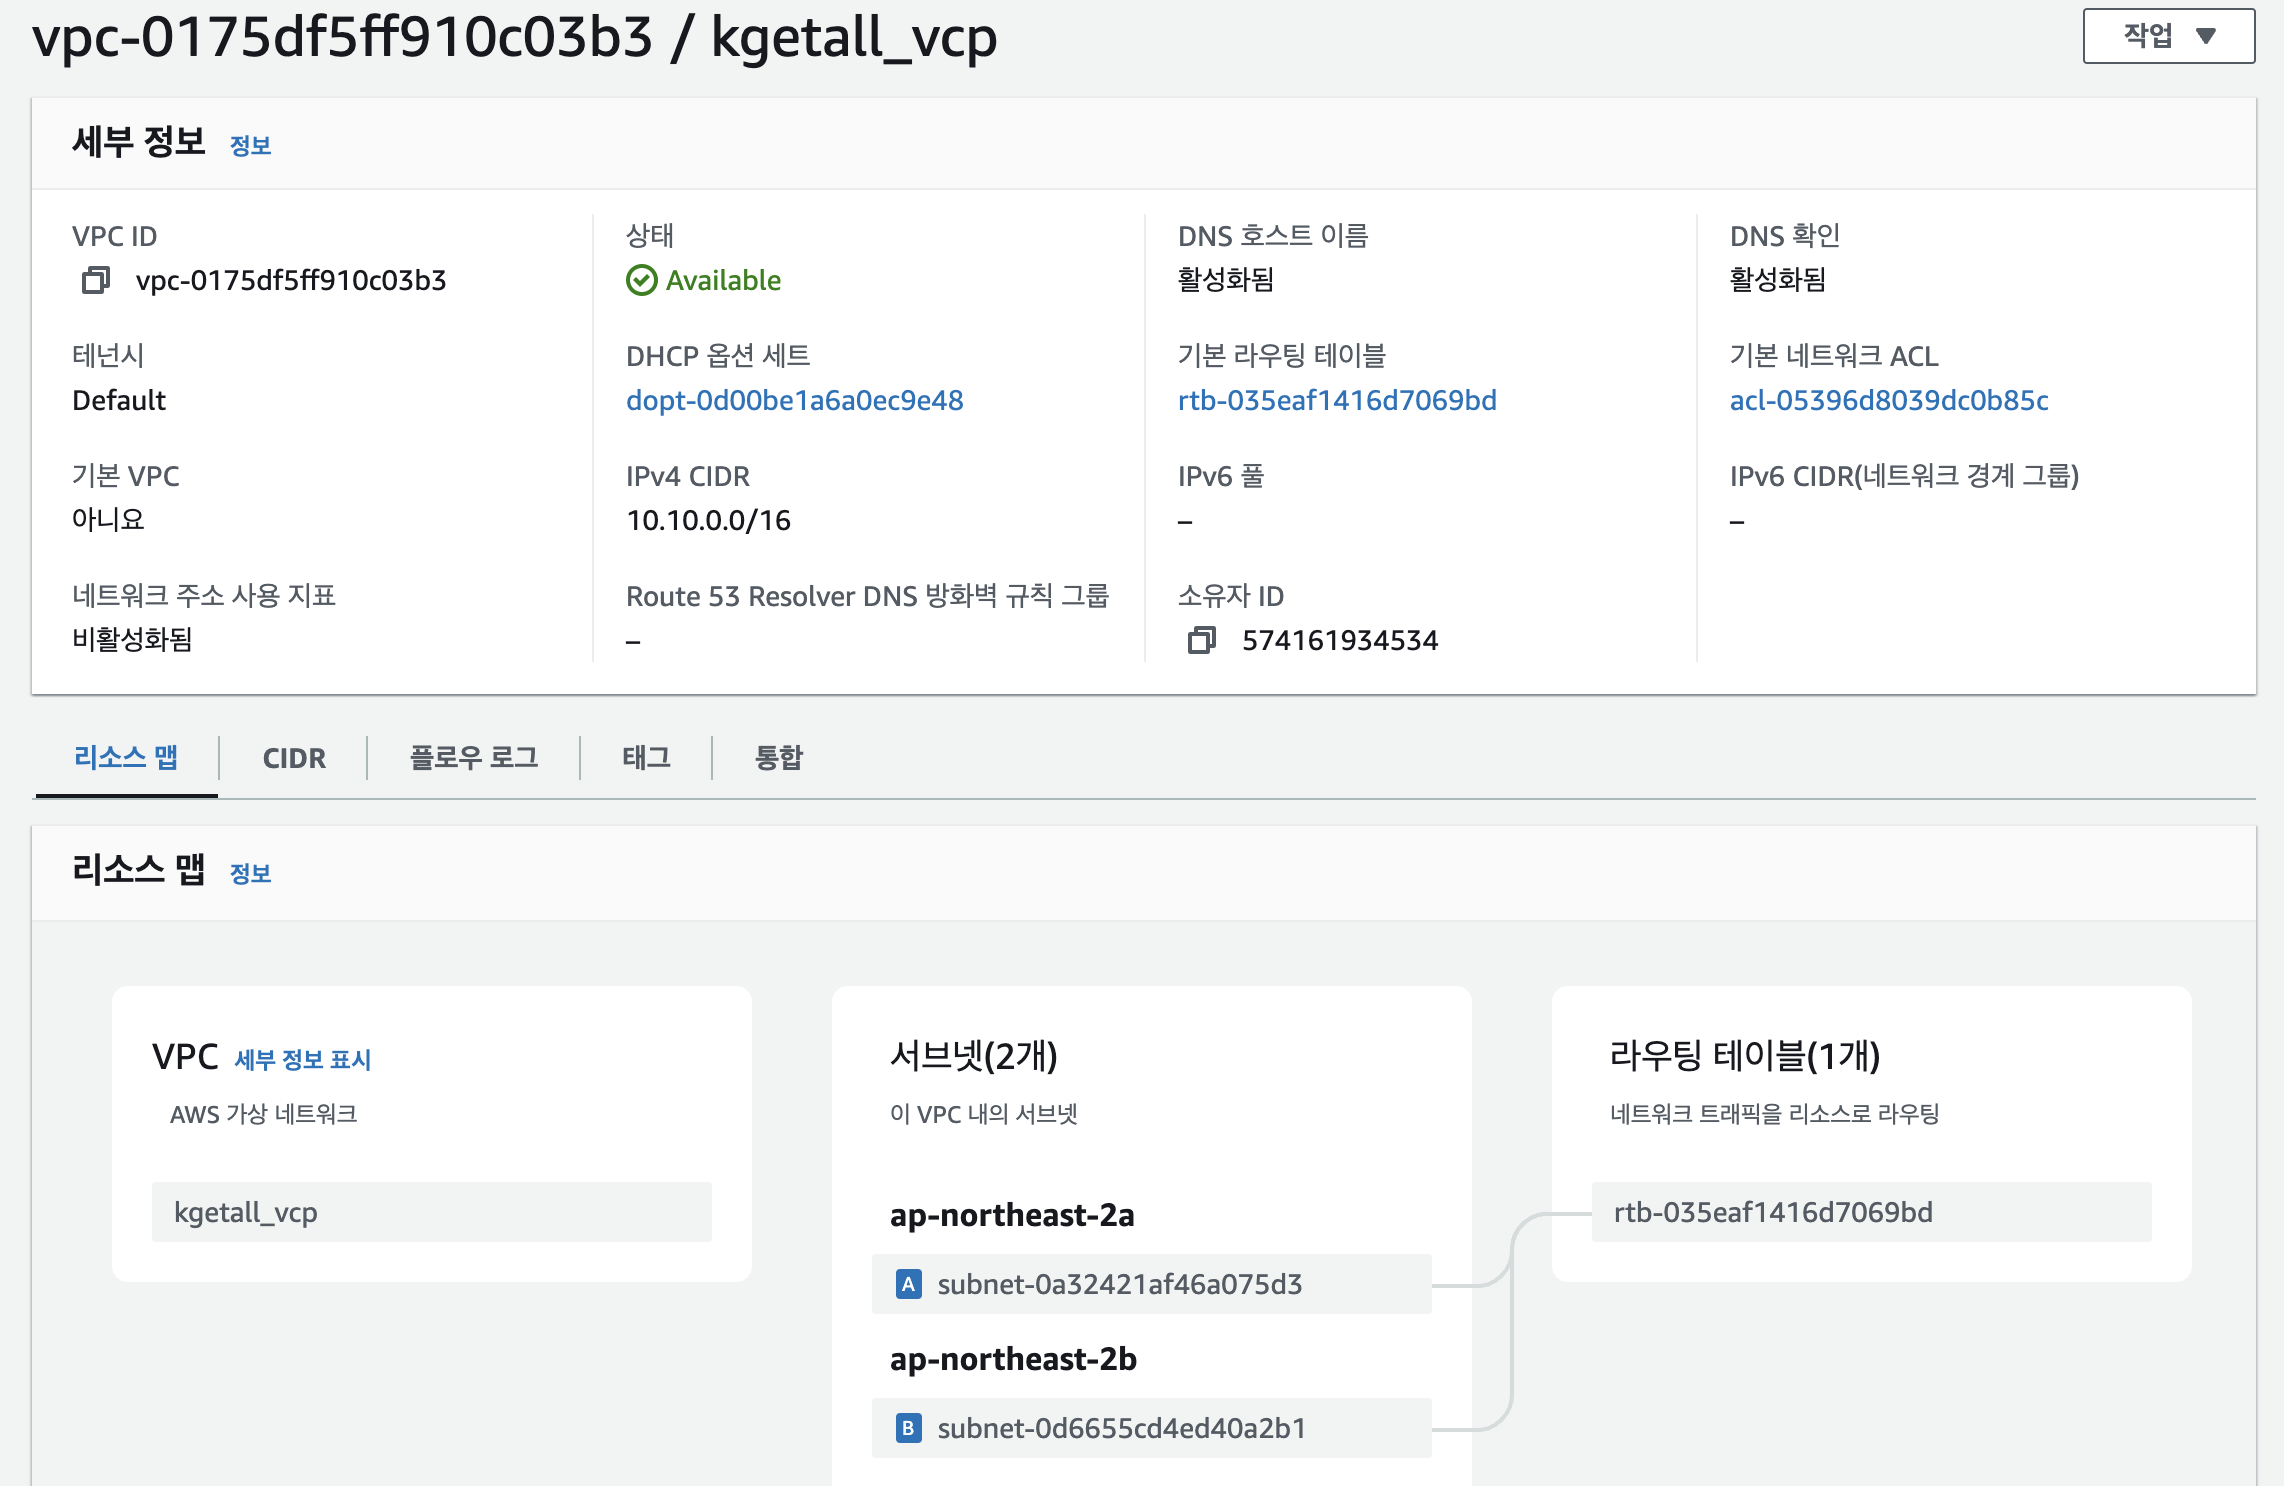
}- 실행 결과
3.6 입력변수
입력 변수는 인프라를 구성하는 데 필요한 속성 값을 정의해 코드의 변경 없이 여러 인프라를 생성하는 데 목적이 있다.
테라폼에서는 이것을 입력 변수 Input Variables 로 정의한다.
변수의 선언 방식
변수는 variable로 시작되는 블록으로 구성된다. 변수 블록 뒤의 이름 값은 동일 모듈 내 모든 변수 선언에서 고유해야 하며, 이 이름으로 다른 코드 내에서 참조된다.
- 변수 정의 시 사용 가능한 메타인수
- default : 변수 값을 전달하는 여러 가지 방법을 지정하지 않으면 기본값이 전달됨, 기본값이 없으면 대화식으로 사용자에게 변수에 대한 정보를 물어봄
- type : 변수에 허용되는 값 유형 정의, string number bool list map set object tuple 와 유형을 지정하지 않으면 any 유형으로 간주
- description : 입력 변수의 설명
- validation : 변수 선언의 제약조건을 추가해 유효성 검사 규칙을 정의 - 링크
- sensitive : 민감한 변수 값임을 알리고 테라폼의 출력문에서 값 노출을 제한 (암호 등 민감 데이터의 경우) - 링크
- nullable : 변수에 값이 없어도 됨을 지정 - Link
# variable 블록 선언의 예
variable "<이름>" {
 <인수> = <값>
}

variable "image_id" {
 type = string
}
변수의 유형
- 기본 유형
- string : 글자 유형
- number : 숫자 유형
- bool : true 또는 false
- any : 명시적으로 모든 유형이 허용됨을 표시
- 집합 유형
- list (<유형>): 인덱스 기반 집합
- map (<유형>): 값 = 속성 기반 집합이며 키값 기준 정렬
- set (<유형>): 값 기반 집합이며 정렬 키값 기준 정렬
- object ({<인수 이름>=<유형>, …})
- tuple ([<유형>, …])
- 변수 유형 별 선언
variable "string" {
  type        = string
  description = "var String"
  default     = "myString"
}

variable "number" {
  type    = number
  default = 123
}

variable "boolean" {
  default = true
}

variable "list" {
  default = [
    "google",
    "vmware",
    "amazon",
    "microsoft"
  ]
}

output "list_index_0" {
  value = var.list.0
}

output "list_all" {
  value = [
    for name in var.list : upper(name)
  ]
}

variable "map" { # Sorting
  default = {
    aws   = "amazon",
    azure = "microsoft",
    gcp   = "google"
  }
}

variable "set" { # Sorting
  type = set(string)
  default = [
    "google",
    "vmware",
    "amazon",
    "microsoft"
  ]
}

variable "object" {
  type = object({ name = string, age = number })
  default = {
    name = "abc"
    age  = 12
  }
}

variable "tuple" {
  type    = tuple([string, number, bool])
  default = ["abc", 123, true]
}

variable "ingress_rules" { # optional ( >= terraform 1.3.0)
  type = list(object({
    port        = number,
    description = optional(string),
    protocol    = optional(string, "tcp"),
  }))
  default = [
    { port = 80, description = "web" },
  { port = 53, protocol = "udp" }]
}
유효성 검사
- 변수 블록 내에 validation 블록에서 조건인 condition에 지정되는 규칙이 true 또는 false를 반환해야 하며, error_message는 condition 값의 결과가 false 인 경우 출력되는 메시지를 정의한다.
- regex 함수는 대상의 문자열에 정규식을 적용하고 일치하는 문자열을 반환하는데, 여기에 can 함수를 함께 사용하면 정규식에 일치하지 않는 경우의 오류를 검출한다.
- validation 블록은 중복으로 선언할 수 있다.
- 유효성 검사 예제 main.tf
variable "image_id" {
  type        = string
  description = "The id of the machine image (AMI) to use for the server."

  validation {
    condition     = length(var.image_id) > 4
    error_message = "The image_id value must exceed 4."
  }

  validation {
    # regex(...) fails if it cannot find a match
    condition     = can(regex("^ami-", var.image_id))
    error_message = "The image_id value must starting with \"ami-\"."
  }
}- 수행 결과
#
terraform apply -auto-approve
var.image_id
  The id of the machine image (AMI) to use for the server.

  Enter a value: ami
...

#
terraform apply -auto-approve
var.image_id
  The id of the machine image (AMI) to use for the server.

  Enter a value: ami-
...


#
terraform apply -auto-approve
var.image_id
  The id of the machine image (AMI) to use for the server.

  Enter a value: ami-12345678
...

terraform apply -auto-approve
변수의 참조
variable은 코드 내에서 var.<이름>으로 참조된다.
- main.tf
variable "my_password" {}

resource "local_file" "abc" {
  content  = var.my_password
  filename = "${path.module}/abc.txt"
}- 수행 결과
#
terraform init -upgrade && terraform apply -auto-approve
var.my_password
  Enter a value: qwe123
...

# 확인
terraform state list
terraform state show local_file.abc
cat abc.txt ; echo

# 해당 파일에 다른 내용으로 변경해보기
terraform apply -auto-approve
var.my_password
  Enter a value: t101mypss
...

# 확인
cat abc.txt ; echo
민감한 변수 취급
입력 변수의 민감 여부 선언 가능
- main.tf
variable "my_password" {
  default   = "password"
  sensitive = true
}

resource "local_file" "abc" {
  content  = var.my_password
  filename = "${path.module}/abc.txt"
}- 수행 결과
# 출력부분에 내용 안보임!
terraform apply -auto-approve
...
 ~ content              = (sensitive value)
...

terraform state show local_file.abc
echo "local_file.abc.content" | terraform console
(sensitive value)

# 결과물 파일 확인
cat abc.txt ; echo

# terraform.tfstate 파일 확인 : VSCODE에서 terraform.tfstate 클릭 후 확인
cat terraform.tfstate | grep '"content":'
            "content": "password",
변수 입력 방식과 우선순위
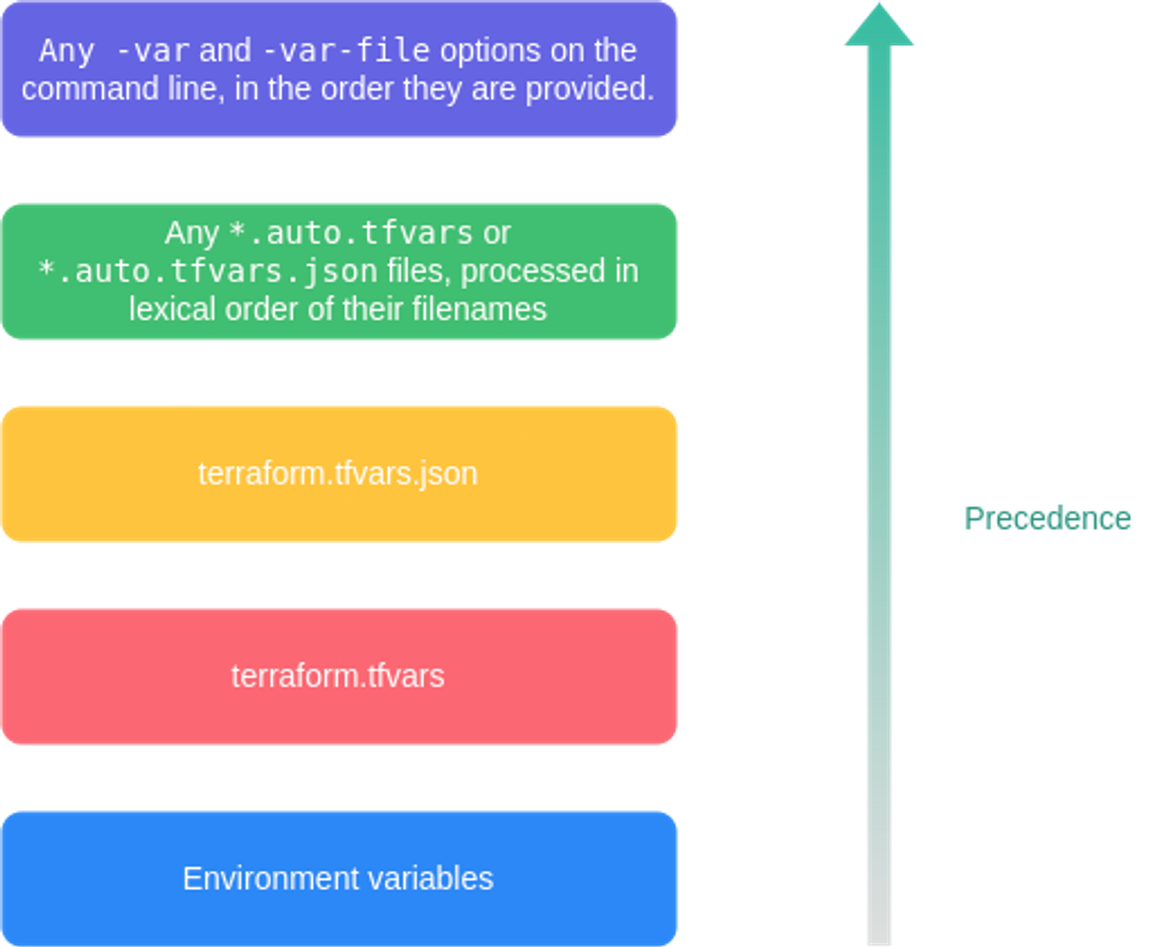
- variable의 목적은 코드 내용을 수정하지 않고 테라폼의 모듈적 특성을 통해 입력되는 변수로 재사용성을 높이는 데 있다.
- 특히 입력 변수라는 명칭에 맞게 사용자는 프로비저닝 실행 시에 원하는 값으로 변수에 정의할 수 있다.
- 선언되는 방식에 따라 변수의 우선순위가 있으므로, 이를 적절히 사용해 로컬 환경과 빌드 서버 환경에서의 정의를 다르게 하거나, 프로비저닝 파이프라인을 구성하는 경우 외부 값을 변수에 지정할 수 있다.
- [우선순위 수준]의 숫자가 작을수록 우선순위도 낮다.
3.7 local 지역 값
코드 내에서 사용자가 지정한 값 또는 속성 값을 가공해 참조 가능한 local (지역 값)은 외부에서 입력되지 않고, 코드 내에서만 가공되어 동작하는 값을 선언한다.
‘local’은 입력 변수와 달리 선언된 모듈 내에서만 접근 가능하고, 변수처럼 실행 시에 입력받을 수 없다.
실습: local의 선언과 참조
모듈 내에서 선언 및 접근됨을 확인해본다.
- main.tf 생성
variable "prefix" {
  default = "hello"
}

locals {
  name    = "terraform"
}

resource "local_file" "abc" {
  content  = local.content
  filename = "${path.module}/abc.txt"
}- sub.tf 생성
추가로 locals 블록에 name 인수를 기재하면 visual studio code 창에 경고가 뜨게 되는데, 이유는 main.tf에 지정한 local.name과 중첩되기 때문이다.
locals {
  content = "${var.prefix} ${local.name}"
}- 실행
ls *.tf
terraform init -upgrade
terraform apply -auto-approve

terraform state list
terraform state show local_file.abc

echo "local.content" | terraform console
"hello terraform"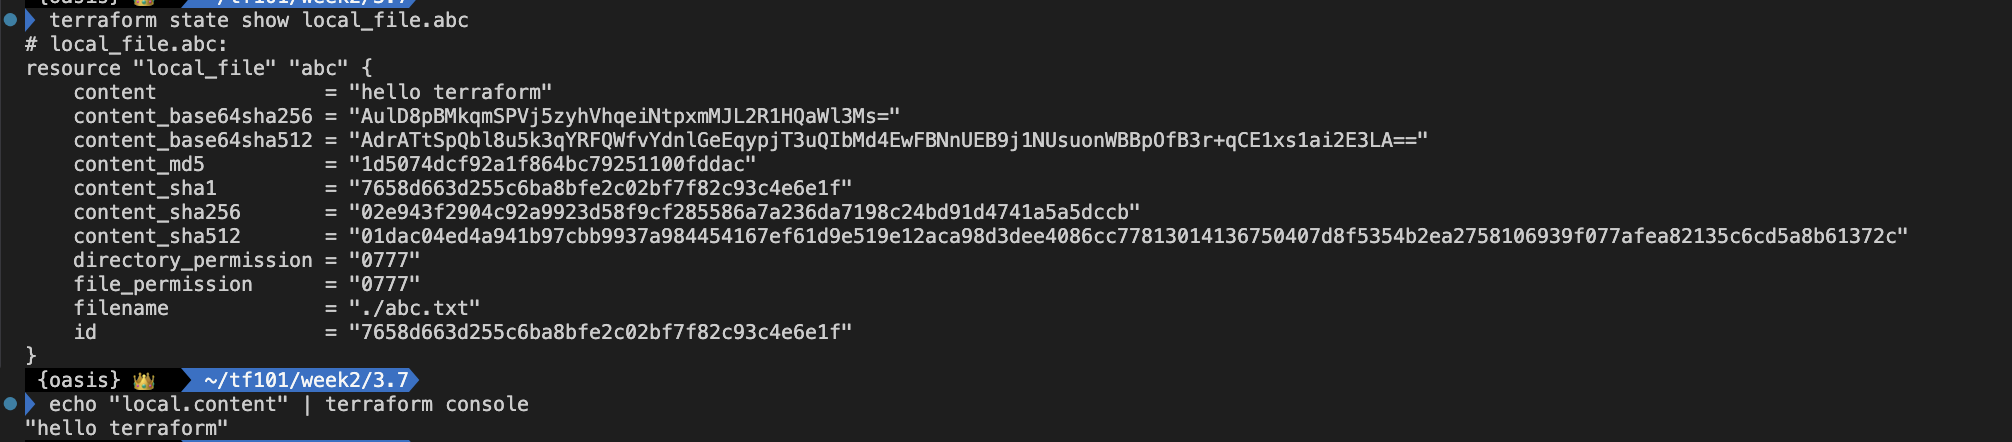
그러면 local은 어떻게 사용하면 좋을까요? 또 많아 질 경우 관리에 어려움이 발생할 것 같은데, 이럴때는 어떻게 해야 될까요?
로컬 변수가 많아질 경우 구조화된 로컬 변수, 별도의 파일로 분리
- 구조화된 로컬 변수: 로컬 변수를 구조화하여 관련된 값들을 그룹화합니다
locals {
  app_config = {
    instance_type = "t2.micro"
    ami_id        = "ami-12345678"
    tags = {
      environment = "production"
      team        = "devops"
    }
  }
}

resource "aws_instance" "example" {
  ami           = local.app_config.ami_id
  instance_type = local.app_config.instance_type

  tags = local.app_config.tags
}- 별도의 파일로 분리: 로컬 변수가 많아질 경우 별도의 파일로 분리하여 관리합니다. 예를 들어, locals.tf 파일을 만들어 모든 로컬 변수를 그 파일에 정의할 수 있습니다.
// locals.tf
locals {
  instance_type = "t2.micro"
  ami_id        = "ami-12345678"
  common_tags = {
    environment = "production"
    team        = "devops"
  }
}

// main.tf
resource "aws_instance" "example" {
  ami           = local.ami_id
  instance_type = local.instance_type

  tags = local.common_tags
}
- 의미 있는 네이밍: 로컬 변수의 이름을 명확하고 의미 있게 지어 코드의 가독성을 높입니다.
locals {
  database_instance_type = "db.t2.micro"
  web_server_instance_type = "t2.micro"
}

resource "aws_instance" "db_instance" {
  instance_type = local.database_instance_type
  // 기타 설정
}

resource "aws_instance" "web_server" {
  instance_type = local.web_server_instance_type
  // 기타 설정
}
- 모듈화: 공통으로 사용되는 설정이나 변수를 모듈화하여 재사용합니다. 이를 통해 코드의 중복을 줄이고 유지보수성을 높일 수 있습니다.
locals {
  database_instance_type = "db.t2.micro"
  web_server_instance_type = "t2.micro"
}

resource "aws_instance" "db_instance" {
  instance_type = local.database_instance_type
  // 기타 설정
}

resource "aws_instance" "web_server" {
  instance_type = local.web_server_instance_type
  // 기타 설정
}
3.8 출력 output
출력 값은 주로 테라폼 코드의 프로비저닝 수행 후의 결과 속성 값을 확인하는 용도로 사용된다.
또한 프로그래밍 언어에서 코드 내 요소 간에 제한된 노출을 지원하듯, 테라폼 모듈 간, 워크스페이스 간 데이터 접근 요소로도 활용할 수 있다.
- 루트 모듈에서 사용자가 확인하고자 하는 특정 속성 출력
- 자식 모듈의 특정 값을 정의하고 루트 모듈에서 결과를 참조
- 서로 다른 루트 모듈의 결과를 원격으로 읽기 위한 접근 요소
실습: output 선언과 활용
- main.tf
resource "local_file" "abc" {
  content  = "abc123"
  filename = "${path.module}/abc.txt"
}

output "file_id" {
  value = local_file.abc.id
}

output "file_abspath" {
  value = abspath(local_file.abc.filename)
}- 실행
$terraform init && terraform plan && terraform apply -auto-approve
...
Outputs:

file_abspath = "/Users/kimj50/tf101/week2/3.8/abc.txt"
file_id = "6367c48dd193d56ea7b0baad25b19455e529f5ee"

$echo "local_file.abc" | terraform console
{
  "content" = "abc123"
  "content_base64" = tostring(null)
  "content_base64sha256" = "bKE9UspwyIPg8LsQHkJaiehiTeUdstI5JZOvaoQRgJA="
  "content_base64sha512" = "xwtd2ev7b1HQnUEytxcMnSB1CnhS8AaA9lZY8DEOgQBW5nY8NMmgCw6UAHb1RJXBafwjAszrMSA5JxxDRpUH3A=="
  "content_md5" = "e99a18c428cb38d5f260853678922e03"
  "content_sha1" = "6367c48dd193d56ea7b0baad25b19455e529f5ee"
  "content_sha256" = "6ca13d52ca70c883e0f0bb101e425a89e8624de51db2d2392593af6a84118090"
  "content_sha512" = "c70b5dd9ebfb6f51d09d4132b7170c9d20750a7852f00680f65658f0310e810056e6763c34c9a00b0e940076f54495c169fc2302cceb312039271c43469507dc"
  "directory_permission" = "0777"
  "file_permission" = "0777"
  "filename" = "./abc.txt"
  "id" = "6367c48dd193d56ea7b0baad25b19455e529f5ee"
  "sensitive_content" = (sensitive value)
  "source" = tostring(null)
}

$echo "local_file.abc.filename" | terraform console
"./abc.txt

$terraform output -raw file_abspath ; echo
/Users/kimj50/tf101/week2/3.8/abc.txt
3.9 반복문
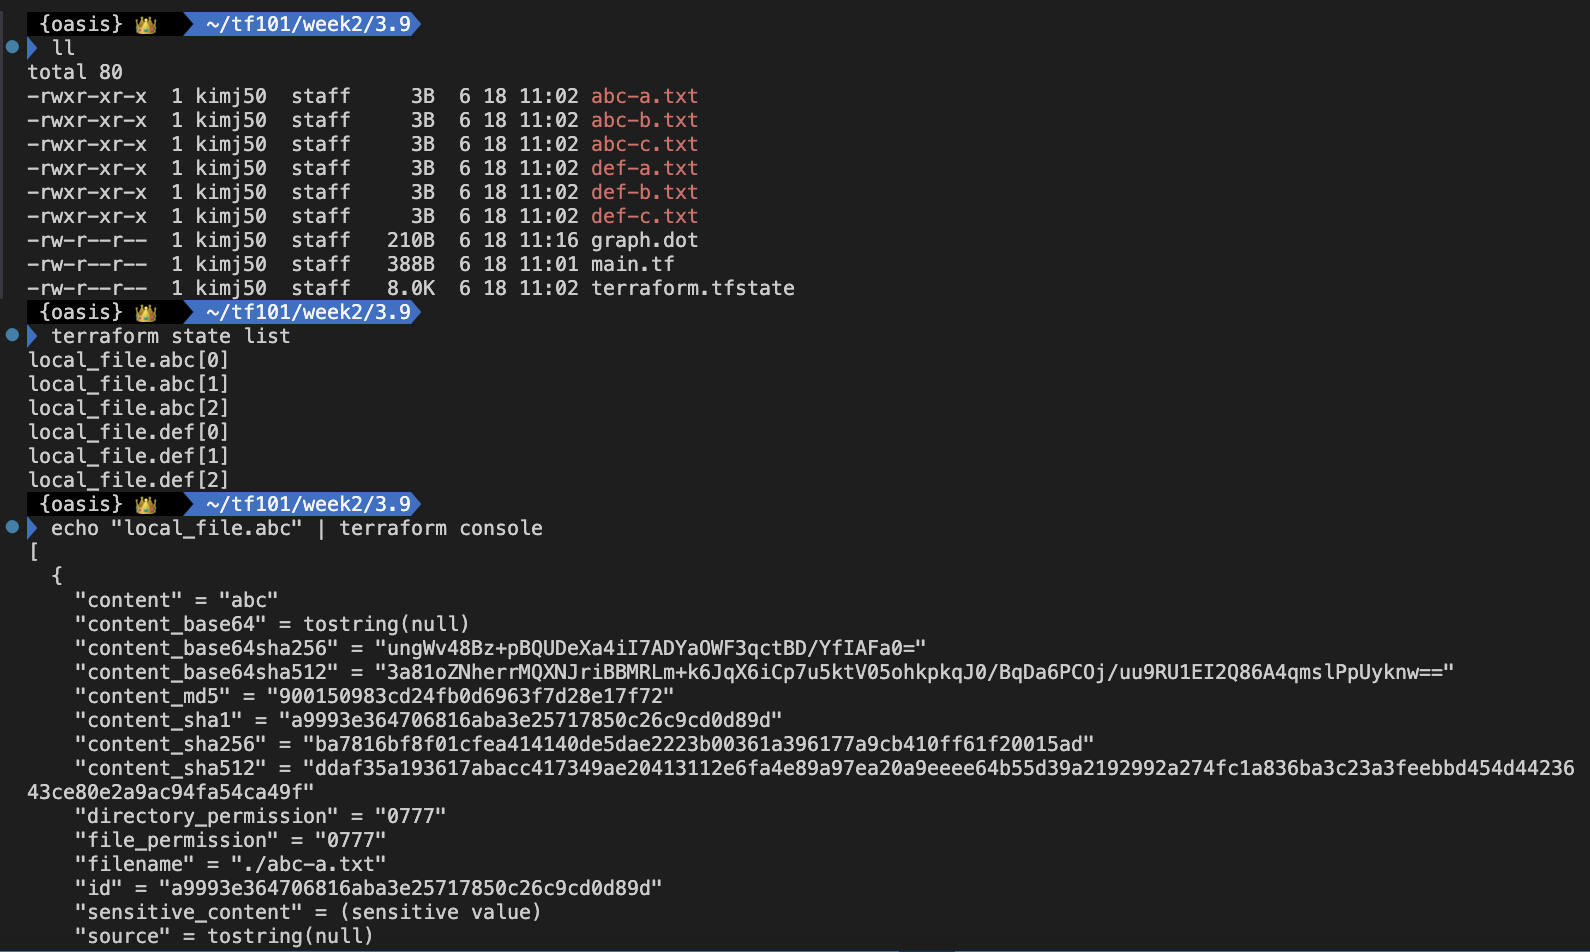
list 형태의 값 목록이나 Key-Value 형태의 문자열 집합인 데이터가 있는 경우 동일한 내용에 대해 테라폼 구성 정의를 반복적으로 하지 않고 관리할 수 있다.
실습: Count 반복문
반복문에 지정된 정수 값 만큼 반복해서 리소스나 모듈을 생성한다. count는 정수를 명시하기도 하지만 리스트를 활용해서 반복문의 동작을 구성 할 수 있다.
- main.tf
variable "names" {
  type = list(string)
  default = [ "a", "b", "c" ]
}

resource "local_file" "abc" {
  count = length(var.names)
  content = "abc"
  filename = "${path.module}/abc-${var.names[count.index]}.txt"
}

resource "local_file" "def" {
  count = length(var.names)
  content = local_file.abc[count.index].content
  filename = "${path.module}/def-${var.names[count.index]}.txt"
}- 실행 결과
[스터디 전용 실습]
실습1. VPC + 보안그룹 + EC2 배포
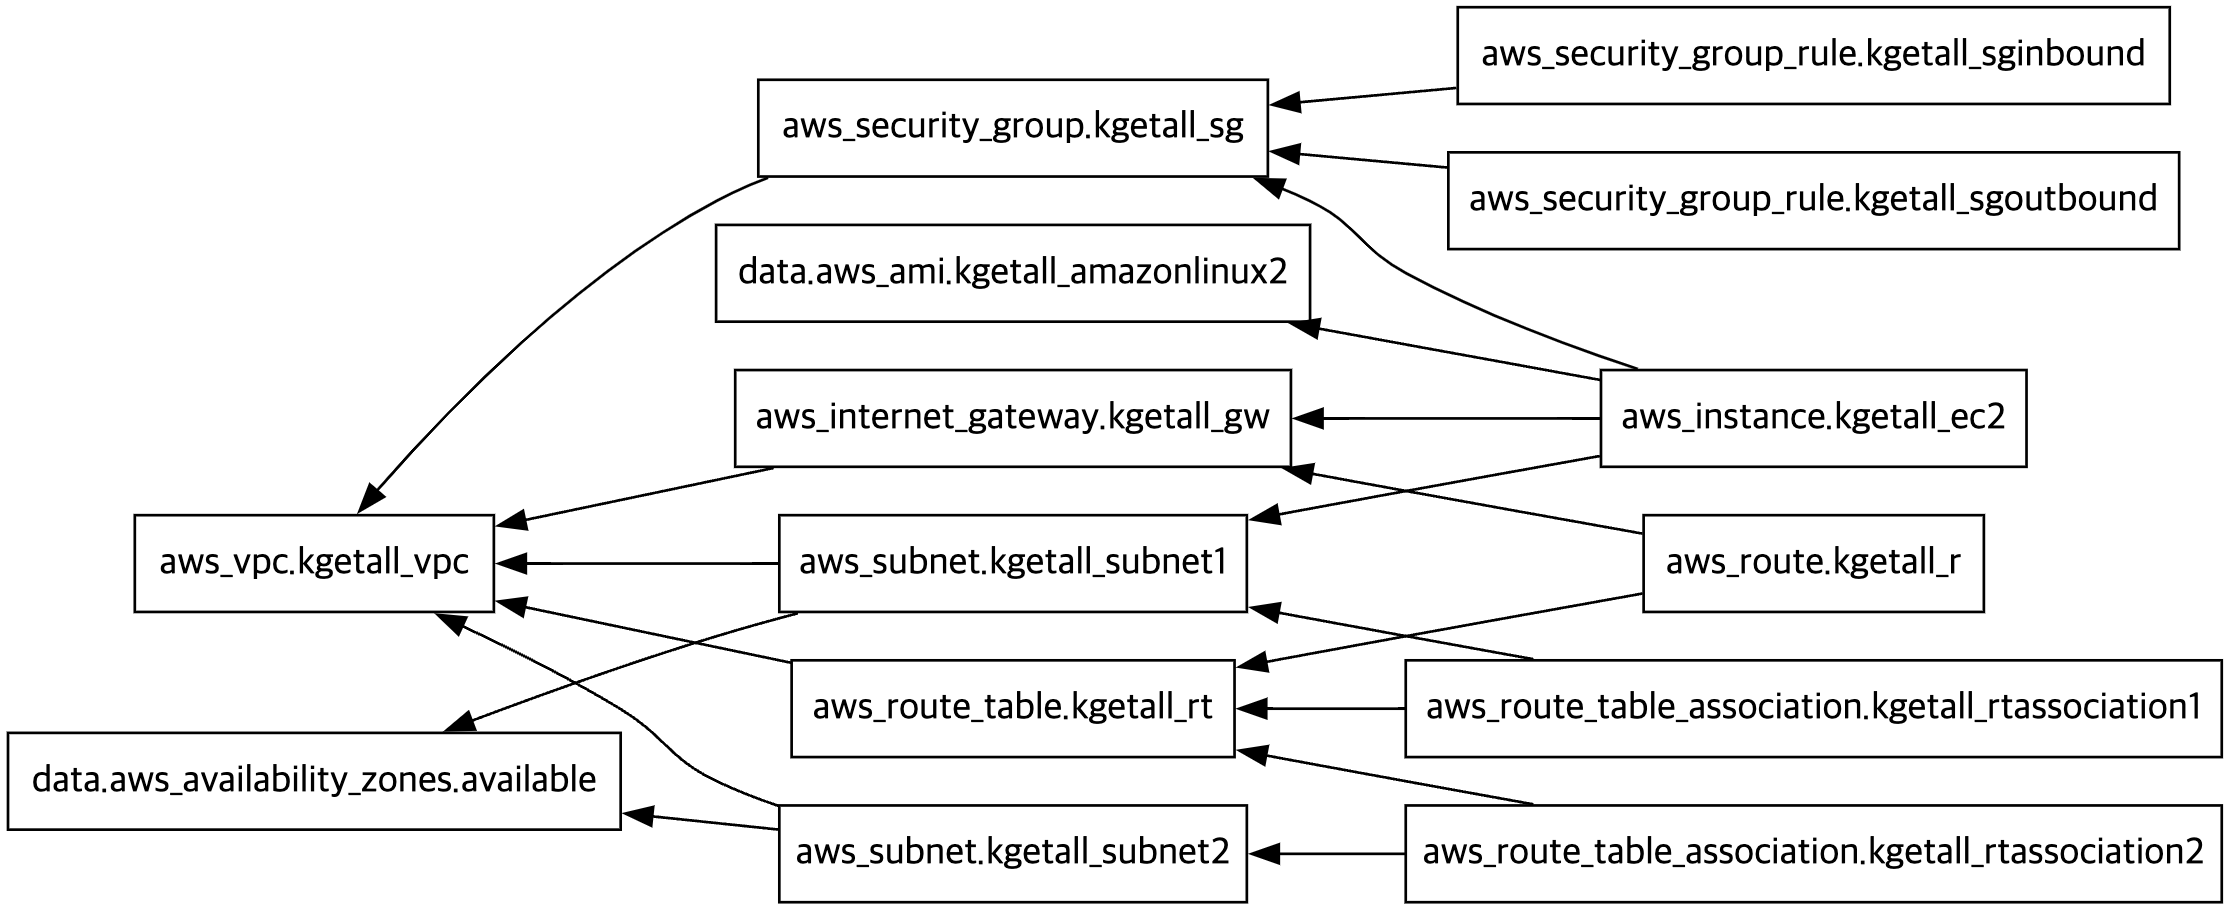
- main.tf
#vpc+보안그룹+EC2배포
provider "aws" {
  region = "ap-northeast-2"
}

#vpc
resource "aws_vpc" "kgetall_vpc" {
  cidr_block = "10.10.0.0/16"
  enable_dns_hostnames = true
  enable_dns_support = true

  tags = {
    Name = "t101-study"
  }
}

#subnets
data "aws_availability_zones" "available" {
  state = "available"
}

resource "aws_subnet" "kgetall_subnet1" {
  vpc_id = resource.aws_vpc.kgetall_vpc.id
  cidr_block = "10.10.1.0/24"
  availability_zone = data.aws_availability_zones.available.names[0]

  tags = {
    Name = "t101-subnet1"
  }
}

resource "aws_subnet" "kgetall_subnet2" {
  vpc_id = resource.aws_vpc.kgetall_vpc.id
  cidr_block = "10.10.2.0/24"
  availability_zone = data.aws_availability_zones.available.names[2]

  tags = {
    Name = "t101-subnet2"
  }
}

#IGW
resource "aws_internet_gateway" "kgetall_gw" {
  vpc_id = resource.aws_vpc.kgetall_vpc.id

  tags = {
    Name = "t101-igw"
  }
}

#route table
resource "aws_route_table" "kgetall_rt" {
  vpc_id = resource.aws_vpc.kgetall_vpc.id

  tags = {
    Name = "t101-rt"
  }
}

resource "aws_route_table_association" "kgetall_rtassociation1" {
  subnet_id      = aws_subnet.kgetall_subnet1.id
  route_table_id = aws_route_table.kgetall_rt.id
}

resource "aws_route_table_association" "kgetall_rtassociation2" {
  subnet_id      = aws_subnet.kgetall_subnet2.id
  route_table_id = aws_route_table.kgetall_rt.id
}

resource "aws_route" "kgetall_r" {
  route_table_id            = aws_route_table.kgetall_rt.id
  destination_cidr_block    = "0.0.0.0/0"
  gateway_id = aws_internet_gateway.kgetall_gw.id
}- sg.tf
resource "aws_security_group" "kgetall_sg" {
  vpc_id      = aws_vpc.kgetall_vpc.id
  name = "T101 SG"
  description = "T101 Study SG"
}

resource "aws_security_group_rule" "kgetall_sginbound" {
  type              = "ingress"
  from_port         = 80
  to_port           = 80
  protocol          = "tcp"
  cidr_blocks       = ["0.0.0.0/0"]
  security_group_id = aws_security_group.kgetall_sg.id
}

resource "aws_security_group_rule" "kgetall_sgoutbound" {
  type              = "egress"
  from_port         = 0
  to_port           = 0
  protocol          = "-1"
  cidr_blocks       = ["0.0.0.0/0"]
  security_group_id = aws_security_group.kgetall_sg.id
}- ec2.tf
data "aws_ami" "kgetall_amazonlinux2" {
  most_recent = true
  filter {
    name = "owner-alias"
    values = ["amazon"]
  }

  filter {
    name = "name"
    values = ["amzn2-ami-hvm-*-x86_64-ebs"]
  }

  owners = ["amazon"]
}

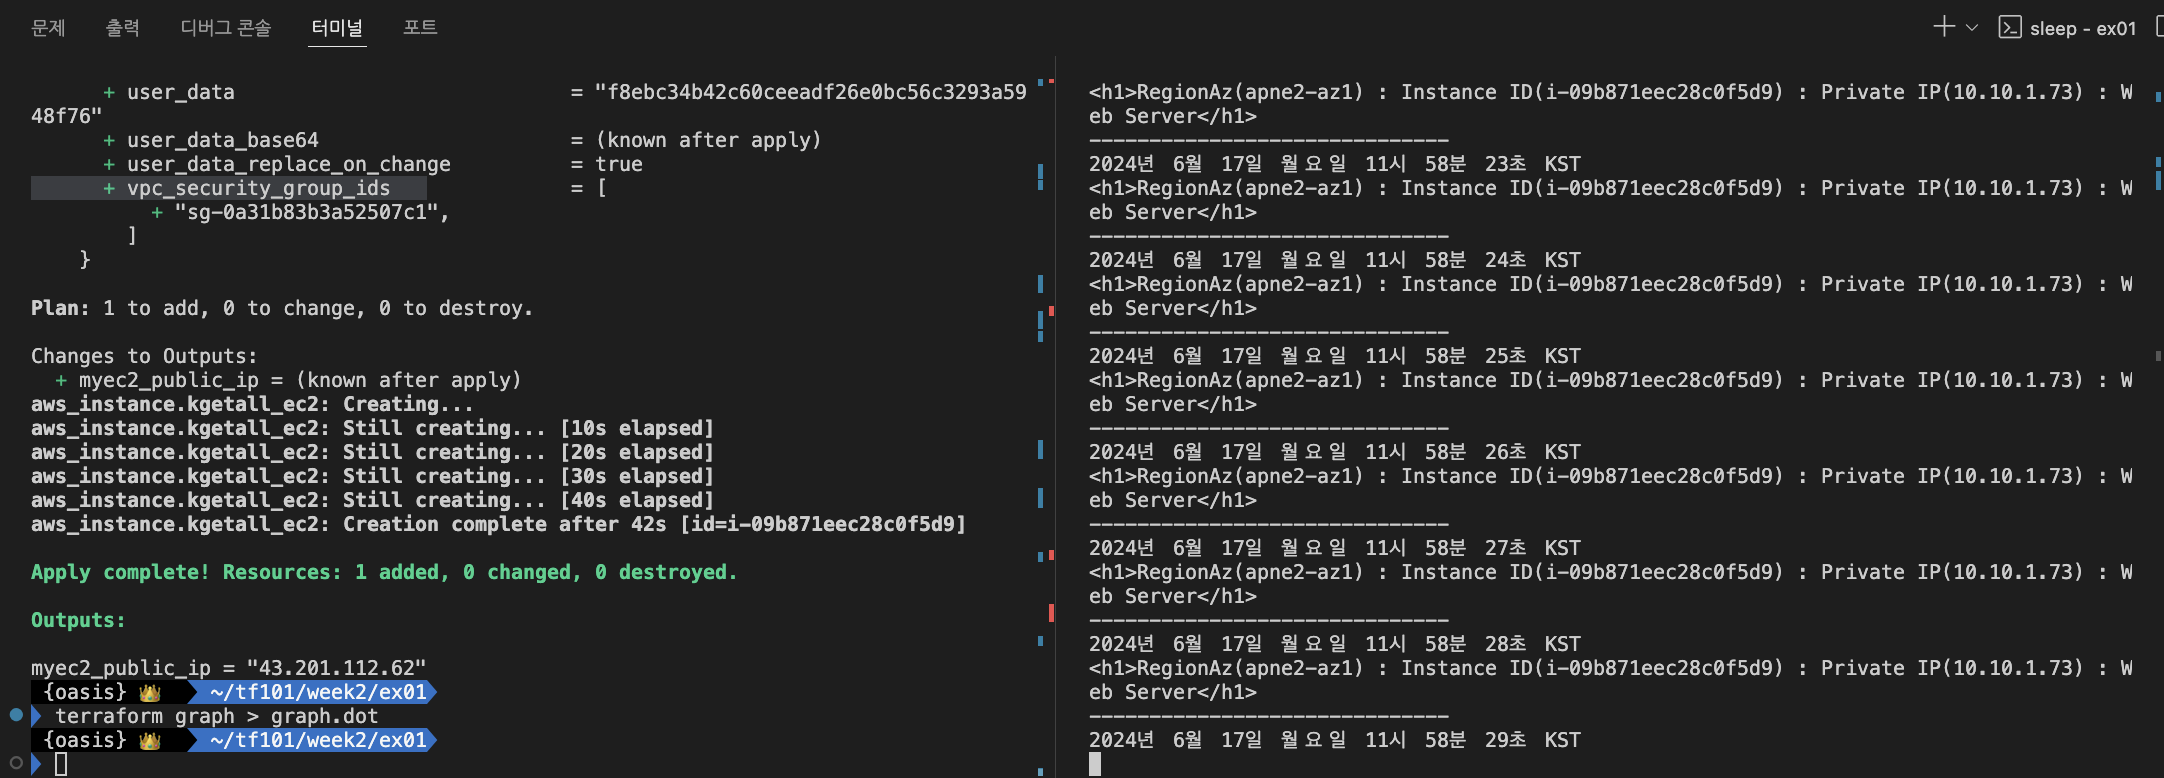
resource "aws_instance" "kgetall_ec2" {
  depends_on = [ aws_internet_gateway.kgetall_gw ]

  ami = data.aws_ami.kgetall_amazonlinux2.id
  associate_public_ip_address = true
  instance_type = "t2.micro"
  vpc_security_group_ids = ["${aws_security_group.kgetall_sg.id}"]
  subnet_id = aws_subnet.kgetall_subnet1.id

  user_data = <<-EOF
              #!/bin/bash
              wget https://busybox.net/downloads/binaries/1.31.0-defconfig-multiarch-musl/busybox-x86_64
              mv busybox-x86_64 busybox
              chmod +x busybox
              RZAZ=$(curl http://169.254.169.254/latest/meta-data/placement/availability-zone-id)
              IID=$(curl 169.254.169.254/latest/meta-data/instance-id)
              LIP=$(curl 169.254.169.254/latest/meta-data/local-ipv4)
              echo "<h1>RegionAz($RZAZ) : Instance ID($IID) : Private IP($LIP) : Web Server</h1>" > index.html
              nohup ./busybox httpd -f -p 80 &
              EOF
  user_data_replace_on_change = true

  tags = {
    Name = "t101-myec2"
  }
}

output "myec2_public_ip" {
  value       = aws_instance.kgetall_ec2.public_ip
  description = "The public IP of the Instance"
}
실습2. AWS IAM User 생성
provider "aws" {
  region = "ap-northeast-2"
}

locals {
  name = "mytest"
  team = {
    group = "dev"
  }
}

resource "aws_iam_user" "kgetall_iamuser1" {
  name = "${local.name}1"
  tags = local.team
}

resource "aws_iam_user" "kgetall_iamuser2" {
  name = "${local.name}2"
  tags = local.team
}
#aws iam list-users | jq
{
"Users": [
{
"Path": "/",
"UserName": "admin",
"UserId": "AIDAYLLVX3DDJGFHWBODO",
"Arn": "arn:aws:iam::574161934534:user/admin",
"CreateDate": "2024-03-03T13:26:44+00:00",
"PasswordLastUsed": "2024-06-17T00:45:14+00:00"
},
{
"Path": "/",
"UserName": "mytest1",
"UserId": "AIDAYLLVX3DDPCUMMUB7M",
"Arn": "arn:aws:iam::574161934534:user/mytest1",
"CreateDate": "2024-06-17T04:47:32+00:00"
},
{
"Path": "/",
"UserName": "mytest2",
"UserId": "AIDAYLLVX3DDKTUVSIQFA",
"Arn": "arn:aws:iam::574161934534:user/mytest2",
"CreateDate": "2024-06-17T04:47:32+00:00"
}
]
}생성된 iamuser1, iamuser2가 확인됨
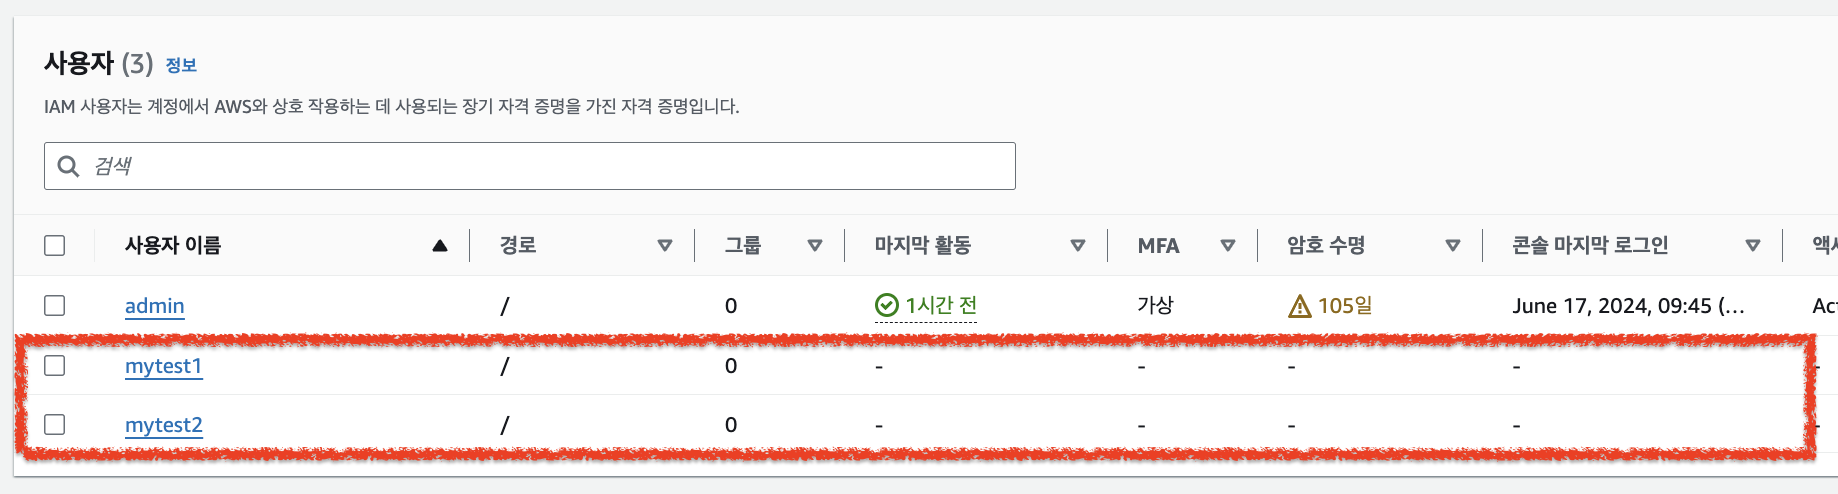
iamuser1 유저만 삭제한다.
$terraform destroy --auto-approve -target=aws_iam_user.kgetall_iamuser1admin과 mytest2 user만 남아 있다.
$aws iam list-users | jq
{
  "Users": [
    {
      "Path": "/",
      "UserName": "admin",
      "UserId": "AIDAYLLVX3DDJGFH",
      "Arn": "arn:aws:iam::574161934534:user/admin",
      "CreateDate": "2024-03-03T13:26:44+00:00",
      "PasswordLastUsed": "2024-06-17T00:45:14+00:00"
    },
    {
      "Path": "/",
      "UserName": "mytest2",
      "UserId": "AIDAYLLVX3DDKTUVSIQFA",
      "Arn": "arn:aws:iam::574161934534:user/mytest2",
      "CreateDate": "2024-06-17T04:47:32+00:00"
    }
  ]
}
실습 3-1. IAM 사용자 3명 생성
- count에 정수를 지정해서 수행하도록 함
- main.tf
resource "aws_iam_user" "iamuser" {
  count = 3
  name = "user${count.index}"
}- 실행 결과
"user0", "user1", "user2" 3명의 IAM User가 생성됨
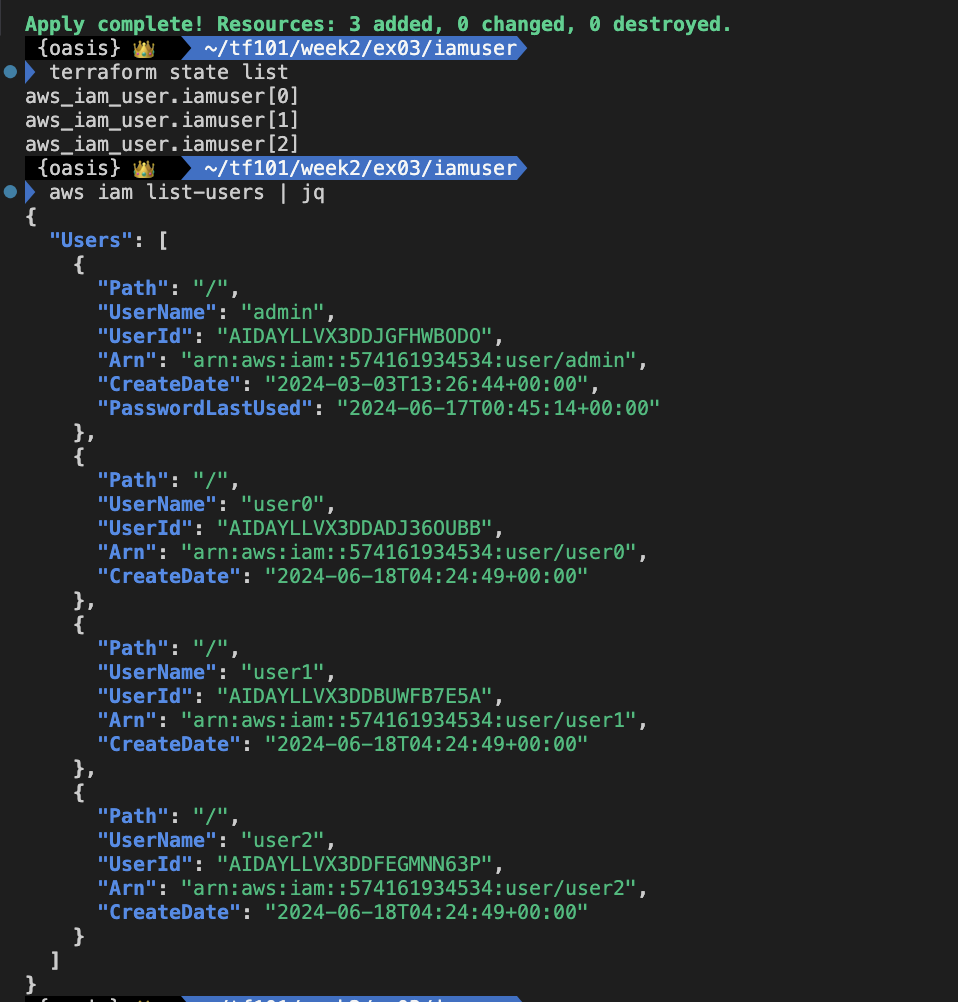
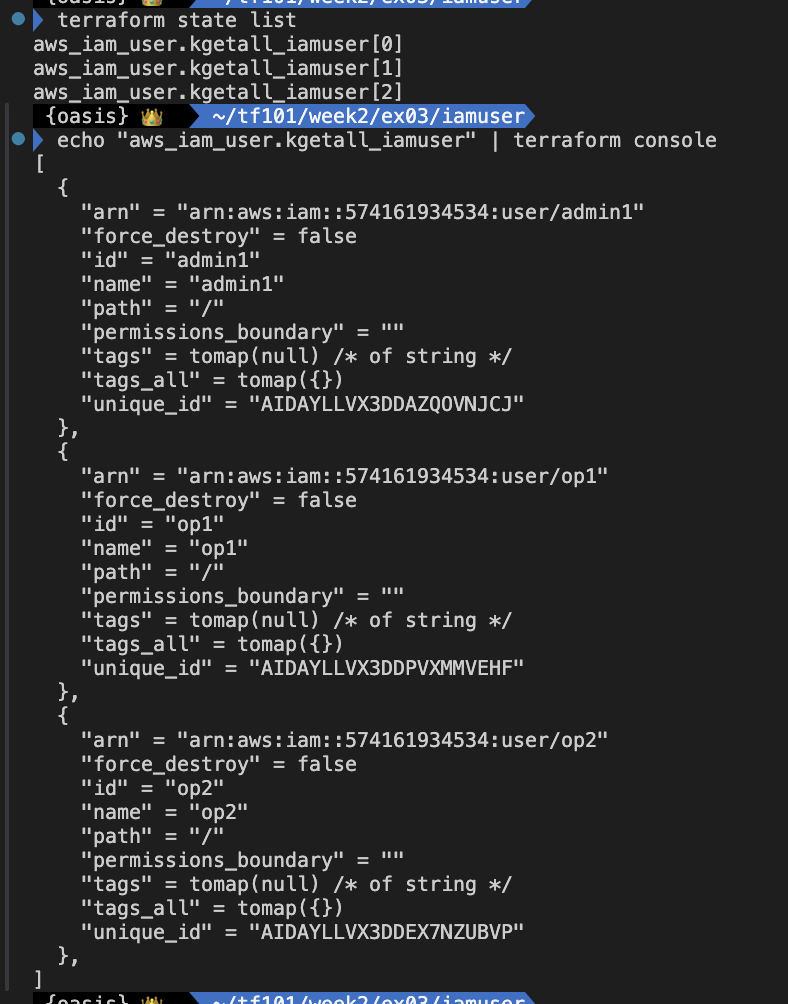
실습 3-2. count 입력 변수를 통해 IAM 사용자 생성
- 리스트 변수에 생성할 IAM User 이름 3개를 지정하고 length 함수를 활용해 count 에 인덱스 수 만큼 정수값을 지정하여 IAM User 3명을 생성함
- main.tf
variable "names" {
  type = list(string)
  default = ["admin1", "op1", "op2"]
}

resource "aws_iam_user" "kgetall_iamuser" {
  count = length(var.names)
  name = "${var.names[count.index]}"
}- 실행 결과
"admin1", "op1", "op2" 3명의 IAM User가 생성됨
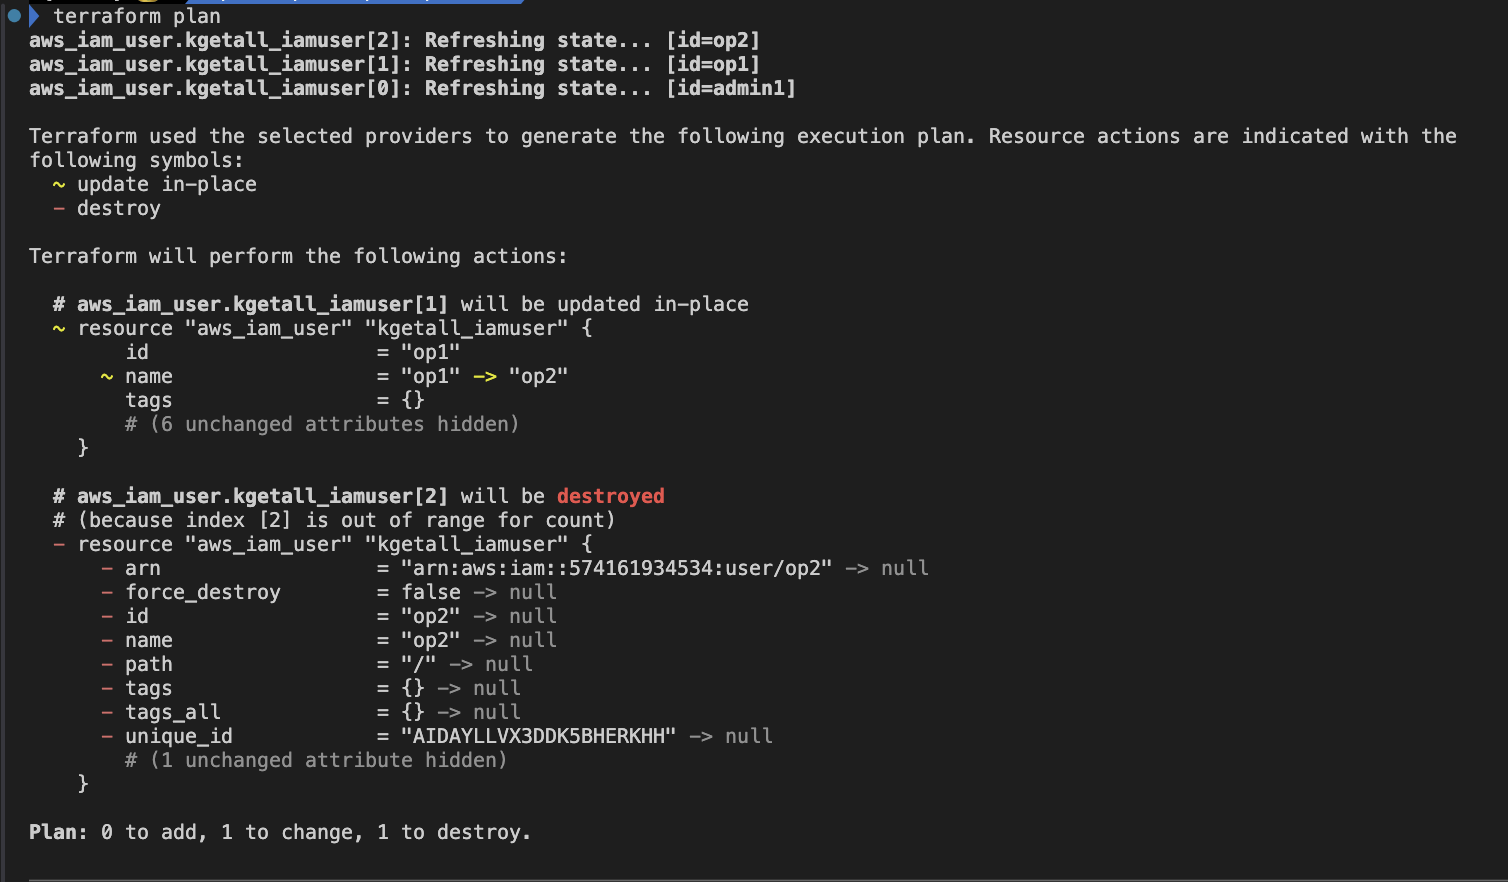
실습 3-3. count 제약사항
- 리스트 변수에 생성할 IAM User를 3개("admin1", "op1", "op2")를 생성했는데 중간에 "op1"을 삭제하게되면 뒤에 있던 모든 리소스가 생성되고 다음 해당 리소스를 다시 만들게되는 된다.
- main.tf
variable "names" {
  type = list(string)
  default = ["admin1", "op2"]  #op1을 삭제
}

resource "aws_iam_user" "kgetall_iamuser" {
  count = length(var.names)
  name = "${var.names[count.index]}"
}- 실행 결과
배열의 중간에 "op1" 항목을 제거하면 뒤의 "op2" 항목이 1칸 앞으로 당겨짐
[악분님 제공: count 실습]
시나리오1. aws_subnet
- AWS VPC Subnet 테라폼 코드 작성
- 요구사항 : subnet cidr를 변수로 입력
- main.tf
resource "aws_vpc" "main" {
  cidr_block = var.vpc_cidr

  tags = {
    Name = "terraform VPC"
  }
}

resource "aws_subnet" "main" {
  vpc_id = aws_vpc.main.id
  cidr_block = var.subnet_cidr
}

output "myvpc_id" {
  value = aws_vpc.main.id
}- variables.tf
variable "vpc_cidr" {
  type = string
}

variable "subnet_cidr" {
  type = string
}- terraform.tfvars 수정
vpc_cidr            = "192.168.0.0/16"
subnet_cidr = "192.168.1.0/24"- 배포 실행
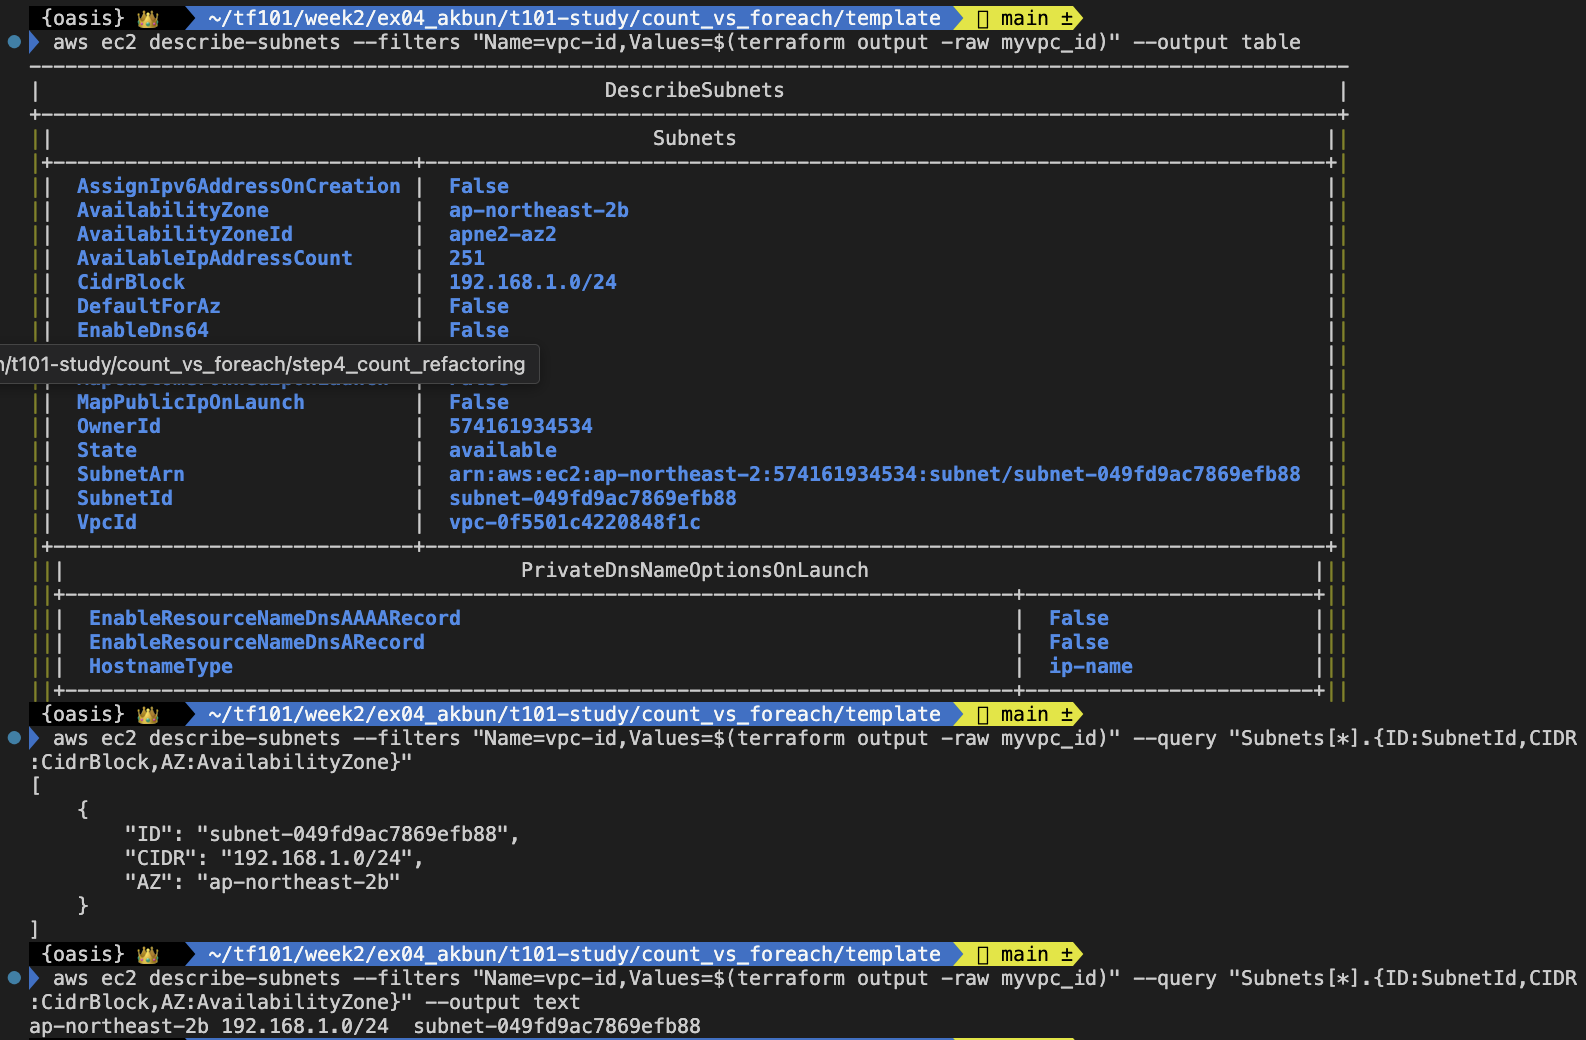
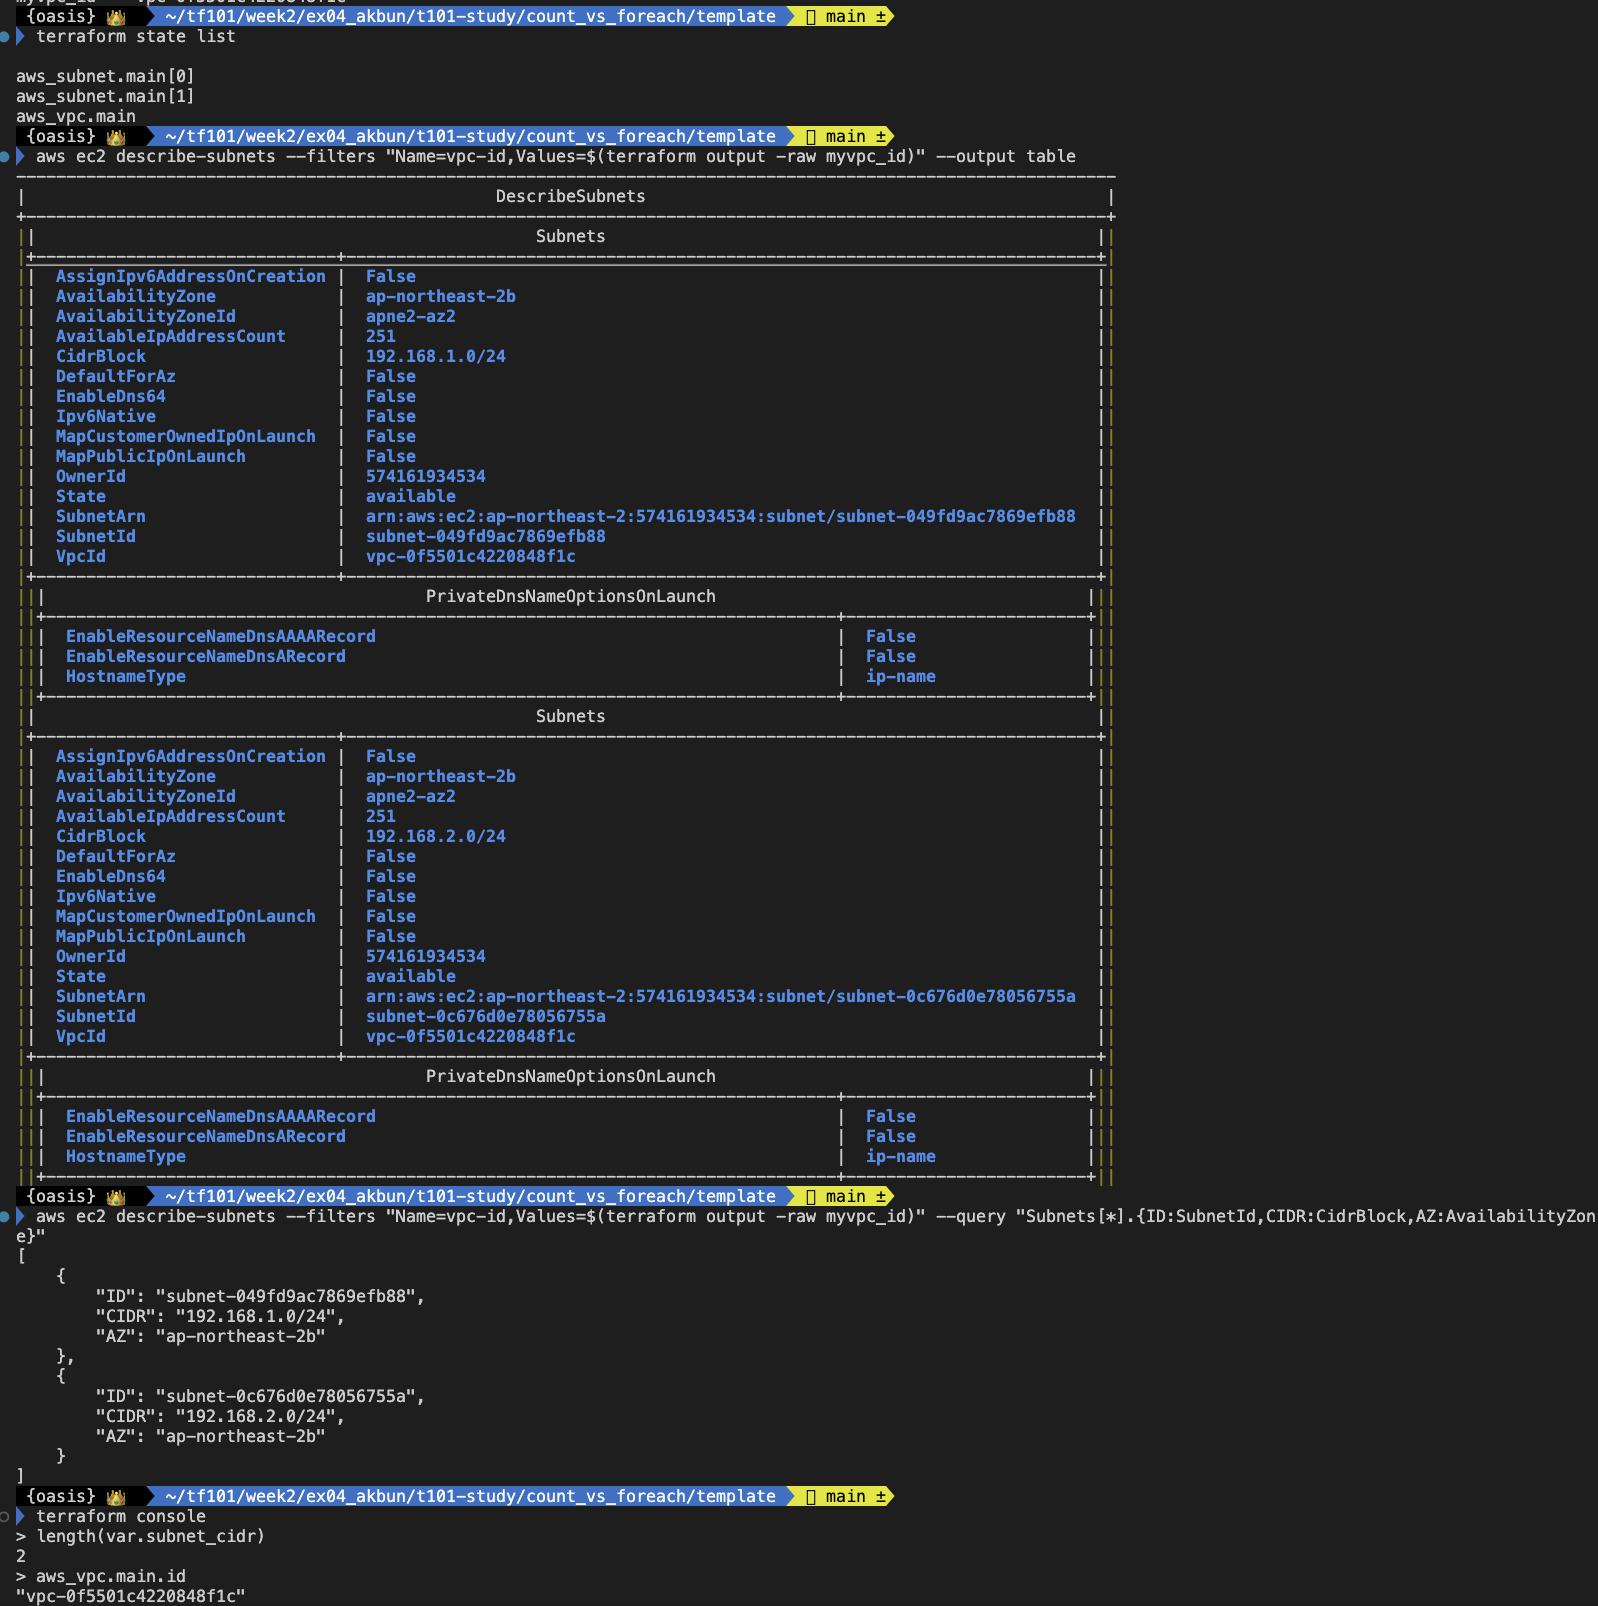
시나리오2. index element length
요구사항 : count를 사용해서 subnet cidr 변수 값을 여러 개 입력 한다.
- main.tf
resource "aws_vpc" "main" {
  cidr_block = var.vpc_cidr

  tags = {
    Name = "terraform VPC"
  }
}

resource "aws_subnet" "main" {
  count = length(var.subnet_cidr)
  vpc_id = aws_vpc.main.id
  cidr_block = element(var.subnet_cidr, count.index)
}

output "myvpc_id" {
  value = aws_vpc.main.id
}- variables.tf
variable "vpc_cidr" {
  type = string
}

variable "subnet_cidr" {
  type = list(string)
}- terraform.tfvars
vpc_cidr            = "192.168.0.0/16"
subnet_cidr = ["192.168.1.0/24", "192.168.2.0/24"]- 배포 실행
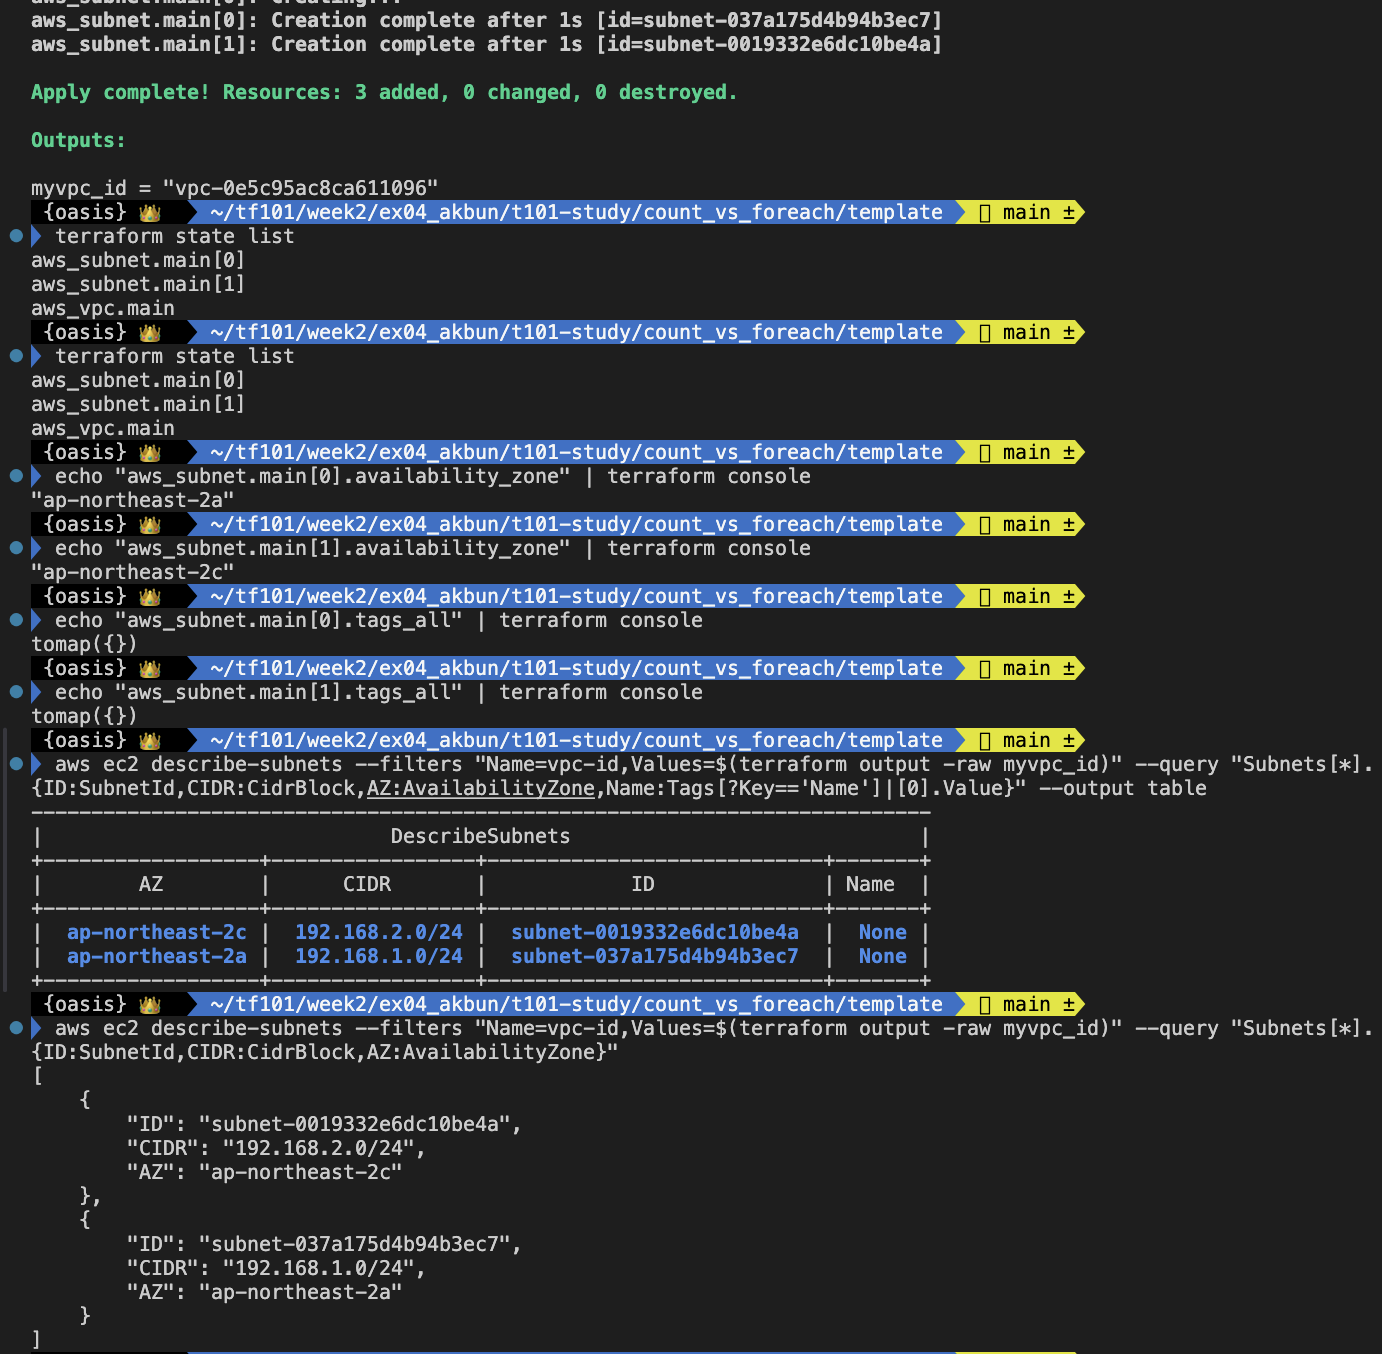
시나리오3. aws_subnet-arg_az (AZ for the subnet)
요구사항 : 서브넷이 배치되는 AZ 설정이 필요. AZ는 변수로 입력
- variables.tf 수정
variable "vpc_cidr" {
  type = string
}

variable "subnet_cidr" {
  type = list(string)
}

variable "subnet_az" {
  type = list(string)
}- terraform.tfvars 수정
vpc_cidr            = "192.168.0.0/16"
subnet_cidr = ["192.168.1.0/24", "192.168.2.0/24"]
subnet_az = ["ap-northeast-2a", "ap-northeast-2c"]- main.tf 수정
resource "aws_vpc" "main" {
  cidr_block = var.vpc_cidr

  tags = {
    Name = "terraform VPC"
  }
}

resource "aws_subnet" "main" {
  count = length(var.subnet_cidr)
  vpc_id = aws_vpc.main.id
  cidr_block = element(var.subnet_cidr, count.index)
  availability_zone = element(var.subnet_az, count.index)
}

output "myvpc_id" {
  value = aws_vpc.main.id
}- 배포 실행
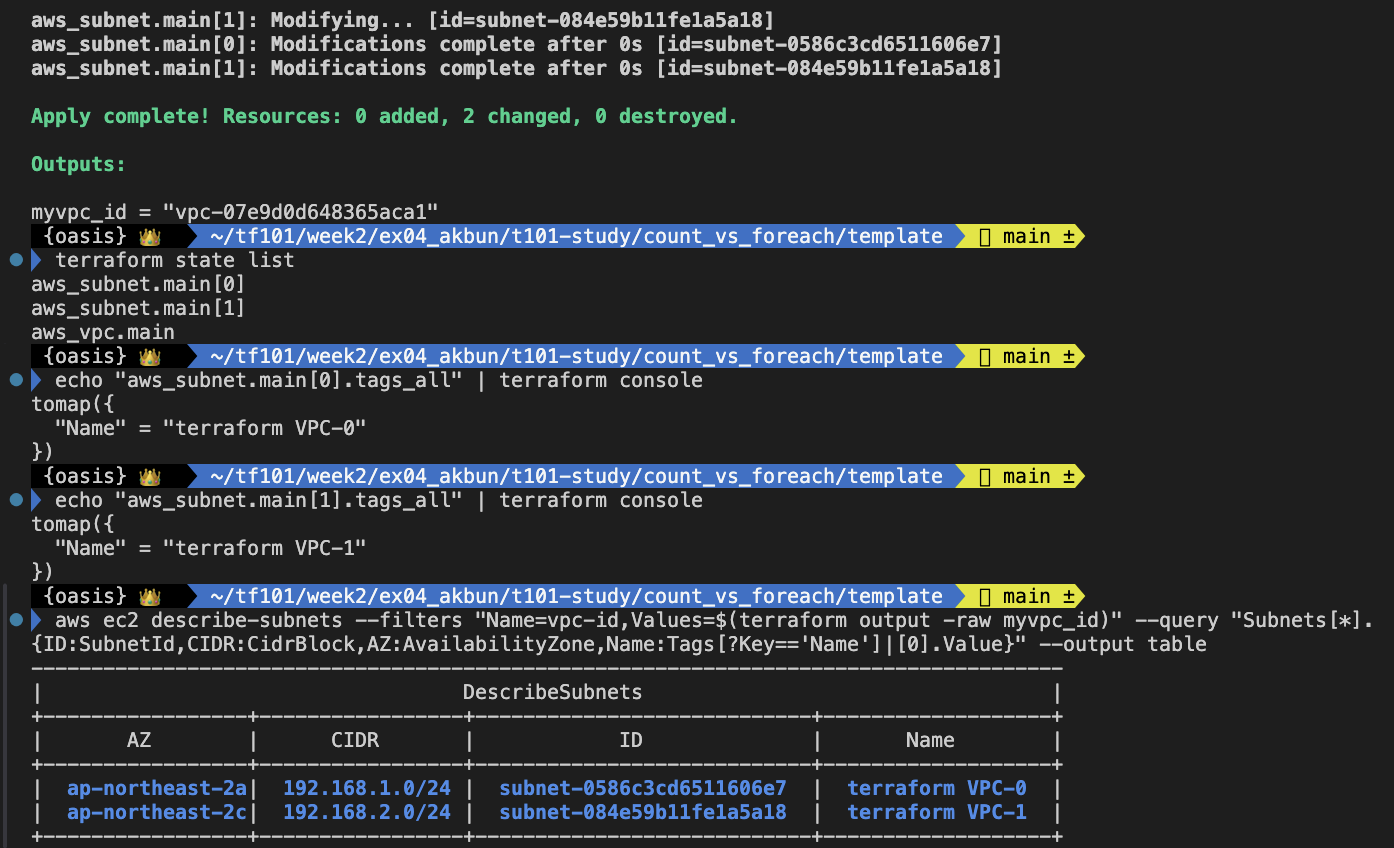
시나리오4. aws_subnet-arg_tags (A map of tags assigned to the resource) map
요구사항 : subnet tag 설정이 필요
- main.tf 수정
resource "aws_vpc" "main" {
  cidr_block = var.vpc_cidr

  tags = {
    Name = "terraform VPC"
  }
}

resource "aws_subnet" "main" {
  count = length(var.subnet_cidr)
  vpc_id = aws_vpc.main.id
  cidr_block = element(var.subnet_cidr, count.index)
  availability_zone = element(var.subnet_az, count.index)

  tags = {
    Name = "terraform VPC-${count.index}"
  }
}

output "myvpc_id" {
  value = aws_vpc.main.id
}- 배포 실행
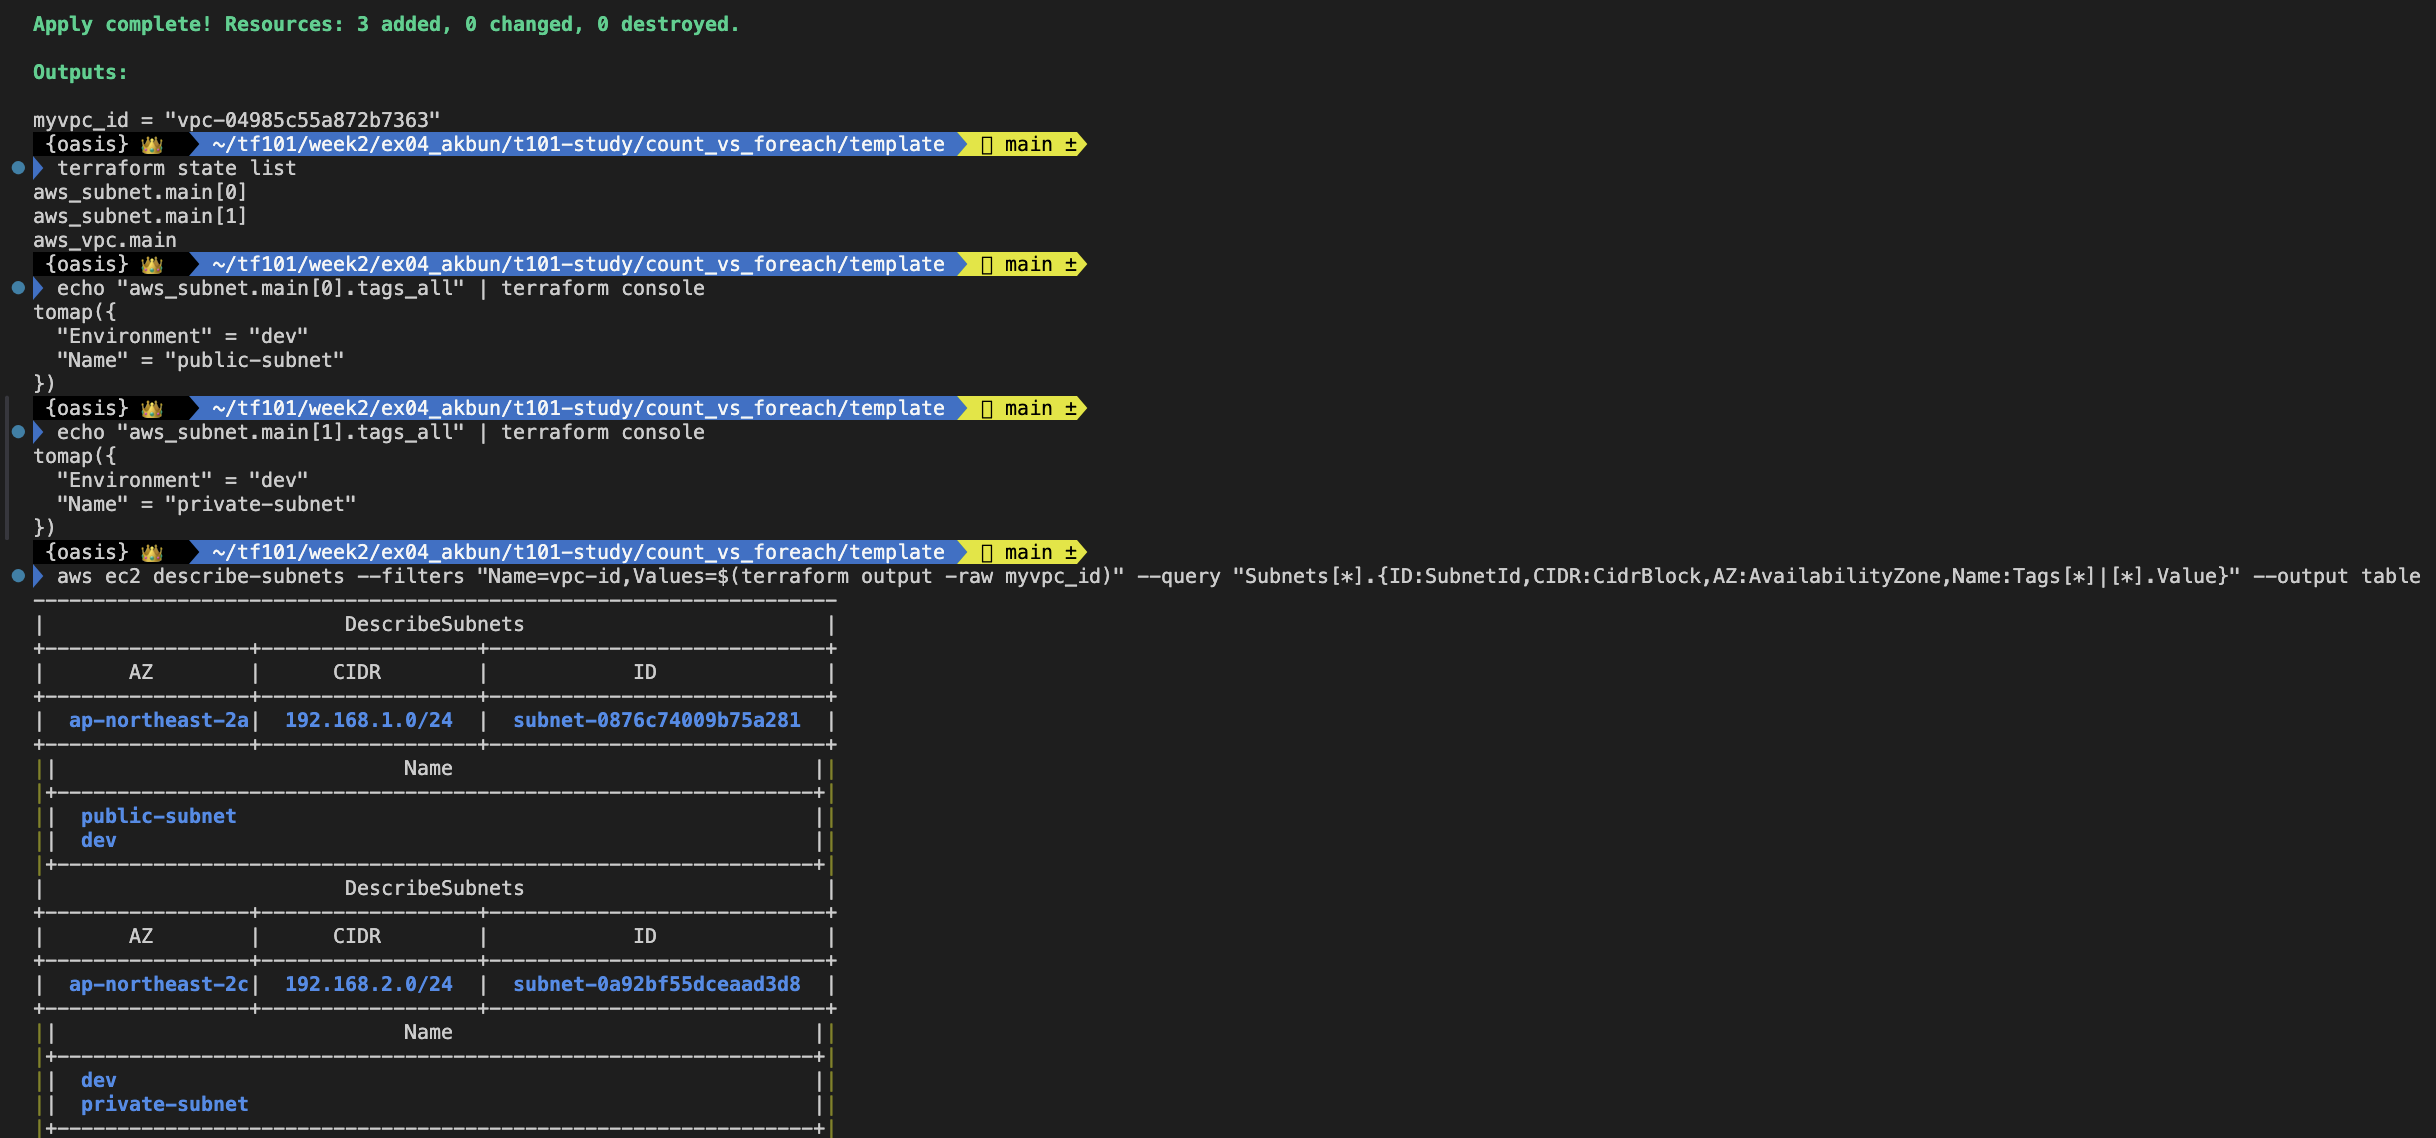
시나리오5. map
요구사항 : subnet tag 를 설정하는 변수 생성
- variables.tf 수정
variable "vpc_cidr" {
  type = string
}

variable "subnet_cidr" {
  type = list(string)
}

variable "subnet_az" {
  type = list(string)
}

#추가
variable "subnet_tag" {
  type = list(map(string))
}- terraform.tfvars 수정
vpc_cidr            = "192.168.0.0/16"
subnet_cidr = ["192.168.1.0/24", "192.168.2.0/24"]
subnet_az = ["ap-northeast-2a", "ap-northeast-2c"]
#추가
subnet_tag = [
    {
        Name = "public-subnet"
        Environment = "dev"
    },
    {
        Name = "private-subnet"
        Environment = "dev"
    }
]- main.tf 수정
resource "aws_vpc" "main" {
  cidr_block = var.vpc_cidr

  tags = {
    Name = "terraform VPC"
  }
}

resource "aws_subnet" "main" {
  count = length(var.subnet_cidr)
  vpc_id = aws_vpc.main.id
  cidr_block = element(var.subnet_cidr, count.index)
  availability_zone = element(var.subnet_az, count.index)

#추가
  tags = element(var.subnet_tag, count.index)
}

output "myvpc_id" {
  value = aws_vpc.main.id
}- 배포 실행
시나리오6. (리팩토링) - map list_object
요구사항 : subnet 설정 변수를 한 변수로 설정하도록 리팩토링
- variables.tf 수정
variable "vpc_cidr" {
  type = string
}

variable "subnets" {
  type = list(object({
    cidr = string
    az = string
    tag = map(string)
  }))
}- terraform.tfvars 수정
vpc_cidr            = "192.168.0.0/16"
subnets = [
        {
            az = "ap-northeast-2a"
            cidr = "192.168.1.0/24"
            tag = {
                Name = "public-subnet"
                Environment = "dev"
            }
        },
        {
            az = "ap-northeast-2c"
            cidr = "192.168.2.0/24"
            tag = {
                Name = "private-subnet"
                Environment = "dev"
            }
        }
]- main.tf 수정
resource "aws_vpc" "main" {
  cidr_block = var.vpc_cidr

  tags = {
    Name = "terraform VPC"
  }
}

resource "aws_subnet" "main" {
  count = length(var.subnets)
  vpc_id = aws_vpc.main.id
  cidr_block = var.subnets[count.index].cidr
  availability_zone = var.subnets[count.index].az

  tags = var.subnets[count.index].tag
}

output "myvpc_id" {
  value = aws_vpc.main.id
}- 배포 실행
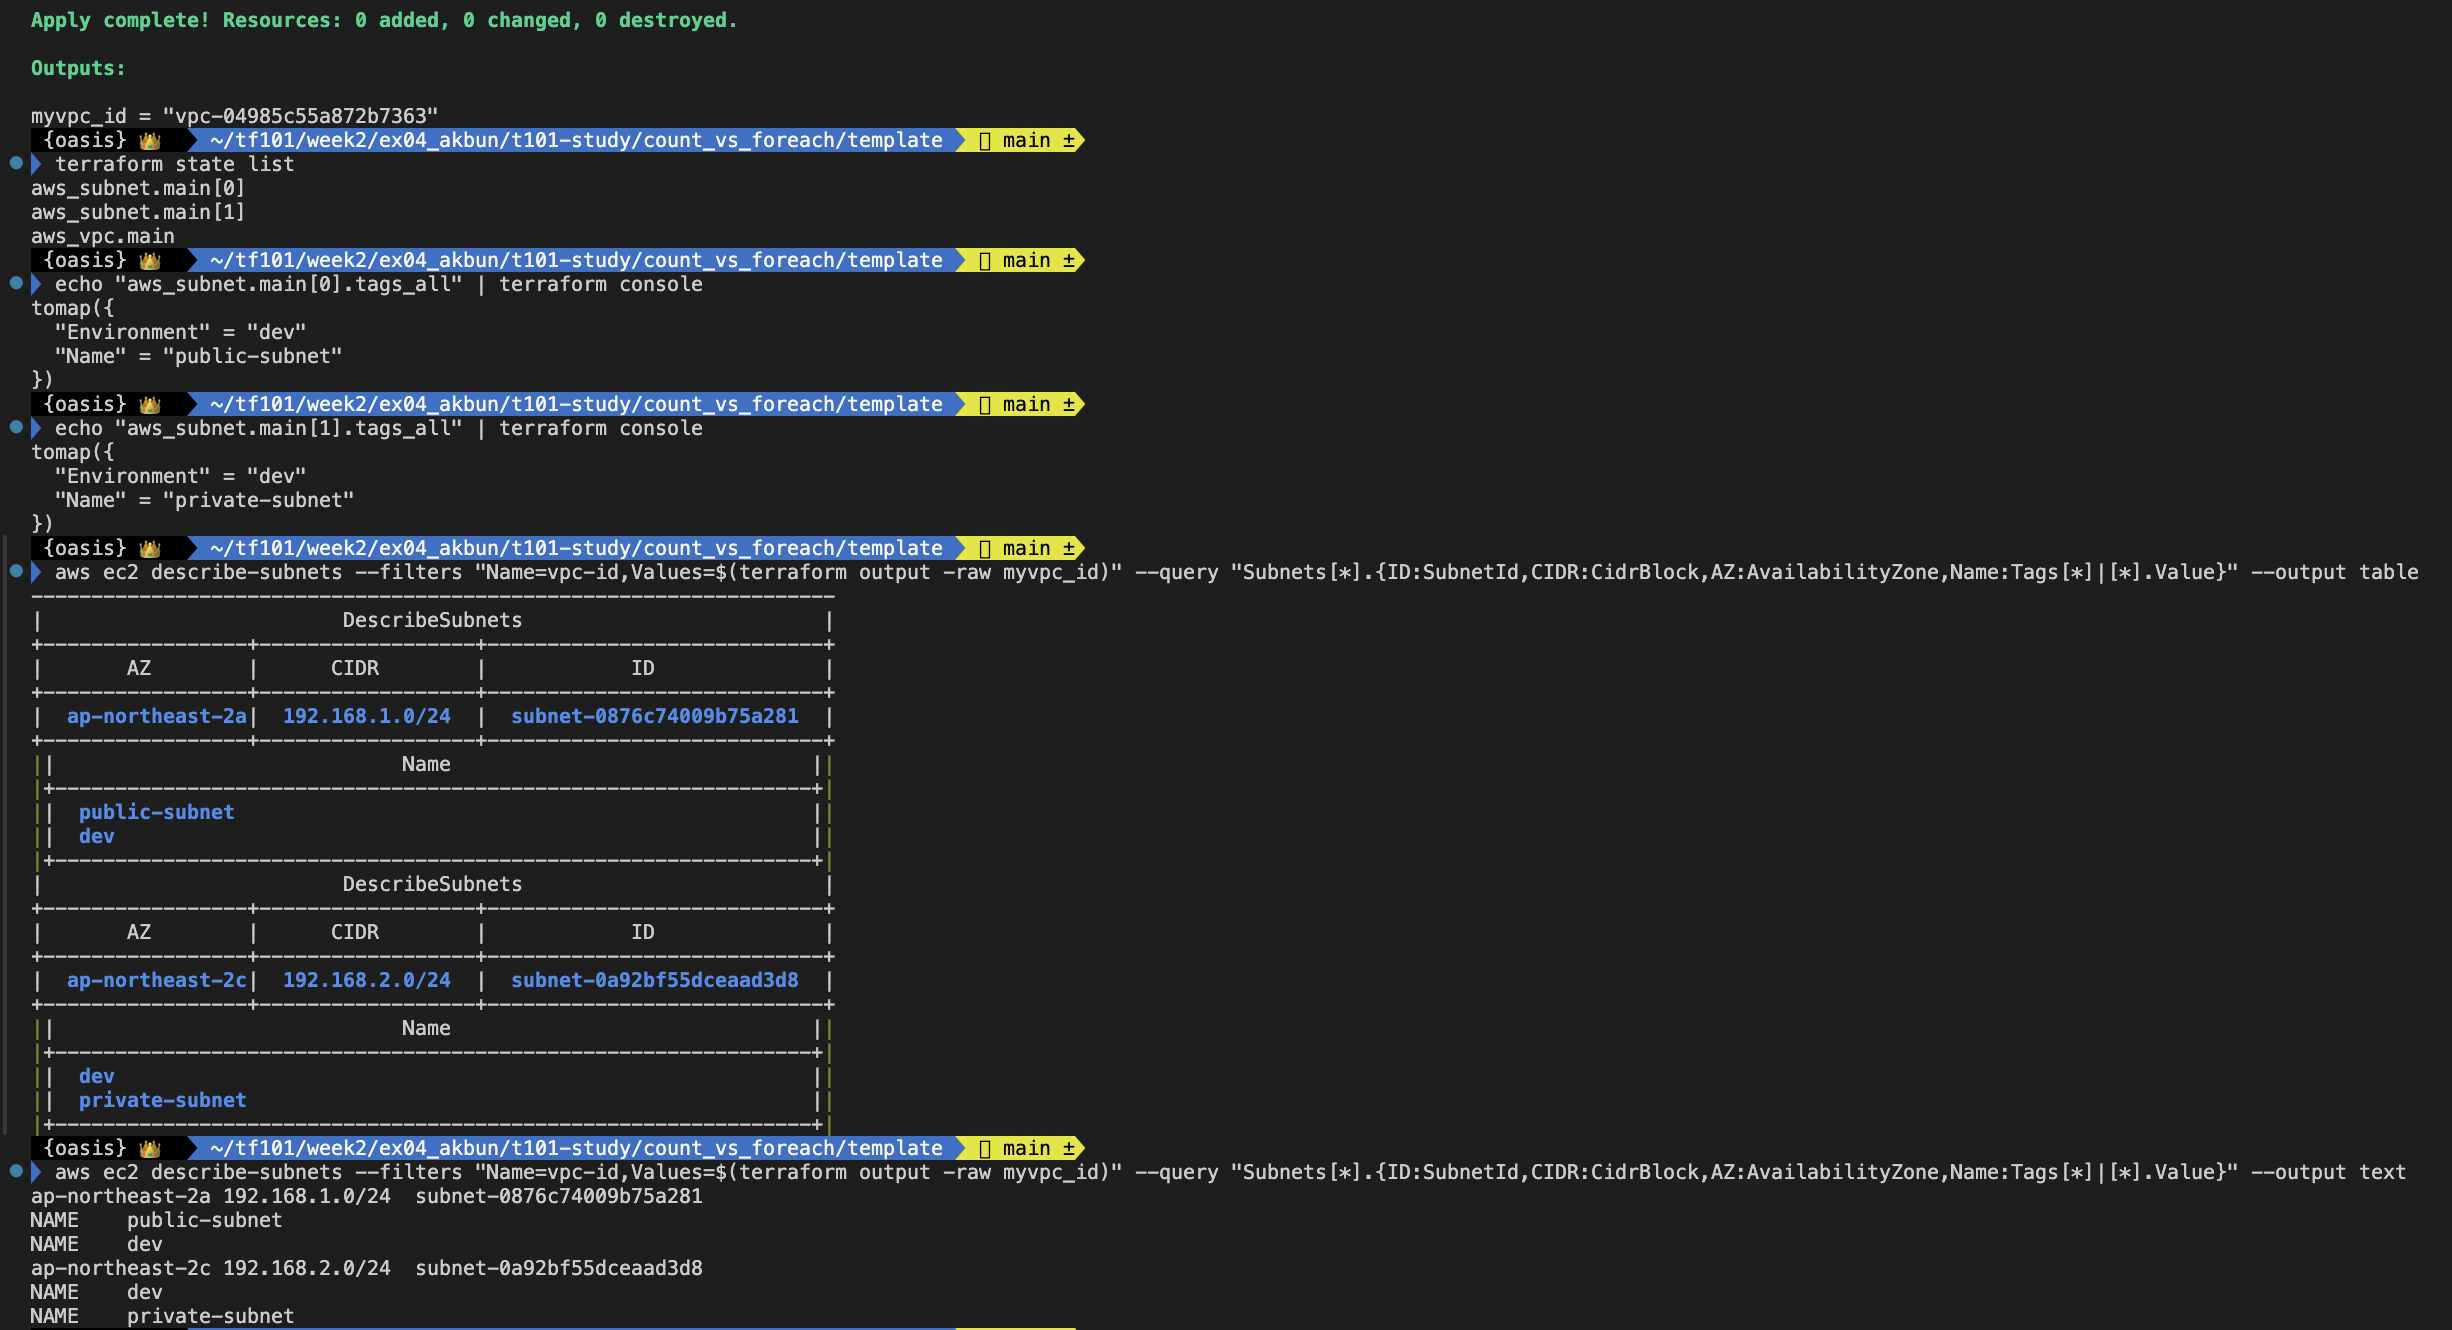
시나리오7. 장애 상황 재현
요구사항 : 오류 확인 후 코드 수정
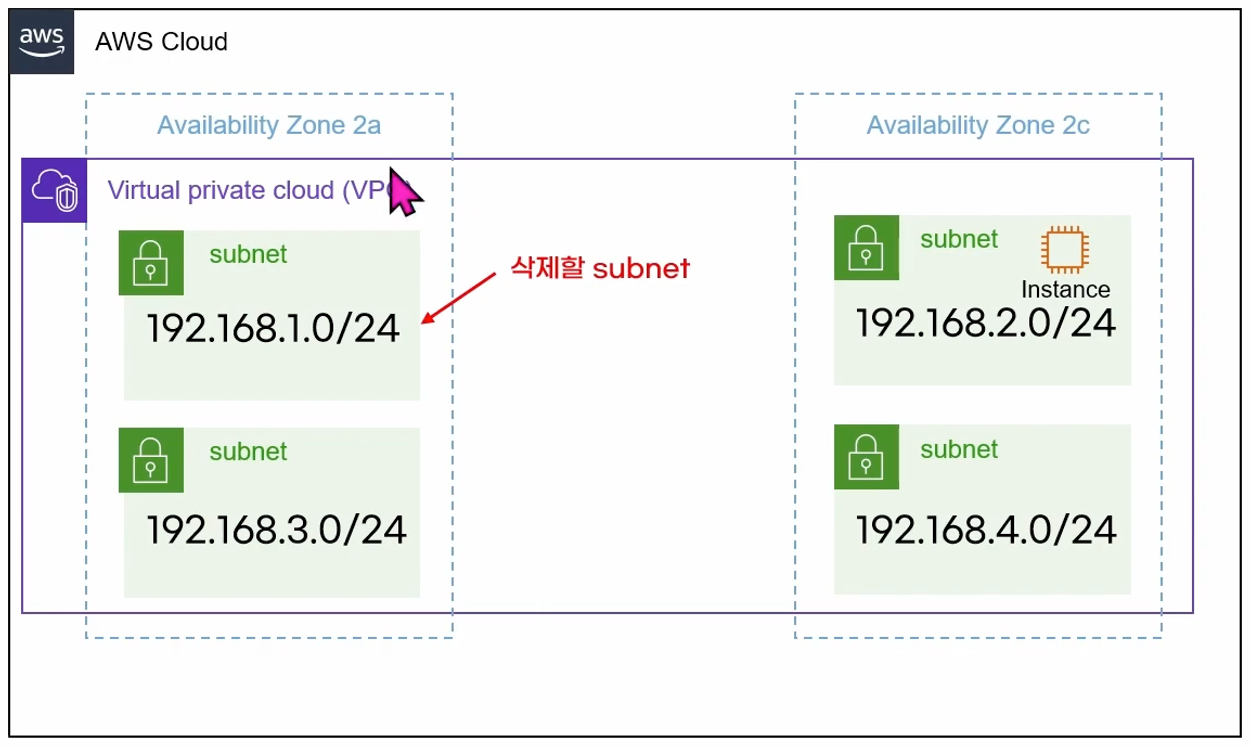
- main.tf
resource "aws_vpc" "main" {
  cidr_block = var.vpc_cidr

  tags = {
    Name = "terraform VPC"
  }
}

resource "aws_subnet" "main" {
  count = length(var.subnets)

  vpc_id     = aws_vpc.main.id
  cidr_block = var.subnets[count.index].cidr
  availability_zone = var.subnets[count.index].az

  tags = var.subnets[count.index].tags
}

resource "aws_instance" "server" {
  ami           = "ami-0e8bd0820b6e1360b"
  instance_type = "t4g.nano"
  subnet_id = aws_subnet.main[1].id
  # index 접근 방법 오류 해결 코드
  # subnet_id = index(aws_subnet.main.*.cidr_block, "192.168.2.0/24")
  tags = {
    Name = "Terraform demo"
  }
}

output "myvpc_id" {
  value = aws_vpc.main.id
}-
배포 실행
4개의 서브넷과 1개의 인스턴스가 생성되었고, 인스턴스는 현재 "aws_subnet.main[1]"(192.168.2.0/24) 서비스넷에 위치해 있다.
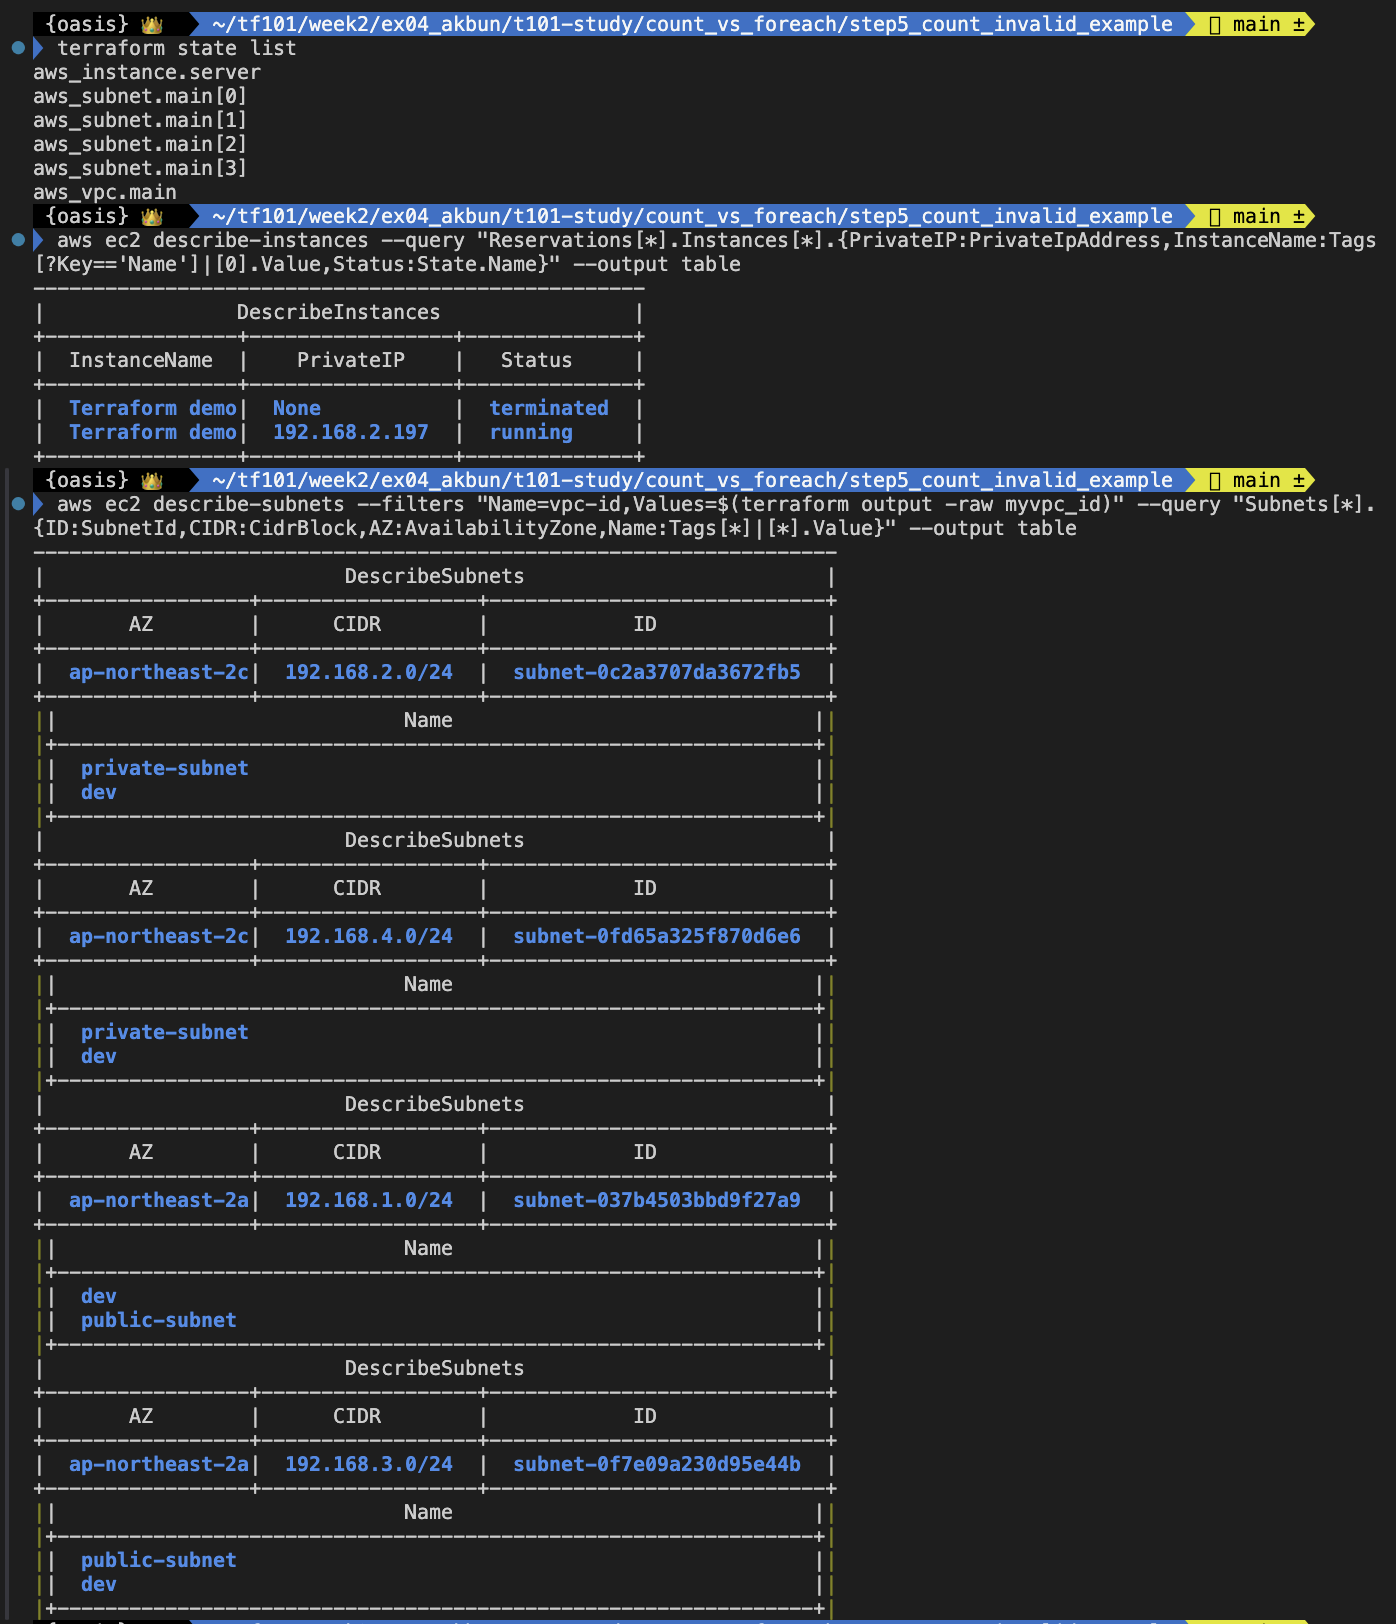
-
[장애 재현] terraform.tfvars 수정 : 아래 부분 주석 처리
vpc_cidr            = "192.168.0.0/16"

subnets = [
  # (유투브 7번째 시나리오) terrafprm apply 이 후, 첫 번째 요소를 주석하세요
  #{
  #  cidr = "192.168.1.0/24",
  #  az = "ap-northeast-2a",
  #  tags = {
  #    Name = "public-subnet"
  #    Environment = "dev"
  #  }
  #},
  # (유투브 8번째 시나리오) terrafprm apply 이 후, 주석을 해제하고 terraform apply해보세요
  # {
  #   cidr = "192.168.5.0/24",
  #   az = "ap-northeast-2a",
  #   tags = {
  #     Name = "public-subnet"
  #     Environment = "dev"
  #   }
  # },
  {
    cidr = "192.168.2.0/24",
    az = "ap-northeast-2c",
    tags = {
      Name = "private-subnet"
      Environment = "dev"
    }
  },
  {
    cidr = "192.168.3.0/24",
    az = "ap-northeast-2a",
    tags = {
      Name = "public-subnet"
      Environment = "dev"
    }
  },
  {
    cidr = "192.168.4.0/24",
    az = "ap-northeast-2c",
    tags = {
      Name = "private-subnet"
      Environment = "dev"
    }
  }
]- 배포 실행
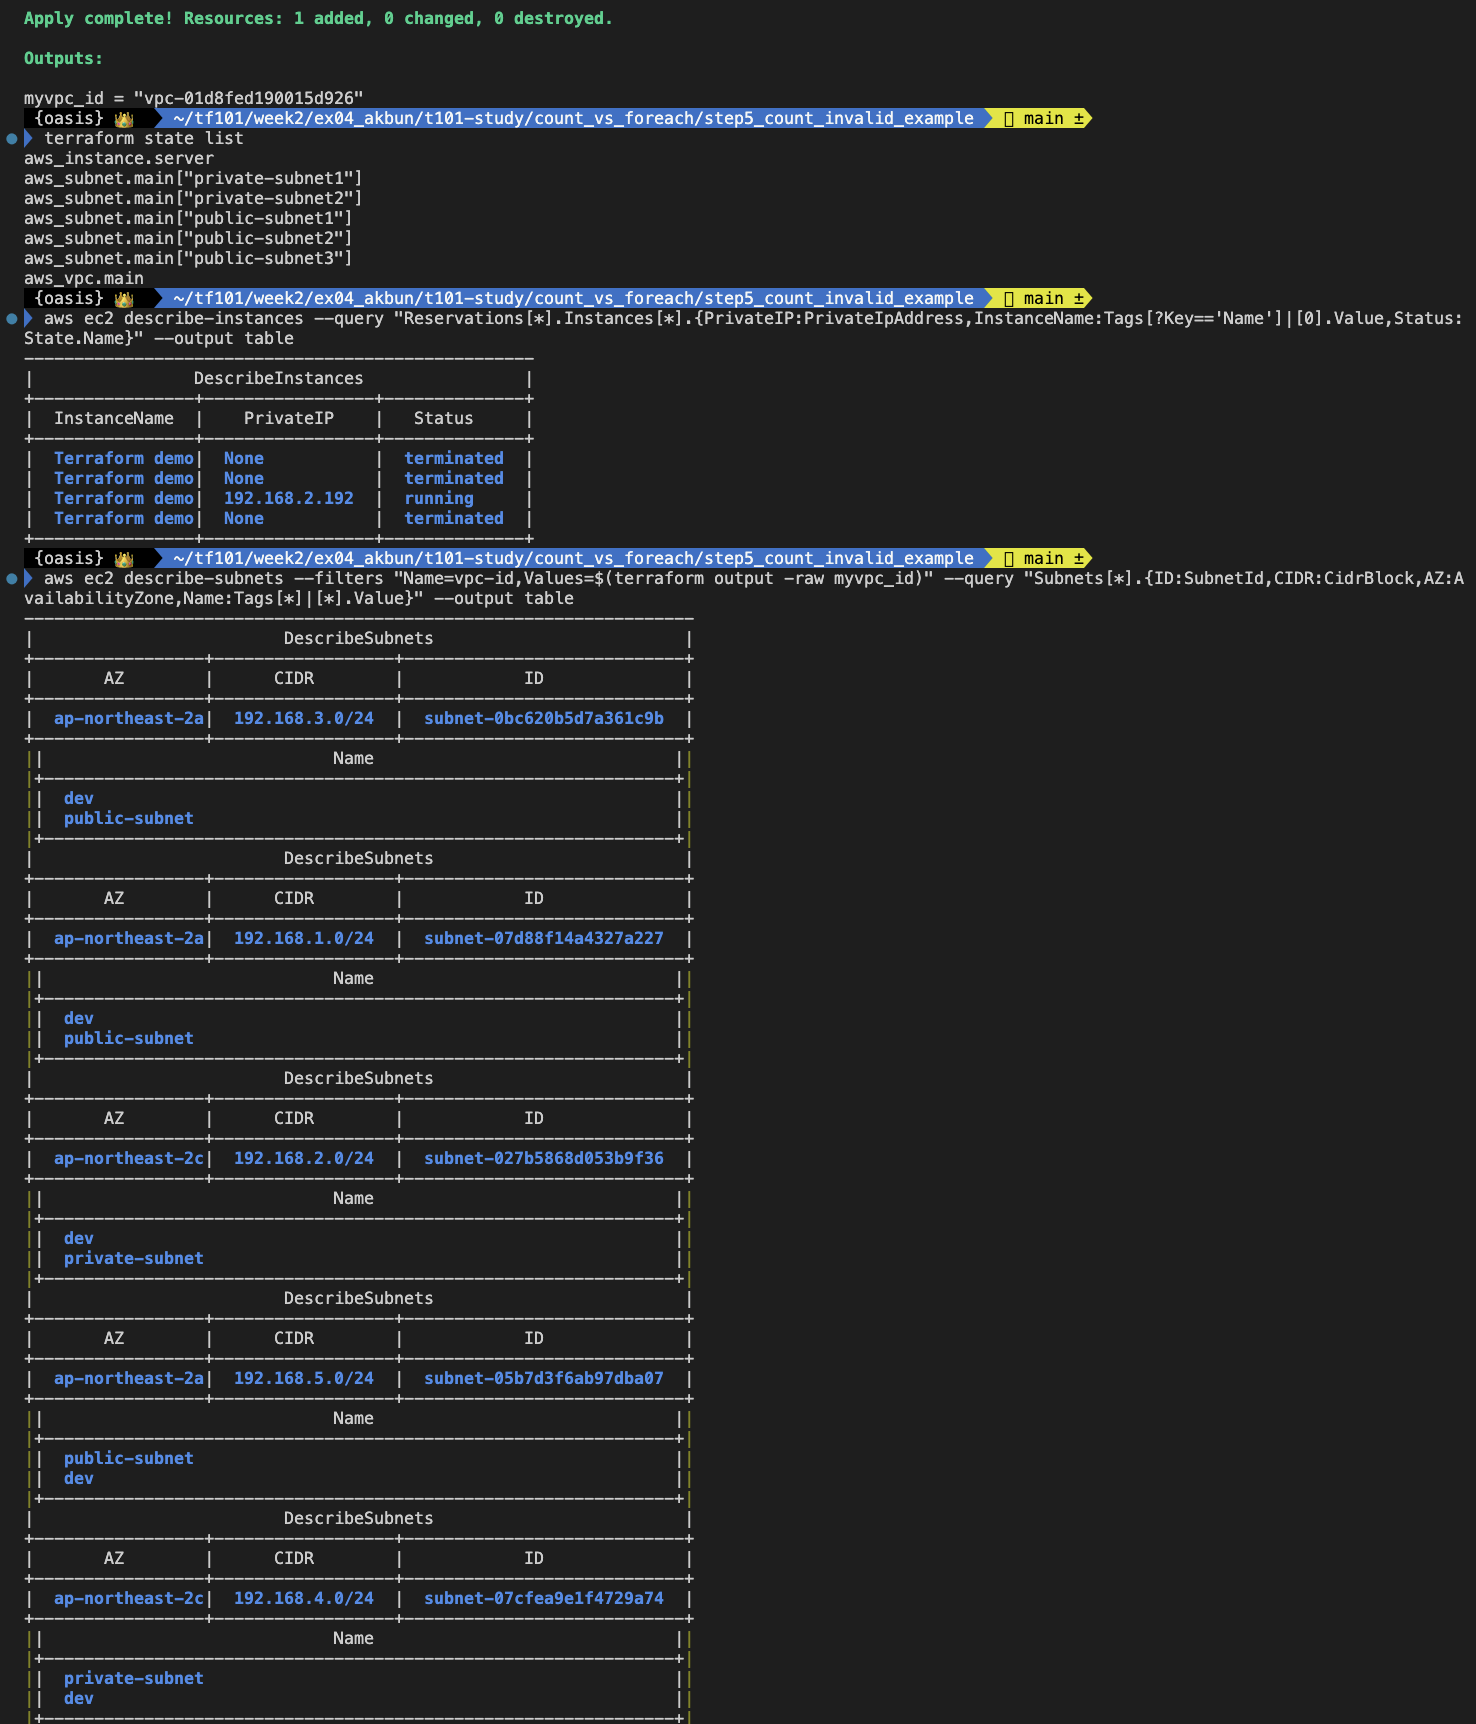
기존 aws_subnet.main[0] "192.168.1.0/24" 서브넷을 제거하면서 인덱스 값이 한칸씩 땡겨지면서 인스턴스 ip는 "192.168.3.0/24" 대역의 IP(192.168.3.211)를 할당 받음
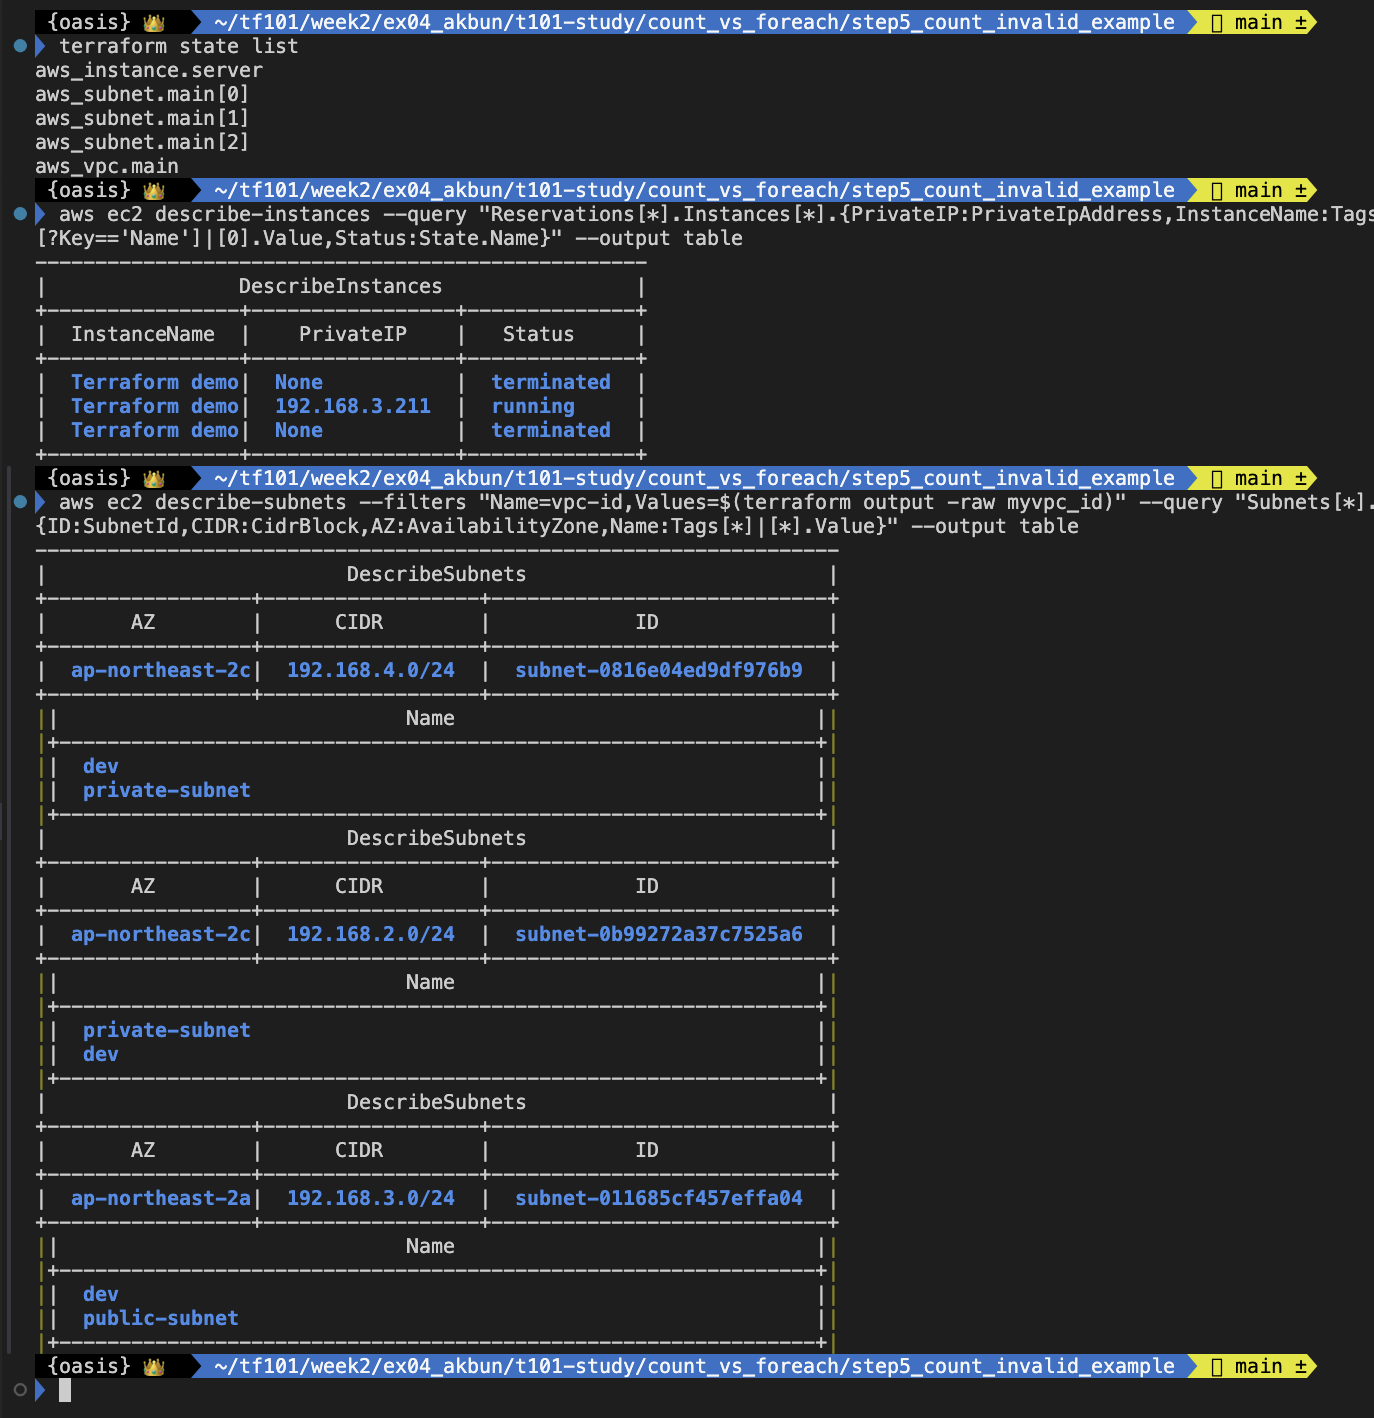
시나리오8. 장애 상황 재현2
요구사항 : 오류 확인 후 코드 수정
기존 subnets 변수의 인덱스 값에 "192.168.5.0/24" 서브넷 값을 중간에 추가함.
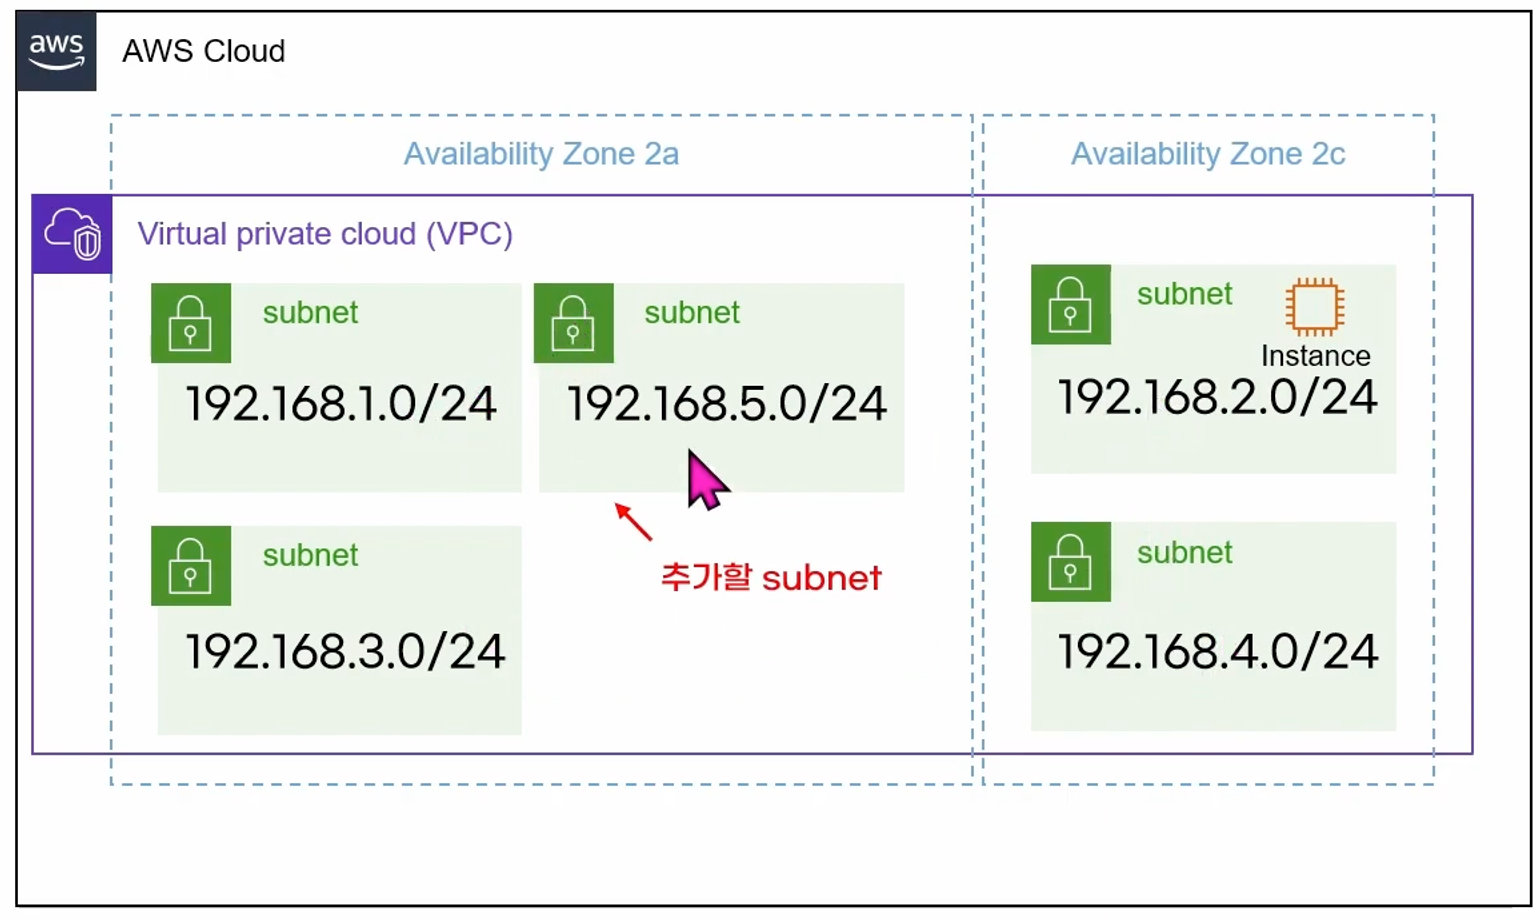
- terraform.tfvars 수정
192.168.5.0/24 영역을 주석 해제 함
vpc_cidr            = "192.168.0.0/16"

subnets = [
  {
    cidr = "192.168.1.0/24",
    az = "ap-northeast-2a",
    tags = {
      Name = "public-subnet"
      Environment = "dev"
    }
  },
 #8번째 시나리오) terrafprm apply 이 후, 주석 해제함
 {
   cidr = "192.168.5.0/24",
   az = "ap-northeast-2a",
   tags = {
     Name = "public-subnet"
     Environment = "dev"
   }
 },
  {
    cidr = "192.168.2.0/24",
    az = "ap-northeast-2c",
    tags = {
      Name = "private-subnet"
      Environment = "dev"
    }
  },
  {
    cidr = "192.168.3.0/24",
    az = "ap-northeast-2a",
    tags = {
      Name = "public-subnet"
      Environment = "dev"
    }
  },
  {
    cidr = "192.168.4.0/24",
    az = "ap-northeast-2c",
    tags = {
      Name = "private-subnet"
      Environment = "dev"
    }
  }
]- 수행 결과
- apply 과정에서 에러 발생함
기존 "192.168.2.0/24" ~ "192.168.4.0/24"이 삭제되고 "192.168.5.0/24"이후로 생성되는 과정에서 충돌이 발생하여 에러가 발생되는 것으로 추정됨
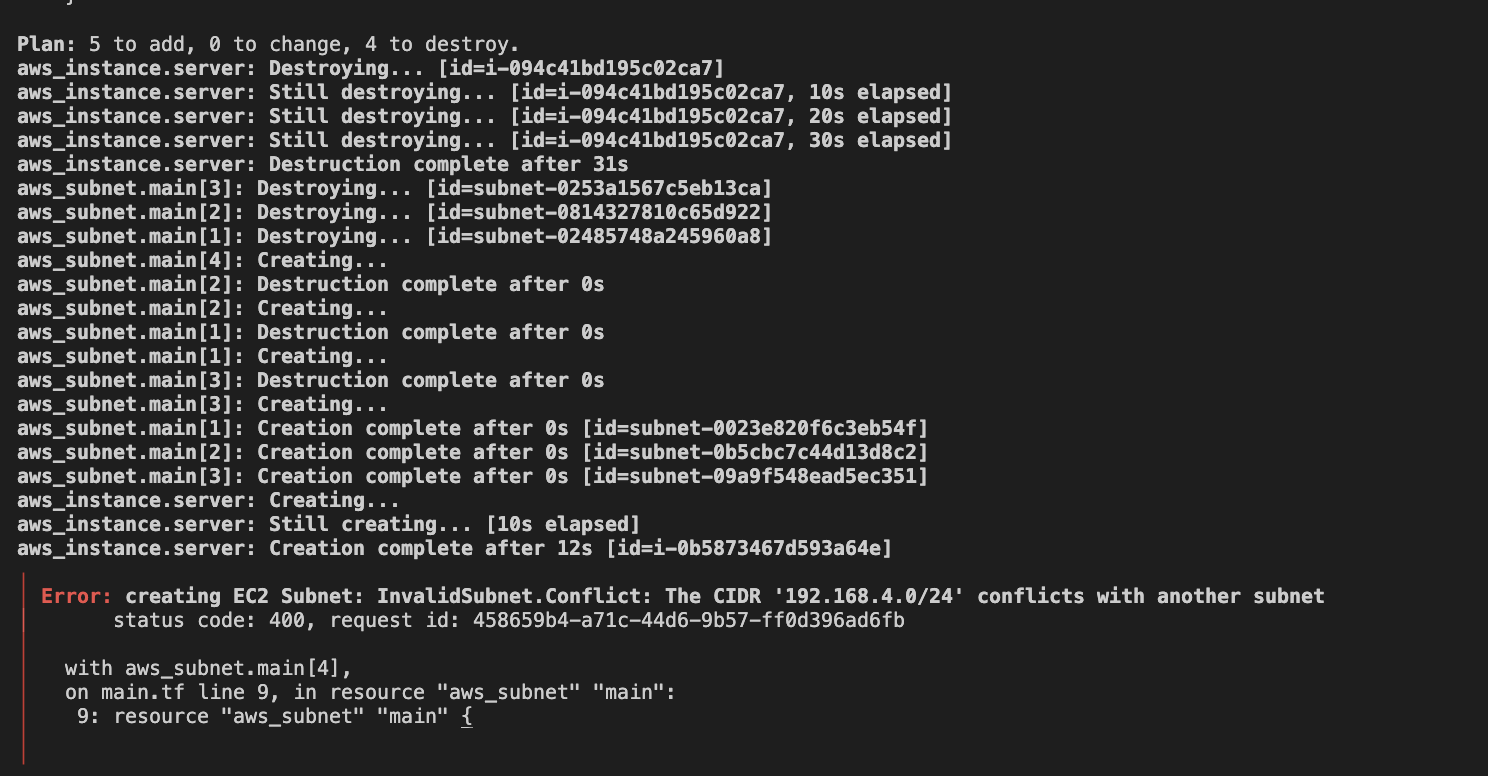
for_each 적용
시나리오7~8의 경우 반복문을 index로 접근했기 때문에 발생되는 이슈들이다. 위 이슈들이 발생되지 않도록 for_each를 적용해 보겠습니다.
- variables.tf 수정
기존 list type에서 map type으로 변경함
variable "vpc_cidr" {
  type = string
}

variable "subnets" {
  type = map(object({
    cidr = string
    az = string
    tags = map(string)
  }))
}- terraform.tfvars 수정
vpc_cidr            = "192.168.0.0/16"
subnets = {
  public-subnet1 = {
    cidr = "192.168.1.0/24",
    az = "ap-northeast-2a",
    tags = {
      Name = "public-subnet"
      Environment = "dev"
    }
  },
  private-subnet1 = {
    cidr = "192.168.2.0/24",
    az = "ap-northeast-2c",
    tags = {
      Name = "private-subnet"
      Environment = "dev"
    }
  },
  public-subnet2 = {
    cidr = "192.168.3.0/24",
    az = "ap-northeast-2a",
    tags = {
      Name = "public-subnet"
      Environment = "dev"
    }
  },
  private-subnet2 = {
    cidr = "192.168.4.0/24",
    az = "ap-northeast-2c",
    tags = {
      Name = "private-subnet"
      Environment = "dev"
    }
  },
}- main.tf 수정
resource "aws_vpc" "main" {
  cidr_block = var.vpc_cidr

  tags = {
    Name = "terraform VPC"
  }
}

resource "aws_subnet" "main" {
  for_each = var.subnets

  vpc_id     = aws_vpc.main.id
  cidr_block = each.value["cidr"]
  availability_zone = each.value["az"]

  tags = each.value["tags"]
}

resource "aws_instance" "server" {
  ami           = "ami-0e8bd0820b6e1360b"
  instance_type = "t4g.nano"
  subnet_id = aws_subnet.main["private-subnet1"].id

  tags = {
    Name = "Terraform demo"
  }
}- 배포 결과
정상적으로 4개의 서브넷이 배포된 것을 확인됨
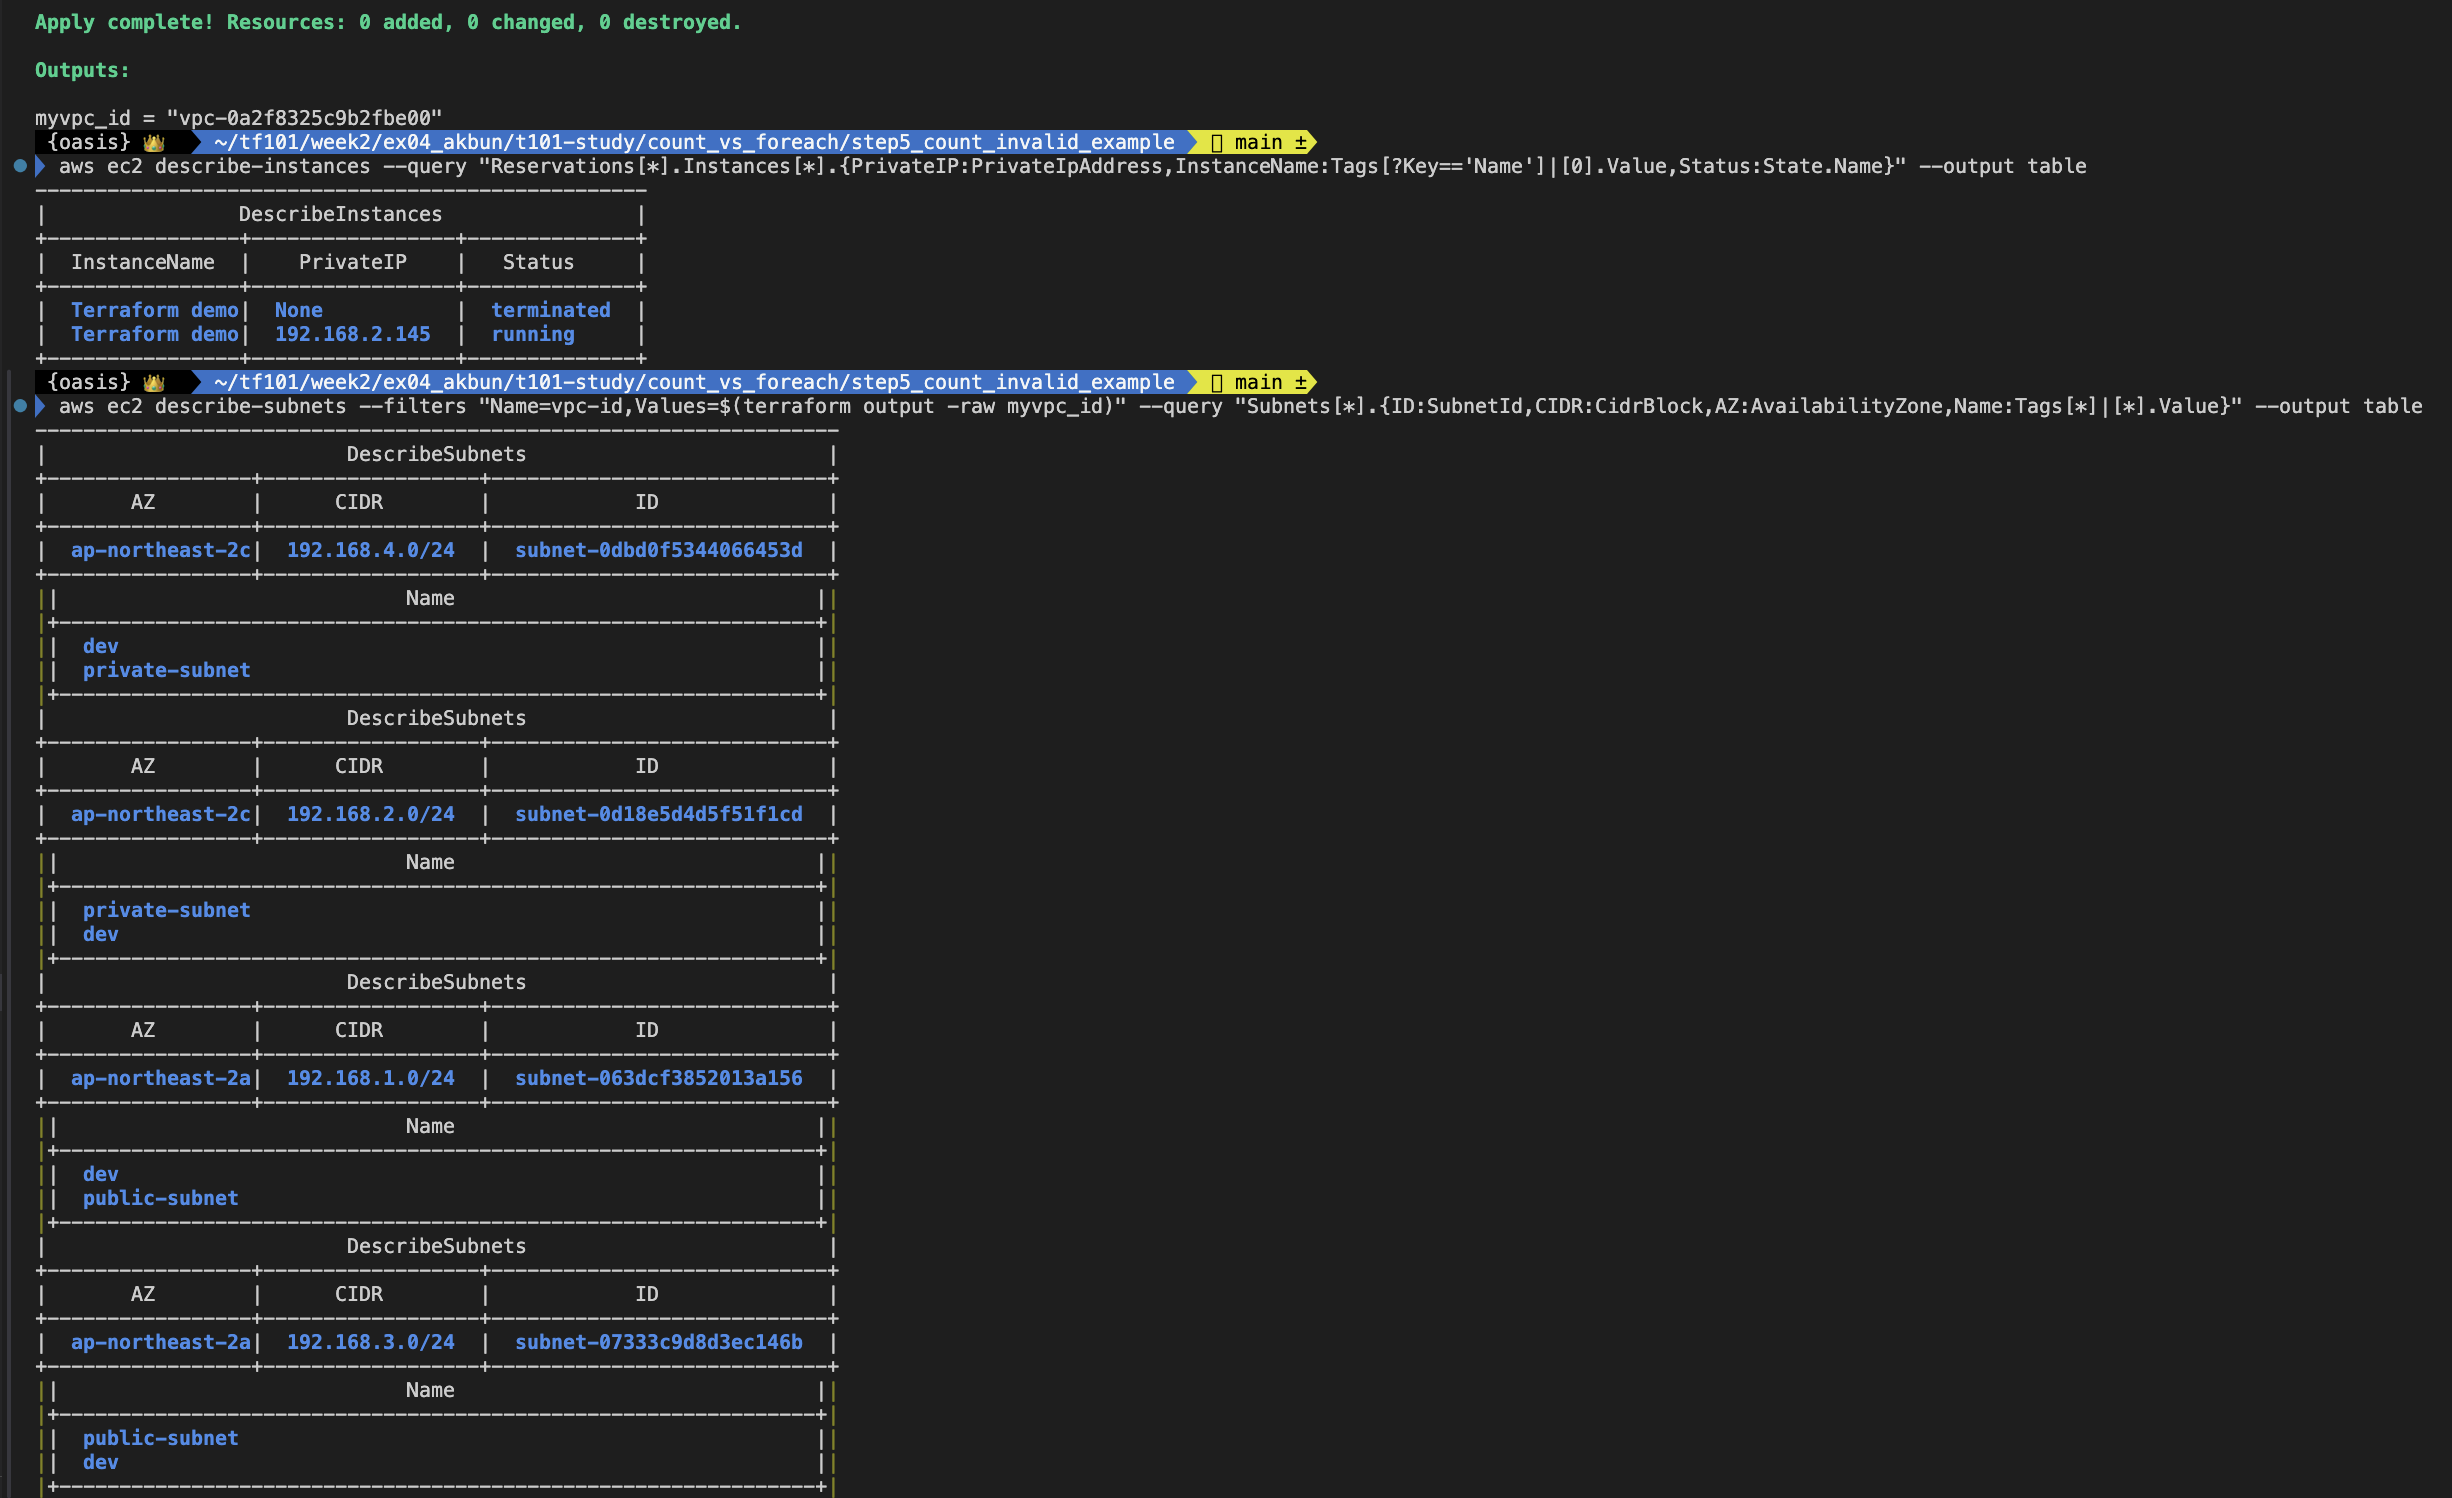
시나리오9. 장애 상황 재현 (for-each)
"시나리오7"과 동일한 장애 상황 재현하기 위해서
사용하지 않는 "192.168.1.0/24"을 삭제함
- terraform.tfvars 수정
vpc_cidr            = "192.168.0.0/16"
subnets = {
  # public-subnet1 = {
  #   cidr = "192.168.1.0/24",
  #   az = "ap-northeast-2a",
  #   tags = {
  #     Name = "public-subnet"
  #     Environment = "dev"
  #   }
  # },
  private-subnet1 = {
    cidr = "192.168.2.0/24",
    az = "ap-northeast-2c",
    tags = {
      Name = "private-subnet"
      Environment = "dev"
    }
  },
  public-subnet2 = {
    cidr = "192.168.3.0/24",
    az = "ap-northeast-2a",
    tags = {
      Name = "public-subnet"
      Environment = "dev"
    }
  },
  private-subnet2 = {
    cidr = "192.168.4.0/24",
    az = "ap-northeast-2c",
    tags = {
      Name = "private-subnet"
      Environment = "dev"
    }
  },
}- 배포 결과
기존 시나리오7의 결과와는 다르게 "192.168.1.0/24" 서브넷만 삭제과 인스턴스가 삭제/생성되거나 다른 서브넷과 변경이 없는 것을 확인할 수 있다.
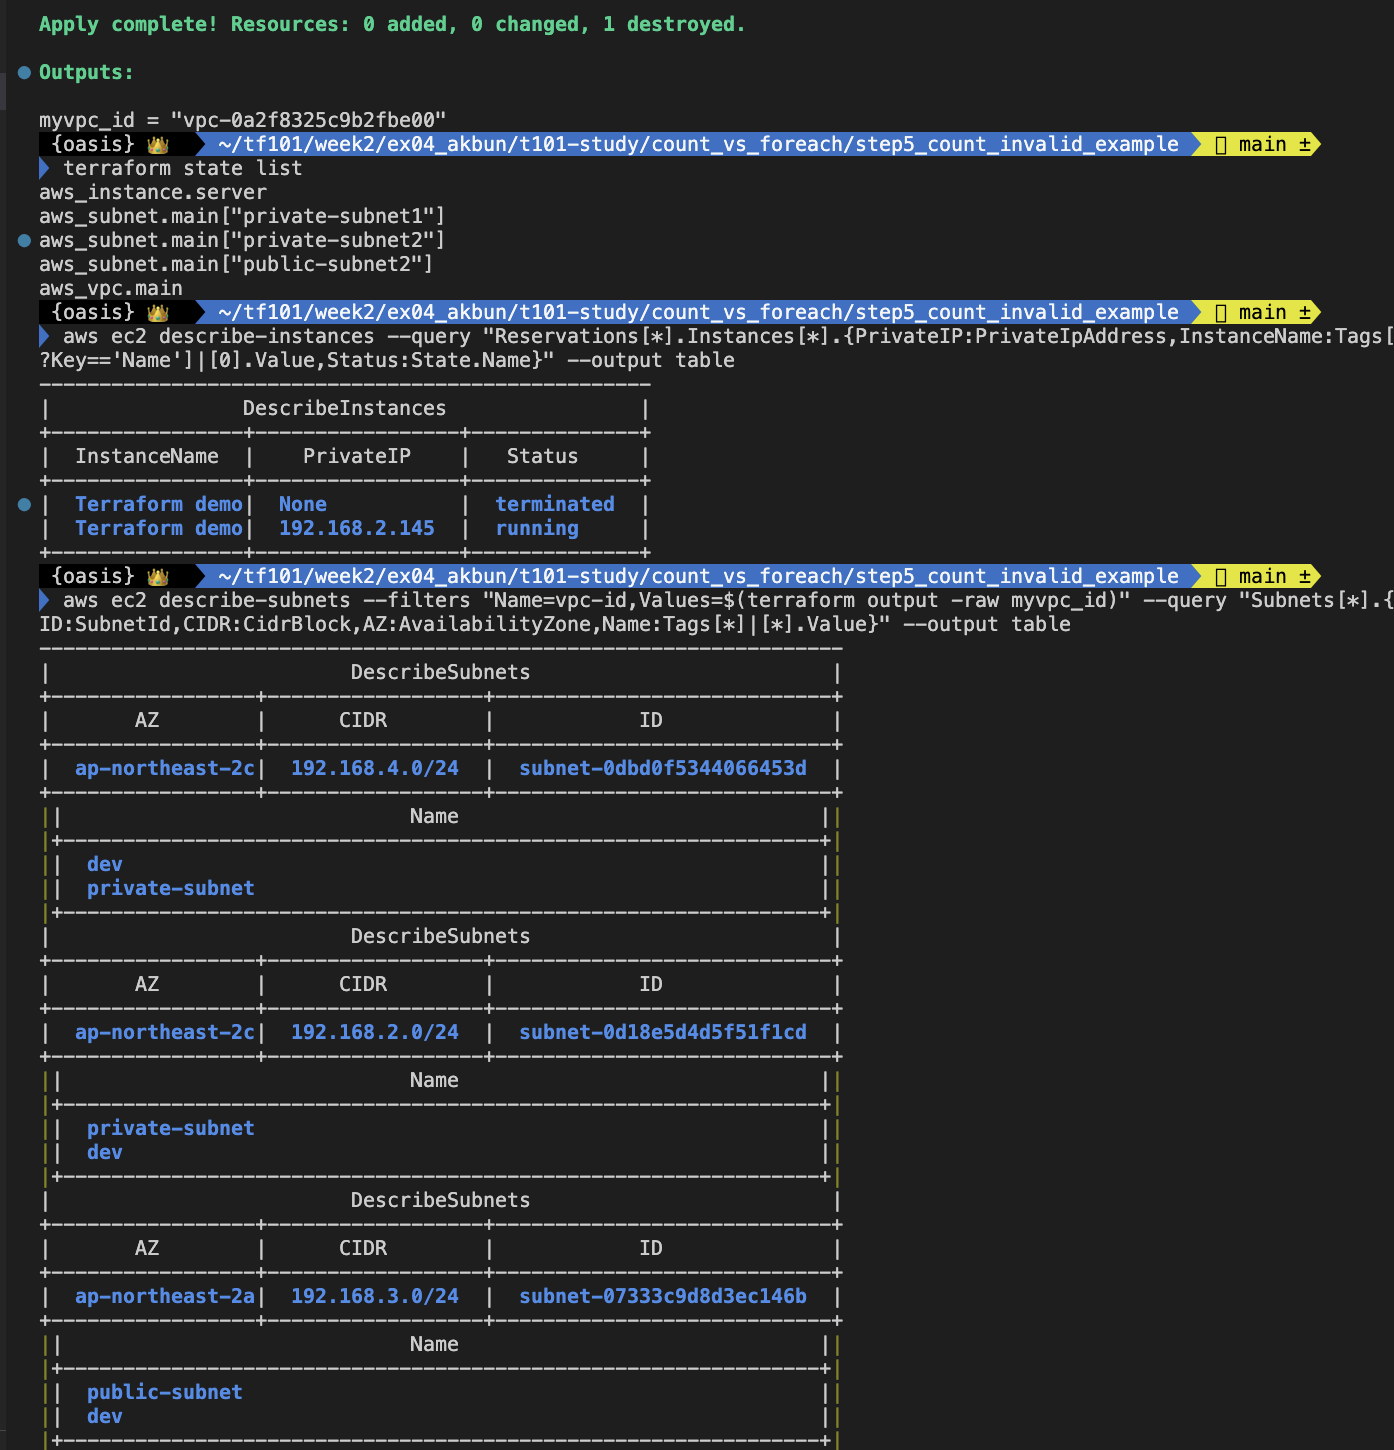
시나리오10. 장애 상황 재현2 (for-each)
"시나리오8"과 동일한 장애 상황 재현하기 위해서
"192.168.5.0/24" 서브넷을 추가함
- terraform.tfvars 수정
vpc_cidr            = "192.168.0.0/16"
subnets = {
  public-subnet1 = {
    cidr = "192.168.1.0/24",
    az = "ap-northeast-2a",
    tags = {
      Name = "public-subnet"
      Environment = "dev"
    }
  },
  #서브넷 추가함
  public-subnet3 = {
    cidr = "192.168.5.0/24",
    az = "ap-northeast-2a",
    tags = {
      Name = "public-subnet"
      Environment = "dev"
    }
  },
  private-subnet1 = {
    cidr = "192.168.2.0/24",
    az = "ap-northeast-2c",
    tags = {
      Name = "private-subnet"
      Environment = "dev"
    }
  },
  public-subnet2 = {
    cidr = "192.168.3.0/24",
    az = "ap-northeast-2a",
    tags = {
      Name = "public-subnet"
      Environment = "dev"
    }
  },
  private-subnet2 = {
    cidr = "192.168.4.0/24",
    az = "ap-northeast-2c",
    tags = {
      Name = "private-subnet"
      Environment = "dev"
    }
  },
}- 배포 결과
추가된 서브넷 "192.168.5.0/24"만 리소스에 추가되었으며 그 외 다른 리소스는 변경이 없는 것을 볼 수 있습니다.