글쓴이는 브라우저로 실행시 모델의 진행이 시간이 다소 많이 걸리는 점을 고려하여 Node.js에서 진행
보스턴 집 값 데이터 얻기
관련 데이터는 열이 13개인 수많은 행을 가진 데이터의 독립변수와 집 값이라는 종속변수를 갖는다.
적용시키기
var tf = require('@tensorflow/tfjs');

var cause = tf.tensor(cause_of);
var result = tf.tensor(result_of);

// 2. 모델의 모양을 만듭니다.
var X = tf.input({ shape: [13] });
var Y = tf.layers.dense({ units: 1 }).apply(X);
var model = tf.model({ inputs: X, outputs: Y });
var compileParam = { optimizer: tf.train.adam(), loss: tf.losses.meanSquaredError }
model.compile(compileParam);

// 3. 데이터로 모델을 학습시킵니다.
//         var fitParam = {epochs: 100}
var fitParam = {
    epochs: 2500,
    callbacks:{
        onEpochEnd:
            function(epoch, logs){
                console.log('epoch', epoch, logs, 'RMSE=>', Math.sqrt(logs.loss));
            }
    }
} // loss 추가 예제
model.fit(cause, result, fitParam).then(function (result) {

    // 4. 모델을 이용합니다.
    // 4.1 기존의 데이터를 이용
    var predict_result = model.predict(cause);
    predict_result.print();

});

let weights = model.getWeights();

setTimeout(function(){
    console.log(weights[0].arraySync())
    console.log(weights[1].arraySync())
},50000)		//결과창에 모델이 학습된후 진행되야하므로 50초정도 가량 지난 후 필요한 weights와 bias 출력
cause_of를 통해 받아온 배열 데이터를 사용하기 위해 shape에서는 13열이므로 [13]으로 처리하고 units은 결과는 1개이므로 1로 한다.
기존과 비슷한 방식으로 모델의 학습을 진행하며 결과를 확인한다.
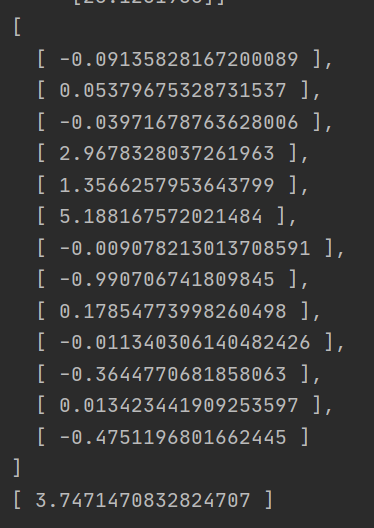
weights는 2차원 배열 형태로 나타나며 bias는 3.747...로 나타난다.
내용 결과
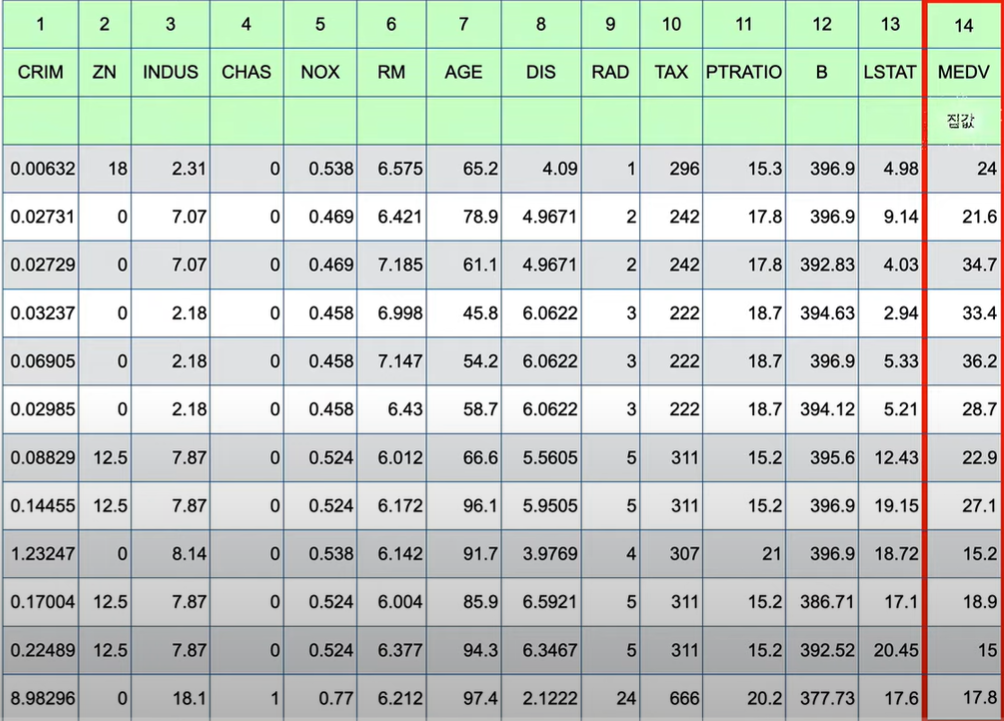
파일의 내용을 보면 13개의 행의 값들중에서 결과값이 5.1로 가장높은 weights를 띄는 곳은 6번째에 있는 RM, 즉 방의 갯수이다. 따라서 집값의 경우 방의 갯수가 가장 많은 영향을 끼친다는 것을 알 수 있다.
브라우저로 나타내기
<!DOCTYPE html>
<html>

<head>
    <title>TensorFlow.js Tutorial - boston housing </title>

    <!-- Import TensorFlow.js -->
    <script src="https://cdn.jsdelivr.net/npm/@tensorflow/tfjs@1.0.0/dist/tf.min.js"></script>
    <script src="10.3.js"></script>
</head>

<body>
    <script>
        var cause = tf.tensor(cause_of);
        var result = tf.tensor(result_of);

        // 2. 모델의 모양을 만듭니다.
        var X = tf.input({ shape: [13] });
        var Y = tf.layers.dense({ units: 1 }).apply(X);
        var model = tf.model({ inputs: X, outputs: Y });
        var compileParam = { optimizer: tf.train.adam(), loss: tf.losses.meanSquaredError }
        model.compile(compileParam);

        // 3. 데이터로 모델을 학습시킵니다.
        //         var fitParam = {epochs: 100}
        var fitParam = {
            epochs: 2500,
            callbacks:{
                onEpochEnd:
                    function(epoch, logs){
                        console.log('epoch', epoch, logs, 'RMSE=>', Math.sqrt(logs.loss));
                    }
            }
        } // loss 추가 예제
        model.fit(cause, result, fitParam).then(function (result) {

            // 4. 모델을 이용합니다.
            // 4.1 기존의 데이터를 이용
            var predict_result = model.predict(cause);
            predict_result.print();

        });
    </script>
</body>

</html>
필요한 배열 데이터를 10.3.js에서 가져와서 이를 modeling 한 후에 콘솔에서
let weights = model.getWeights();
weights[0].arraySync()
weights[1].arraySync()
이러면 Node.js와 비슷한 결과들이 나타날 것이다.
출처

나의 하루를 가능한 기억하고 즐기고 후회하지말자