상속 개념
- 부모 클래스의 멤버를 자식 클래스에게 물려주는 것
- 현실에서는 부모가 자식을 선택해서 물려주지만, 프로그램에서는 자식이 부모를 선택함
- 부모 클래스는 상위 클래스, 자식 클래스는 하위 클래스 또는 파생 클래스라고 부르기도 함
- 클래스 수정을 최소화시키고, 코드의 중복을 줄여줌
- 부모 클래스에서 private 접근 제한을 갖는 필드와 메소드는 상속 대상에서 제외
- 서로 다른 패키지에 존재하는 경우 default 접근 제한을 갖는 필드와 메소드는 상속 대상에서 제외


자바에서는 클래스를 통한 다중 상속을 지원하지 않음
클래스 상속
예제
class CellPhone {
    String model;
    String color;

    void powerOn() {
        System.out.println("전원을 켭니다.");
    }
    void powerOff() {
        System.out.println("전원을 끕니다.");
    }
    void bell() {
        System.out.println("벨이 울립니다.");
    }
    void sendVoice(String message) {
        System.out.println("나: " + message);
    }
    void receiveVoice(String message) {
        System.out.println("상대방: " + message);
    }
    void hangUp() {
        System.out.println("전화를 끊습니다.");
    }
}

class DmbCellPhone extends CellPhone {
    int channel;

    DmbCellPhone(String model, String color, int channel) {
        this.model = model;
        this.color = color;
        this.channel = channel;
    }

    void turnOnDmb() {
        System.out.println("채널 " + channel + "번 DMB 방송 수신을 시작합니다.");
    }
    void changeChannelDmb(int channel) {
        this.channel = channel;
        System.out.println("채널 " + channel + "번으로 바꿉니다.");
    }
    void turnOffDmb() {
        System.out.println("DMB 방송 수신을 멈춥니다.");
    }
}

public class Main {
    public static void main(String[] args) {
        // DmbCellPhone 객체 생성
        DmbCellPhone dmbCellPhone = new DmbCellPhone("자바폰", "검정", 10);

        // CellPhone으로부터 상속받은 필드
        System.out.println("모델: " + dmbCellPhone.model);
        System.out.println("색상: " + dmbCellPhone.color);

        // DmbCellPhone의 필드
        System.out.println("채널: " + dmbCellPhone.channel);

        // CellPhone으로부터 상속받은 메소드 호출
        dmbCellPhone.powerOn();
        dmbCellPhone.bell();
        dmbCellPhone.sendVoice("여보세요");
        dmbCellPhone.receiveVoice("안녕하세요");
        dmbCellPhone.sendVoice("누구세요");
        dmbCellPhone.hangUp();

        // DmbCellPhone의 메소드 호출
        dmbCellPhone.turnOnDmb();
        dmbCellPhone.changeChannelDmb(12);
        dmbCellPhone.turnOffDmb();
    }
}
부모 생성자 호출
DmbCellPhone dmbCellPhone = new DmbCellPhone();위 코드는 DmbCellPhone 객체만 생성하는 것처럼 보이지만 내부적으로는 CellPhone 객체가 먼저 생성되고, DmbCellPhone 객체가 생성됩니다. 모든 객체는 클래스의 생성자를 호출해야만 생성이 되는데, 자식 생성자의 첫 줄에서 부모 생성자를 호출하기 위한 코드가 실행됩니다.
public DmbCellPhone() {
	super();
}
생성자를 명시적으로 선언하지 않았다면 컴파일러는 위와 같이 기본 생성자를 생성해 냅니다. super()는 부모의 기본 생성자를 호출하는 역할을 합니다. 그래서 아래의 CellPhone 클래스의 생성자를 호출합니다.
public CellPhone() {
}
CellPhone의 생성자가 선언되지 않았더라도 컴파일러에 의해 기본 생성자가 만들어지므로 문제없이 실행이 됩니다. 명시적으로 부모 생성자를 호출하고 싶다면 다음과 같이 작성합니다. 주의할 점은 super()는 반드시 자식 생성자 첫 줄에 위치해야 하고, 그렇지 않으면 컴파일 에러가 납니다.
자식클래스(매개변수선언, ... ) {
	super(매개값, ... );
}
예제
class People {
    public String name;
    public String ssn;

    public People(String name, String ssn) {
        this.name = name;
        this.ssn = ssn;
    }
}

class Student extends People {
    public int studentNo;

    public Student(String name, String ssn, int studentNo) {
        super(name, ssn); // 부모 생성자 호출
        this.studentNo = studentNo;
    }
}

public class Main {
    public static void main(String[] args) {
        Student student = new Student("홍길동", "123123-1231234", 1);
        System.out.println("name: " + student.name);
        System.out.println("ssn: " + student.ssn);
        System.out.println("studentNo: " + student.studentNo);
    }
}
메소드 재정의
부모 클래스의 메소드가 자식 클래스에서 사용하기에 적합하지 않을 때, 해당 메소드는 자식 클래스에서 다시 수정해서 사용해야 합니다. 자바는 이런 경우를 위해 메소드 오버라이딩 기능을 제공합니다.
@Override
메소드를 오버라이딩할 때는 주의해야할 규칙들이 있습니다.
- 부모의 메소드와 동일한 시그니처(리턴 타입, 메소드 이름, 매개 변수 리스트)를 가져야 함
- 접근 제한을 더 강하게 오버라이딩할 수 없음
- 새로운 예외를 throws할 수 없음
접근 제한을 더 강하게 오버라이딩할 수 없다는 것은 부모 메소드가 public 접근 제한을 가지고 있을 경우 오버라이딩하는 자식 메소드는 default나 private 접근 제한으로 수정할 수 없다는 의미입니다. 반대의 경우에는 가능합니다.
아래 예제에서 @Override 어노테이션은 생략해도 좋으나, 이것을 붙여주게 되면 areaCircle() 메소드가 정확히 오버라이딩된 것인지 컴파일러가 체크하기 때문에 개발자의 실수를 줄여줍니다. 예를 들어 areaCirl() 처럼 끝에 e를 빼먹게 되면 컴파일 에러가 발생합니다.
예제
class Calculator {
    double areaCircle(double r) {
        System.out.println("Calculator 객체의 areaCircla() 실행");
        return 3.14159 * r * r;
    }
}

class Computer extends Calculator {
    @Override
    double areaCircle(double r) {
        System.out.println("Computer 객체의 areaCircle() 실행");
        return Math.PI * r * r;
    }
}

public class Main {
    public static void main(String[] args) {
        int r = 10;

        Calculator cal = new Calculator();
        System.out.println("원면적: " + cal.areaCircle(r));
        System.out.println();

        Computer com = new Computer();
        System.out.println("원면적: " + com.areaCircle(r));
    }
}
부모 메소드 호출
자식 클래스에서 부모 클래스의 메소드를 오버라이딩하게 되면, 부모 클래스의 메소드는 숨겨지고 오버라이딩된 자식 메소드만 사용됩니다. 자식 클래스 내부에서 오버라이딩된 부모 클래스의 메소드를 호출해야 하는 상황이 발생하면 명시적으로 super 키워드를 붙여서 부모 메소드를 호출할 수 있습니다.
super.부모메소드();예제
class Airplane {
    public void land() {
        System.out.println("착륙합니다.");
    }
    public void fly() {
        System.out.println("일반비행합니다.");
    }
    public void takeOff() {
        System.out.println("이륙합니다.");
    }
}

class SupersonicAirplane extends Airplane {
    public static final int NORMAL = 1;
    public static final int SUPERSONIC = 2;

    public int flyMode = NORMAL;

    @Override
    public void fly() {
        if (flyMode == SUPERSONIC) {
            System.out.println("초음속비행합니다.");
        } else {
            // Airplane 객체의 fly() 메소드 호출
            super.fly();
        }
    }
}

public class Main {
    public static void main(String[] args) {
        SupersonicAirplane sa = new SupersonicAirplane();
        sa.takeOff();
        sa.fly();
        sa.flyMode = SupersonicAirplane.SUPERSONIC;
        sa.fly();
        sa.flyMode = SupersonicAirplane.NORMAL;
        sa.fly();
        sa.land();
    }
}
final 클래스와 final 메소드
상속할 수 없는 final 클래스
클래스를 선언할 때 final 키워드를 class 앞에 붙이게 되면 이 클래스는 최종적인 클래스이므로 상속할 수 없는 클래스가 됩니다. 즉 final 클래스는 자식 클래스를 만들 수 없습니다. final 클래스의 대표적인 예는 자바 표준 API에서 제공하는 String 클래스가 있습니다.
public final class String { ... }오버라이딩할 수 없는 final 메소드
메소드를 선언할 때 final 키워드를 붙이게 되면 이 메소드는 최종적인 메소드이므로 오버라이딩할 수 없는 메소드가 됩니다.
예제
class Car {
public int speed;
public void speedUp() {
speed += 1;
}
// final 메소드
public final void stop() {
System.out.println("차름 멈춤");
speed = 0;
}
}
class SportsCar extends Car {
@Override
public void speedUp() {
speed += 10;
}
// 오버라이딩을 할 수 없음
@Override
public void stop() {
System.out.println("스포츠카를 멈춤");
speed = 0;
}
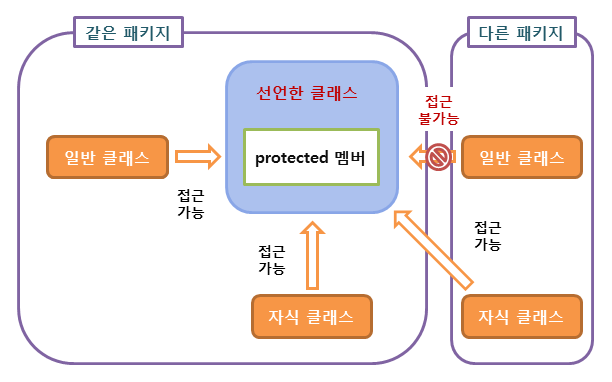
}protected 접근 제한자
public, protected, dafault, private 네 가지의 종류 중 protected는 상속과 관련이 있습니다. protected는 public과 default 접근 제한의 중간 쯤에 해당합니다. default와 같이 접근 제한이 없지만 다른 패키지에서는 자식 클래스만 접근을 허용합니다.
타입 변환과 다형성
다형성을 위해서 부모 타입에 모든 자식 객체가 대입될 수 있습니다. 예를 들어 자동차를 설계할 때 타이어 클래스 타입을 적용했다면 이 클래스를 상속한 실제 타이어들은 어떤 것이든 상관없이 대입이 가능하게 됩니다.
클래스 타입도 기본 타입과 마찬가지로 타입 변환이 있음
클래스 타입의 변환은 상속 관계에 있는 클래스 사이에서 발생함
public class Car {
	Tier t1 = new HankookTire();
    Tier t2 = new KumhoTire();
}
자동 타입 변환
class Animal {
	...
}

class Cat extends Animal {
	...
}
Cat cat = new Cat();
Animal animal = cat; // Animal animal = new Cat(); 가능Cat 클래스로부터 Cat 객체를 생성하고 이것을 Animal 타입 변수에 대입하면 자동 타입 변환이 일어납니다. cat과 animal 변수는 타입만 다를 뿐 동일한 Cat 객체를 참조합니다. 즉 다음 연산의 결과는 true입니다.
cat == animal // true부모 타입으로 자동 타입 변환된 이후에는 변수는 자식 객체를 참조하지만 변수로 접근 가능한 멤버는 부모 클래스 멤버로만 한정됩니다. 예외가 있는데, 메소드가 자식 클래스에서 오버라이딩되었다면 자식 클래스의 메소드가 대신 호출된다는 것입니다.
예제
class Parent {
	public void method1() {
    	System.out.println("Parent-method1()");
    }

    public void method2() {
    	System.out.println("Parent-method2()");
    }
}

class Child extends Parent {
	@Override
    public void method2() {
    	System.out.println("Child-method2()");
    }

    public void method3() {
    	System.out.println("child-method3()");
    }
}

public class Main {
	public static void main(String[] args) {
    	Child child = new Child();

        Parent parent = child; // 자동 타입 변환
        parent.method1();
        parent.method2(); // 재정의된 메소드가 호출됨
        parent.method3(); // 호출 불가능
    }
}
필드의 다형성
필드의 타입은 변함이 없지만 실행 도중에 어떤 객체를 필드로 저장하느냐에 따라 실행 결과가 달라질 수 있는데, 이것이 필드의 다형성입니다.
예제
class Tire {
    // 필드
    public int maxRotation; // 최대 회전수
    public int accumulatedRotation; // 누적 회전수
    public String location;

    // 생성자
    public Tire(String location, int maxRotation) {
        this.location = location;
        this.maxRotation = maxRotation;
    }

    // 메소드
    public boolean roll() {
        ++accumulatedRotation; // 누적 회전수 1증가
        if (accumulatedRotation < maxRotation) { // 누적 < 최대일 경우 실행
            System.out.println(location + " Tire 수명: " +
            (maxRotation - accumulatedRotation) + "회");
            return true;
        } else {
            System.out.println("*** " + location + " Tire 펑크 ***");
            return false;
        }
    }
}

class Car {
    // 필드
    Tire frontLeftTire = new Tire("앞왼쪽", 6);
    Tire frontRightTire = new Tire("앞오른쪽", 2);
    Tire backLeftTire = new Tire("뒤왼쪽", 3);
    Tire backRightTire = new Tire("뒤오른쪽", 4);

    // 메소드
    int run() {
        System.out.println("[자동차가 달립니다]");
        if (frontLeftTire.roll() == false) {
            stop(); return 1;
        }
        if (frontRightTire.roll() == false) {
            stop(); return 2;
        }
        if (backLeftTire.roll() == false) {
            stop(); return 3;
        }
        if (backRightTire.roll() == false) {
            stop(); return 4;
        }
        return 0;
    }

    void stop() {
        System.out.println("[자동차가 멈춥니다]");
    }
}

class HankookTire extends Tire {
    // 생성자
    public HankookTire(String location, int maxRotation) {
        super(location, maxRotation);
    }

    // 메소드
    @Override
    public boolean roll() {
        ++accumulatedRotation;
        if (accumulatedRotation < maxRotation) {
            System.out.println(location + " HankookTire 수명: " +
            (maxRotation - accumulatedRotation) + "회");
            return true;
        } else {
            System.out.println("*** " + location + " HankookTire 펑크 ***");
            return false;
        }
    }
}

class KumhoTire extends Tire {
    // 생성자
    public KumhoTire(String location, int maxRotation) {
        super(location, maxRotation);
    }

    // 메소드
    @Override
    public boolean roll() {
        ++accumulatedRotation;
        if (accumulatedRotation < maxRotation) {
            System.out.println(location + " KumhoTire 수명: " +
            (maxRotation - accumulatedRotation) + "회");
            return true;
        } else {
            System.out.println("*** " + location + " KumhoTire 펑크 ***");
            return false;
        }
    }
}

public class Main {
    public static void main(String[] args) {
        Car car = new Car();

        for (int i=1; i<=5; i++) {
            int problemLocation = car.run();

            switch (problemLocation) {
                case 1:
                    System.out.println("앞왼쪽 HankookTire로 교체");
                    car.frontLeftTire = new HankookTire("앞왼쪽", 15);
                    break;
                case 2:
                    System.out.println("앞오른쪽 KumhoTire로 교체");
                    car.frontRightTire = new HankookTire("앞오른쪽", 13);
                    break;
                case 3:
                    System.out.println("뒤왼쪽 HankookTire로 교체");
                    car.backLeftTire = new HankookTire("뒤왼쪽", 14);
                    break;
                case 4:
                    System.out.println("뒤오른쪽 KumhoTire로 교체");
                    car.backRightTire = new HankookTire("뒤오른쪽", 17);
                    break;
            }
            System.out.println("----------------------------------");
        }
    }
}
하나의 배열로 객체 관리
이전 예제에서 Car 클래스에 4개의 타이어 객체를 4개의 필드로 각각 저장했는데, 동일한 타입의 값들이기 때문에 배열로 관리하는 것이 가능합니다. 이전 예제에서 작성한 Car 클래스의 타이어 필드를 배열로 수정하면 다음과 같습니다.
class Car {
    Tire frontLeftTire = new Tire("앞왼쪽", 6);
    Tire frontRightTire = new Tire("앞오른쪽", 2);
    Tire backLeftTire = new Tire("뒤왼쪽", 3);
    Tire backRightTire = new Tire("뒤오른쪽", 4);
}

// 배열로 객체 관리
class Car {
	Tire[] tires = {
    	new Tire("앞왼쪽", 6),
        new Tire("앞오른쪽", 2),
        new Tire("뒤왼쪽", 3),
        new Tire("뒤오른쪽", 4)
    };
}
매개 변수의 다형성
메소드를 호출할 때에는 매개 변수의 타입과 동일한 매개값을 지정하는 것이 일반적이지만, 매개값을 다양화하기 위해 매개 변수에 자식 타입 객체를 지정할 수도 있습니다.
예제
class Vehicle {
	public void run() {
    	System.out.println("차량이 달립니다.");
    }
}

class Driver {
	public void drive(Vehicle vehicle) {
    	vehicle.run();
    }
}

class Bus extends Vehicle {
	@Override
    public void run() {
    	System.out.println("버스가 달립니다.");
    }
}

public class Main {
	public static void main(String[] args) {
    	Driver driver = new Driver();
        Bus bus = new Bus();
        driver.drive(bus); // 자동 타입 변환 Vehicle vehicle = bus;
    }
}
강제 타입 변환
강제 타입 변환은 부모 타입을 자식 타입으로 변환합니다. 자식 타입이 부모 타입으로 자동 변환한 후, 다시 자식 타입으로 변환할 때 강제 타입 변환을 사용할 수 있습니다.
자식클래스 변수 = (자식클래스) 부모클래스타입; // 자식 타입이 부모 타입으로 변환된 상태자식 타입이 부모 타입으로 자동 변환하면 부모 타입에 선언된 필드와 메소드만 사용 가능하다는 제약 사항이 있습니다. 만약 자식 타입에 선언된 필드와 메소드를 꼭 사용해야 한다면 강제 타입 변환으로 다시 자식 타입으로 변환해야 합니다.
예제
class Parent {
    public String field1;

    public void method1() {
        System.out.println("Parent-method1()");
    }

    public void method2() {
        System.out.println("Parent-method2()");
    }
}

class Child extends Parent {
    public String field2;

    public void method3() {
        System.out.println("Child-method3()");
    }
}

public class Main {
    public static void main(String[] args) {
        Parent parent = new Child(); // 자동 타입 변환
        parent.field1 = "data1";
        parent.method1();
        parent.method2();

        /*
        parent.field2 = "data2";
        parent.method3();
         */

        Child child = (Child) parent; // 강제 타입 변환
        child.field2 = "data2";
        child.method3();
    }
}
객체 타입 확인 instanceOf
강제 타입 변환은 부모 타입의 변수가 부모 객체를 참조할 경우에는 사용할 수 없습니다. 그래서 부모 변수가 참조하는 객체가 부모 객체인지 자식 객체인지 확인하는 방법이 필요한데, 어떤 객체가 어떤 클래스의 인스턴스인지 확인할 때 instanceOf 연산자를 사용합니다. instanceOf 연산자의 좌항은 객체, 우항은 타입이 오는데 좌항의 객체가 우항의 인스턴스이면 true, 그렇지 않으면 false를 산출합니다.
boolean result = 좌항(객체) instanceOf 우항(타입)추상 클래스
추상 클래스의 개념
- 객체를 직접 생성할 수 있는 클래스(실체 클래스)의 공통적인 특성을 추출해서 선언한 클래스
- 실체 클래스와 상속의 관게를 가짐 (추상 클래스가 부모 클래스의 역할을 함)
- 실체 클래스는 추상 클래스의 모든 특성을 물려받고, 추가적인 특성(멤버)를 가질 수 있음
- 추상 클래스는 객체를 직접 생성해서 사용할 수 없음
추상은 실체 간에 공통되는 특성을 추출한 것을 의미합니다.
예를 들어 새, 물고기 등의 실체에서 공통되는 특성을 추출해보면 동물이라는 공통점이 있습니다.
추상 클래스의 용도
- 실체 클래스들의 공통된 필드와 메소드의 이름을 통일할 목적
- 실체 클래스를 작성할 때 시간을 절약
실체 클래스를 설계하는 사람이 여러 사람일 경우, 실체 클래스마다 필드와 메소드가 제각기 다른 이름을 가질 수 있습니다. 동일한 데이터와 기능임에도 불구하고 이런 상황이 생길 수 있기 때문에 추상 클래스에 공통된 특성들을 선언하고, 실체 클래스에서 이를 상속함으로써 필드와 메소드 이름을 통일시킬 수 있습니다. 그리고 다른 부분만 실체 클래스에 선언하게 되면 클래스를 작성하는데 시간을 절약할 수 있습니다.
추상 클래스 선언
추상 클래스를 선언할 때에는 클래스 선언에 abstract 키워드를 붙여야 합니다.
예제
abstract class Phone {
    public String owner;

    public Phone(String owner) {
        this.owner = owner;
    }

    public void turnOn() {
        System.out.println("전원켬");
    }
    public void turnOff() {
        System.out.println("전원끔");
    }
}

class SmartPhone extends Phone {
    public SmartPhone(String owner) {
        super(owner);
    }

    public void search() {
        System.out.println("검색");
    }
}

public class Main {
    public static void main(String[] args) {
        SmartPhone smartPhone = new SmartPhone("김자바");

        smartPhone.turnOn();
        smartPhone.search();
        smartPhone.turnOff();
    }
}
추상 메소드와 오버라이딩
모든 실체 클래스들이 가지고 있는 실행 내용이 동일하다면 추상 클래스에 메소드를 작성하는 것이 좋겠지만, 메소드의 선언만 통일화하고 실행 내용은 실체 클래스마다 달라야 하는 경우가 있습니다. 이런 경우를 위해서 추상 클래스는 추상 메소드를 선언할 수 있는데, 메소드의 선언부만 있고 메소드 실행 내용인 중괄호가 없는 메소드를 의미합니다. 다음과 같이 선언할 수 있습니다.
[public | protected] abstract 리턴타입 메소드명(매개변수, ...);추상 클래스를 설계할 때 하위 클래스가 반드시 실행 내용을 채우도록 강요하고 싶은 메소드가 있을 경우, 해당 메소드를 추상 메소드로 선언합니다. 그렇게 되면 자식 클래스는 반드시 추상 메소드를 오버라이딩해서 실행 내용을 작성해야 합니다.
예제
abstract class Animal {
    public String kind;

    public void breathe() {
        System.out.println("숨을 쉽니다");
    }

    public abstract void sound(); // 추상 메소드
}

class Dog extends Animal {
    public Dog() {
        this.kind = "포유류";
    }

    @Override
    public void sound() {
        System.out.println("멍멍");
    }
}

public class Main {
    public static void main(String[] args) {
        Dog dog = new Dog();
        dog.sound();
        System.out.println("-----");

        // 변수의 자동 타입 변환
        Animal animal = null;
        animal = new Dog(); // 자동 타입 변환
        animal.sound(); // 재정의된 메소드 호출
        System.out.println("-----");

        // 메소드의 다형성
        animalSound(new Dog());
    }

    public static void animalSound(Animal animal) {
        animal.sound();
    }
}
레퍼런스
- 이것이 자바다: 신용권의 Java 프로그래밍 정복
- Inheritance in Java: https://www.javatpoint.com/inheritance-in-java
- 접근 제어자: http://www.tcpschool.com/java/java_modifier_accessModifier