수업 목표
1. Flask 프레임워크를 활용해서 API를 만들 수 있다.
2. '모두의책리뷰' API를 만들고 클라이언트에 연결한다.
3. '나홀로메모장' API를 만들고 클라이언트와 연결한다.
1. Flask
-
Flask 프레임워크: 서버를 구동시켜주는 편한 코드 모음. 서버를 구동하려면 필요한 복잡한 일들을 쉽게 가져다 쓸 수 있다.
프레임워크를 쓰지 않으면 태양초를 빻아서 고추장을 만드는 것과 같다.
프레임워크는 3분 요리/소스 세트
1-1 Flask 기초 - 서버 만들기
1) 기본 실행
-
app.py 파일을 만들어 시작 코드 붙여넣기
from flask import Flask app = Flask(__name__) @app.route('/') def home(): return 'This is Home!' if __name__ == '__main__': app.run('0.0.0.0',port=5000,debug=True) -
app.py 는 flask 이용 시 통상적인 서버파일명
-
서버 시작하는 법: 파일을 run시킨 후, chrome에서
http://localhost:5000/로 접속하면 'Hello World!' 메세지가 나오면서 서버 실행 -
서버 종료하는 법 : 터미널창에 ctrl + c 누르면 서버 종료
2) URL 나눠보기
- @app.route('/) 부분을 수정해서 URL을 나눌 수 있다.
- 하지만! url 별로 함수명이 같거나, route('/')내의 주소가 같으면 안됩니다.
from flask import Flask
app = Flask(__name__)

@app.route('/')
def home():
   return 'This is Home!'

@app.route('/mypage')
def mypage():
   return 'This is My Page!'

if __name__ == '__main__':
   app.run('0.0.0.0',port=5000,debug=True)
1-2 Flask 기초 - HTML 파일 주기
1) 기본 폴더 구조
- Flask 서버를 만들 때, 항상, 프로젝트 폴더 안에,
ㄴstatic 폴더 (이미지, css파일을 넣어둡니다)
ㄴtemplates 폴더 (html파일을 넣어둡니다)
ㄴapp.py 파일
이렇게 세 개를 만들어두고 시작하기
(꼭 참고!! venv는 실제로는 보이지만, 안보인다~라고 생각하세요! 기억하시죠?)
2) HTML 파일 불러오기
templates 폴더의 역할 : HTML 파일을 담아두고, 불러오는 역할
-
간단한 index.html 파일을 templates 안에 만들기
- [코드스니펫] index.html 예제코드
<!DOCTYPE html>
<html lang="en">
<head>
    <meta charset="UTF-8">
    <meta name="viewport" content="width=device-width, initial-scale=1.0">
    <script src="https://ajax.googleapis.com/ajax/libs/jquery/3.4.1/jquery.min.js"></script>
    <title>Document</title>
</head>
<body>
    <h1>서버를 만들었다!</h1>
</body>
</html>
- [코드스니펫] index.html 예제코드
-
html 파일 불러오기
- flask 내장함수 render_template를 이용하여 index.html 파일 불러오기
from flask import Flask, render_template # 함수 임포트
app = Flask(__name__)

## URL 별로 함수명이 같거나,
## route('/') 등의 주소가 같으면 안됩니다.

@app.route('/')
def home():
   return render_template('index.html') # html 파일 불러오기

if __name__ == '__main__':
   app.run('0.0.0.0', port=5000, debug=True)
1-3 Flask 기초 - 본격 API 만들기
1) 들어가기 전에: GET, POST 요청타입(리마인드)
은행의 창구가 API와 같다.
같은 예금 창구에서도 개인 고객이냐 기업 고객이냐에 따라 처리하는 것이 다른 것처럼,
클라이언트가 요청 할 때에도, "방식"이 존재합니다.
HTTP 라는 통신 규약을 따른다는 거 잊지 않으셨죠? 클라이언트는 요청할 때 HTTP request method(요청 메소드)를 통해, 어떤 요청 종류인지 응답하는 서버 쪽에 정보를 알려주는 거에요.
GET, POST 방식
여러 방식(링크)이 존재하지만 우리는 가장 많이 쓰이는 GET, POST 방식에 대해서만 알아보자.
-
GET → 통상적으로! 데이터 조회(Read)를 요청할 때
예) 영화 목록 조회
→ 데이터 전달 : URL 뒤에 물음표를 붙여 key=value로 전달
→ 예: google.com?q=북극곰 -
POST → 통상적으로! 데이터 생성(Create), 변경(Update), 삭제(Delete) 요청 할 때
예) 회원가입, 회원탈퇴, 비밀번호 수정
→ 데이터 전달 : 바로 보이지 않는 HTML body에 key:value 형태로 전달
2) GET, POST 요청에서 클라이언트의 데이터를 받는 방법
- GET 요청 API코드
@app.route('/test', methods=['GET']) def test_get(): # 클라이언트로부터 'title_give'라는 이름으로 데이터를 받아 온다. title_receive = request.args.get('title_give') print(title_receive) # 결과 == '봄날은간다' return jsonify({'result':'success', 'msg': '이 요청은 GET!'}) # 딕셔너리를 클라이언트로 보낸다. - GET 요청 확인 Ajax코드
$.ajax({ type: "GET", url: "/test?title_give=봄날은간다", // 동일한 url의 서버로 title_give=봄날은간다 데이터 전송 data: {}, success: function (response) { // response == {'result':'success', 'msg': '이 요청은 GET!'} let result = response['result'] let msg = response['msg'] console.log(result, msg) // 결과 == success 이 요청은 GET! } }) - POST 요청 API코드
@app.route('/test', methods=['POST']) def test_post(): title_receive = request.form['title_give'] print(title_receive) return jsonify({'result':'success', 'msg': '이 요청은 POST!'}) - POST 요청 확인 Ajax코드
$.ajax({
    type: "POST",
    url: "/test",
    data: {title_give: '봄날은간다'},
    success: function (response) {
        let result = response['result']
        let msg = response['msg']
        console.log(result, msg)
    }
        })
2. 모두의 책리뷰
2-1 POST 연습(리뷰 저장)
API 코드 작성 후 DB에 데이터 저장하기(제목, 저자, 리뷰)
아래 순서에 따라 코드를 작성하는 것이 완성도가 높다.
1) 클라이언트와 서버 확인하기
- 서버:
app.py코드
  ## API 역할을 하는 부분
  @app.route('/review', methods=['POST'])
  def write_review():
      # 1. 클라이언트가 준 title, author, review 가져오기.
      # 2. DB에 정보 삽입하기
      # 3. 성공 여부 & 성공 메시지 반환하기
return jsonify({'result': 'success', 'msg': '리뷰가 성공적으로 작성되었습니다.'})- 클라이언트:
index.html파일 코드
function makeReview() {
		// 1. 제목, 저자, 리뷰 내용을 가져옵니다.
		// 2. 제목, 저자, 리뷰 중 하나라도 입력하지 않았을 경우 alert를 띄웁니다.
		// 3. POST /review 에 저장을 요청합니다.
    $.ajax({
        type: "POST",
        url:  "/review",
        data: { },
        success: function (response) {
            if (response["result"] == "success") {
                alert(response["msg"] );
              // 결과값으로 '리뷰가 성공적으로 작성되었습니다.'가 alert 되면 정상적으로 연결되었다는 뜻
                window.location.reload();
            }
        }
    })
}
2) 서버부터 만들기
- 서버:
app.py코드
  @app.route('/review', methods=['POST'])
  def write_review():
      # title_receive로 클라이언트가 준 title 가져오기
      title_receive = request.form['title_give']
      # author_receive로 클라이언트가 준 author 가져오기
      author_receive = request.form['author_give']
      # review_receive로 클라이언트가 준 review 가져오기
      review_receive = request.form['review_give']

      # DB에 삽입할 review 만들기
      doc = {
          'title': title_receive,
          'author': author_receive,
          'review': review_receive
      }
      # reviews에 review 저장하기
      db.bookreview.insert_one(doc)
      # 성공 여부 & 성공 메시지 반환
      return jsonify({'msg': '리뷰가 성공적으로 작성되었습니다.'})
3) 클라이언트 만들기
- 클라이언트:
index.html파일 코드
function makeReview() {
// 화면에 입력어 있는 제목, 저자, 리뷰 내용을 가져옵니다.
let title = $("#title").val();
let author = $("#author").val();
let review = $("#bookReview").val();
// POST /review 에 저장(Create)을 요청합니다.
$.ajax({
type: "POST",
url: "/review",
// 서버와 약속한 키값에 맞게 input 내용 저장
data: { title_give: title, author_give: author, review_give: review },
success: function (response) {
alert(response["msg"]);
window.location.reload(); // 포스팅 후 재로딩 시키기
}
})
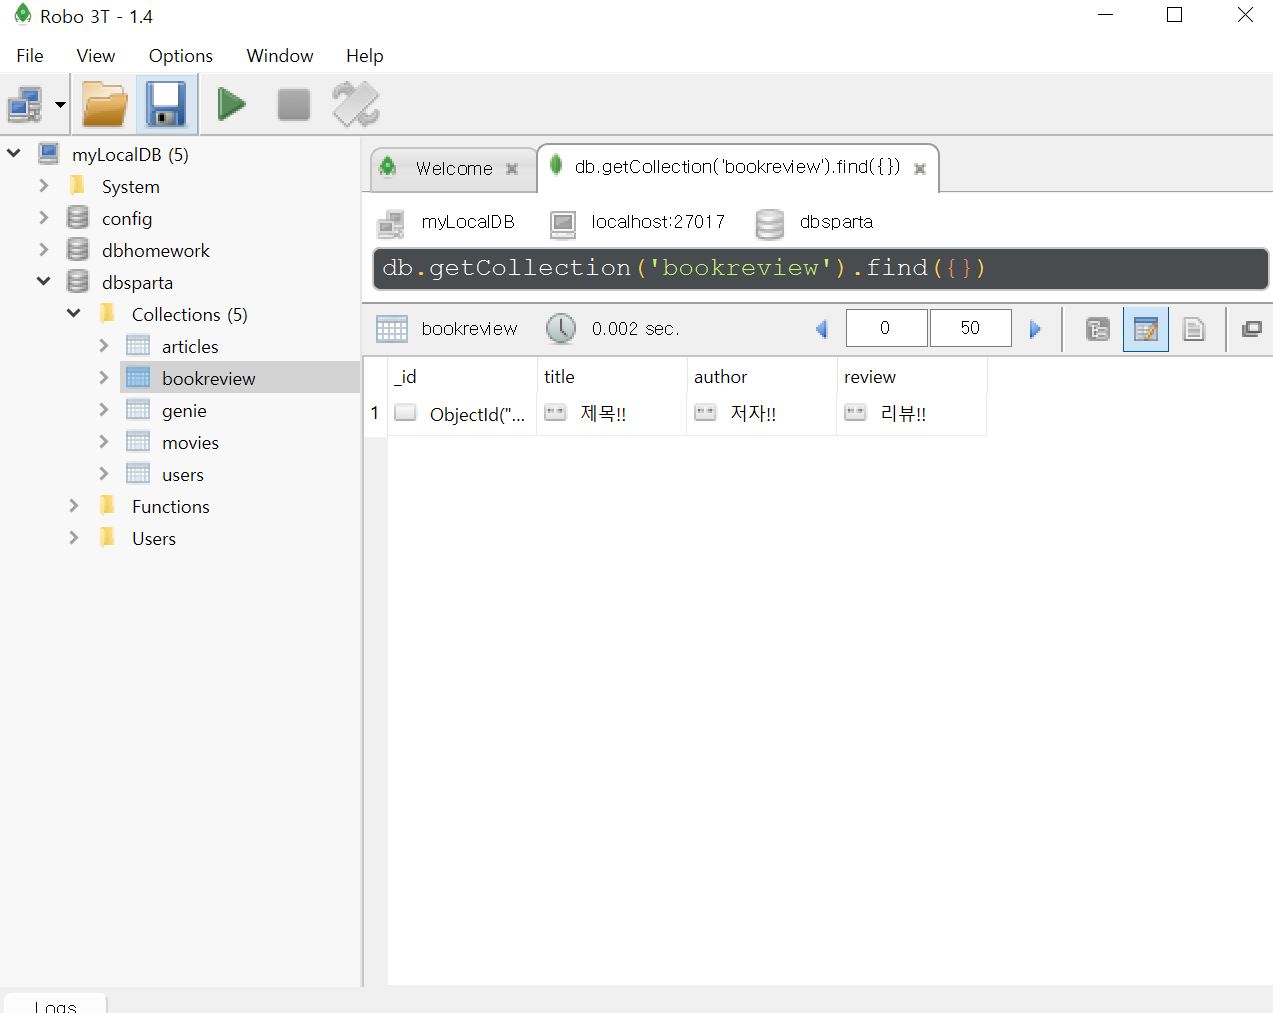
}4) 완성 확인하기
-
정상적으로 코드가 작동했다는 alert 메세지
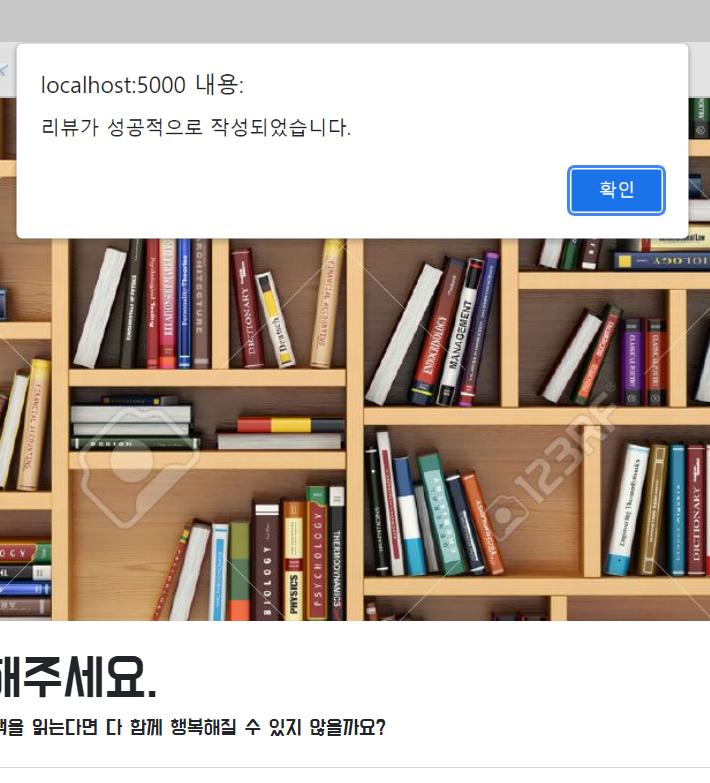
-
mongoDB에 저장된 데이터의 모습
2-2 GET 연습(리뷰 보여주기)
만들어져 있는 API 정보
1. 요청 정보 : 요청 URL=/review, 요청 방식 =GET
2. 서버가 제공할 기능 : 클라이언트에게 정해진 메시지를 보냄
3. 응답 데이터 : (JSON 형식) {'msg': '이 요청은 GET!'}
1) 클라이언트와 서버 확인하기
- 서버:
app.py코드
  @app.route('/review', methods=['GET'])
  def read_reviews():
      sample_receive = request.args.get('sample_give')
      print(sample_receive) // '샘플데이터' print되면 정상 연결
return jsonify({'msg': '이 요청은 GET!'})- 클라이언트:
index.html파일 코드
  // 페이지가 로딩되면 아래 함수를 실행시키라는 함수
  $(document).ready(function () {
  	showReview();
  });

  function showReview() {
          // 서버의 데이터를 받아오기
          $.ajax({
          type: "GET",
          url: "/review?sample_give=샘플데이터",
          data: {},
          success: function (response) {
              alert(response["msg"]);
            // 페이지 새로고침을 alert창이 뜨면 정상적으로 연결된 것
          }
      })
  }
2) 서버부터 만들기
- 서버:
app.py코드
  @app.route('/review', methods=['GET'])
  def read_reviews():
      # 1. DB에서 리뷰 정보 모두 가져오기
      reviews = list(db.bookreview.find({}, {'_id': False}))
      # 2. 성공 여부 & 리뷰 목록 반환하기
      return jsonify({'all_reviews': reviews})
3) 클라이언트 만들기
- 클라이언트:
index.html파일 코드
function showReview() {
$.ajax({
type: "GET",
url: "/review",
data: {},
success: function (response) {
// 서버가 보내준 데이터 이름인 all_reviews
let reviews = response['all_reviews']
// 반복문을 통해 원하는 데이터값 분류
for (let i = 0; i < reviews.length; i++) {
let title = reviews[i]['title']
let author = reviews[i]['author']
let review = reviews[i]['review']
// 추가할 html 코드양식 생성
let temp_html = `<tr>
<td>${title}</td>
<td>${author}</td>
<td>${review}</td>
</tr>`
$('#reviews-box').append(temp_html)
}
}
})
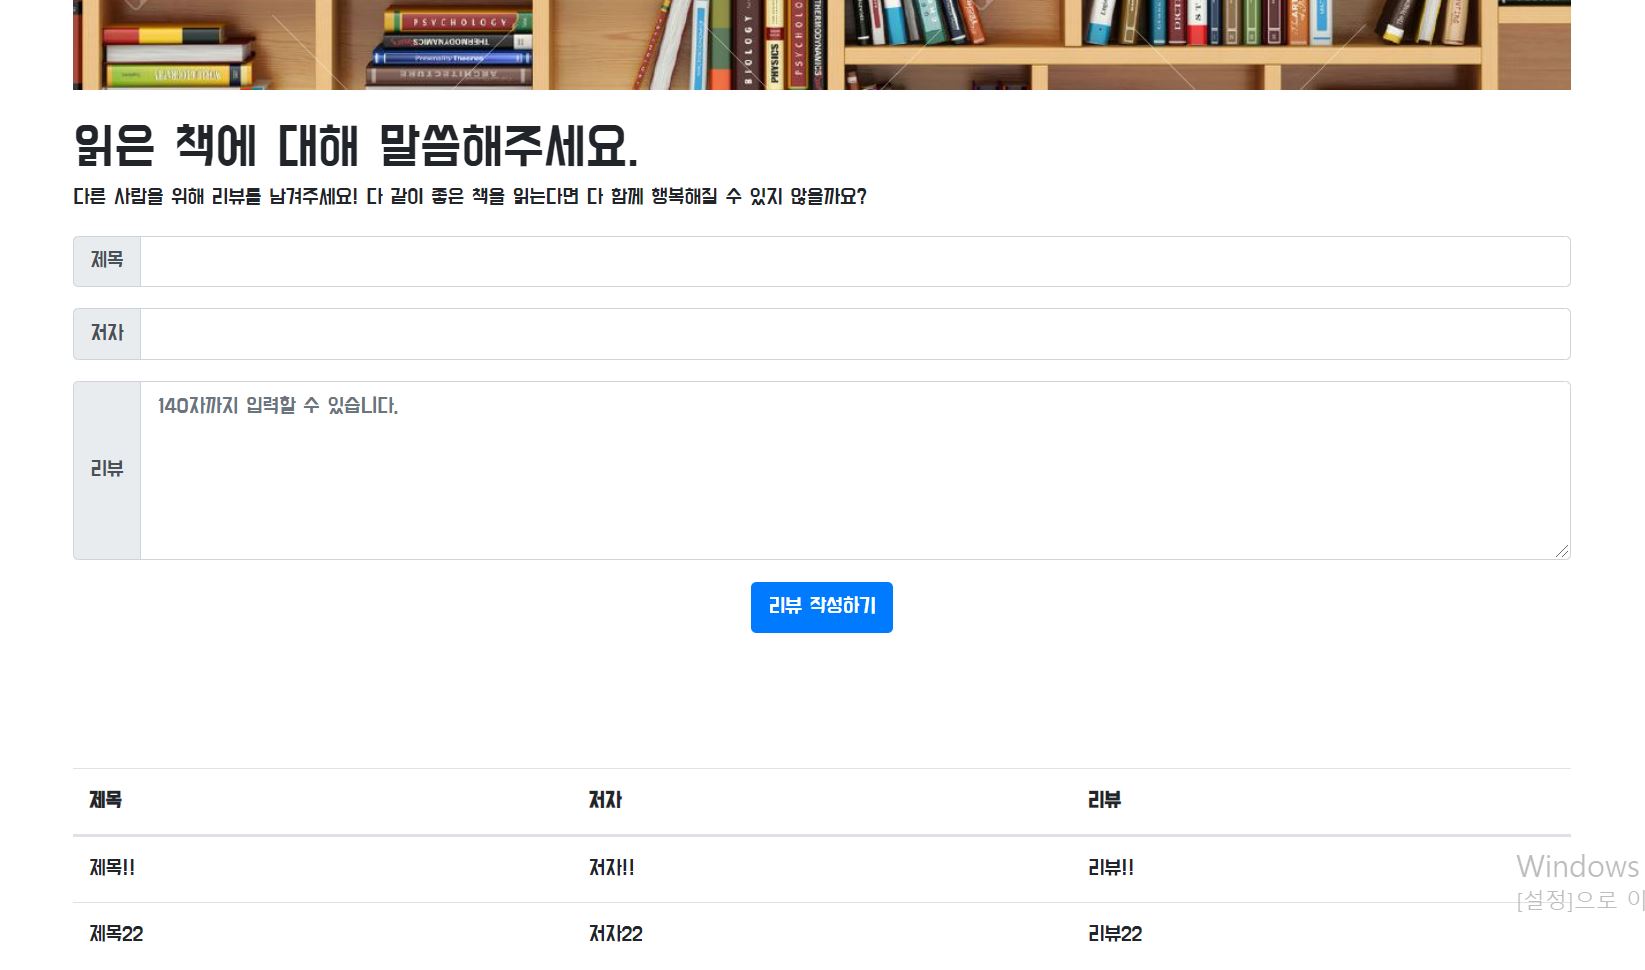
}4) 완성 확인하기
- 페이지 로딩 후 자동적으로 추가되어 보여지는 리뷰 리스트
3. 나홀로 메모장
3-1 POST 연습(메모하기)
우리가 만들 API 두 가지
포스팅 API - 카드 생성 (Create) : 클라이언트에서 받은 url, comment를 이용해서 페이지 정보를 찾고 저장하기
리스팅API - 저장된 카드 보여주기 (Read)
1) 클라이언트와 서버 확인하기
- 서버:
app.py코드
  @app.route('/memo', methods=['POST'])
  def post_articles():
          sample_receive = request.form['sample_give']
          print(sample_receive) # '샘플데이터' 값이 print 되면 연결 성공
return jsonify({'msg': 'POST 연결되었습니다!'})- 클라이언트:
index.html파일 코드
function postArticle() {
  $.ajax({
    type: "POST",
    url: "/memo",
    data: {sample_give:'샘플데이터'},
    success: function (response) {
      // 버튼을 눌렀을 때 'POST 연결되었습니다!' 값이 alert 되면 연결 성공
      alert(response['msg']);
    }
  })
}

<button type="button" class="btn btn-primary" onclick="postArticle()">기
2) 서버부터 만들기
- 서버:
app.py코드
  @app.route('/memo', methods=['POST'])
  def saving():
      url_receive = request.form['url_give']
      comment_receive = request.form['comment_give']

      # 크롤링을 위한 bs4 함수
      headers = {
          'User-Agent': 'Mozilla/5.0 (Windows NT 10.0; Win64; x64)AppleWebKit/537.36 (KHTML, like Gecko) Chrome/73.0.3683.86 Safari/537.36'}
      data = requests.get(url_receive, headers=headers)

      soup = BeautifulSoup(data.text, 'html.parser')

      # meta 태그에서 property가 og:000 인 줄의 content 값을 가져와라
      title = soup.select_one('meta[property="og:title"]')['content']
      image = soup.select_one('meta[property="og:image"]')['content']
      desc = soup.select_one('meta[property="og:description"]')['content']

      doc = {
          'title':title,
          'image':image,
          'desc':desc,
          'url':url_receive,
          'comment':comment_receive
      }

      # DB에 저장
      db.articles.insert_one(doc)

      # 정상적으로 저장되었으면 메세지 값 전송
      return jsonify({'msg':'저장이 완료되었습니다!'})
3) 클라이언트 만들기
- 클라이언트:
index.html파일 코드
  function postArticle() {
    	// 입력된 값 저장
        let url = $('#post-url').val()
        let comment = $('#post-comment').val()

        $.ajax({
            type: "POST",
            url: "/memo",
          	// 서버와 약속된 이름으로 입력값 전송
            data: {url_give:url, comment_give:comment},
            success: function (response) {
              //정상적으로 작동했다면 msg값 alert
                alert(response["msg"]);
              // 재 로딩
                window.location.reload()
            }
        })
    }
4) 완성 확인하기
- 정상적으로 코드가 작동했다는 alert 메세지

- mongoDB에 저장된 데이터의 모습
3-2 GET 연습(보여주기)
1) 클라이언트와 서버 확인하기
- 서버:
app.py코드
  @app.route('/memo', methods=['GET'])
  def read_articles():
      # 1. 모든 document 찾기 & _id 값은 출력에서 제외하기
      # 2. articles라는 키 값으로 영화정보 내려주기
return jsonify({'result':'success', 'msg':'GET 연결되었습니다!'})- 클라이언트:
index.html파일 코드
  $(document).ready(function () {
  	showArticles(); // 페이지가 준비되면 안에 있는 함수를 실행
  });

  function showArticles() {
    $.ajax({
      type: "GET",
      url: "/memo",
      data: {},
      success: function (response) {
        if (response["result"] == "success") {
          alert(response["msg"]); // 페이지 로딩과 동시에 alert창이 뜨면 연결 성공
        }
      }
    })
  }
2) 서버부터 만들기
- 서버:
app.py코드
  @app.route('/memo', methods=['GET'])
  def listing():
      # DB에 있는 모든 데이터 가져오기
      articles = list(db.articles.find({}, {'_id': False}))
      # all_articles 라는 이름의 딕셔너리로 클라이언트에 전송
      return jsonify({'all_articles':articles})
3) 클라이언트 만들기
- 클라이언트:
index.html파일 코드
  function showArticles() {
      $.ajax({
          type: "GET",
          url: "/memo",
          data: {},
          success: function (response) {
              // 서버가 보내준 이름 그대로 가져오기
              let articles = response['all_articles']
              // 반복문을 통해 데이터 분류
              for (let i = 0; i < articles.length; i++) {
                  let title = articles[i]['title']
                  let image = articles[i]['image']
                  let url = articles[i]['url']
                  let desc = articles[i]['desc']
                  let comment = articles[i]['comment']

                  let temp_html = `<div class="card">
                                      <img class="card-img-top"
                                           src="${image}"
                                           alt="Card image cap">
                                      <div class="card-body">
                                          <a target="_blank" href="${url}" class="card-title">${title}</a>
                                          <p class="card-text">${desc}</p>
                                          <p class="card-text comment">${comment}</p>
                                    </div>
                                </div>`
                $('#cards-box').append(temp_html)
            }
        }
    })
}
4) 완성 확인하기
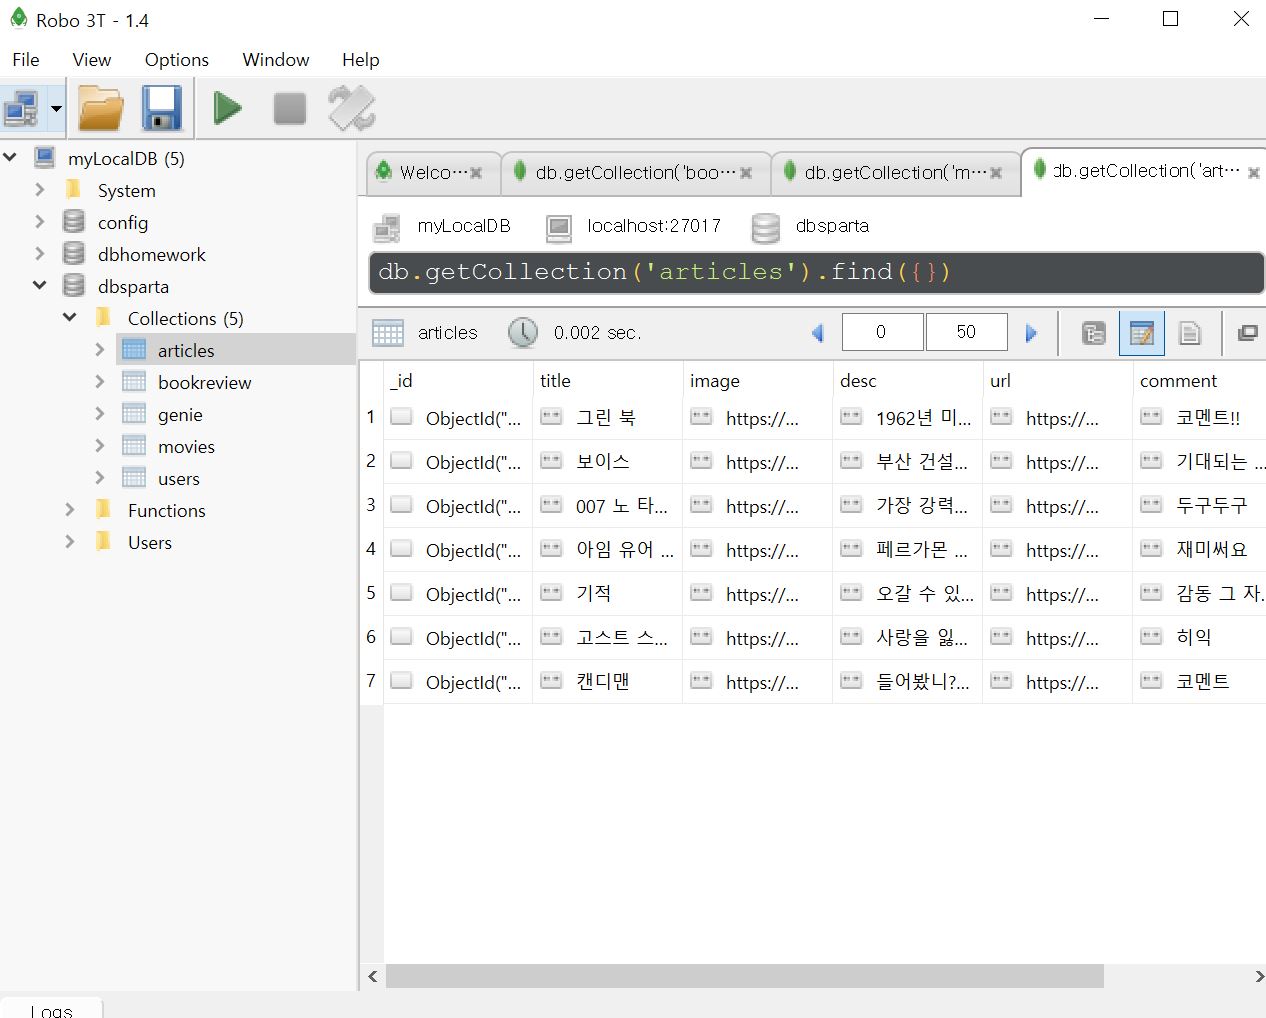
- 포스팅되어 있는 영화 정보

4주차 숙제
나만의 쇼핑몰 페이지에 flask 기능 추가
추가할 기능
1. 주문자 정보 저장하기(POST)
2. 화면 하단에 주문자 명단 보여주기(GET)
1) 사용 코드
- 서버 파일(app.py)
  from flask import Flask, render_template, jsonify, request

  app = Flask(__name__)

  from pymongo import MongoClient

  client = MongoClient('localhost', 27017)
  db = client.dbhomework


  ## HTML 화면 보여주기
  @app.route('/')
  def homework():
      return render_template('index.html')


  # 주문하기(POST) API
  @app.route('/order', methods=['POST'])
  def save_order():
      name_receive = request.form['name_give']
      count_receive = request.form['count_give']
      address_receive = request.form['address_give']
      phonenumber_receive = request.form['phonenumber_give']

      doc = {
          'name' : name_receive,
          'count' : count_receive,
          'address' : address_receive,
          'phonenumber' : phonenumber_receive
      }
      db.homework.insert_one(doc)

      return jsonify({'msg': '주문 완료!!'})


  # 주문 목록보기(Read) API
  @app.route('/order', methods=['GET'])
  def view_orders():
      orders = list(db.homework.find({}, {'_id': False}))
      return jsonify({'order_list': orders})


  if __name__ == '__main__':
app.run('0.0.0.0', port=5000, debug=True)- 클라이언트 파일(index.html)
<!doctype html>
<html lang="en">
<head>
<!-- Required meta tags -->
<meta charset="utf-8">
<meta name="viewport" content="width=device-width, initial-scale=1, shrink-to-fit=no">
<!-- Bootstrap CSS -->
<link rel="stylesheet" href="https://maxcdn.bootstrapcdn.com/bootstrap/4.0.0/css/bootstrap.min.css"
integrity="sha384-Gn5384xqQ1aoWXA+058RXPxPg6fy4IWvTNh0E263XmFcJlSAwiGgFAW/dAiS6JXm" crossorigin="anonymous">
<!-- Google fonts 추가 -->
<link rel="preconnect" href="https://fonts.googleapis.com">
<link rel="preconnect" href="https://fonts.gstatic.com" crossorigin>
<link href="https://fonts.googleapis.com/css2?family=Nanum+Gothic:wght@700&display=swap" rel="stylesheet">
<!-- Optional JavaScript -->
<!-- jQuery first, then Popper.js, then Bootstrap JS -->
<script src="https://ajax.googleapis.com/ajax/libs/jquery/3.5.1/jquery.min.js"></script>
<script src="https://cdnjs.cloudflare.com/ajax/libs/popper.js/1.12.9/umd/popper.min.js"
integrity="sha384-ApNbgh9B+Y1QKtv3Rn7W3mgPxhU9K/ScQsAP7hUibX39j7fakFPskvXusvfa0b4Q"
crossorigin="anonymous"></script>
<script src="https://maxcdn.bootstrapcdn.com/bootstrap/4.0.0/js/bootstrap.min.js"
integrity="sha384-JZR6Spejh4U02d8jOt6vLEHfe/JQGiRRSQQxSfFWpi1MquVdAyjUar5+76PVCmYl"
crossorigin="anonymous"></script>
<title>나만의 쇼핑몰_김선호</title>
<style>
* {
font-family: 'Nanum Gothic', sans-serif;
}
.wrap {
width: 700px;
margin: 50px auto auto auto;
}
.img {
width: 700px;
height: 500px;
background-image: url("https://images.unsplash.com/photo-1568702846914-96b305d2aaeb?ixid=MnwxMjA3fDB8MHxwaG90by1wYWdlfHx8fGVufDB8fHx8&ixlib=rb-1.2.1&auto=format&fit=crop&w=1170&q=80");
background-position: center;
background-size: cover;
}
.description {
font-size: 20px;
}
.description_price {
font-weight: normal;
font-size: 20px;
}
.btn-primary {
font-size: 20px;
display: block;
width: auto;
margin: auto;
border-radius: 5px;
}
#dollartowon {
color:blue;
}
.table {
margin: 20px auto 20px auto;
text-align: center;
}
</style>
<script>
$(document).ready(function () {
dollar_to_won();
order_listing();
})
function ordered() {
let name = $('#name-text').val()
let count = $('#count-text').val()
let address = $('#address-text').val()
let phonenumber = $('#phonenumber-text').val()
$.ajax({
type: "POST",
url: "/order",
data: { name_give: name,
count_give: count,
address_give: address,
phonenumber_give: phonenumber
},
success: function (response) {
alert(response["msg"]);
window.location.reload();
}
})
}
function order_listing() {
$.ajax({
type: "GET",
url: "/order",
data: {},
success: function (response) {
// 서버로 부터 받아온 딕셔너리가 response 안에 있으니 'order_list'로 다시 변수 지정
let orders = response['order_list']
for (let i=0; i<orders.length; i++) {
let address = orders[i]['address']
let count= orders[i]['count']
let name = orders[i]['name']
let phonenumber= orders[i]['phonenumber']
let temp_html = `<tr>
<th scope="row">${name}</th>
<td>${count}</td>
<td>${address}</td>
<td>${phonenumber}</td>
</tr>`
$('#order-list').append(temp_html)
}
}
})
}
function dollar_to_won() {
$.ajax({
type: "GET",
url: "http://spartacodingclub.shop/sparta_api/rate",
data: {},
success: function (response) {
let rate = response['rate'];
let temp_html = `${rate}`;
$('#dollartowon').append(temp_html);
}
})
}
</script>
</head>
<body>
<div class="wrap">
<div class="img"> </div>
<div class="description">
<h1>사과를 팝니다 <span class="description_price">가격: 1,000원/개</span></h1>
<p>이 사과는 먹으면 기분이 좋아지는 효과가 있어요. 이유는 그냥 달고 맛있거든요😁</p>
<p>오늘의 환율($ → ₩) : <span id="dollartowon"> </span> 원</p>
</div>
<div class="orderbox">
<div class="input-group mb-3">
<div class="input-group-prepend">
<span class="input-group-text" id="inputGroup-sizing-default">주문자 이름</span>
</div>
<input type="text" id="name-text" class="form-control" aria-label="Default"
aria-describedby="inputGroup-sizing-default">
</div>
<div class="input-group mb-3">
<div class="input-group-prepend">
<label class="input-group-text" for="count-text">개수</label>
</div>
<select class="custom-select" id="count-text">
<option selected></option>
<option value="1개">1개</option>
<option value="3개">3개</option>
<option value="6개">6개</option>
<option value="12개">12개</option>
</select>
</div>
<div class="input-group mb-3">
<div class="input-group-prepend">
<span class="input-group-text" id="inputGroup-sizing-default">주소</span>
</div>
<input type="text" id="address-text" class="form-control" aria-label="Default"
aria-describedby="inputGroup-sizing-default">
</div>
<div class="input-group mb-3">
<div class="input-group-prepend">
<span class="input-group-text" id="inputGroup-sizing-default">전화번호</span>
</div>
<input type="text" id="phonenumber-text" class="form-control" aria-label="Default"
aria-describedby="inputGroup-sizing-default">
</div>
<button onclick = ordered() type="button" class="btn-primary">주문하기</button>
</div>
<table class="table">
<thead>
<tr>
<th scope="col">주문자 이름</th>
<th scope="col">개수</th>
<th scope="col">주소</th>
<th scope="col">전화번호</th>
</tr>
</thead>
<tbody id="order-list">
</tbody>
</table>
</div>
</body>
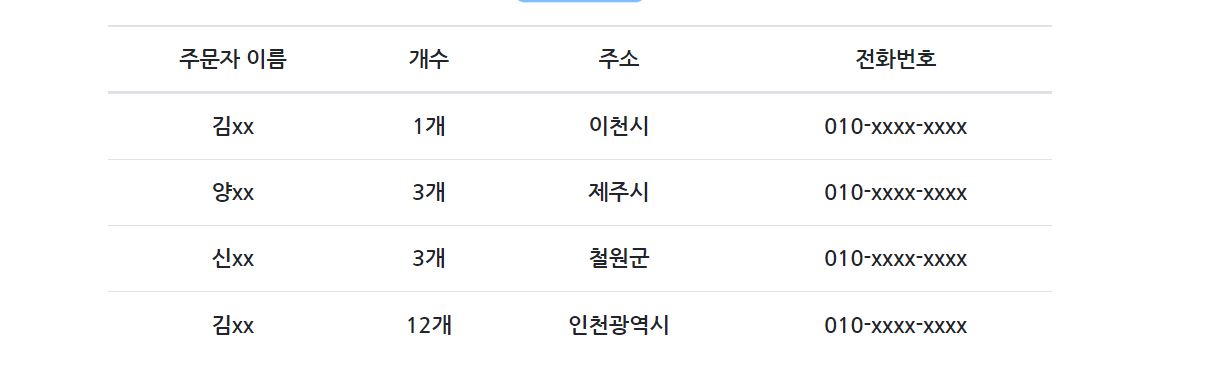
</html>2) 완성 모습
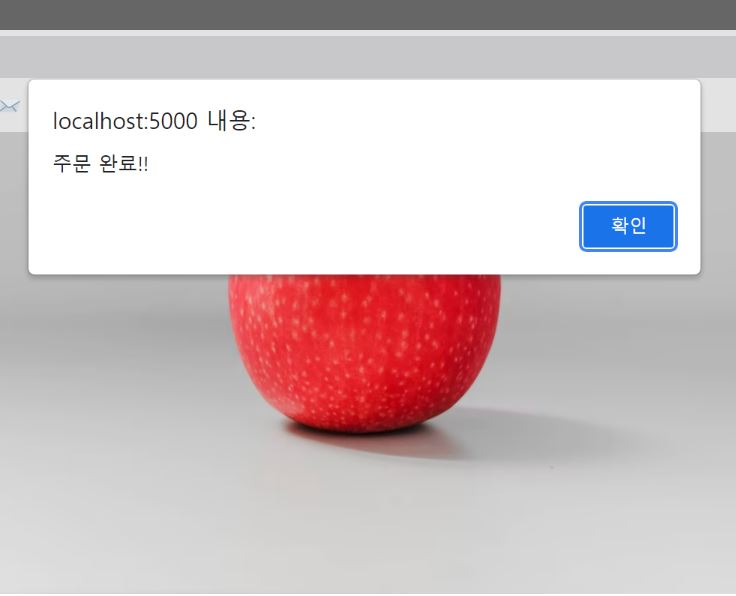
- 주문하기 버튼 클릭시 나오는 alert 메세지
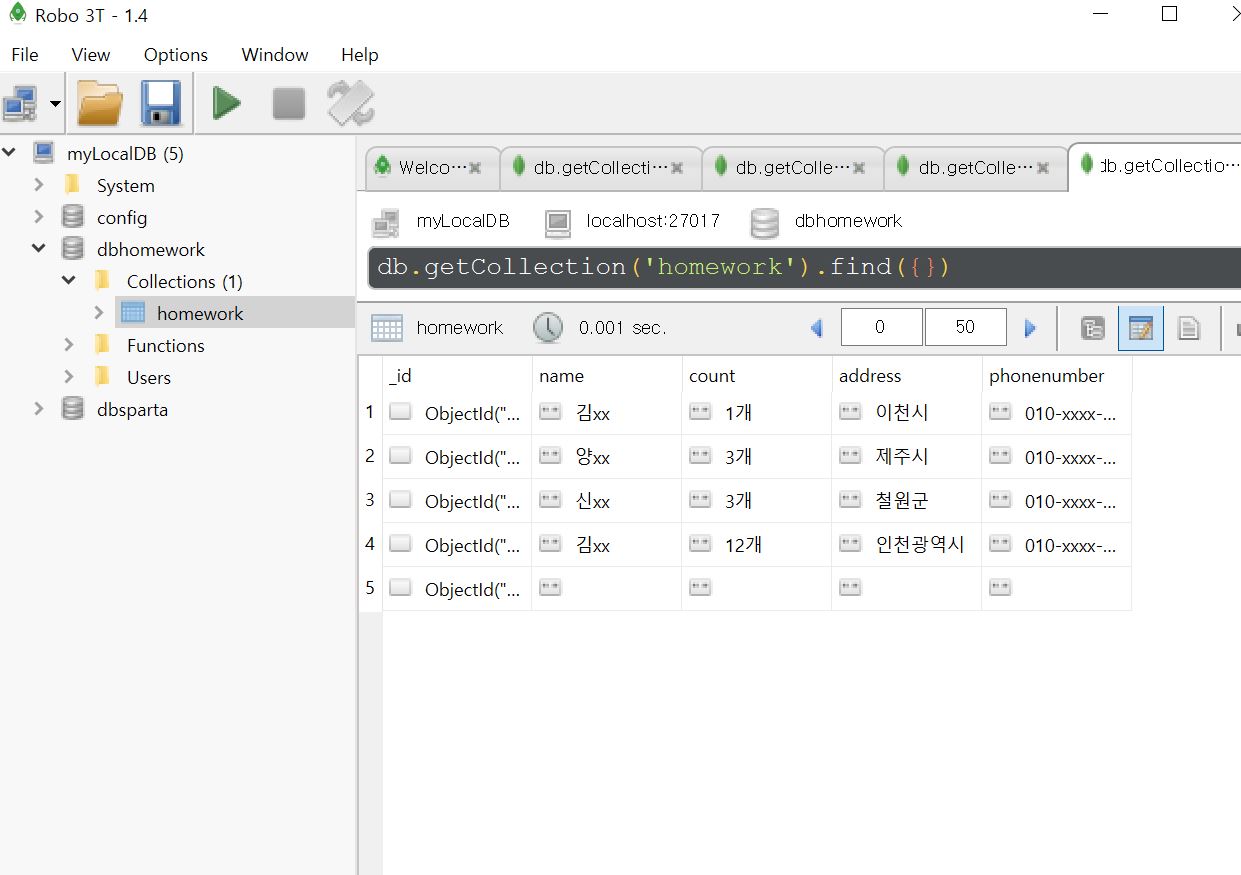
- 입력된 데이터가 저장된 DB
- 추가되는 주문자 목록