기존 배포 경험
기존에 Github Action + s3 + Code Deploy 를 통해 CI/CD 환경을 구축했었다.
그리고 여러 작은 프로젝트에서 배포는 DockerHub를 통해 직접 배포하는 형식으로 간단하게 구축했었다.
이번에는 AWS의 ECS와 GitLab을 통해 CI/CD 파이프라인을 구축해보려고 한다.
CI/CD 도구
GitHub Actions
- GitHub Actions는 GitHub 저장소에 직접 통합되어 있는 CI/CD 도구로, YAML 파일을 사용하여 워크플로우를 정의할 수 있습니다.
- 특징
- GitHub 저장소와의 강력한 통합
- 다양한 이벤트 기반 트리거
- 풍부한 커뮤니티 및 Marketplace 지원
- 무료 사용 가능 (제한된 런타임 제공)
Jenkins
- Jenkins는 오픈 소스 CI/CD 도구로, 플러그인을 통해 다양한 기능을 확장할 수 있습니다.
- 특징
- 높은 커스터마이징 가능
- 다양한 플러그인 지원
- 분산 빌드 및 다중 플랫폼 지원
- 대규모 프로젝트에 적합
GitLab CI
- GitLab CI는 GitLab과 통합된 CI/CD 도구로, GitLab 저장소를 기반으로 CI/CD 파이프라인을 설정할 수 있습니다.
- 특징
- GitLab과의 통합
- 강력한 파이프라인 편집기 제공
- 자동화된 DevOps 수명 주기 관리
- 클라우드 및 온프레미스 모두 지원
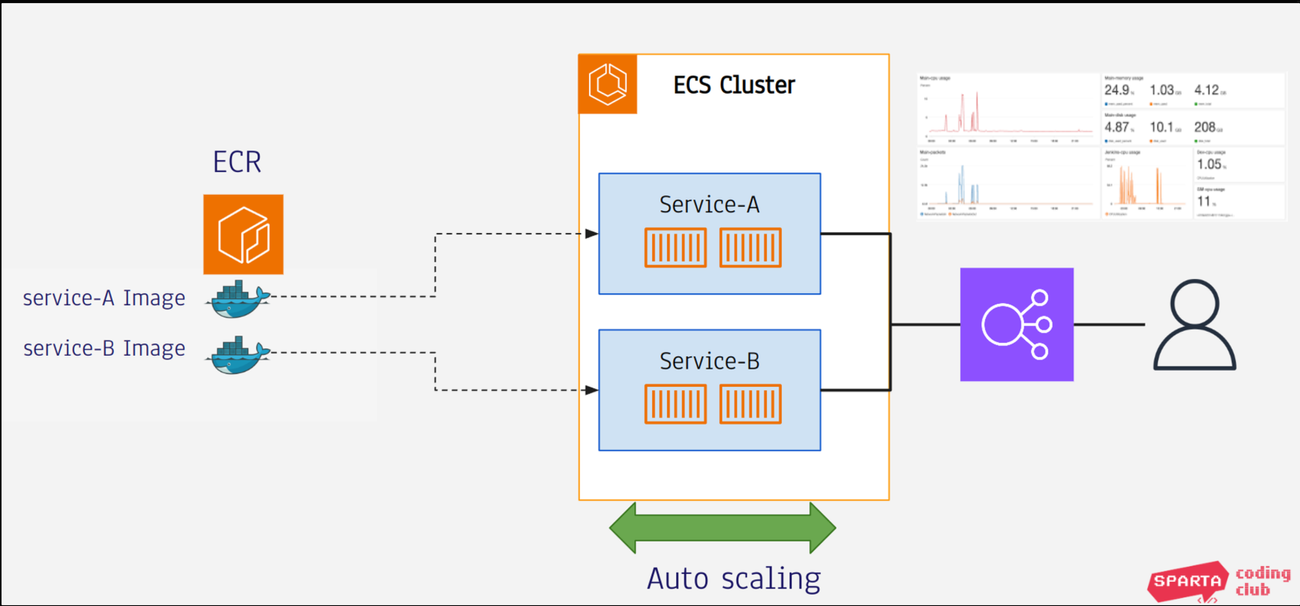
Amazon ECS
- AWS Elastic Container Service는 docker 애플리케이션을 쉽게 배포하고 운영 할 수 있도록 지원하는 완전관리형 Container Orchestration 서비스
- Kubernetes와 같은 container Orchestration 서비스
- Kubernetes 보다 사용하기 쉽고, 비용적으로도 저렴하기 때문에 소/중 규모의 프로젝트에 널리 사용
- serverless로 구성할 수 있는데, 이렇게 하면 인스턴스(가성서버)를 구성하고 관리할 필요도 없음
구조
- ECS는 크게 ECR, ECS Cluster, ECS Service, ECS Task로 이루어집니다.
- ECR: Docker image 저장소
- ECS Cluster: 컨테이너를 실행하기 위한 Cluster로 여러 인스턴스로 이루어집니다. 이 인스턴스에 Docker container가 분산 실행됩니다. Serverless로 할 경우에는 인스턴스도 필요가 없습니다.
- ECS Server: Docker 애플리케이션의 실행 그룹입니다.
- ECS Task: ECS Server에 실제로 실행되는 docker container들을 Task 라고 합니다.
- 로드밸런서와, 모니터링, Auto Scaling 등의 요소도 있음. ECS를 이용하면 이런 요소들까지 자동으로 관리
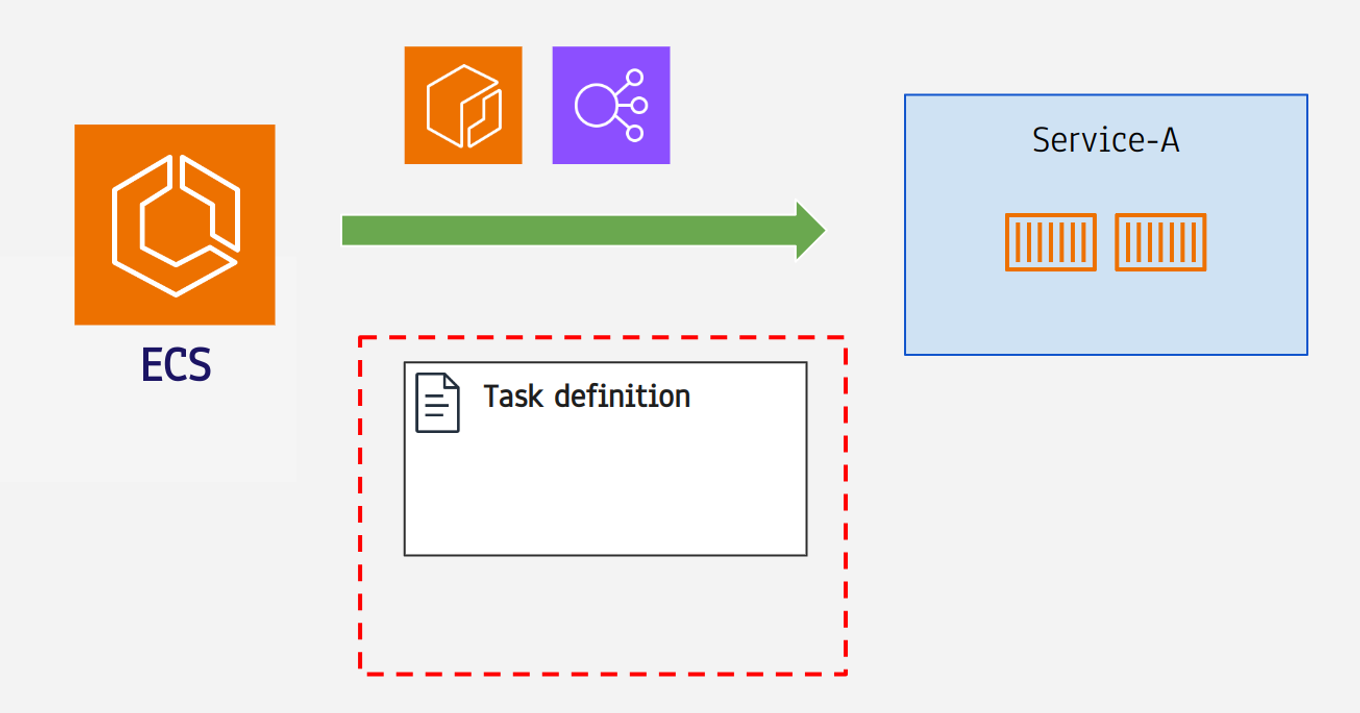
- Task definition
- ECS의 최소 실행단위는 “Task”
- “Service”는 Task가 두개 이상 모인것
- Task는 docker 애플리케이션
- 어느 포트에서 몇개의 도커 컨테이너를 어떤 이미지로 실행할지 애플리케이션 실행 정보가 필요함.
- 이 정보를 저장하고 있는것이 Task definition
실습
-
GitLab을 이용해서 CI/CD 환경을 구축하고 CI 과정을 자동화
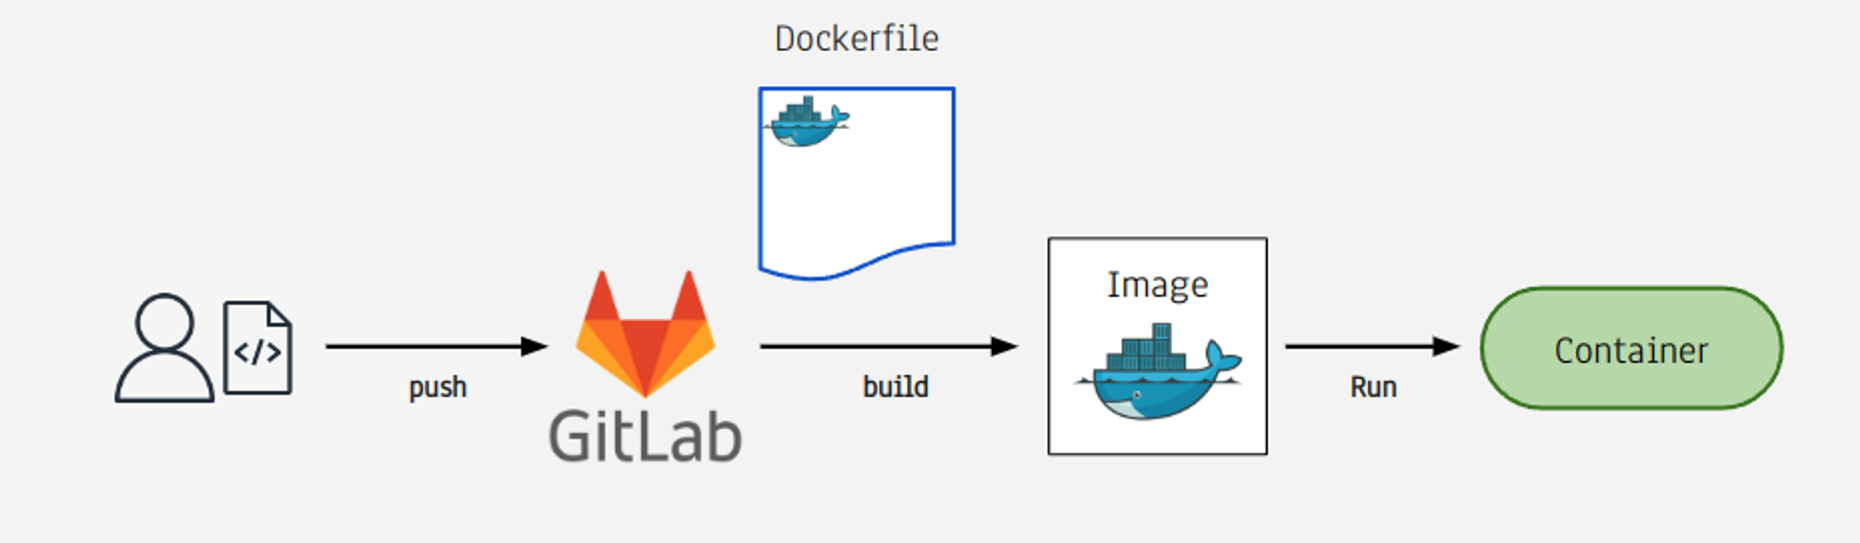
- GitLab 프로젝트를 만들고 여기에 개발한 코드를 PUSH
- 그러면 GitLab은 코드 Push 가 된 것을 확인하고 Docker Image를 생성 ECR에 등록
- 이 Docker Image로 부터 docker container를 ECS에 실행
GitLab 프로젝트 생성 / Spring 프로젝트 생성 / AWS 보안 그룹 설정 / AWS ECR / AWS ECS / AWS IAM 순으로 생성
실습은 서버리스 환경으로 세팅
.gitlab-ci.yml
services:
  - docker:stable-dind
stages:
  - build jar
  - build and push docker image
  - deploy
variables:
  APPLICATION_NAME: "01"
  TAG_NAME: "latest"
  DOCKER_IMAGE: "${Amazon ECR 리포지토리 이름}"

build:
  image: openjdk:17-jdk-slim
  stage: build jar
  script:
    - chmod +x gradlew
    - ./gradlew clean build
  artifacts:
    paths:
      - build/libs/*.jar

docker build:
  image: docker:latest
  stage: build and push docker image
  rules:
    - if: $CI_COMMIT_BRANCH == "main" || $CI_COMMIT_REF_NAME == "main"
      variables:
        TAG_NAME: "latest"
    - if: $CI_COMMIT_BRANCH == "develop" || $CI_COMMIT_REF_NAME == "develop"
      variables:
        TAG_NAME: "develop"
  script:
    - apk add --update --no-cache curl py3-pip py3-virtualenv
    - python3 -m venv /tmp/venv
    - source /tmp/venv/bin/activate
    - pip install awscli
    - aws configure set aws_access_key_id $AWS_ACCESS_KEY_ID # IAM USER ACCESS_KEY
    - aws configure set aws_secret_access_key $AWS_SECRET_ACCESS_KEY # IAM USER SECRET_ACCESS_KEY
    - aws configure set region ap-northeast-2
    - docker build -t $DOCKER_IMAGE .
    # 푸시 명령 작성
    - docker tag $DOCKER_IMAGE:latest ~~
    - aws ecr get-login-password --region ap-northeast-2 | docker login --username AWS --password-stdin 851725237950.dkr.ecr.ap-northeast-2.amazonaws.com
    - docker push ~~

deploy:
  image: python:3.9-slim
  stage: deploy
  script:
    - python3 -m venv /tmp/venv
    - source /tmp/venv/bin/activate
    - pip install awscli
    - aws configure set aws_access_key_id $AWS_ACCESS_KEY_ID
    - aws configure set aws_secret_access_key $AWS_SECRET_ACCESS_KEY
    - aws configure set region ap-northeast-2
    - aws ecs update-service --cluster ${cluster-name} --service ${service-name} --task-definition ${task-name}:1 --force-new-deployment

- ECR -> 레지스트리 -> 푸시명령 보기
이제 Spring Project를 GitLab 프로젝트로 Push 하면 된다.

그러면 다음과 같이 3개의 파이프라인이 돌아가면서 성공하게 된다.
이 파이프라인은 build -> docker build -> deploy 과정으로 yml 파일에서 정의해준 순서대로 동작하게 된다.
다음으로 해당 서비스에 연결된 로드밸런서로 접근을 해보면

다음과 같이 확인 가능하다.!!
트러블 슈팅

처음에는 작업 자체가 보이지 않는 문제가 발생했다.
이는 위 블로그에서 Shared Runner의 상태를 Off 로 설정하면 되는 문제였다.
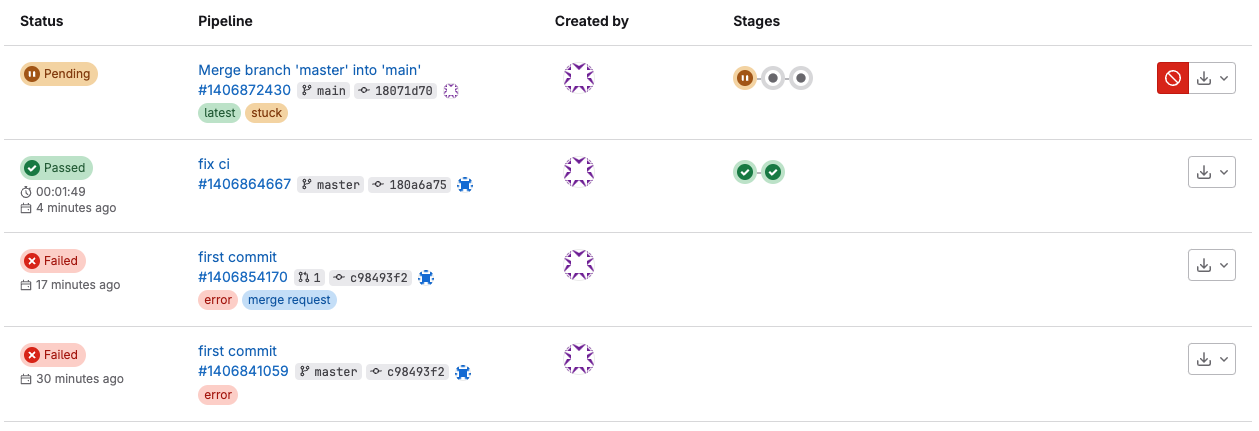
2번의 Passed 과정이 2 단계의 파이프라인을 거치는 이유는 main 브랜치에 넣어야 할 것을 master 브랜치에 넣어서 생긴 문제였고,
이번엔 main에 제대로 넣었는데도, status가 Pending 상태가 되버렸다.
이는 Shared Runner의 상태를 다시 On 으로 설정 하면 해결되었다.
(정확한 이유는 모르겠다..)

Github Action
이번엔 Github Action을 통해서도 테스트 해볼 것이다.

다음과 같이 .github/workflows 아래에 2개의 파일이 존재해야 한다.
github의 actions 탭에 들어가서
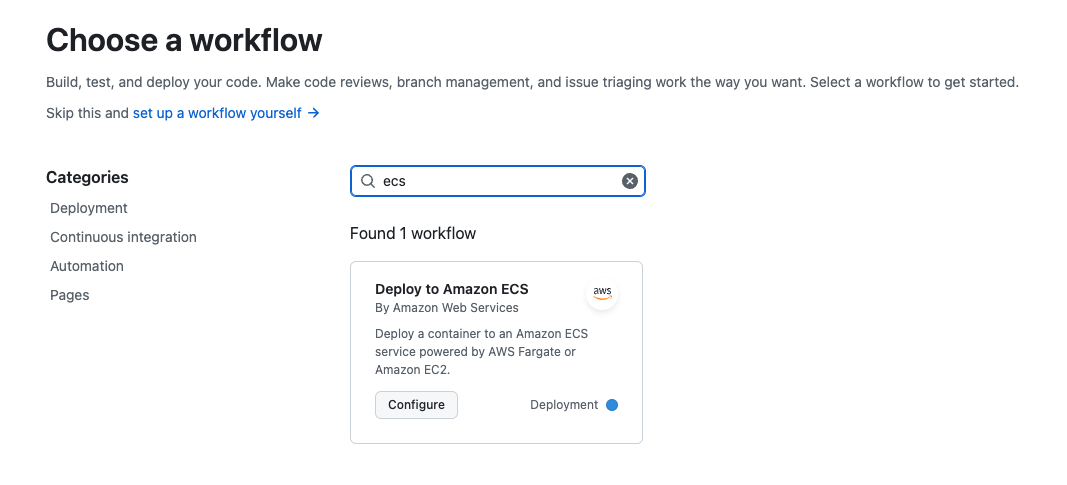
다음처럼 ecs 관련 workflow 템플릿을 찾을 수 있다.
aws.yml
name: Deploy to Amazon ECS

on:
  push:
    branches: [ "main" ]

env:
  AWS_REGION: ap-northeast-2               # set this to your preferred AWS region, e.g. us-west-1
  ECR_REPOSITORY: ${ecr-리포지토리 이름}         # set this to your Amazon ECR repository name
  ECS_SERVICE: #{ecs-service-name}                # set this to your Amazon ECS service name
  ECS_CLUSTER: #{ecs-cluster-name}                 # set this to your Amazon ECS cluster name
  ECS_TASK_DEFINITION: .github/workflows/project-01-task-revision1.json # set this to the path to your Amazon ECS task definition
                                               # file, e.g. .aws/task-definition.json
  CONTAINER_NAME: #{ecs-container-name}            # set this to the name of the container in the
                                               # containerDefinitions section of your task definition

permissions:
  contents: read

jobs:
  build:
    name: Build Jar
    runs-on: ubuntu-latest

    steps:
    - name: Checkout
      uses: actions/checkout@v4

    - name: Set up JDK 17
      uses: actions/setup-java@v3
      with:
        java-version: '17'
        distribution: 'temurin'

    - name: Grant execute permission for gradlew
      run: chmod +x gradlew

    - name: Build with Gradle
      run: ./gradlew clean build

    - name: Upload Build Artifacts
      uses: actions/upload-artifact@v3
      with:
        name: build-libs
        path: build/libs/*.jar


  deploy:
    name: Deploy
    runs-on: ubuntu-latest
    needs: build
    environment: production

    steps:
    - name: Checkout
      uses: actions/checkout@v4

    - name: Download Build Artifacts
      uses: actions/download-artifact@v3
      with:
        name: build-libs
        path: build/libs

    - name: Configure AWS credentials
      uses: aws-actions/configure-aws-credentials@v1
      with:
        aws-access-key-id: ${{ secrets.AWS_ACCESS_KEY_ID }}
        aws-secret-access-key: ${{ secrets.AWS_SECRET_ACCESS_KEY }}
        aws-region: ${{ env.AWS_REGION }}

    - name: Login to Amazon ECR
      id: login-ecr
      uses: aws-actions/amazon-ecr-login@v1

    - name: Build, tag, and push image to Amazon ECR
      id: build-image
      env:
        ECR_REGISTRY: ${{ steps.login-ecr.outputs.registry }}
        IMAGE_TAG: ${{ github.sha }}
      run: |
        # Build a docker container and
        # push it to ECR so that it can
        # be deployed to ECS.
        docker build -t $ECR_REGISTRY/$ECR_REPOSITORY:$IMAGE_TAG .
        docker push $ECR_REGISTRY/$ECR_REPOSITORY:$IMAGE_TAG
        echo "image=$ECR_REGISTRY/$ECR_REPOSITORY:$IMAGE_TAG" >> $GITHUB_OUTPUT

    - name: Fill in the new image ID in the Amazon ECS task definition
      id: task-def
      uses: aws-actions/amazon-ecs-render-task-definition@v1
      with:
        task-definition: ${{ env.ECS_TASK_DEFINITION }}
        container-name: ${{ env.CONTAINER_NAME }}
        image: ${{ steps.build-image.outputs.image }}

    - name: Deploy Amazon ECS task definition
      uses: aws-actions/amazon-ecs-deploy-task-definition@v1
      with:
        task-definition: ${{ steps.task-def.outputs.task-definition }}
        service: ${{ env.ECS_SERVICE }}
        cluster: ${{ env.ECS_CLUSTER }}
        wait-for-service-stability: true
project-01-task-revision1.json 파일은 ecs -> 테스크 정의 -> task -> json 탭에서 확인할 수 있다.
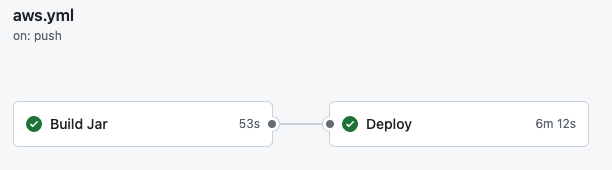
다음처럼 제대로 CI/CD가 작동된 것을 확인할 수 있다.
마무리
생각보다 배포 과정이 오래걸리는 것 같긴한데, 확실히 개발 기간이 긴 프로젝트에서는 한 번 구축해놓으면 편할 것 같다.
점점 많은 CI/CD 툴을 사용해보고 있는 것 같은데, 다음 프로젝트에 적용할때는 1순위를 가장 비용이 싼 것, 2순위를 편하게 적용할 수 있는 것 으로 염두해 두고 결정할 것 같다.
확실히 ECS 를 통한 배포는 서버리스환경에서 작동하기에 내가 경험한 것 중에선 가장 편한 것 같다.
또한 로드밸런서도 적용하기 쉬워서 자주 애용하지 않을까 싶다.
GitLab 을 통합 배포는 계속 무료가 아니라 경험상으로 사용할 것 같고, 주는 Github Action을 사용할 것 같다.
