TIL - 2026.09.30
opencv 실습
import pyrealsense2 as rs
import numpy as np
import cv2
import os
import time

WIN = "RealSense D435 (R: record, ESC: quit)"
REC_DIR = os.path.join(os.path.dirname(os.path.abspath(__file__)), "recordings")
FPS = 30
W, H = 640, 480

pipeline = rs.pipeline()
config = rs.config()
config.enable_stream(rs.stream.color, W, H, rs.format.bgr8, 30)
config.enable_stream(rs.stream.depth, W, H, rs.format.z16, 30)
pipeline.start(config)
align = rs.align(rs.stream.color)

mouse = [W // 2, H // 2]


def on_mouse(event, x, y, flags, param):
    # 합쳐진 창(가로 2W)에서 좌/우 어느 쪽에 올려도 같은 픽셀을 가리키도록 보정
    mouse[0], mouse[1] = x % W, min(y, H - 1)


def draw_distance(img, x, y, dist, label):
    text = f"{label}: {dist:.2f} m" if dist > 0 else f"{label}: --"
    cv2.drawMarker(img, (x, y), (0, 255, 0), cv2.MARKER_CROSS, 20, 2)
    cv2.putText(img, text, (x + 10, max(y - 10, 20)), cv2.FONT_HERSHEY_SIMPLEX,
                0.6, (0, 0, 0), 4, cv2.LINE_AA)
    cv2.putText(img, text, (x + 10, max(y - 10, 20)), cv2.FONT_HERSHEY_SIMPLEX,
                0.6, (255, 255, 255), 1, cv2.LINE_AA)


writer = None
cv2.namedWindow(WIN)
cv2.setMouseCallback(WIN, on_mouse)

try:
    while True:
        frames = align.process(pipeline.wait_for_frames())
        color_frame = frames.get_color_frame()
        depth_frame = frames.get_depth_frame()
        if not color_frame or not depth_frame:
            continue
        color = np.asanyarray(color_frame.get_data()).copy()
        depth = np.asanyarray(depth_frame.get_data())
        depth_cm = cv2.applyColorMap(cv2.convertScaleAbs(depth, alpha=0.03), cv2.COLORMAP_JET)

        cx, cy = W // 2, H // 2
        mx, my = mouse
        for img in (color, depth_cm):
            draw_distance(img, cx, cy, depth_frame.get_distance(cx, cy), "Center")
            draw_distance(img, mx, my, depth_frame.get_distance(mx, my), "Mouse")

        view = np.hstack((color, depth_cm))
        if writer is not None:
            writer.write(view)
            if int(time.time() * 2) % 2 == 0:  # 깜빡이는 REC 표시 (녹화 파일에는 미포함)
                shown = view.copy()
                cv2.circle(shown, (2 * W - 25, 25), 8, (0, 0, 255), -1)
                cv2.putText(shown, "REC", (2 * W - 75, 32), cv2.FONT_HERSHEY_SIMPLEX,
                            0.6, (0, 0, 255), 2, cv2.LINE_AA)
                view_shown = shown
            else:
                view_shown = view
        else:
            view_shown = view
        cv2.imshow(WIN, view_shown)

        key = cv2.waitKey(1) & 0xFF
        if key == 27:
            break
        if key in (ord("r"), ord("R")):
            if writer is None:
                os.makedirs(REC_DIR, exist_ok=True)
                path = os.path.join(REC_DIR, time.strftime("rs_%Y%m%d_%H%M%S.mp4"))
                writer = cv2.VideoWriter(path, cv2.VideoWriter_fourcc(*"mp4v"), FPS, (2 * W, H))
                print("녹화 시작:", path)
            else:
                writer.release()
                writer = None
                print("녹화 종료")
finally:
    if writer is not None:
        writer.release()
    pipeline.stop()
    cv2.destroyAllWindows()
위 코드는 python으로 작성된 realsense실습용 프로그램이다. venv가상환경에서 실행되도록 되어있으며, 실행을 할경우 프로그램이 실행되며 일반 비전과 depth 비전을 동시에 나누어 볼 수 있다.
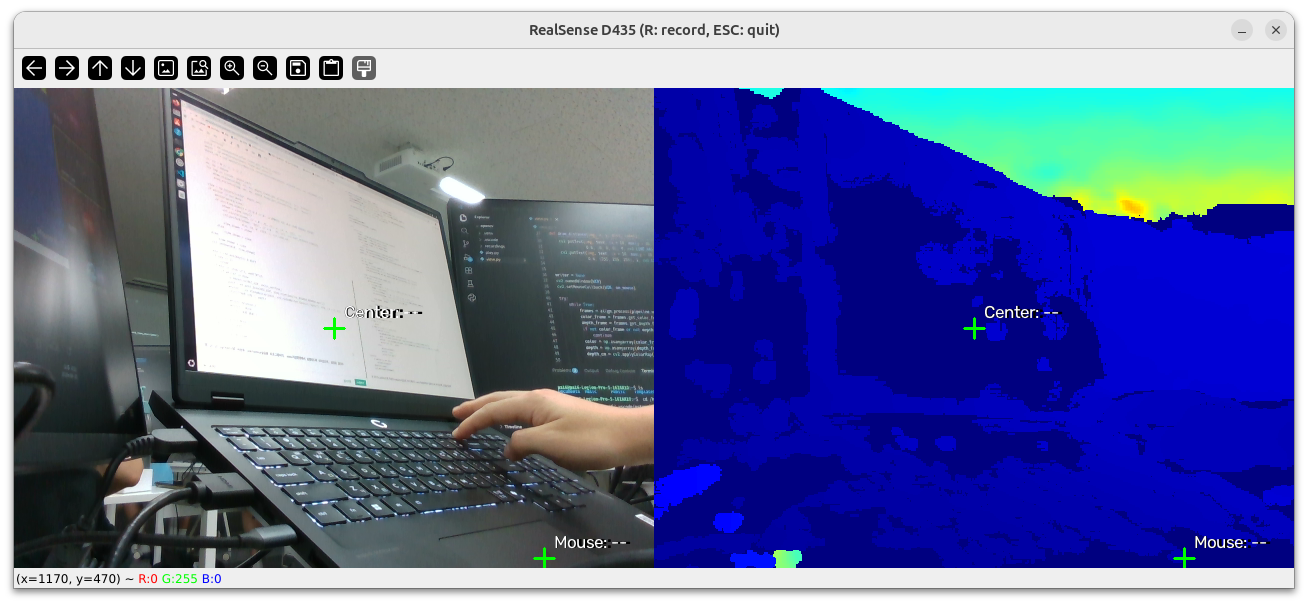
몇번의 수정을 통하여 마우스포인터를 따라다니는 마커를 지정하여 마우스가 위치해있는 지점이 카메라로부터 얼마나 떨어져 있는지를 출력하도록 코드를 추가하였다.
안녕하세요.