TIL-2026.10.02
import cv2
import numpy as np
import pyrealsense2 as rs

# 전역 변수: 마우스의 현재 실시간 좌표를 저장
mouse_u, mouse_v = -1, -1


def mouse_move_callback(event, x, y, flags, param):
    """마우스가 움직일 때마다 현재 픽셀 좌표를 실시간으로 업데이트"""
    global mouse_u, mouse_v
    if event == cv2.EVENT_MOUSEMOVE:
        mouse_u, mouse_v = x, y


def main():
    global mouse_u, mouse_v

    # 1. 리얼센스 설정 및 스트림 선언
    pipeline = rs.pipeline()
    config = rs.config()

    width, height = 640, 480
    config.enable_stream(rs.stream.color, width, height, rs.format.bgr8, 30)
    config.enable_stream(rs.stream.depth, width, height, rs.format.z16, 30)

    # 2. 파이프라인 시작
    profile = pipeline.start(config)

    # 3. [공간 정렬] Depth를 Color 좌표계에 완벽 매칭
    align_to = rs.stream.color
    align = rs.align(align_to)

    # 4. [단위/스케일] 센서 고유 depth_scale 조회
    depth_sensor = profile.get_device().first_depth_sensor()
    depth_scale = depth_sensor.get_depth_scale()

    # 5. [내부 파라미터] 역투영 관계식용 Intrinsics 조회
    color_stream = profile.get_stream(rs.stream.color)
    intrinsics = color_stream.as_video_stream_profile().get_intrinsics()

    # 2개의 개별 윈도우 창 생성
    cv2.namedWindow("1. Color Image")
    cv2.namedWindow("2. Depth Image")

    # 컬러 이미지 창에 마우스 이동 콜백 등록 (마우스를 올리기만 해도 작동)
    cv2.setMouseCallback("1. Color Image", mouse_move_callback)

    print("💡 [사용법] '1. Color Image' 창 위에 마우스를 올려두면 실시간 3D 좌표가 화면에 표시됩니다.")
    print("💡 [종료] 아무 창이나 선택한 상태에서 키보드 'q'를 누르세요.")

    try:
        while True:
            # 6. 실시간 프레임 수신 및 공간 정렬
            frames = pipeline.wait_for_frames()
            aligned_frames = align.process(frames)

            color_frame = aligned_frames.get_color_frame()
            depth_frame = aligned_frames.get_depth_frame()

            if not color_frame or not depth_frame:
                continue

            # NumPy 이미지 데이터 배열화
            color_image = np.asanyarray(color_frame.get_data())
            depth_image = np.asanyarray(depth_frame.get_data())

            # 시각화를 위해 원시 깊이(Z16) 영상에 컬러 맵(JET 효과)을 적용 (어두운 곳은 파랗고 가까운 곳은 붉게)
            depth_colormap = cv2.applyColorMap(
                cv2.convertScaleAbs(depth_image, alpha=0.03), cv2.COLORMAP_JET
            )

            # 마우스 커서가 컬러 창 내부 유효 영역에 있을 때 기하 계산 처리
            if 0 <= mouse_u < width and 0 <= mouse_v < height:
                u, v = mouse_u, mouse_v

                # [필터링 및 중앙값 채택] 강인성을 위한 주변 10x10 ROI 분석
                roi_size = 10
                u_start = max(0, u - roi_size // 2)
                v_start = max(0, v - roi_size // 2)
                u_end = min(width, u + roi_size // 2)
                v_end = min(height, v + roi_size // 2)

                roi_depths = depth_image[v_start:v_end, u_start:u_end]

                # 유효 작업 거리 마스킹 (0.2m ~ 3.0m 범위)
                min_w = int(0.2 / depth_scale)
                max_w = int(3.0 / depth_scale)
                valid_mask = (roi_depths > 0) & (roi_depths >= min_w) & (roi_depths <= max_w)

                total_samples = roi_depths.size
                valid_samples = np.sum(valid_mask)

                # 유효 샘플 비율이 30% 이상일 때만 화면에 좌표 드로잉 수행 (노이즈 거부 조건)
                if valid_samples >= (total_samples * 0.3):
                    raw_median_depth = np.median(roi_depths[valid_mask])

                    # 단위 복원: 미터(m) 단위 깊이 값
                    Z = raw_median_depth * depth_scale

                    # 역투영 관계식 연산 (2D -> 3D 물리 거리 산출)
                    X = (u - intrinsics.ppx) * Z / intrinsics.fx
                    Y = (v - intrinsics.ppy) * Z / intrinsics.fy

                    # 실제 유클리드 직선거리 계산 (슬라이드 10 내용)
                    Distance = np.sqrt(X**2 + Y**2 + Z**2)

                    # 화면에 그려줄 텍스트 가공
                    text_u_v = f"Pixel: ({u}, {v})"
                    text_x = f"X (Horiz): {X:+.3f} m"
                    text_y = f"Y (Vert) : {Y:+.3f} m"
                    text_z = f"Z (Depth): {Z:.3f} m"
                    text_d = f"Dist     : {Distance:.3f} m"

                    # 시각적 가독성을 위해 마우스 위치에 조준선(크로스헤어) 그리기
                    cv2.drawMarker(color_image, (u, v), (0, 255, 0), cv2.MARKER_CROSS, 20, 2)
                    cv2.drawMarker(depth_colormap, (u, v), (255, 255, 255), cv2.MARKER_CROSS, 20, 2)

                    # 텍스트가 화면 경계를 벗어나지 않도록 좌표 계산 후 화면 우측/하단 배정
                    text_x_pos = u + 15 if u < width - 200 else u - 180
                    text_y_pos = v + 20 if v < height - 120 else v - 100

                    # 반투명 텍스트 박스 배경 그리기 (가독성 확보)
                    cv2.rectangle(color_image, (text_x_pos - 5, text_y_pos - 20), (text_x_pos + 185, text_y_pos + 85), (0, 0, 0), -1)

                    # 컬러 화면 위에 문자열 드로잉 (OpenCV 폰트 적용)
                    font = cv2.FONT_HERSHEY_SIMPLEX
                    scale, thickness = 0.45, 1
                    cv2.putText(color_image, text_u_v, (text_x_pos, text_y_pos), font, scale, (255, 255, 0), thickness)
                    cv2.putText(color_image, text_x, (text_x_pos, text_y_pos + 20), font, scale, (0, 255, 255), thickness)
                    cv2.putText(color_image, text_y, (text_x_pos, text_y_pos + 40), font, scale, (0, 255, 255), thickness)
                    cv2.putText(color_image, text_z, (text_x_pos, text_y_pos + 60), font, scale, (100, 255, 100), thickness)
                    cv2.putText(color_image, text_d, (text_x_pos, text_y_pos + 80), font, scale, (255, 150, 150), thickness)
                else:
                    # 유효 데이터가 부족하거나 빈 배경/가림 영역일 때 표시
                    cv2.putText(color_image, "Invalid / Out of Range", (mouse_u + 15, mouse_v),
                                cv2.FONT_HERSHEY_SIMPLEX, 0.5, (0, 0, 255), 1)

            # 7. 두 개의 분리된 창에 각각 출력
            cv2.imshow("1. Color Image", color_image)
            cv2.imshow("2. Depth Image", depth_colormap)

            # 키보드 'q' 입력 시 안전 종료
            if cv2.waitKey(1) & 0xFF == ord("q"):
                break

    finally:
        pipeline.stop()
        cv2.destroyAllWindows()
        print("[시스템] 리얼센스 카메라 스트림 및 모든 창이 정상 종료되었습니다.")


if __name__ == "__main__":
    main()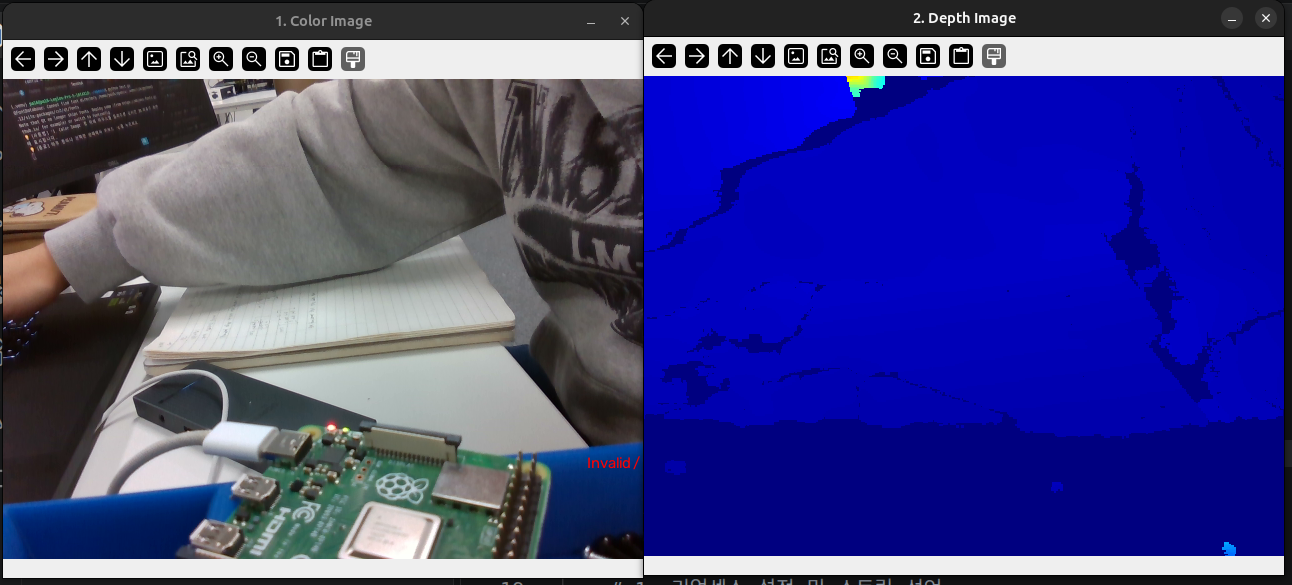
실행결과
안녕하세요.