구현한 페이지는 개발자들에게 동기부여를 할 수 있는 영화를 추천하는 페이지이다.
JavaScript가 29줄 뿐이지만, 반응형으로 계산하는 방법을 익히느라 시간이 좀 걸렸다.
2가지 기능에 중점을 두고 구현해낸 결과물이다.
![]()
Javascript 전체 코드
//arrow-button click 시 이동 기능

const arrows = document.querySelectorAll(".next-arrow");
const movieLists = document.querySelectorAll(".main-list");

arrows.forEach((arrow,i)=>{
    const itemNumber = movieLists[i].querySelectorAll("img").length;
    let clickCounter = 0;
    arrow.addEventListener("click", ()=> {
        const ratio = Math.floor(window.innerWidth / 270);
        clickCounter++;
        if(itemNumber - (3 + clickCounter) + (4 - ratio) >= 0) {
            movieLists[i].style.transform = `translateX(${movieLists[i].computedStyleMap().get("transform")[0].x.value - 300}px)`;
        } else {
            movieLists[i].style.transform = "translateX(0)";
            clickCounter = 0;
        }
    });

  // toggle click 시 Dark/Day mode로 변경 기능
const ball = document.querySelector(".toggle-ball");
const items = document.querySelectorAll(".container, .movie-list-title, .navbar-container,.profile-text-container,.menu-list-item,.sidebar,.left-menu-icon,.movie-list-title,.toggle");

ball.addEventListener("click", () => {
    items.forEach(item=> {
        item.classList.toggle("active")
    })
    ball.classList.toggle("active")
})
주요 기능
1. 화살표 click해서 movie-list를 왼쪽으로 넘기기 (slide)
- 반응형으로 구현한 방법
1) img의 width 값인 270px 이므로 전체 너비를 나눈 값 중 가장 큰 값 반환하도록 선언
 const ratio = Math.floor(window.innerWidth / 270);
// 이미지가 1개만 나오는 size의 경우에는 ratio가 0이 되고 , 2개가 보여지는 size이면 값이 2가 되겠져.
2) click counter가 증가할 때마다 남은 img 갯수가 줄어들도록 if 문 사용
2-1. click을 할 때마다 남은 클릭 횟수가 줄어들고 X축으로 -300px만큼 (이미지 값인 270 + margin 30값) 이동한다. (ratio에 따라 클릭해야 하는 수가 변화됨)
2-2. main-list 의 css transform 값이 0 으로 지정되어 있기 때문에, 0값에서 X축으로 -300px만큼 이동해준다.
// 총 7개의 intemNumber - (3 + 1click) + ( 4 - 0(width:270)) = 7
// 총 7개의 intemNumber - (3 + 2click) + ( 4 - 0(width:270)) = 6
// 총 7개의 intemNumber - (3 + 3click) + ( 4 - 0(width:270)) = 5
.
.
// 총 7개의 intemNumber - (3 + 1click) + ( 4 - 3(width:810)) = 4
// 총 7개의 intemNumber - (3 + 2click) + ( 4 - 3(width:810)) = 3
// 총 7개의 intemNumber - (3 + 3click) + ( 4 - 3(width:270)) = 2
// 총 7개의 intemNumber - (3 + 4click) + ( 4 - 3(width:270)) = 1
// 총 7개의 intemNumber - (3 + 5click) + ( 4 - 3(width:270)) = 0
// 총 7개의 intemNumber - (3 + 6click) + ( 4 - 3(width:270)) = -1
//  => else 로 이동

 if(itemNumber - (3 + clickCounter) + (4 - ratio) >= 0) {
            movieLists[i].style.transform = `translateX(${movieLists[i].computedStyleMap().get("transform")[0].x.value - 300}px)`;
} //main-list 의 css transform 값이 0 으로 지정되어 있기 때문에, 0값에서 X축으로 -300px만큼 이동해준다.
잠깐. - *computedStyleMap() 은 ?*
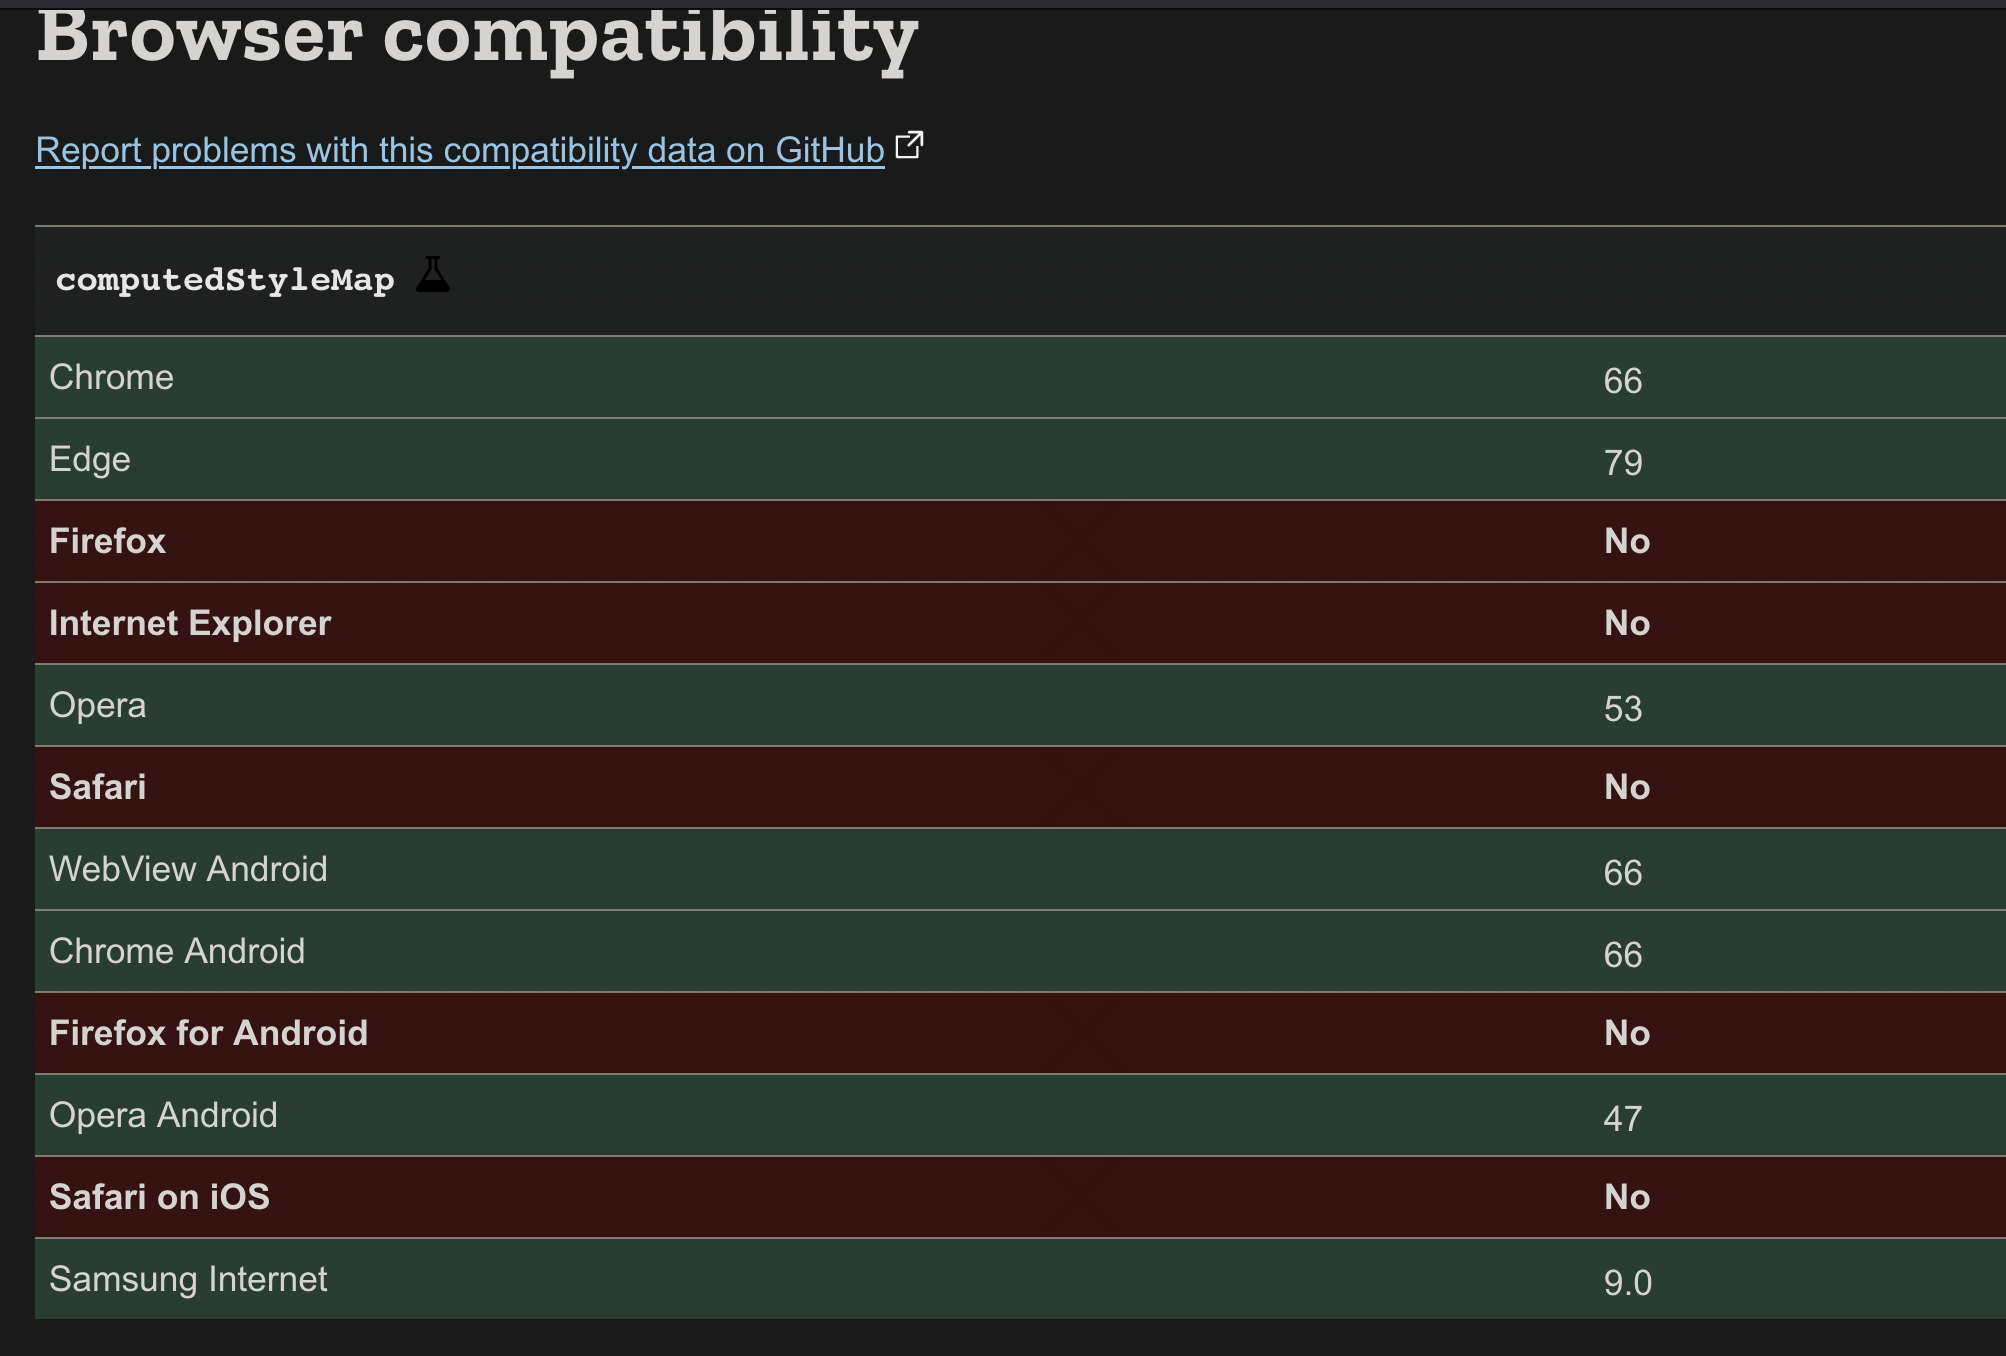
The
computedStyleMap()method of the[Element](https://developer.mozilla.org/en-US/docs/Web/API/Element)interface returns a[StylePropertyMapReadOnly](https://developer.mozilla.org/en-US/docs/Web/API/StylePropertyMapReadOnly)interface which provides a read-only representation of a CSS declaration block that is an alternative to[CSSStyleDeclaration](https://developer.mozilla.org/en-US/docs/Web/API/CSSStyleDeclaration)
~~BUT. browser compatibility가 좋지는 않다 ~~

3) 이동할 값이 0보다 작은 값이 되면 init 위치로 돌아오고 clickCounter 값도 초기화를 해준다.
else {
            movieLists[i].style.transform = "translateX(0)";
            clickCounter = 0;
        }
2. toggle로 Day/Night mode 변경 하는 방법 (기본 Dark mode)
1) Day version으로 toggle 되었을 때, 변경하려는 속성을 CSS에 작성하고 .active를 준다
.container.active {
    background-color: white;
}

.navbar-container.active {
    background-color: white;
}

.menu-list-item.active {
    color: black;
}

.profile-text-container.active {
    color: black;
}
.sidebar.active {
    background-color: white;
}
.left-menu-icon.active {
    color: black;
}
.movie-list-title.active {
    color: black;
}

.toggle.active {
    background-color: black;
}
.toggle-ball.active {
    background-color: white;
    transform: translateX(-22px);
}
2) toggle안의 ball을 click하면 active 속성을 불러온다.
const ball = document.querySelector(".toggle-ball");
const items = document.querySelectorAll(".container, .movie-list-title, .navbar-container,.profile-text-container,.menu-list-item,.sidebar,.left-menu-icon,.movie-list-title,.toggle");

ball.addEventListener("click", () => {
    items.forEach(item=> {
        item.classList.toggle("active")
    })
    ball.classList.toggle("active")
})
끝으로.
혼자서 영상을 보며 여차저차 따라 만든 첫번째 구현 페이지다.
자바스크립트를 문법으로만 보다가 실제 사용해보니 훨씬 이해가 잘 된다.
중간 중간 console.log로 반환값이 무엇인지를 다 체크해봐야 에러가 났을 때 빠르게 수정할 수 있다.
갈길이 멀지만,
또 새로운 페이지를 구현해보러 드디어 넘어간다!