[Paper Review] OpenPose : Realtime Multi-Person 2D Pose Estimation using Part Affinity Fields
Pose Estimation

OPENPOSE란?
실시간으로 여러사람의 자세를 추정할 수 있는 API로 이미지, 비디오, 웹캠을 Input으로 넣어줄 수 있다. 넣어준 Input위에 Keypoint가 display된 형태로 결과가 나타난다. OpenPose에서는 크게 Pose Estimation, Hand Detection, Face Detection을 할 수 있다.
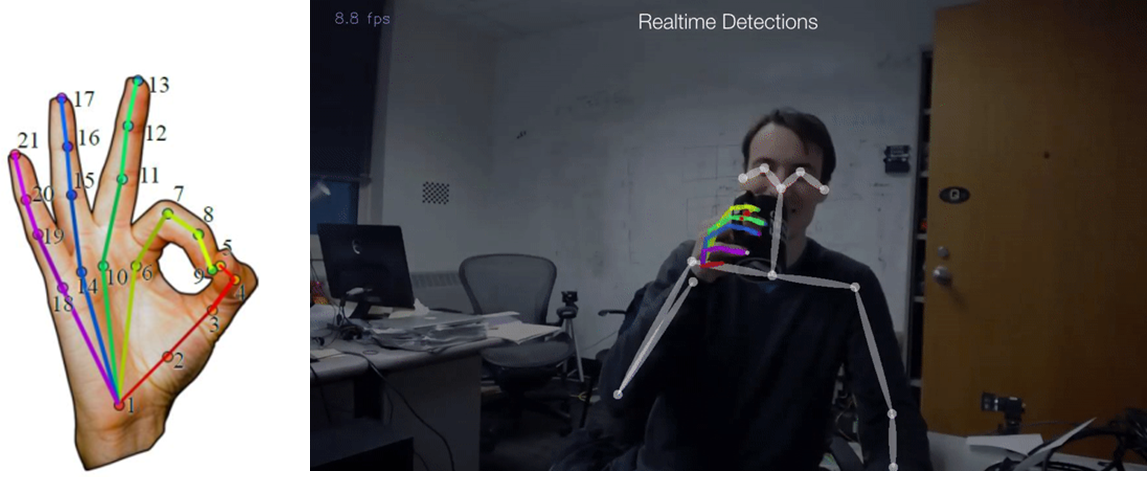
Hand Detection 같은 경우에는 한 손당 21개의 keypoint를 추정하여 총 42개의 keypoint를 추정한다.
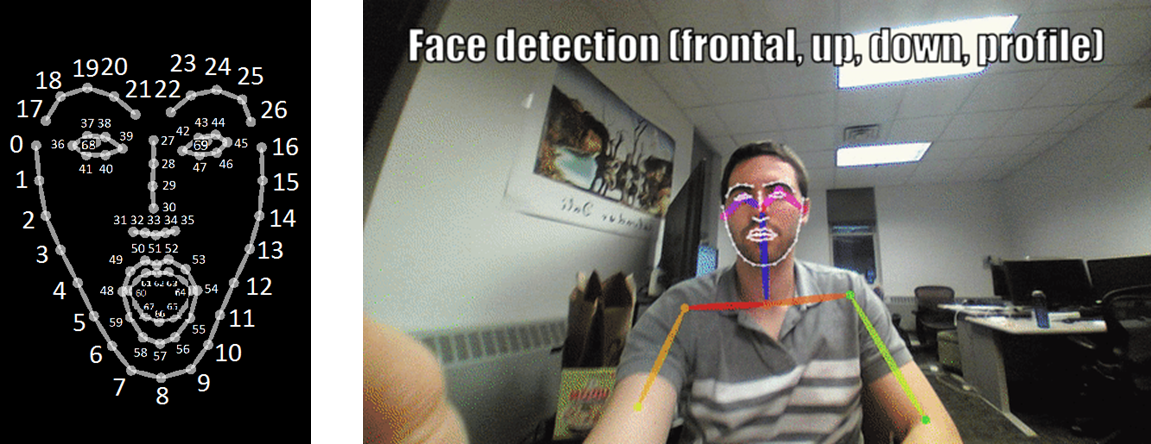
Face Detection 같은 경우에는 70개의 keypoint를 추정한다.
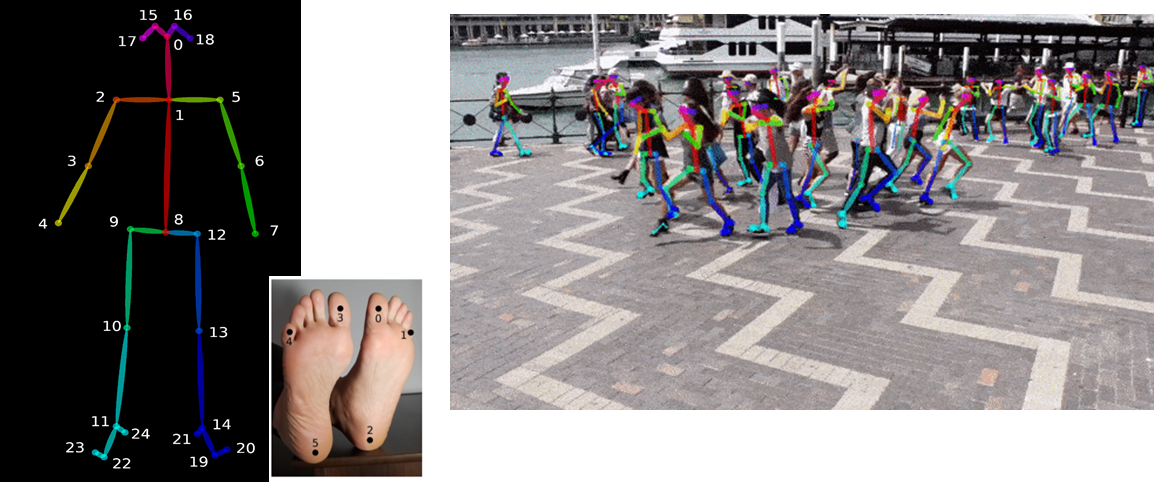
Pose Detection 같은 경우에는 Body25라는 데이터셋을 활용하여 keypoint를 추정했는데 이는 기존 COCO dataset에 Foot 데이터셋이 추가된 데이터 셋으로 25개의 keypoinf를 추정한다.
Openpose 원리
여러 명의 사람을 추적하는 방법에는 크게 2가지가 있다.
Top-down 방식 : 사람을 먼저 찾고 그 후에 키포인트를 이어줌

Bottom-up 방식 : 키포인트를 먼저 찾고 올바르게 이어줌

Top-down 방식은 사람을 먼저 Detection하고, Bounding Box내부에서 포즈를 추정하는 방식인데 Bottom-up방식에 비해서 정확도가 높지만, 이미지 내에 사람이 여러명이 있을 경우 추정이 느려진다는 단점이 있다.
Bottom-up 방식의 경우 영상에 Top-down 방식처럼 Bounding Box를 찾는 과정을 거치지 않기 때문에 빠르고, 실시간 자세 추정에 쓰일 수 있다.
따라서 OpenPose 역시 Bottom-up 방식을 따르고 있다.
OpenPose 논문에서는 Bottom-up 방식으로 keypoints를 찾고 올바르게 이어주기 위해서 세가지 방법을 제시했다.
1. PCM(Part Confidence Maps)

Input 이미지에서 keypoints가 있을 확률이 높은 위치를 나타내는 Confidence Map(2D heat map)을 학습시키고, 이 Confidence Map을 NMS을 이용하여 keypoints의 위치를 추정했다.
사용된 식을 살펴보자면

Confidence map(S)는 keypoint를 정점으로 하는 Gaussian model로 j는 part index, k는 person index, p는 이미지 내의 각 픽셀의 위치를 나타내며

동일 픽셀 위치에 여러 사람의 part confidence가 중첨되어 있을 경우, 가장 큰 score의 person/part를 ground truth로 선정한다.
2. PAF(Part Affinity Fields)

Input 이미지에서 keypoint와 keypoint가 이어질 limb의 위치와 방향을 나타내는 Affininty Fields(2D heat map)를 학습시키고, 이 Affinity Fields를 이용하여 원하는 관절과 관절을 올바르게 이어준다.
사용된 식을 살펴보자면
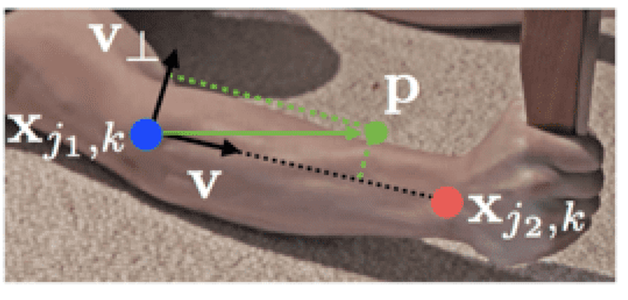

파란색 keypoint에서 빨간색 keypoint로 향하는 단위 백터 v를 구한다.

단위벡터v를 이용하여 파란색 점에서 P점까지의 벡터를 구하고 내적하여 limb의 길이보다 짧은 위치의 P와, 단위 벡터 v와 수직한 벡터를 이용하여 파란색 점에서 P점까지의 벡터를 구하고 내적하여 limb의 두께보다 좁은 위치의 P를 구한다.
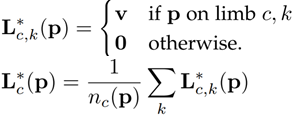
L(P)는 위에서 구한 유효한 P의 위치에서 단위 벡터 v를 가진다.

파란색 keypoint와 빨간색 keypoint 사이를 잘게 쪼개 관절을 연결하는 limb 위에 있을 것으로 예상되는 P(u)의 모든 PAF 값을 적분하여 E값을 구한다. 이때 limb 위에 있을 것이라고 예상되는 pixel들의 모든 벡터 방향과 두 후보 keypoint간의 단위 벡터의 방향이 일치할 수록 E의 값은 커진다.
3. bipartite Matching

앞에서 학습한 PCM과 PAF를 활용하여 이제 keypoints를 서로 연결시켜줘야 하는데 keypoints들의 연결 방법은 너무 경우의 수가 많은 NP-Hard 문제이다. 따라서 논문에서는 문제를 해결하기 위해서 2가지 완화법을 제시했다.
1. 하나의 keypoint와 이어질 수 있는 keypoint는 정해져있다.
예를 들어서 말하면 사람의 keypoint 중에서 팔꿈치라는 keypoint의 경우 어깨와 손목 이 두가지와는 이어질 수 있지만, 같은 팔꿈치와 이어지거나 멀리 떨어져있는 발목과 이어질 수 없다는 말이다.
2. 한번에 두개의 part만 매칭한다.
그림 C와 같이 어깨, 팔꿈치, 손목을 연결시켜줘야할때 이를 한번에 매칭을 하지 않고, (어깨,팔꿈치),(팔꿈치,손목) 이렇게 두개씩 따로 따로 매칭을 하여 그 경우의 수를 크게 줄일 수 있다.
이 2가지 완화법을 사용한 후에 헝가리안 알고리즘을 통해서 최적의 해를 찾아 매칭을 하게 된다.
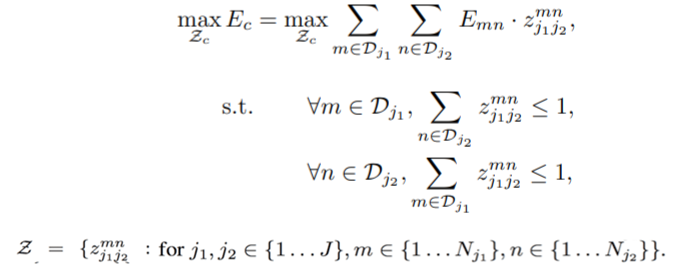
이때 keypoint와 keypoint 연결할때 사이의 가중치는 PAF에서 구했던 E를 사용하고 가장 큰 E를 가지는 keypoint 쌍을 매칭한다.
OpenPose 아키텍쳐
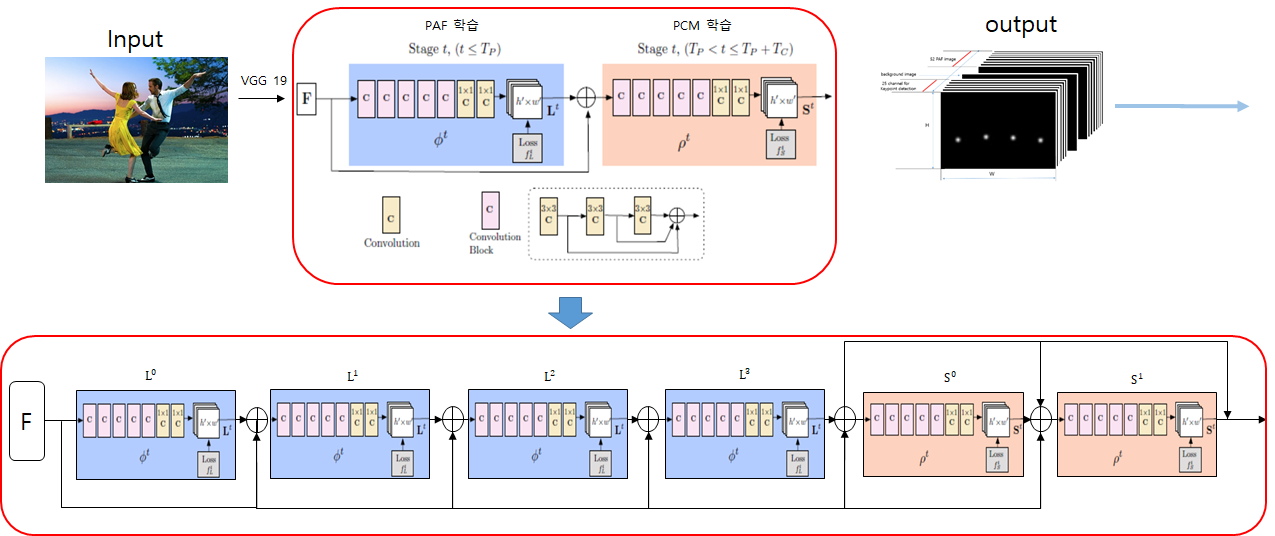
OpenPose에 Input으로 이미지를 넣어주게 되면 VGG-19 모델의 10개의 layer를 이용해서 Feature를 Extract한다. 이후 PAF와 PCM을 여러 stage를 거쳐 학습을 한다. 각 stage에서는 3X3 convolution이 3번 concate된 convolution block들과 1x1 convolution으로 이루어져 있다.
내가 실행해본 body25 dataset의 학습 아키텍쳐를 보면 4개의 stage를 통해서 PAF map을 학습 시킬 수 있었고, 2개의 stage를 통해서 PCM을 학습 시키는 것을 알 수 있었다.
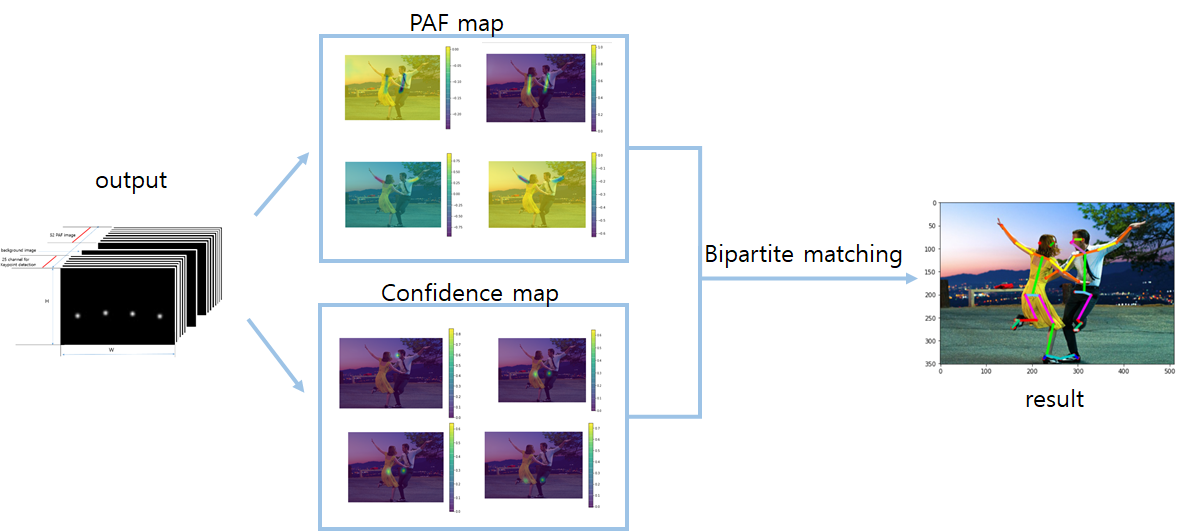
학습을 통해서 나온 output은 PAF 와 PCM으로 구성되어있었고, 이를 잘 매칭해주어서 결과가 나오는 구조였다.
Python CV2.dnn Module
python cv2.dnn 모듈은 미리 학습된 모델을 실행할 수 있게 해주는 모듈로 학습을 할 수 없지만, 순전파(forward)와 추론(inference)만 가능하다. dnn 모듈을 통해 나온 결과를 가지고
Python 코드를 통해서 직접 시각화를 시키는 과정을 통해서 OpenPose 과정을 더 자세히 살펴 볼 수 있었다.
dnn 모듈을 통해서 OpenPose를 구현을 할 때 다음 순서를 따랐다.
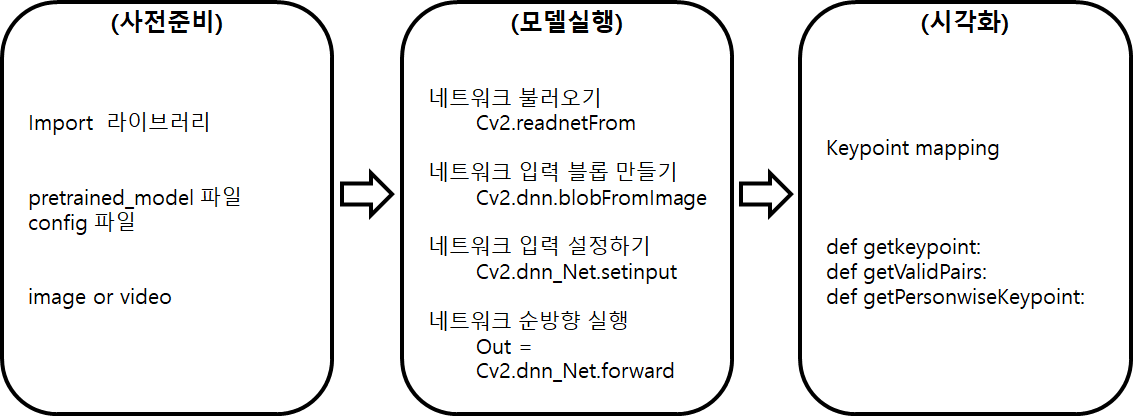
사전준비
먼저 라이브러리(OpenCV,numpy,matplotlib), pretrained_model파일, config파일, input image 를 사전에 준비하였다.
모델실행
이후 dnn 모듈의 실행 순서에 맞게
1. pretrained모델과 config파일을 이용해 네트워크를 불러오고,
2. 미리 준비한 이미지를 blob객체로 바꿔줬다.
3. blob객체를 네트워크에 입력으로 넣어줬고
4. 네트워크를 실행했다.
이를 통해 output을 얻을 수 있었다.
OUTPUT
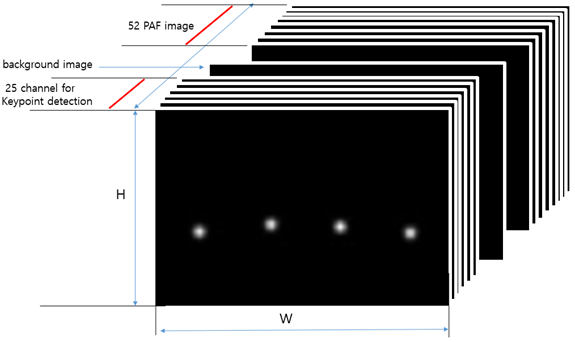
output.shape = (1, 78, 46, 35) 와 같이 나왔고
1번째 차원은 : imageId
2번째 차원은 : PAF와 PCM의 인덱스를 나타낸다.
3번째 차원은 : PAF 또는 PCM의 height
4번째 차원은 : PAF 또는 PCM의 width 를 나타낸다.
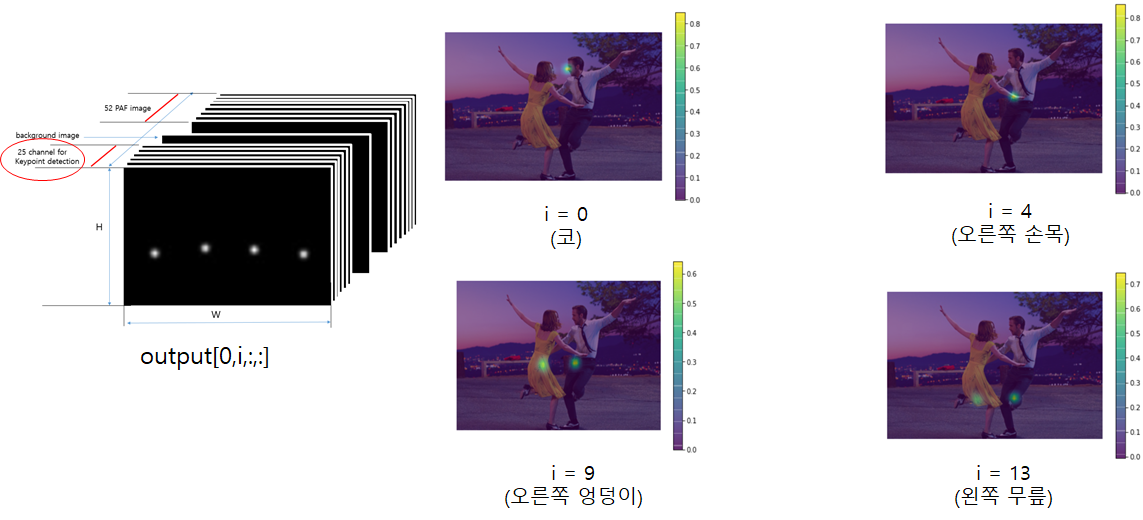
2번째 차원의 0~24번 인덱스는 추적한 keypoint를 나타내는데 BODY25 데이터셋을 사용했기에 25개의 관절을 학습하여 25개의 PCM을 얻을 수 있었다.
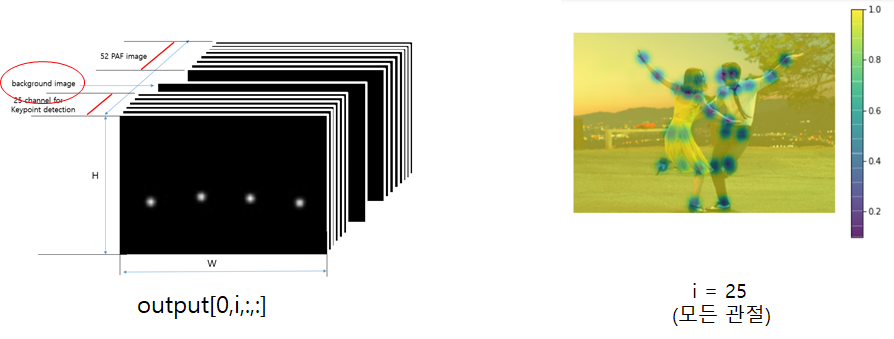
2번째 차원의 25번 인덱스는 모든 관절의 PCM을 나타내는 것으로 볼 수 있었는데 쓰임은 잘 모르겠다.
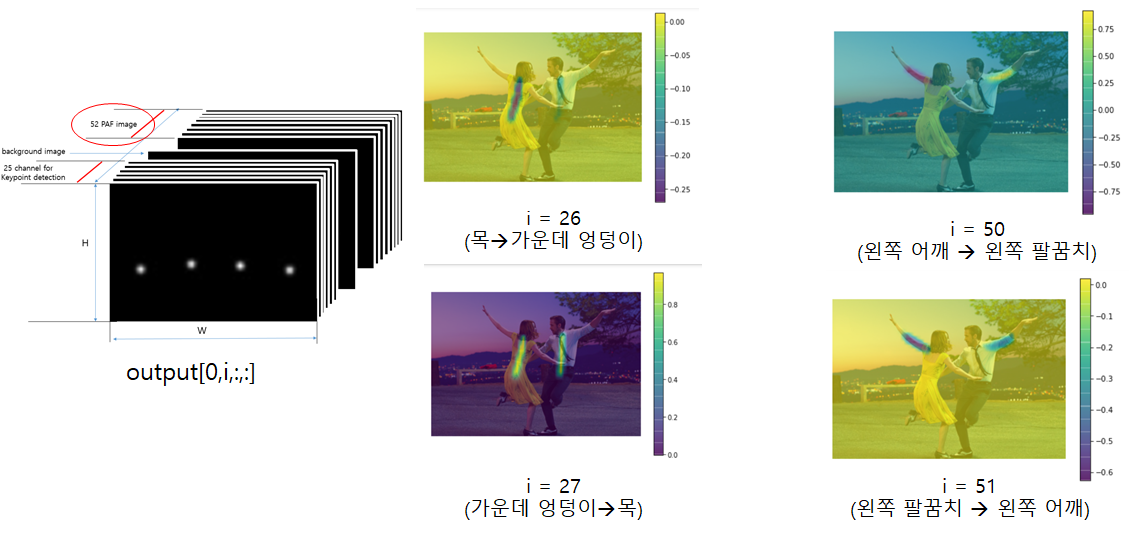
2번째 차원의 36~77번 인덱스는 총 52개의 PAF이다. 총 26개의 limb의 위치와 방향을 학습을 하는데 한 방향으로만 학습을 하는 것이 아니라 양 방향으로 학습을 해서 26X2=52의 PAF를 얻을 수 있었다. 예를 들어서 i=26,27의 경우 목에서 가운데 엉덩이 방향으로 학습된 PAF와 가운데 엉덩이에서 목 방향으로 학습된 PAF 두가지가 있었다.
KEYPOINT Mapping
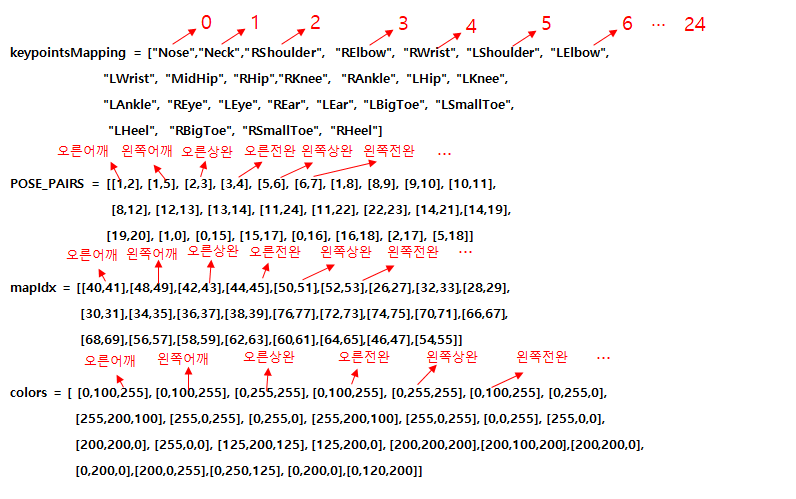
output을 통해 PCM과 PAF의 인덱스를 알게 되었고, 이를 통해 우리가 원하는 관절과 관절을 이을 수 있도록 keypoint를 매핑해주었다.
keypointsMapping의 경우 output 결과의 2번째 차원 PCM 인덱스와 같은 순서로 인덱싱이 되어있다.
Pose_Pairs의 경우 keypointsMapping의 인덱스와 인덱스의 쌍으로 되어 있어 매칭 될 수 있는 keypoint의 쌍을 나타내 주었다.
mapIdX의 경우 output 결과의 2번째 차원 PAF인덱스와 같은 순서로 인덱싱 되었고, Pose_Pairs와 같은 limb의 PAF를 매핑해주었다.
시각화
이제 앞에서 학습한 PCM과 PAF를 이용해서 keypoint를 찾아주고 keypoint를 이어주어 시각화를 해주었고, 다음 3개의 함수를 이용하였다.
1.
def getKeypoints(probMap, threshold=0.1):

    mapSmooth = cv2.GaussianBlur(probMap,(3,3),0,0)

    mapMask = np.uint8(mapSmooth>threshold)
    keypoints = []
    #find the blobs
    contours, _ = cv2.findContours(mapMask, cv2.RETR_TREE, cv2.CHAIN_APPROX_SIMPLE)

    #for each blob find the maxima
    for cnt in contours:
       blobMask = np.zeros(mapMask.shape)
       blobMask = cv2.fillConvexPoly(blobMask, cnt, 1)
       maskedProbMap = mapSmooth * blobMask
       #maxVal = 있을 확률
       #maxLoc = x,y좌표
       _, maxVal, _, maxLoc = cv2.minMaxLoc(maskedProbMap)
       keypoints.append(maxLoc + (probMap[maxLoc[1], maxLoc[0]],))
   return keypoints
getKeypoint 함수에서 probMap은 output의 PCM 결과를 나타내며 다음과 같다.
for i in range(78):
    n = i+1
    probMap = output[0,i, :, :]
    probMap = cv2.resize(probMap, (frameWidth, frameHeight))
GaussianBlur를 이용해 노이즈를 제거하고 findContours를 이용해 외곽선을 찾았다. 이후 NMS를 사용하였고 Keypoint를 찾아주었다. 결과는 다음과 같이 나왔고, 이또한 input 이미지에 시각화 해보았다.

2.
detected_keypoints = []
keypoints_list = np.zeros((0,3))
keypoint_id = 0
threshold = 0.1

for part in range(nPoints):
    probMap = output[0,part,:,:]
    probMap = cv2.resize(probMap, (image1.shape[1], image1.shape[0]))

    keypoints = getKeypoints(probMap, threshold)
    print("Keypoints - {} : {}".format(keypointsMapping[part], keypoints))
    keypoints_with_id = []
    for i in range(len(keypoints)):
        keypoints_with_id.append(keypoints[i] + (keypoint_id,))
        keypoints_list = np.vstack([keypoints_list, keypoints[i]])
        keypoint_id += 1

    detected_keypoints.append(keypoints_with_id)
def getValidPairs(output):
valid_pairs = []
invalid_pairs = []
n_interp_samples = 10 # 벡터를 나눌 수
paf_score_th = 0.1
conf_th = 0.7
# loop for every POSE_PAIR
for k in range(len(mapIdx)):
# A->B constitute a limb
pafA = output[0, mapIdx[k][0], :, :]
pafB = output[0, mapIdx[k][1], :, :]
pafA = cv2.resize(pafA, (frameWidth, frameHeight))
pafB = cv2.resize(pafB, (frameWidth, frameHeight))
# Find the keypoints for the first and second limb
candA = detected_keypoints[POSE_PAIRS[k][0]]
candB = detected_keypoints[POSE_PAIRS[k][1]]
nA = len(candA)
nB = len(candB)
# If keypoints for the joint-pair is detected
# check every joint in candA with every joint in candB
# Calculate the distance vector between the two joints
# Find the PAF values at a set of interpolated points between the joints
# Use the above formula to compute a score to mark the connection valid
if( nA != 0 and nB != 0):
valid_pair = np.zeros((0,3))
for i in range(nA):
max_j=-1
maxScore = -1
found = 0
for j in range(nB):
# Find d_ij
d_ij = np.subtract(candB[j][:2], candA[i][:2])
norm = np.linalg.norm(d_ij)
if norm:
d_ij = d_ij / norm
else:
continue
# Find p(u)
interp_coord = list(zip(np.linspace(candA[i][0], candB[j][0], num=n_interp_samples),
np.linspace(candA[i][1], candB[j][1], num=n_interp_samples)))
# Find L(p(u))
paf_interp = []
for k in range(len(interp_coord)):
paf_interp.append([pafA[int(round(interp_coord[k][1])), int(round(interp_coord[k][0]))],
pafB[int(round(interp_coord[k][1])), int(round(interp_coord[k][0]))] ])
# Find E
paf_scores = np.dot(paf_interp, d_ij)
avg_paf_score = sum(paf_scores)/len(paf_scores)
# Check if the connection is valid
# If the fraction of interpolated vectors aligned with PAF is higher then threshold -> Valid Pair
if ( len(np.where(paf_scores > paf_score_th)[0]) / n_interp_samples ) > conf_th :
if avg_paf_score > maxScore:
max_j = j
maxScore = avg_paf_score
found = 1
# Append the connection to the list
if found:
valid_pair = np.append(valid_pair, [[candA[i][3], candB[max_j][3], maxScore]], axis=0)
# Append the detected connections to the global list
valid_pairs.append(valid_pair)
else: # If no keypoints are detected
print("No Connection : k = {}".format(k))
invalid_pairs.append(k)
valid_pairs.append([])
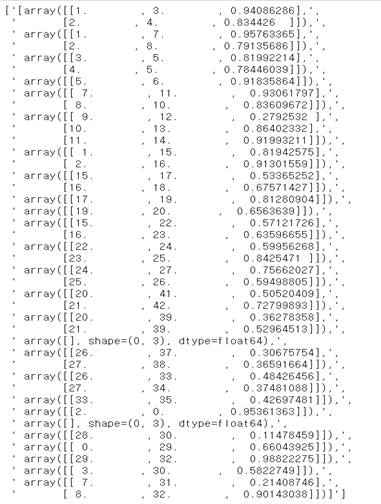
return valid_pairs, invalid_pairsdetected_keypoints : getkeypoints 함수를 통해서 구한 keypoint들의 총 개수에 대한 index를 추가해주었다.
(총 43개의 keypoints를 찾았다고 했을때 각 keypoints는 0~42까지의 인덱싱이 추가로 붙는다)
GetValidPairs 함수를 통해서 앞에서 찾은 keypoint들이 서로 맺어질 수 있는 쌍을 찾아주었다.
k번째 limb는 A라는 keypoint와 B라는 keypoint의 연결이라고 할때(k는 0~26으로 limb의 수)
pafA : k번째 limb의 A->B 방향 paf
pafB : k번째 limb의 B->A 방향 paf
candA : k번째 limb의 A keypoint들 (ex) 세 사람의 keypoint를 찾았을 경우 nA = 3)
candB : k번째 limb의 B keypoint들
for i in range(nA): 부분을 통해서 k번째 limb의 A keypoint에서 B keypoint로 매칭을 할 때 여러개의 B 중에서 올바른 B keypoint를 찾는다. 이때 앞의 이론에서 설명한 단위벡터 d_ij를 찾고, 유효한 P(u)를 찾은 뒤 L(p)를 구하여 최종 E를 찾고 이를 통해서 가장 큰 E를 가지는 i번째 A keypoint와 j번째 B keypoint를 한 쌍으로 묶는다.(헝가리안 알고리즘)
3.
def getPersonwiseKeypoints(valid_pairs, invalid_pairs):
    # the last number in each row is the overall score
    personwiseKeypoints = -1 * np.ones((0, 26))

    for k in range(len(mapIdx)):
        if k not in invalid_pairs:
            partAs = valid_pairs[k][:,0]
            partBs = valid_pairs[k][:,1]
            indexA, indexB = np.array(POSE_PAIRS[k])

            for i in range(len(valid_pairs[k])):
                found = 0
                person_idx = -1
                for j in range(len(personwiseKeypoints)):
                    if personwiseKeypoints[j][indexA] == partAs[i]:
                        person_idx = j
                        found = 1
                        break

                if found:
                    personwiseKeypoints[person_idx][indexB] = partBs[i]
                    personwiseKeypoints[person_idx][-1] += keypoints_list[partBs[i].astype(int), 2] + valid_pairs[k][i][2]

                # if find no partA in the subset, create a new subset
                elif not found and k < 24:
                    row = -1 * np.ones(26)
                    row[indexA] = partAs[i]
                    row[indexB] = partBs[i]
                    # add the keypoint_scores for the two keypoints and the paf_score
                    row[-1] = sum(keypoints_list[valid_pairs[k][i,:2].astype(int), 2]) + valid_pairs[k][i][2]
                    personwiseKeypoints = np.vstack([personwiseKeypoints, row])
    return personwiseKeypoints
앞에서 찾은 valid_pairs를 이용하여 각 사람에게 맞는 keypoints를 인덱스 순서에 맞게 지정해준다.
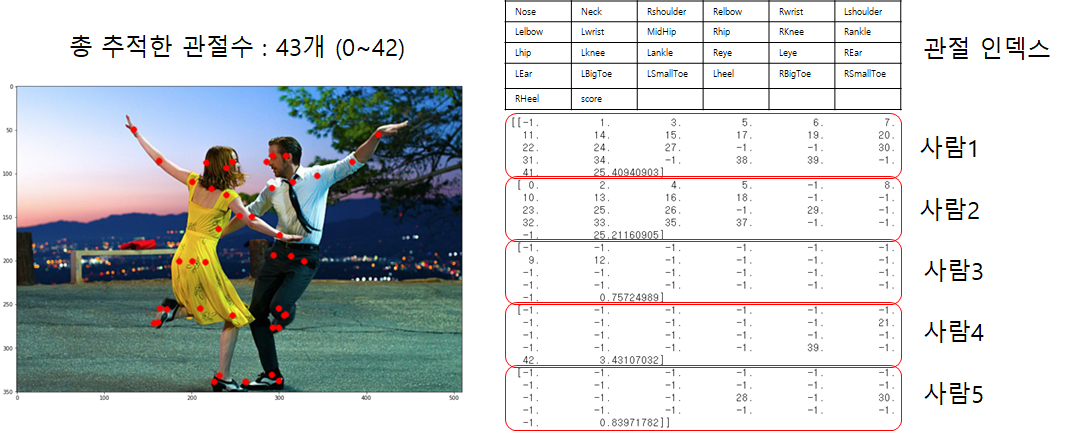
위의 사진의 경우 몇몇 keypoint를 찾지 못해서 5명의 사람으로 나타나게 되었고, 밑의 사진의 경우 이상적인 결과를 얻을 수 있었다.
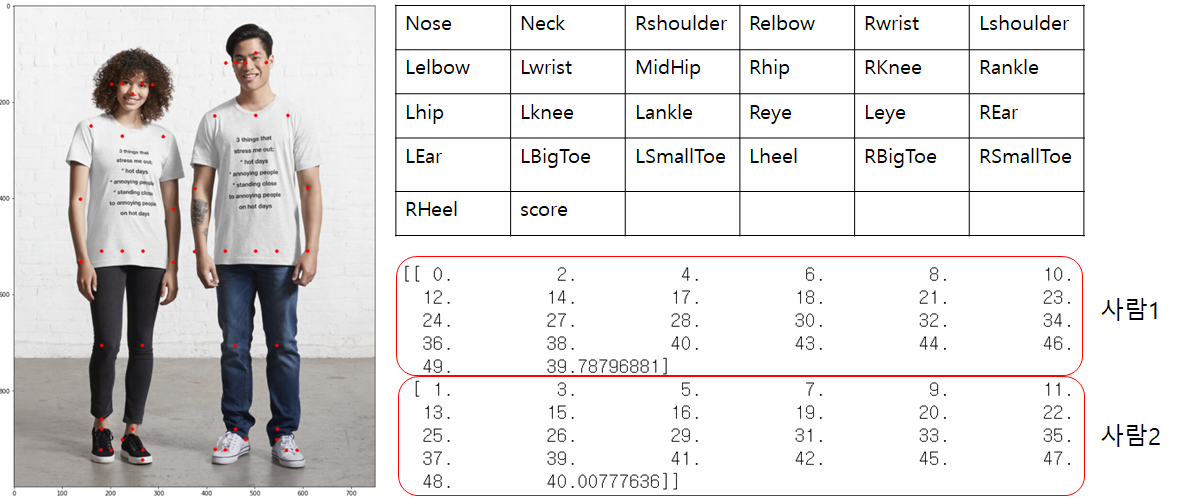
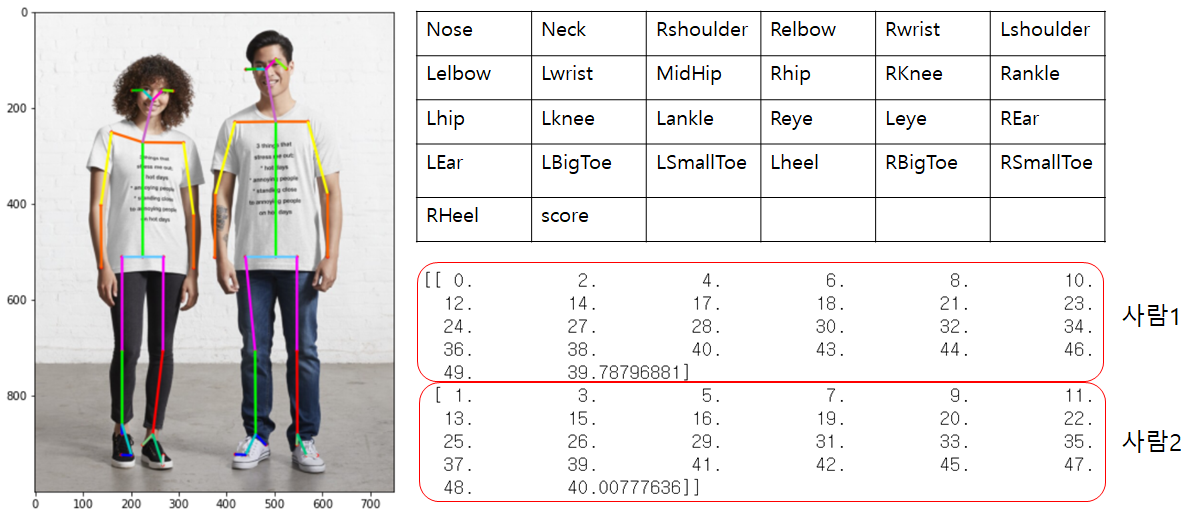
이제 각 keypoints가 이어져야할 keypoints에 연결시켜주었다.
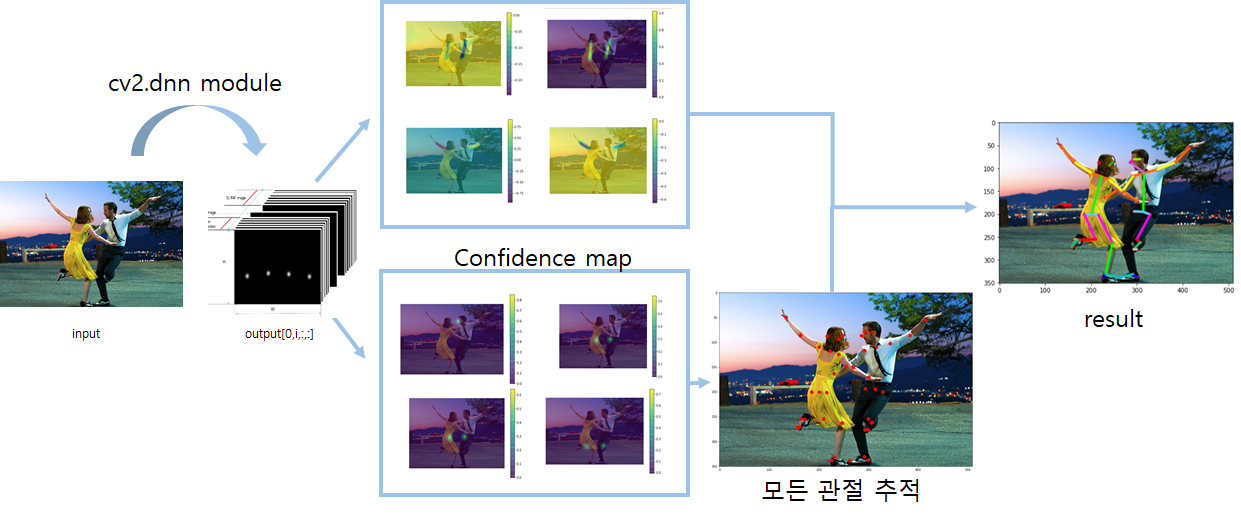
총 정리하자면 Input이미지를 cv2.dnn moudle로 output을 얻을 수 있었고, 학습된 PCM과 PAF를 활용하여 keypoints를 찾고 연결되어야 할 keypoints와 연결되어 결과를 얻을 수 있었다.
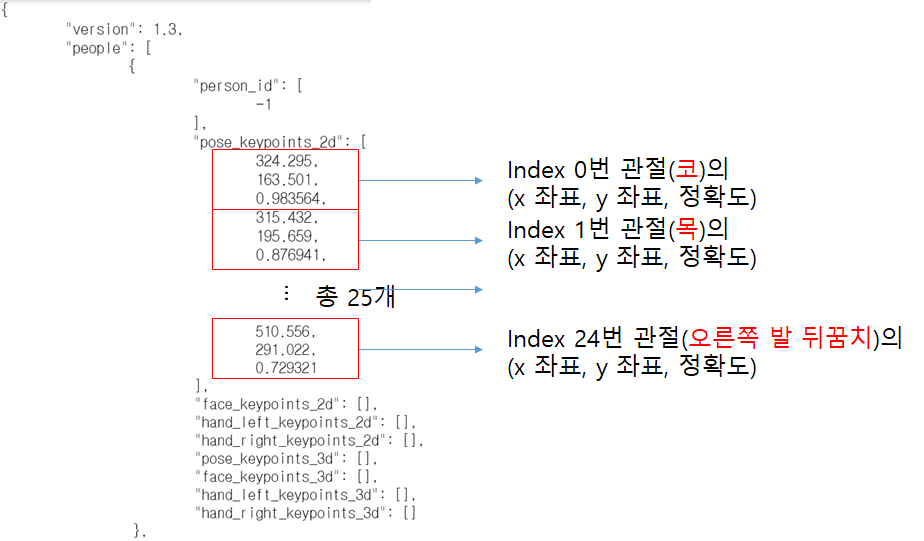
이제 OPENPOSE의 WINDOW PORTABLE DEMO를 실행해 보았고 다음과 같은 실행결과를 얻을 수 있었다.
실행된 이미지


json 파일
전체 코드
import cv2
import time
import numpy as np
import matplotlib.pyplot as plt

weightsFile = 'C:/Users/Admin/Downloads/openpose-1.7.0-binaries-win64-gpu-python3.7-flir-3d_recommended/openpose/models/pose/body_25/pose_iter_584000.caffemodel'
protoFile = 'C:/Users/Admin/Downloads/openpose-1.7.0-binaries-win64-gpu-python3.7-flir-3d_recommended/openpose/models/pose/body_25/pose_deploy.prototxt'

nPoints = 25
keypointsMapping = ["Nose","Neck","RShoulder", "RElbow", "RWrist", "LShoulder", "LElbow",
                    "LWrist", "MidHip", "RHip","RKnee", "RAnkle", "LHip", "LKnee",
                    "LAnkle", "REye", "LEye", "REar", "LEar", "LBigToe", "LSmallToe",
                     "LHeel",  "RBigToe", "RSmallToe", "RHeel"]

POSE_PAIRS = [[1,2], [1,5], [2,3], [3,4], [5,6], [6,7],
              [1,8], [8,9], [9,10], [10,11], [8,12], [12,13], [13,14],
              [11,24], [11,22], [22,23], [14,21],[14,19],[19,20],
              [1,0], [0,15], [15,17], [0,16], [16,18],
              [2,17], [5,18]]
mapIdx = [[40,41],[48,49],[42,43],[44,45],[50,51],[52,53],
          [26,27],[32,33],[28,29],[30,31],[34,35],[36,37],
          [38,39],[76,77],[72,73],[74,75],[70,71],[66,67],
          [68,69],[56,57],[58,59],[62,63],[60,61],[64,65],
          [46,47],[54,55]]
colors = [ [0,100,255], [0,100,255], [0,255,255], [0,100,255], [0,255,255], [0,100,255],
         [0,255,0], [255,200,100], [255,0,255], [0,255,0], [255,200,100], [255,0,255],
         [0,0,255], [255,0,0], [200,200,0], [255,0,0], [125,200,125], [125,200,0],
         [200,200,200],[200,100,200],[200,200,0],[0,200,0],[200,0,255],[0,250,125],
         [0,200,0],[0,120,200]]

device = 'gpu'

def getKeypoints(probMap, threshold=0.1):

    mapSmooth = cv2.GaussianBlur(probMap,(3,3),0,0)

    mapMask = np.uint8(mapSmooth>threshold)
    keypoints = []
    #find the blobs
    contours, _ = cv2.findContours(mapMask, cv2.RETR_TREE, cv2.CHAIN_APPROX_SIMPLE)

    #for each blob find the maxima
    for cnt in contours:
       blobMask = np.zeros(mapMask.shape)
       blobMask = cv2.fillConvexPoly(blobMask, cnt, 1)
       maskedProbMap = mapSmooth * blobMask
       #maxVal = 있을 확률
       #maxLoc = x,y좌표
       _, maxVal, _, maxLoc = cv2.minMaxLoc(maskedProbMap)
       keypoints.append(maxLoc + (probMap[maxLoc[1], maxLoc[0]],))
    return keypoints

def getValidPairs(output):
    valid_pairs = []
    invalid_pairs = []
    n_interp_samples = 10 # 벡터를 나눌 수
    paf_score_th = 0.1
    conf_th = 0.7
    # loop for every POSE_PAIR
    for k in range(len(mapIdx)):
        # A->B constitute a limb
        pafA = output[0, mapIdx[k][0], :, :]
        pafB = output[0, mapIdx[k][1], :, :]
        pafA = cv2.resize(pafA, (frameWidth, frameHeight))
        pafB = cv2.resize(pafB, (frameWidth, frameHeight))

        # Find the keypoints for the first and second limb
        candA = detected_keypoints[POSE_PAIRS[k][0]]
        candB = detected_keypoints[POSE_PAIRS[k][1]]
        nA = len(candA)
        nB = len(candB)

        # If keypoints for the joint-pair is detected
        # check every joint in candA with every joint in candB
        # Calculate the distance vector between the two joints
        # Find the PAF values at a set of interpolated points between the joints
        # Use the above formula to compute a score to mark the connection valid

        if( nA != 0 and nB != 0):
            valid_pair = np.zeros((0,3))
            for i in range(nA):
                max_j=-1
                maxScore = -1
                found = 0
                for j in range(nB):
                    # Find d_ij
                    d_ij = np.subtract(candB[j][:2], candA[i][:2])
                    norm = np.linalg.norm(d_ij)
                    if norm:
                        d_ij = d_ij / norm
                    else:
                        continue
                    # Find p(u)
                    interp_coord = list(zip(np.linspace(candA[i][0], candB[j][0], num=n_interp_samples),
                                            np.linspace(candA[i][1], candB[j][1], num=n_interp_samples)))
                    # Find L(p(u))
                    paf_interp = []
                    for k in range(len(interp_coord)):
                        paf_interp.append([pafA[int(round(interp_coord[k][1])), int(round(interp_coord[k][0]))],
                                           pafB[int(round(interp_coord[k][1])), int(round(interp_coord[k][0]))] ])
                    # Find E
                    paf_scores = np.dot(paf_interp, d_ij)
                    avg_paf_score = sum(paf_scores)/len(paf_scores)

                    # Check if the connection is valid
                    # If the fraction of interpolated vectors aligned with PAF is higher then threshold -> Valid Pair
                    if ( len(np.where(paf_scores > paf_score_th)[0]) / n_interp_samples ) > conf_th :
                        if avg_paf_score > maxScore:
                            max_j = j
                            maxScore = avg_paf_score
                            found = 1
                # Append the connection to the list
                if found:
                    valid_pair = np.append(valid_pair, [[candA[i][3], candB[max_j][3], maxScore]], axis=0)

            # Append the detected connections to the global list
            valid_pairs.append(valid_pair)
        else: # If no keypoints are detected
            print("No Connection : k = {}".format(k))
            invalid_pairs.append(k)
            valid_pairs.append([])
    print(valid_pairs)
    return valid_pairs, invalid_pairs
# This function creates a list of keypoints belonging to each person
# For each detected valid pair, it assigns the joint(s) to a person
# It finds the person and index at which the joint should be added. This can be done since we have an id for each joint

def getPersonwiseKeypoints(valid_pairs, invalid_pairs):
    # the last number in each row is the overall score
    personwiseKeypoints = -1 * np.ones((0, 26))

    for k in range(len(mapIdx)):
        if k not in invalid_pairs:
            partAs = valid_pairs[k][:,0]
            partBs = valid_pairs[k][:,1]
            indexA, indexB = np.array(POSE_PAIRS[k])

            for i in range(len(valid_pairs[k])):
                found = 0
                person_idx = -1
                for j in range(len(personwiseKeypoints)):
                    if personwiseKeypoints[j][indexA] == partAs[i]:
                        person_idx = j
                        found = 1
                        break

                if found:
                    personwiseKeypoints[person_idx][indexB] = partBs[i]
                    personwiseKeypoints[person_idx][-1] += keypoints_list[partBs[i].astype(int), 2] + valid_pairs[k][i][2]

                # if find no partA in the subset, create a new subset
                elif not found and k < 24:
                    row = -1 * np.ones(26)
                    row[indexA] = partAs[i]
                    row[indexB] = partBs[i]
                    # add the keypoint_scores for the two keypoints and the paf_score
                    row[-1] = sum(keypoints_list[valid_pairs[k][i,:2].astype(int), 2]) + valid_pairs[k][i][2]
                    personwiseKeypoints = np.vstack([personwiseKeypoints, row])
    return personwiseKeypoints

image1 = cv2.imread('C:/Users/Admin/Downloads/openpose-1.7.0-binaries-win64-gpu-python3.7-flir-3d_recommended/openpose/examples/lala/lala4.jpg')
frameWidth = image1.shape[1]
frameHeight = image1.shape[0]

t = time.time()
net = cv2.dnn.readNetFromCaffe(protoFile, weightsFile)

if device == "cpu":
    net.setPreferableBackend(cv2.dnn.DNN_TARGET_CPU)
    print("Using CPU device")
elif device == "gpu":
    net.setPreferableBackend(cv2.dnn.DNN_BACKEND_CUDA)
    net.setPreferableTarget(cv2.dnn.DNN_TARGET_CUDA)
    print("Using GPU device")

# Fix the input Height and get the width according to the Aspect Ratio
inHeight = 368
inWidth = int((inHeight/frameHeight)*frameWidth)

inpBlob = cv2.dnn.blobFromImage(image1,
                            1.0 / 255, (inWidth, inHeight),
                          (0, 0, 0), swapRB=False, crop=False)

net.setInput(inpBlob)
output = net.forward()
print("Time Taken = {}".format(time.time() - t))

for i in range(78):
    n = i+1
    probMap = output[0,i, :, :]
    probMap = cv2.resize(probMap, (frameWidth, frameHeight))
    plt.figure(figsize = (7,5))
    plt.imshow(cv2.cvtColor(image1, cv2.COLOR_BGR2RGB))
    plt.imshow(probMap, alpha=0.6)
    plt.colorbar()

    plt.axis("off")

plt.show()

detected_keypoints = []
keypoints_list = np.zeros((0,3))
keypoint_id = 0
threshold = 0.1

for part in range(nPoints):
    probMap = output[0,part,:,:]
    probMap = cv2.resize(probMap, (image1.shape[1], image1.shape[0]))
#     plt.figure()
#     plt.imshow(255*np.uint8(probMap>threshold))
    keypoints = getKeypoints(probMap, threshold)
    print("Keypoints - {} : {}".format(keypointsMapping[part], keypoints))
    keypoints_with_id = []
    for i in range(len(keypoints)):
        keypoints_with_id.append(keypoints[i] + (keypoint_id,))
        keypoints_list = np.vstack([keypoints_list, keypoints[i]])
        keypoint_id += 1

    detected_keypoints.append(keypoints_with_id)
print(detected_keypoints)

frameClone = image1.copy()
for i in range(nPoints):
    for j in range(len(detected_keypoints[i])):
        cv2.circle(frameClone, detected_keypoints[i][j][0:2], 3, [0,0,255], -1, cv2.LINE_AA)
plt.figure(figsize=[15,15])
plt.imshow(frameClone[:,:,[2,1,0]])

valid_pairs, invalid_pairs = getValidPairs(output)

personwiseKeypoints = getPersonwiseKeypoints(valid_pairs, invalid_pairs)

for i in range(24):
    for n in range(len(personwiseKeypoints)):
        index = personwiseKeypoints[n][np.array(POSE_PAIRS[i])]
        if -1 in index:
            continue
        B = np.int32(keypoints_list[index.astype(int), 0])
        A = np.int32(keypoints_list[index.astype(int), 1])
        cv2.line(frameClone, (B[0], A[0]), (B[1], A[1]), colors[i], 3, cv2.LINE_AA)

plt.figure(figsize=[10,8])
plt.imshow(frameClone[:,:,[2,1,0]])
참고 :
https://www.mimul.com/blog/realtime-multi-person-pose-estimation/
https://spyjetson.blogspot.com/2021/03/running-openpose-models-directly-from.html


안녕하세요. 최근 openpose에 대해 공부를 하고 있어서 선생님 코드로 연습을 하고 있는데,
probMap = output[0,i, :, :] 에서 IndexError: index 44 is out of bounds for axis 1 with size 44
라고 계속 오류가 뜨네요ㅠ. 이게 무슨 오류인지 혹시 알려 주실 수 있을까요..?