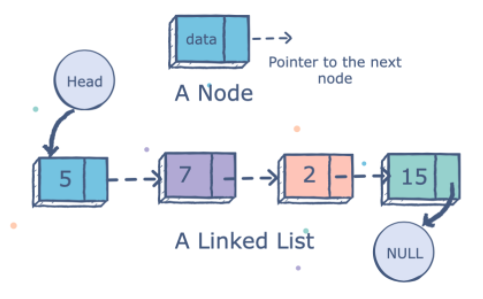
Linked List
Linked List는 배열과 달리 메모리상에 index에 의한 물리적 배치를 하지 않고, node를 생성 후 해당 node의 pointer에 의해 다음 node를 연결한다. 이를 통해 Linked List는 데이터 삽입/삭제시 데이터의 구조를 재정렬하지 않아도 된다.
Linked List의 이점
- 새로운 elements를 삽입, 삭제 시 용이
- restructuring이 덜 복잡함
Linked List의 단점
- array보다 많은 메모리 사용
- 특정 element를 검색시 비효율적임
Linked List 적용
- data를 연달아 추가, 삭제 시 용이
Linked List 구현
Javascript에서 연결리스트는 객체를 통해 구현할 수 있다.
아래 예시는 두개의 객체를 next로 연결하여 Linked List의 기본적인 구조를 보여준다.
const n1 = {
  data: 100
}

const n2 = {
  data: 200
}

n1.next = n2;

console.log(n1) // { data: 100, next: { data: 200 } }
연결리스트의 핵심은 node이며, node는 data를 담는 data field와 다음 노드를 알려주는 linked field로 구성된다.
class Node {
  constructor(data, next = null) {
    //data와 next를 넣고 next의 디폴트는 null로 지정 왜냐하면 linkedlist의 tail(마지막은) null로 끝나기때문
    this.data = data;
    this.next = next;
  }
}

class LinkedList {
  constructor() {
    this.head = null; //처음에 데이터가 없다면 head는 null이다.
    this.size = 0; //리스트의 크기를 찾기위해 사용 디폴트는 0으로 지정.
  }

  // Insert first node - 첫번째 삽입
  insertFirst(data) {
    this.head = new Node(data, this.head) //head에 새로운 node가 들어가고 기존의 해드는 next로 밀려난다.
    this.size++;
  }

  // Insert last node - 마지막 삽입
  insertLast(data) {
    let node = new Node(data);
    let current;

    // if empty, make head
    if (!this.head) {
      this.head = node;
    } else {
      current = this.head;

      while (current.next) { //this.head에 next가 있다면 즉, next가 null이아니라면
        current = current.next; // current는 current.next가 되고
      }

      current.next = node; //결국 current.next가 새로넣은 node가 된다?
    }
    this.size++; //length 는 1증가
  }

  // Insert at index - 중간 삽입
  insertAt(data, index) {
    // If index is out of range ~ 인덱스가 size 범위 넘어서면 아무것도 리턴 하지 않는다.
    if (index > 0 && index > this.size) {
      return;
    }

    // If first index
    if (index === 0) {
      this.head = new Node(data, this.head) //즉, index 0에 삽입시 해당 노드를 넣고 다 한칸식 뒤로 미룸
      this.size++
      return;

    }

    const node = new Node(data);
    let current, previous;

    // Set current first
    current = this.head;
    let count = 0;

    while (count < index) {
      previous = current; //node before index
      count++;
      current = current.next; //node after index
    }

    node.next = current;
    previous.next = node;

    this.size++;
  }

  // Get at index
  getAt(index) {
    let current = this.head;
    let count = 0;

    while (current) {
      //해당 data의 값을 가져오기 위해 index와 값이 같아질때까지 loop한다.
      if (count == index) {
        console.log(current.data);
      }
      count++;
      current = current.next;
    }
    return null;
  }

  // Remove at index
  removeAt(index) {
    if (index > 0 && index > this.size) {
      return;
    }

    let current = this.head; //current는 현재 첫번째 노드임
    let previous;
    let count = 0;

    // Remove first
    if (index === 0) {
      this.head = current.next;
    } else {
      //loop를 통해 해당 index의 연결고리를 끊는다.
      while (count < index) {
        count++;
        previous = current;
        current = current.next;
      }
      previous.next = current.next;
    }

    this.size--;
  }

  // Clear list ~ 메모리자체에는 데이터가 남아있겠지만 보여주기 위해서 func 만들었다.
  clearList() {
    this.head = null;
    this.size = 0;
  }
  // Print list data ~ data값만 따로
  printListData() {
    let current = this.head; // 현재 노드를 나타냄

    while (current) {
      console.log(current.data);
      current = current.next;
    }
  }
}
const linkedList = new LinkedList();

linkedList.insertFirst(100);
linkedList.insertFirst(200);
linkedList.insertFirst(300);
linkedList.insertLast(400);
linkedList.insertAt(500, 1)

linkedList.removeAt(2)

linkedList.printListData();

linkedList.getAt(2);

//linkedList.clearList();

console.log(linkedList)
Pay it forward
감사합니다!