
목표
custom pie chart 만들기 !
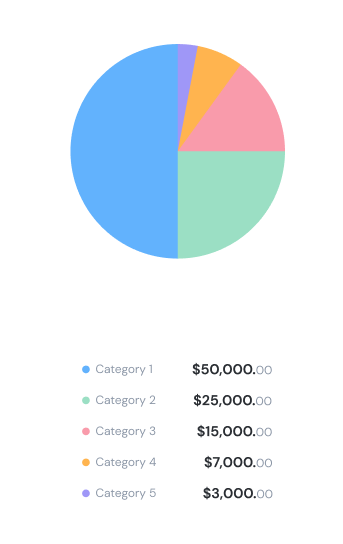
원했던건 이 모양이였지만 .. 마땅한 라이브러리가 없다..
다른 라이브들도 사용하려고 알아봤지만 나한테는 참고하기에도 어려웠기 때문에
MPAndroidChart를 사용하게 됐다.
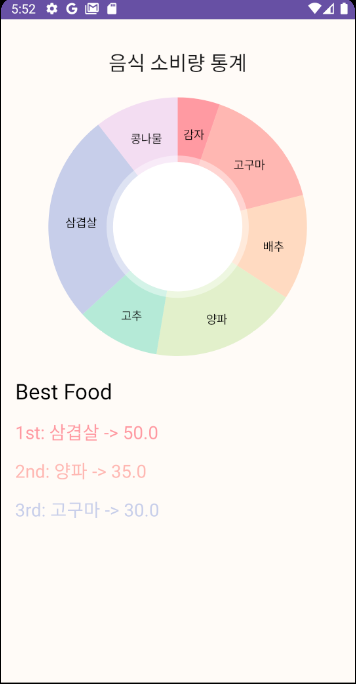
결과물
Code
build.gradle
// viewBinding
viewBinding {
        enabled = true
    }

// MPAndroid PieChart
    implementation 'com.github.PhilJay:MPAndroidChart:v3.1.0'
setting.gradle ( 추가 )
maven { url 'https://jitpack.io' }
``


## xml
```kotlin
<RelativeLayout xmlns:android="http://schemas.android.com/apk/res/android"
    xmlns:app="http://schemas.android.com/apk/res-auto"
    xmlns:tools="http://schemas.android.com/tools"
    android:layout_width="match_parent"
    android:layout_height="match_parent"
    android:padding="16dp"
    tools:context=".PieChartActivity"
    android:background="@color/ivory">

    <com.google.android.material.appbar.MaterialToolbar
        android:id="@+id/stats"
        android:layout_width="match_parent"
        android:layout_height="wrap_content"
        app:title="음식 소비량 통계"
        app:titleCentered="true"/>

    <com.github.mikephil.charting.charts.PieChart
        android:id="@+id/pieChart"
        android:layout_width="match_parent"
        android:layout_height="300dp"
        android:layout_centerHorizontal="true"
        android:layout_below="@+id/stats"/>

    <TextView
        android:id="@+id/bestItem"
        android:layout_width="wrap_content"
        android:layout_height="wrap_content"
        android:layout_below="@id/pieChart"
        android:layout_marginTop="16dp"
        android:text="Best Food"
        android:textSize="24sp"
        android:textColor="@color/black"/>

    <LinearLayout
        android:layout_width="match_parent"
        android:layout_height="wrap_content"
        android:layout_below="@+id/bestItem"
        android:layout_marginTop="16dp"
        android:orientation="vertical">

        <TextView
            android:id="@+id/bestItem1"
            android:layout_width="wrap_content"
            android:layout_height="wrap_content"
            android:text=""
            android:textSize="20sp"
            android:textColor="@color/pastel_rainbow1"/>

        <TextView
            android:id="@+id/bestItem2"
            android:layout_width="wrap_content"
            android:layout_height="wrap_content"
            android:text=""
            android:textSize="20sp"
            android:textColor="@color/pastel_rainbow2"
            android:layout_marginTop="16dp"/>

        <TextView
            android:id="@+id/bestItem3"
            android:layout_width="wrap_content"
            android:layout_height="wrap_content"
            android:text=""
            android:textSize="20sp"
            android:textColor="@color/pastel_rainbow6"
            android:layout_marginTop="16dp"/>

    </LinearLayout>
</RelativeLayout>
pieChart.kt
// 백분율로 표시하여 파이 차트의 전체 합이 100%가 되도록 보여준다.
binding.pieChart.setUsePercentValues(true)

// 넣고 싶은 데이터 설정
val dataList: List<PieEntry> = listOf(
            PieEntry(10F, "감자"),
            PieEntry(30F, "고구마"),
            PieEntry(25F, "배추"),
            PieEntry(35F, "양파"),
            PieEntry(20F, "고추"),
            PieEntry(50F, "삼겹살"),
            PieEntry(20F, "콩나물")
        )


// value -> color 안에 color를 만들어 넣어서 사용 했기 때문에 ContextCompat.getColor 사용

// 기본 값을 사용 한다면 ->
//  PieEntry(10F, "감자", ContextCompat.getColor(this, R.color.color1))

val dataSet = PieDataSet(dataList, "")
        dataSet.colors = listOf(
            ContextCompat.getColor(this, R.color.pastel_rainbow1),
            ContextCompat.getColor(this, R.color.pastel_rainbow2),
            ContextCompat.getColor(this, R.color.pastel_rainbow3),
            ContextCompat.getColor(this, R.color.pastel_rainbow4),
            ContextCompat.getColor(this, R.color.pastel_rainbow5),
            ContextCompat.getColor(this, R.color.pastel_rainbow6),
            ContextCompat.getColor(this, R.color.pastel_rainbow7),
        ) // 각 섹션의 색상 설정

// pieChart 안에 들어갈 텍스트 크기
dataSet.valueTextSize = 16F

// pieChart 안에 들어간 value 값 표기 지우기
dataSet.setDrawValues(false)

// 데이터 설정 값 삽입
val piedata = PieData(dataSet)


binding.run {
            pieChart.apply {
                data = piedata
                description.isEnabled = false // 차트 설명 비활성화
                legend.isEnabled = false // 하단 설명 비활성화
                isRotationEnabled = true // 차트 회전 활성화
                setEntryLabelColor(Color.BLACK) // label 색상
                animateY(1400, Easing.EaseInOutQuad) // 1.4초 동안 애니메이션 설정
                animate()
            }

            // Gson 객체 생성
            val gson = Gson()

            // 원본 데이터를 JSON 형식으로 직렬화
            val jsonString = gson.toJson(dataList)

            // JSON 형식의 데이터를 다시 역직렬화하여 리스트로 변환
            val typeToken = object : TypeToken<List<PieEntry>>() {}.type
            val copiedList = gson.fromJson<List<PieEntry>>(jsonString, typeToken)

            // 내림차순으로 정렬
            val sortedList = copiedList.sortedByDescending { it.value }

            // 정렬된 데이터 중에서 인덱스 0부터 2까지 추출
            val selectedDataList = sortedList.subList(0, 3)

            bestItem1.setText("1st: ${selectedDataList[0].label} -> ${selectedDataList[0].value}")
            bestItem2.setText("2nd: ${selectedDataList[1].label} -> ${selectedDataList[1].value}")
            bestItem3.setText("3rd: ${selectedDataList[2].label} -> ${selectedDataList[2].value}")
        }
소비량이 높은 순으로 표기하고 싶었고 데이터를 변경할 것은 아니지만
원본에 영향을 가게 하기 싫었기 때문에 깊은 복사을 이용했습니다
결과물 영상

Android