FCC : Responsive Web Design > (1) Basic HTML and HTML5
<h1>Hello World</h1>

<h2>CatPhotoApp</h2>

<p>Kitty ipsum dolor sit amet, shed everywhere shed everywhere stretching attack your ankles chase the red dot, hairball run catnip eat the grass sniff.</p>
HTML Elements (h1 / p)
대부분의 HTML elements은 opening tag와 closing tag를 가지고 있습니다...
ex)<h1></h1>
h1elements은 main headings을 꾸릴 때 주로 사용되고, 반면에h2elements은 일반적으로 subheadings을 꾸릴 때 사용 됩니다.h3,h4,h5그리고h6elements은 덩어리의 크기를 구분하기 위해 사용됩니다...
pelement는 웹사이트의 문단 글을 표현할 때 사용됩니다.p는 "paragraph"의 줄임말이죠...관습적으로, 모든 HTML 태그들은 소문자로 작성됩니다...
그리고 웹 개발자들은 빈 텍스트를 채울 때,
placeholder로써 lorem ipsum을 사용합니다...
<h2>CatPhotoApp</h2>
<main>
  <p>View more cat pics by <a href="https://www.freecatphotoapp.com" target="_blank">external link</a></p>
  <p>View footer by <a href="#footer">internal link</a></p>

  <a href = '#'><img src="https://cdn.freecodecamp.org/curriculum/cat-photo-app/relaxing-cat.jpg" alt="A cute orange cat lying on its back."></a>

  <p>Kitty ipsum dolor sit amet, shed everywhere shed everywhere stretching attack your ankles chase the red dot, hairball run catnip eat the grass sniff.</p>
  <p>Purr jump eat the grass rip the couch scratched sunbathe, shed everywhere rip the couch sleep in the sink fluffy fur catnip scratched.</p>
</main>
<footer id='footer'>Copyright Cat Photo App</footer>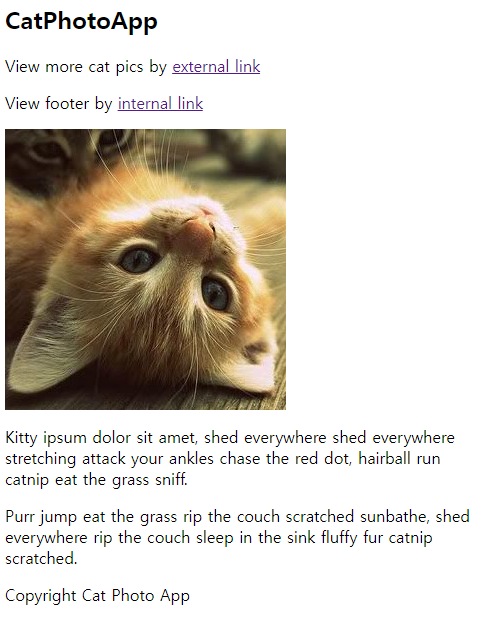
HTML5 Elements의 소개
HTML5는 더 많은 명시적 HTML tags를 제공합니다. 여기에는
main,header,footer,nav,video,article,section등이 포함되지요...이 tag들은 당신의 HTML에 명시적 구조를 주고, HTML의 가독성을 늘려주고
Search Engine Optimization(SEO)과 접근성 관련해서 큰 도움이 됩니다.maintag는 서치 엔진과 다른 개발자들이 당신의 페이지의 주요한 내용을 찾는 것을 쉽게 만들지요...
img Elements의 사용
imgelement를 쓸 때,srcattribute에 알맞은 이미지 링크를 넣어주면 웹 페이지에 이미지를 넣을 수 있습니다.단, 모든
imgelements는altattribute를 반드시 가져야 합니다.
altattribute에 주어진 텍스느는 screen readers의 접근성을 향상하기 위해 사용되고, 이미지가 로드되지 않는 상황에 이미지에 대한 간략한 설명을 하기 위해 쓰이지요...
img는 혼자 알아서 닫힙니다...
Anchor Elements의 사용
a(anchor) elements를 사용하면 당신의 웹 페이지 바깥에 있는 내용물에 링크를 걸 수 있습니다.
aelements 웹 주소의 목적지를 요구하는데, 이는hrefattribute라고 불러요.img의src처럼href안에 알맞은 주소를 작성하면 되요...순수한
aelements 위의 커서를 올리고 버튼을 누르면, 지금 열려 있는 창에서 바로 새 내용물이 불려 옵니다. 그러나,taget = '_blank'attribute를a안의 작성함으로써, 새 창으로 열기가 가능해져요...
a는 만들어 놓았는데, 죽은 링크를 주고 싶을 때는href = '#'이렇게 해봐요...
a태그는p태그 안에 nested 될 수도 있고,img태그를 감쌀 수도 있어요...
a(anchor) elements는 현재 웹 페이지의 다른 부분으로 점프하게끔, 외부 링크가 아닌 내부링크로도 설정할 수 있습니다...이걸 하려면
hrefattribute에 #와 링크를 걸고 싶은 element의idattribute의 값을 설정하면 됩니다.id는 특정 element를 꼭 찝어주게끔 하는 attribute에요...
<h2>CatPhotoApp</h2>
<main>
  <p>Click here to view more <a href="#">cat photos</a>.</p>

  <a href="#"><img src="https://cdn.freecodecamp.org/curriculum/cat-photo-app/relaxing-cat.jpg" alt="A cute orange cat lying on its back."></a>
  <div>
    <p>Things cats love:</p>
    <ul>
      <li>cat nip</li>
      <li>laser pointers</li>
      <li>lasagna</li>
    </ul>
    <p>Top 3 things cats hate:</p>
    <ol>
      <li>flea treatment</li>
      <li>thunder</li>
      <li>other cats</li>
    </ol>
  </div>
  <form action="https://www.freecatphotoapp.com/submit-cat-photo">
    <label for="indoor"><input id="indoor" type="radio" name="indoor-outdoor" value="indoor" checked> Indoor</label>
    <label for="outdoor"><input id="outdoor" type="radio" name="indoor-outdoor" value="outdoor"> Outdoor</label><br>
    <label for="loving"><input id="loving" type="checkbox" name="personality" value="loving" checked> Loving</label>
    <label for="lazy"><input id="lazy" type="checkbox" name="personality" value="lazy"> Lazy</label>
    <label for="energetic"><input id="energetic" type="checkbox" name="personality" value="energetic"> Energetic</label><br>
    <input type="text" placeholder="cat photo URL" required>
    <button type="submit">Submit</button>
  </form>
</main>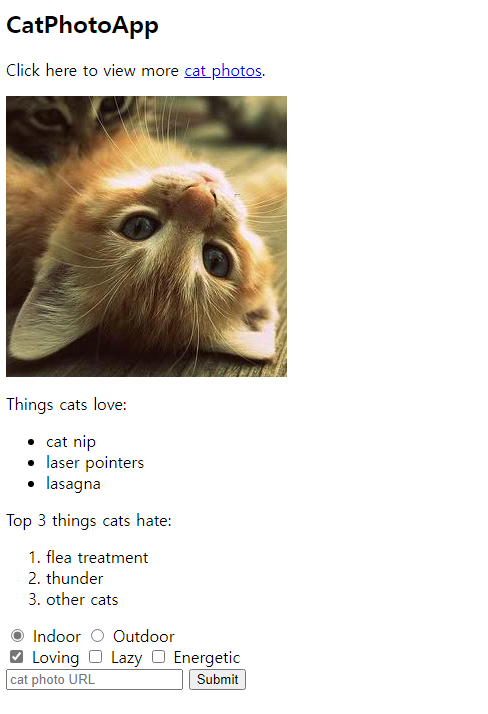
Unordered List / Ordered List
ul: 순서가 없는 리스트, 앞에 땡그라미가 옵니다.
- 이게 Unordered List
- 요로코롬...
ulelement로 시작해서/ul로 닫히는데, 그 안에lielements들이 있어요...
ol: 순서 있는 리스트, 앞에 숫자가 옵니다.
- 이게 Ordered List
- 요로코롬...
olelement로 시작해서/ol로 닫히는데, 그 안에lielements들이 있어요...
입력창 만들기
inputelements의typeattribute에text라는 값을 주면, 가장 간단한 입력창을 만들 수 있습니다.
이러한 입력은 유저들로부터 응답을 수집하기 편리한 방법이지요...Ex)
<input type="text">
inputelements는 혼자 닫힙니다...
placeholderattribute에 값을 줌으로써, 비어있는 입력창에 지시사항 등을 넣을 수 있습니다...Ex)
<input type="text" placeholder='여기에 입력하는 겁니다...'>서식 안에서, 서식을 완료하지 않으면 제출하지 못하게 하는 방법이 있습니다.
input내부에required라는 attribute을 넣는 방밥이지요...Ex)
input type="text" required
Form Element 만들기
순수한 HTML로도 유저가 제공하는 정보를 서버로 전달하는 웹 형식을 만들 수 있습니다.
actionattribute에 해당 입력값을 어디로 날릴지 링크만 적으면 그만이죠...
일반적으로input등의 elements들은form의 자식 형태로 nested 되어 있죠...
Submit Button 만들기
form에 제출 버튼을 보통 만들어줍니다. 이 버튼을 눌러야, 입력된 값들이form의action에서 표시한 주소로 날라가지요...Ex)
<button type="submit">Submit</button>Submit
Radio Buttons 만들기 / label 이해
여러 선택지 중에 하나만 고르는 버튼을 유저에게 제공하고 싶을 때, 가장 적합한 것은
radio입니다.
inputelements의type='radio'타입을 이와 같이 작성하면 되지요...각각의
radio buttons들은 그들 고유의labelelement에 의해 nested 될 수 있습니다.
바로inputelement을labelelement로 감싸주면 되는 것이죠...
그러면, 자동적으로radiobutton과labelelement와의 연결이 생기는 것이지요...모든 관계된
radiobuttons은 전부 동일한nameattribute을 가져야 해요.
이는radiobutton 무리를 만들기 위함인데, 이들 중 하나를 선택하면 자동적으로 그 외의 버튼은 선택해제가 됩니다.
따라서radio는 오로지 하나의 답변만 유저로부터 받아 오지요...Ex)
Indoor Outdoor<label for='indoor'> <input type="radio" id= 'indoor' name="indoor-outdoor">Indoor </label> <label for='outdoor'> <input type="radio" id = 'outdoor' name="indoor-outdoor">Outdoor </label>
forattribut은labelelement 안에 들어가 있는 것이 가장 적절합니다.
그리고,label의for의 값은 해당label이 품고 있는id의 값과 동일하게 작성해야 합니다.
이러면label과input이 더 끈끈하게 이어지지요...<input id="indoor" type="radio" name="indoor-outdoor"> <label for="indoor">Indoor</label> <label for="indoor"> <input id="indoor" type="radio" name="indoor-outdoor">Indoor </label>
input을label안에 넣는 방법도 있고, 따로 넣는 방법도 있고, 취향것 따라 하면 될 것 같아요...
Checkboxes 만들기
radio와 달리 답변이 여러가지일 수 있는 질문이 있을 때는, 체크박스가 유용하게 쓰입니다.
Checkboxes도input의 종류,type='checkbox'을input에다가 설정하면 됩니다.위에서
label에 대해 설명한 것처럼, 체크박스도 위의 형태를 따라,label로 감싸든지, 그냥 나란히 작성하든지 취향것 따라하시면 됩니다.
마찬가지로 연관된 체크박스들은 전부 동일한name값을 공유해야 하며,label의for값과id값을 일치시켜야 하지요...Ex)
<label for="loving"><input id="loving" type="checkbox" name="personality"> Loving</label>
<label for="hating"><input id="hating" type="checkbox" name="personality"> Hating</label>
<label for="caring"><input id="caring" type="checkbox" name="personality"> Caring</label>
Loving
Hating
Caring
Radio Buttons and Checkboxes에서 value attribute 사용
서식이 제출될 때, 서버에 실제로 전달되는 데이타는
valueattribute 안에 담겨 있습니다.
이는radio와checkbox에서 공통적으로 적용되죠...Ex)
Indoor Outdoor<label for="indoor"> <input id="indoor" value="indoor" type="radio" name="indoor-outdoor">Indoor </label> <label for="outdoor"> <input id="outdoor" value="outdoor" type="radio" name="indoor-outdoor">Outdoor </label>여기서 indoor option을 선택하면, 서버에 날라가는 실제 정보는 다음과 같습니다.
indoor-outdoor=indoor
이들은 "indoor"input의name,valueattribute의 값들이죠..만일
valueattribute를 비워준 채로 서식을 제출한다면, 서버에 제출되는 정보는 다음과 같게 될 것입니다.
indoor-outdoor=on
때문에 사용자가 어떤 선택지를 골랐는지에 대해 확실히 지시해주는 값을value에 넣어주어야 합니다..!
Radio Buttons and Checkboxes에서 디폴트로 Check 하기
가만히 냅둬도, 해당 선택지가 클릭된 것을 디폴트로 삼을 수 있습니다.
이걸 하기 위해서 단순히checkedattribute를inputelement 안에 적으면 되지요...Ex)
<input type="radio" name="test-name" checked>
<input type="checkbox" name="test-name" checked>
많은 Elements들을 div Element 안에 모시기
divelement (division element)은 일반적인 목적으로 굉장히, 아주 많이, 무난하게 쓰이는 elements 들의 컨테이너 같은 것입니다.
HTML elements 중에서 아마 가장 많이, 흔하게 쓰일 거에요...
<div>로 열고</div>로 닫으면 됩니다...
HTML Document의 Doctype 선언하기
몇몇 elements들은 웹 페이지에 전반적인 구조를 제공합니다.
또, 이들은 모든 HTMl 문서에 반드시 명시되어야 하죠..!문서의 최상단에, 당신의 페이지가 어떤 버전의 HTML을 사용하고 있는지 브라우저에게 알려야 합니다.
HTML은 계속해서 진화하는 언어이고, 정기적으로 최신 버전으로 업데이트되고 있습니다.
대부분의 브라우저는 가장 최신 버전인 HTML5을 지원합니다만, 나이 많은 웹 페이지는 이전 버전의 언어를 사용할 수도 있거든요,,,그럼 브라우저에게 이를 어떻게 알리느냐!
<!DOCTYPE ...>tag를 문서 첫 줄에 작성하면 됩니다.
...부분에 HTML의 버전을 명시합니다.
HTML5의 경우,<!DOCTYPE html>이렇게 말이죠그 다음으로는 나머지 HTML code들이
htmltags에 의해 둘러싸일 필요가 있습니다.
<html>오프닝 태그는<!DOCTYPE html>줄 바로 아래에 작성하고,</html>클로징 태그는 문서의 마지막에 작성하면 됩니다...Ex)
<!DOCTYPE html>
<html>

</html>
HTML Document에서 Head와 Body 정의하기
head와bodyelements들을 통해 다른 수준의 HTML 문서 정리가 가능합니다.
어떠한 페이지에 대한 정보는headtag로 가게 되고,
페이지의 내용(유저들 눈에 보이게 되는 것)은bodytag 안에 가게 됩니.
Metadataelements,link,meta,title, 그리고style과 같은 elements들은 일반적으로headelement 안에 갑니다.Ex)
<!DOCTYPE html>
<html>
  <head>
    <meta />
  </head>
  <body>
    <div>
    </div>
  </body>
</html>
