✅ Node에 적용하는 Properties와 Methods
🐸 Node properties
- parentNode
- 자식을 가질 수 있는 모든 종류의 Node 객체가 공통으로 가지는 메서드와 속성을 가진다.
- 부모 노드가 없을 때
Document node를 return 한다
- childNodes
- 주어진 요소의 자식 노드 모음을 반환. (현재 요소의 자식 노드가 포함된 NodeList를 반환)
- 요소 노드뿐만 아니라 주석 노드와 같은 비 요소 노드를 포함한다
let nodeList = document.querySelector("div").childNodes ;

❗ children 속성과 똑같은 기능을 하지만, children은 비 요소 노드(ex. 주석)는 모두 제외한다
반면 childNode 속성은 비 요소 노드까지 모두 포함한다
- firstChild
- 노드의 첫 번째 자식 반환 (노드가 자식이 없으면 null 반환)
- 공백도 자식요소로 인식(space, tab등 어떤 공백이라도 있으면
#text가 자식으로 인식)let childNode = document.querySelector("ul").firstChild ; ❗ 공백을 소스에서 제거하면, #text 노드는 삽입되지 않고 li 요소가 paragraph의 첫 번째 자식이 된다. // 예시 (모든 공백 제거) <ul><li>First span</li></ul>
- lastChild
- 노드의 마지막 번째 자식 반환 (노드가 자식이 없으면 null 반환)
let childNode = document.querySelector("ul").lastChild ;
- nextSibling
- 부모의
childNodes 목록에서, 지정된 노드 바로 다음에 있는 노드를 반환- 지정된 노드가 해당 목록의 마지막 노드이면
null값을 반환 한다.- 공백도 자식요소로 인식(space, tab등 어떤 공백이라도 있으면
#text가 nextSibling으로 인식)
- previousSibling
- 현재 호출하는 Node가 속해 있는
부모의 childNodes 목록에서 특정 자식 노드를 리턴- childNodes 목록의 첫번째 노드일 경우 Null값을 리턴
// 공백 없는 태그에서 previousSibling 찾기
// <a><b1 id="b1"/><b2 id="b2"/></a>

alert(document.getElementById("b1").previousSibling); // null
alert(document.getElementById("b2").previousSibling.id); // "b1"
- nodeName
- nodeType
- nodeValue
🐸 Node Methodes
- appendChild()
- 한 node를 특정 부모 node의 자식 node 리스트 중
마지막 자식으로 붙인다// 새로운 단락 요소를 생성하고 문서에 있는 바디 요소의 끝에 붙인다. var p = document.createElement("p"); document.ul.appendChild(p);
- removeChild()
- 자식 node 목록에서 node를 제거한다.
// <div id="demo">
//     <p> Hi, everyone. </p>
//     <p> Nice to meet you. </p>
// </div>

let tag = document.getElementById( "demo" );

tag.removeChild( tag.childNodes[ 0 ] );
- hasChildNodes()
- 특정한 자식node가 있는지 없는지
Boolean값으로 반환
- cloneNode()
- contains()
- insertBefore()
- isEqualNode()
- replaceChild()
🐸 Document Methodes
- document.createElement()
- element를 생성할 때
- document.createTextNode()
- 텍스트(문자열)를 입력할 때
❗ 텍스트 노드에 쓰여지는 문자열 입력 후, appendChild()를 통해 특정 태그에 삽입해준다ex) let p = document.createTextNode("This is sentence"); li.appendChild(p) // <li> This is sentence </li>
🐸 HTML Element properties
- innerHTML
- 특정 태그의 내용을 바꾸거나, 새로운 태그를 html에 삽입해주는 역할
// <p id="name">홍길동</p>

document.getElementById('name').innerHTML="이순신"
// 출력결과 : <p id="name">이순신</p>
- outerHTML
- textContent
- innerText
- outerText
- firstElementChild
- lastElementChild
- nextElementChild
- previousElementChild
- children
🐸 HTML Element Methodes
- insertAdjacentHTML()
- 특정 위치에 DOM tree 안에 원하는 node들을 추가 한다.
- element 안에 존재하는 element를 건드리지 않는다.
(innerHtml과 다름/ innerHtml는 기존 element를 변경시킴).
✅ Element Node ✨✨✨
🔸 html 내 모든 태그를 지칭하는 것
🚩 HTML Element Object Properties and Methods
- createElement()
- 지정한 tagName의 HTML 요소를 만들어 반환한다
let newDiv = document.createElement("div");
  // and give it some content

let newContent = document.createTextNode("환영합니다!");
  // add the text node to the newly created div

newDiv.appendChild(newContent);
// html에 추가된 결과 : <div> 환영합니다 </div>
- getAttribute()
해당 요소(element)의 속성값을 가져온다document.querySelector('html 요소').getAttribute( '속성명' )// <p><a id="abc" href="https://www.naver.com">Click</a></p> let result = document.getElementById( 'abc' ).getAttribute( 'href' ); console.log(result); // id가 "abc"인 요소(element)의 속성인 href의 값을 보여준다. // 출력결과 : https://www.naver.com
- setAttribute()
선택한 요소(element)의 속성값을 정한다.document.querySelector('html 요소').setAttribute( '지정할 속성명', '지정할 속성값' )// <p><a id="abc" href="https://www.naver.com">Click</a></p> let result = document.setElementById( 'abc' ).getAttribute( 'href', "https://www.daum.com" ); console.log(result); // id가 "abc"인 요소(element)의 href 속성에 지정한 값을 정해준다. // 출력결과 : https://www.daum.com❗ 만약 이미 요소 내 속성값이 존재한다면 그 값을 지우고 새 값을 적용
- hasAttribute()
- html내 지정 태그가 존재하는지 확인할때 쓰이는 메서드 ➡ Boolean 값으로 return
let result = document.getElementsByTagName("BUTTON")[0].hasAttribute("onclick");
// 버튼 요소의 onclick 속성이 있는지 확인
- removeAttribute()
- 요소에서 주어진 이름의 특성(속성)을 제거
element.removeAttribute(attrName);

//<div id="div1" align="left" width="200px">
document.getElementById("div1").removeAttribute("align");
// 출력결과 : <div id="div1" width="200px">
- classList()
- el.classList.add('추가하려는 클래스명")
- el.classList.remove('제거하려는 클래스명")
- el.classList.toggle('토글하려는 클래스명")
❗ 하나의 인수만 있을 때 클래스 값을 토글링한다 (클래스가 존재한다면 제거하고 false를 반환하며, 존재하지 않으면 클래스를 추가하고 true를 반환)const div = document.createElement('div'); div.className = 'foo'; // 클래스명이 'foo'인 div태그 생성 // html 출력결과: <div class="foo"></div> div.classList.remove("foo"); // 'foo'라는 클래스명 제거 div.classList.add("anotherclass"); // 'anotherclass'라는 클래스명 추가 // html 출력결과: <div class="anotherclass"></div> div.classList.toggle("active"); // css에 '.active'라는 클래스 속성 추가 (ex. color: red)
- tagName
- children
- dateset
- attributes
✅ DOM Event
Event handler는 html요소를 javascript에서 불러와 이벤트를 적용하고 통제하는 기능을 말한다.
=Event Listener,Event callback이라고도 부른다.Event handler를 만들어주는 방식은addEventListner또는onClick등이 있다
❗addEventListener를 주로 쓴다
🐟 DOM Event Types
👉 user interface events
load
scroll
resize👉 focus events
blur
focus👉 form events
change
submit👉 mouse events
click
mousedown
mouseenter
mouseleave
mouseup👉 keyboard events
keydown
keyup
✅ DOM Event Flow
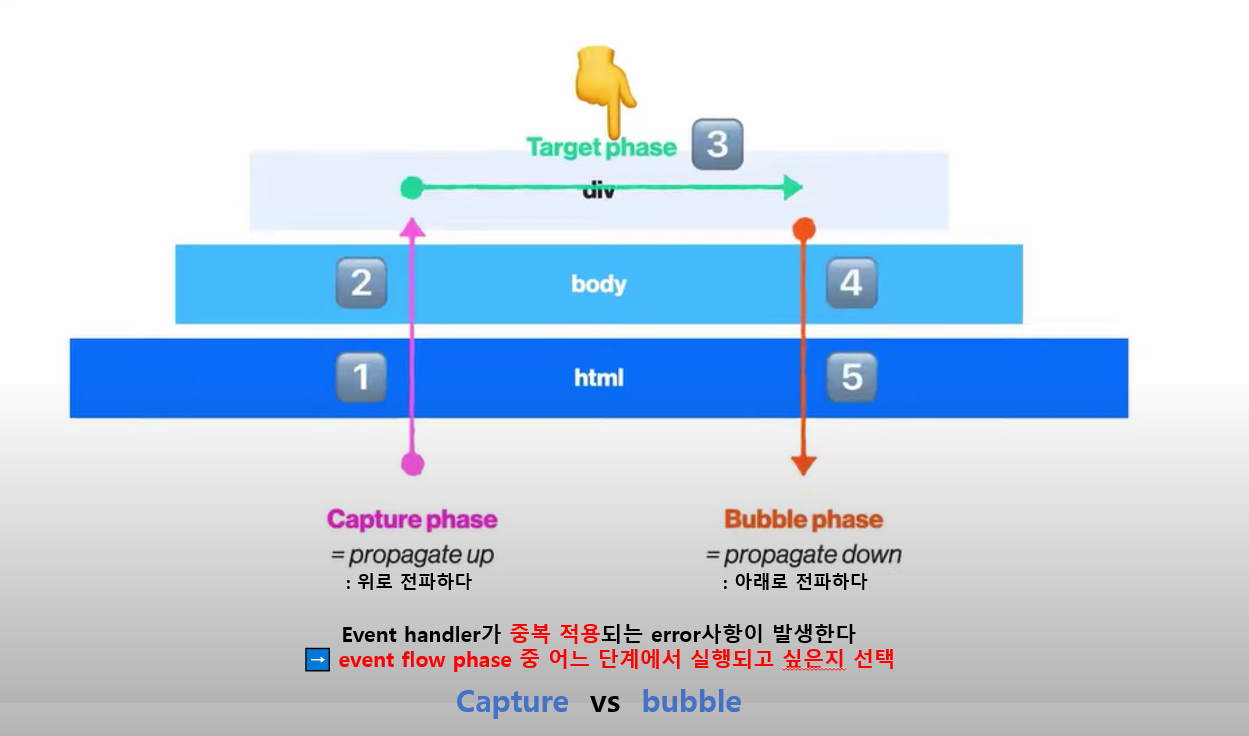
👉 DOM(돔)에서 event가 발생하면, 이벤트가 직접적으로 적용된 태그 뿐만 아니라,
해당 태그를 감싸고 있는 상위 태그에도 동일한 event handler가 적용된다.
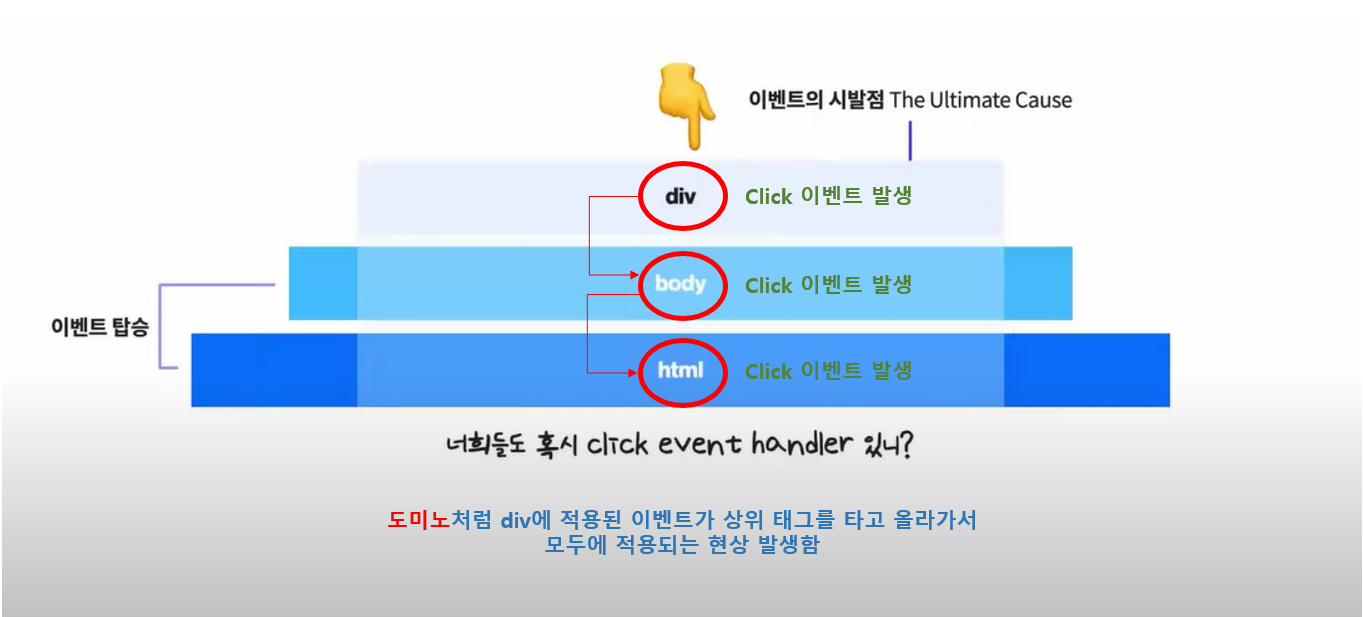
🐹 Event Flow
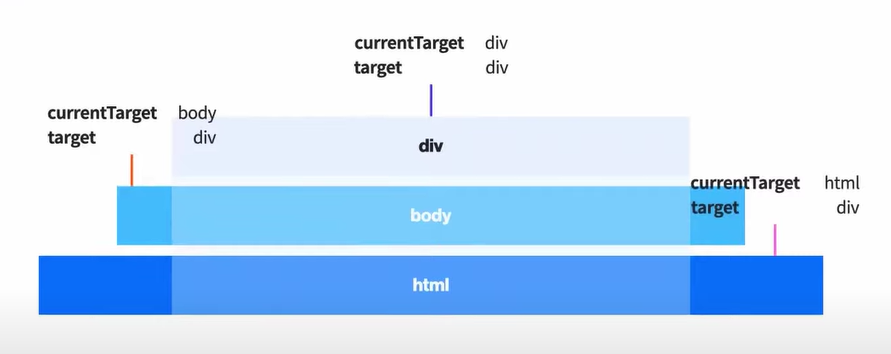
current target과target간의 event 흐름(순차적)이 존재한다.🚫
current target과target용어 정리👉
current target은, 이벤트의 진짜 주인 (div,body,html)
👉target은, 이벤트의 시발점이 되는 타겟 (div)
🐻 Event Flow 흐름도 (중복발생 error)
🚫 Capture 와 bubble 로 이벤트 중복 발생이 생긴다
🚫 capture과 bubble 중에서 양자택일을 해야한다 (중복발생을 방지하기 위해)
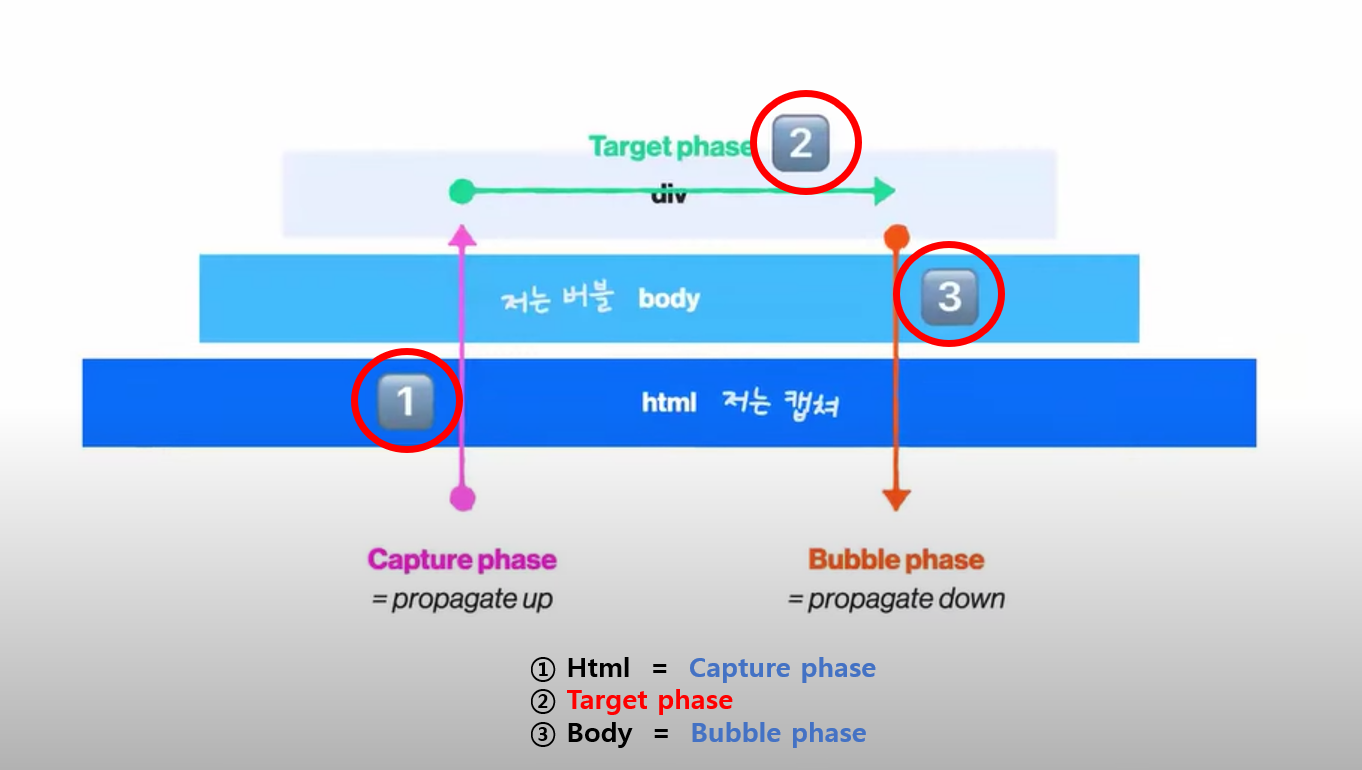
🐻 최종 Event Flow 흐름도
🐠 코드로 확인해보기
// js 에서 html 불러오기
const html = document.documentElement

// js 에서 body 불러오기
const body = document.body

// js 에서 div 태그 불러오기
const div = document.querySelector('div)


div.addEventListener( 'click', function() {
  console.log('DIV')
} )
// capture와 bubble 모두 사용하지 않으므로 boolean값을 적용하지 않는다


body.addEventListener( 'click', function() {
  console.log('body')
}, true )
// body 는 bubble을 사용하기 때문에 false 출력


html.addEventListener( 'click', function() {
  console.log('html')
}, true )
// html 은 capture를 사용하기 때문에 true 출력
(1) div / body / html에 addEventListner를 적용한다.
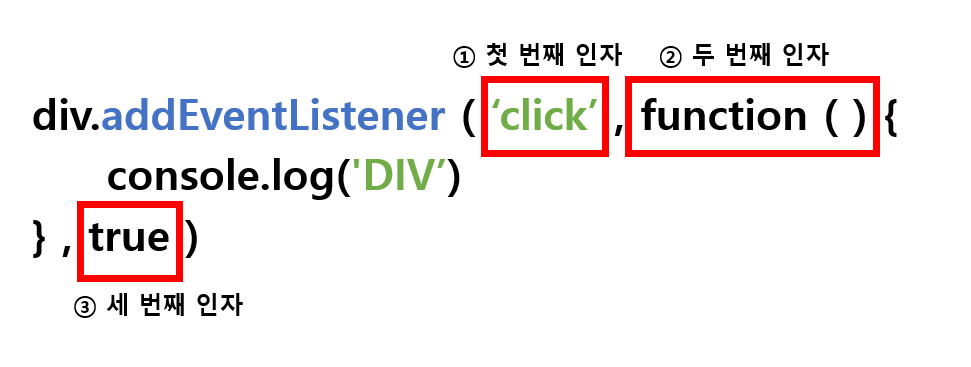
(2) addEventListener의 인자는 3개가 올 수 있다. ➡ (type,function(method),boolean)
(3) 3번째 인자인 boolean에 true를 적용하면 capture를 사용한다는 뜻
( false를 적용하면 bubble때 사용한다는 뜻 )
❗ defalt값은 false이다. 즉 기본적으로 bubble때 실행한다는 뜻이다.
(div➡body➡html)
❗ html, body 태그에, 직접적으로 3번째 인자에 true를 넣어주면 capture때 실행되므로, 출력순서가 바뀐다.
(html➡body➡div)
기본적으로 bubble을 사용한다. 특수한 경우에만 capture를 적용해준다
➡ addEventListener의 3번째 인자에 true를 적용해주기.
✅ DOM Event Object Method
🪐 e.stopPropagation()
➡ addEventListener가 실행되는 순간, 직접적 이벤트 실행 태그 이외 연관된 부모태그에 모두 event handler가 적용되게 된다(= bubble up)
➡ 이 때,e.stopPropagation을 사용하는 것은 부모태그로의 이벤트 전파를 stop, 중지하라는 의미이다.
즉, 이벤트가 상위 엘리먼트에 전달되지 않게 막아 준다
🪐 e.preventDefault()
➡ addEventListener가 실행되는 순간, 직접적 이벤트 실행 태그의 고유 동작(고유 속성)을 중단시키는 역할을 한다.
➡ 예를들면,<a>의href속성을 중단할 수 있다.
즉,<a>를 클릭했을 때,preventDefault()메서드 실행을 통해, 페이지 이동을 하는 기본 기능을 막아 준다
