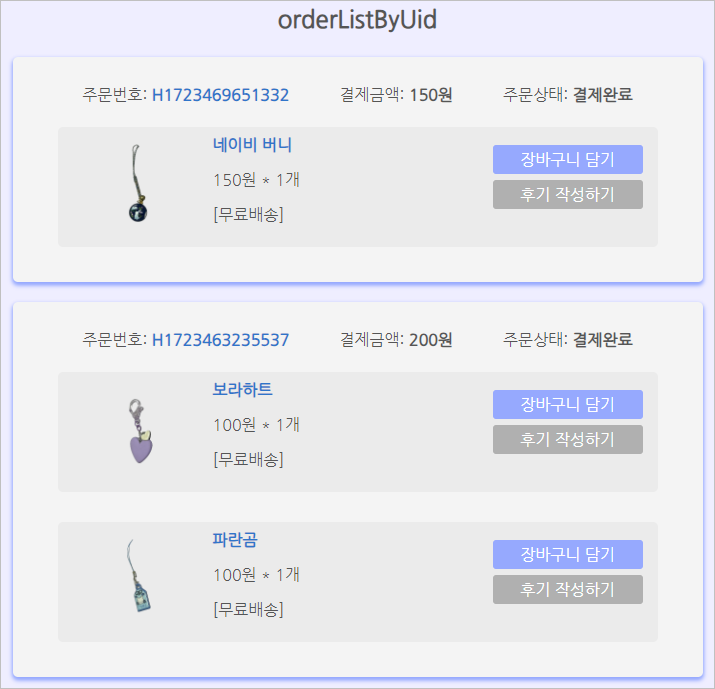
사용자별 주문목록 들어갈 때 결제번호 기준으로 주문 리스트 있고,
결제건당 주문상품 2건 이상일 때 해당 리스트도 함께 한 페이지에 출력해보고 싶었다.
약 70-80% 생각하고 작성해보고 나머지는 chat gpt에게 도움 받았다.
1, Mapper
ㄴ 아직 group by 하지 않음
//uid별 결제내역 보기
		@Select("select paynum, o.uid, o.product_code, pnames, pquantity, "
				+ "totalPay, odate, omethod, ostatus, oname, otel, oadd, "
				+ "uname, utel, "
				+ "pname, pprice, pdelifee, pimgStr "
				+ "from ord o join users u on o.uid = u.uid "
				+ "join products p on o.product_code = p.product_code "
				+ "where o.uid=#{uid} "
				+ "order by odate desc")
		List<OrdVo> orderListByUid(String uid);
2, Service
public List<OrdVo> orderListByUid(String uid) {
		return ordMapper.orderListByUid(uid);
	}
3, Ctrl
@GetMapping("orderListByUid")
	public String orderListByUid(Model model, @RequestParam("uid") String uid) {
	    System.out.println("orderListByUid");

	    // uid별 결제내역 가져오기
	    List<OrdVo> orderListByUid = ordSvc.orderListByUid(uid);

	    // paynum 기준으로 정보 저장할 Map 생성
	    Map<String, Map<String, Object>> ordersByPaynum = new LinkedHashMap<>();

	    for (OrdVo order : orderListByUid) {
	        String paynum = order.getPaynum();
	        if (!ordersByPaynum.containsKey(paynum)) {

	            // paynum별 첫 주문정보 초기화
	            Map<String, Object> orderInfo = new HashMap<>();
	            orderInfo.put("ostatus", order.getOstatus());
	            orderInfo.put("totalPay", order.getFmtTotalPay());
	            orderInfo.put("products", new ArrayList<OrdVo>());
	            ordersByPaynum.put(paynum, orderInfo);
	        }

	        // 경고 억제
	        @SuppressWarnings("unchecked")
	        List<OrdVo> products = (List<OrdVo>) ordersByPaynum.get(paynum).get("products");

	        // 해당 paynum에 속하는 주문상품을 리스트에 추가
	        products.add(order);
	    }

	    // 모델에 그룹화된 주문 리스트 추가
	    model.addAttribute("ordersByPaynum", ordersByPaynum);

	    return "ord/orderListByUid";
	}
4, Front
<!-- paynum 별로 감싸는 div -->
<div th:each="entry : ${ordersByPaynum}"
     style="width: 800px; display: flex; flex-wrap: wrap; justify-content: center;
     padding: 20px; margin: 20px; background-color: #f4f4f4; border-radius: 5px;
     box-shadow: 0 3px 5px #96a9fe, 0 2px 4px #96a9fe; background-color: #f4f4f4;">

    <div style="width: 750px; display: flex; justify-content: flex-start;"><!-- 기본정보 -->
	    <div style="margin-right: 70px">
	    	주문번호:
	        <a th:href="@{/ord/viewOrder(paynum=${entry.key})}"
	                    th:utext="'<strong>' + ${entry.key}+ '</strong>'"></a>
	    </div>

	    <div style="margin-right: 70px">
	        <span th:utext="'결제금액: <strong>' + ${entry.value.totalPay} + '원' + '</strong>'"></span>
	    </div>

		<div>
	    	<span th:utext="'주문상태: <strong>' + ${entry.value.ostatus}+'</strong>'"></span>
	    </div>
	</div><!-- 기본정보 끝 -->

    <!-- paynum에 해당하는 상품 리스트 -->
    <div th:each="oitem : ${entry.value.products}"
         style="width: 750px; border-radius: 5px; margin: 15px;
         display: flex; flex-wrap: wrap; align-content: center;
         justify-content: left; background-color: #ebebeb;">

        <!-- 각 주문 상품 -->
        <div style="width: 150px; margin-left: 5px;">
            <a th:href="@{/prd/viewPrd(product_code=${oitem.product_code})}" target="_blank">
                <img th:src="@{/img/}+${oitem.pimgStr}" width="120" />
            </a>
        </div>

        <div style="width: 350px; text-align: left; margin-right: 15px;">
            <div>
                <a th:href="@{/prd/viewPrd(product_code=${oitem.product_code})}"
                    th:utext="'<strong>' + ${oitem.pname} + '</strong>'"
                    target="_blank"></a>
            </div>

            <div>
                <span th:text="${oitem.fmtPprice} + '원 * ' + ${oitem.pquantity} + '개'"></span>
            </div>

            <div>
                <span th:text="${oitem.pdelifee == 0 ? '[무료배송]' : '+ 배송비: ' + oitem.fmtPdelifee + '원'}"></span>
            </div>
        </div>

        <div style="width: 150px; text-align: right; margin: 10px;">
            <div>
                <form action="/cart/addCart" method="post">
                    <input type="hidden" name="product_code" th:value="${oitem.product_code}">
                    <input type="hidden" name="pquantity" value="1">
                    <button type="submit" class="button">장바구니 담기</button>
                </form>
            </div>

            <div>
                <button class="subbtn">후기 작성하기</button>
                <!-- 	후기 작성 기능은 주문상태가 '도착'인 건에 한해 출력 예정 -->
            </div>
        </div>

    </div><!-- 각 주문상품 끝 -->
</div><!-- paynum별 주문 끝 -->
기기 좋아하는 여자