Layout의 기본적인 요구사항
- 위젯이 어떻게 배치되는가
- ex)위젯의 상하 배치
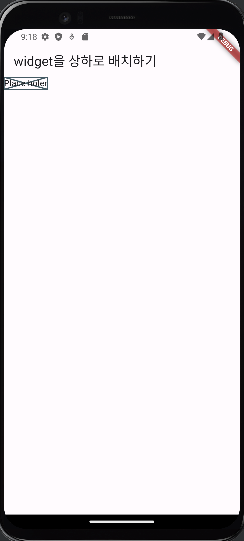
Placeholer
- placeholer: 이 위치에 어떤 위젯이 올거니 자리를 차지하라는 뜻
예시
import 'package:flutter/material.dart';

void main() {
  runApp(
    MaterialApp(
      home: Scaffold(
        appBar: AppBar(
          title: Text('widget을 상하로 배치하기'),
        ),
        body: Body(),
      ),
    ),
  );
}

class Body extends StatelessWidget {
  const Body({super.key});

  @override
  Widget build(BuildContext context) {
    return Placeholder(
      child: Text('Place holer'),
    );
  }
}
결과
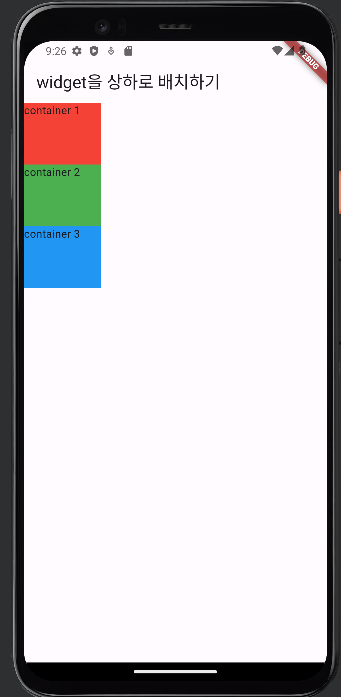
위젯 위아래로 배치하기
- column을 주로 사용
- column 안에 container 들을 이용하여 각각의 width와 height등을 사용해 각 container의 높이와 너비등을 조정가능
column
- column: container를 설정하면 해당 container를 위아래로 배치하도록 함
- 기본적으로 맨 위에 딱 달라붙는 형태
예시
import 'package:flutter/material.dart';

void main() {
  runApp(
    MaterialApp(
      home: Scaffold(
        appBar: AppBar(
          title: Text('widget을 상하로 배치하기'),
        ),
        body: Body(),
      ),
    ),
  );
}

class Body extends StatelessWidget {
  const Body({super.key});

  @override
  Widget build(BuildContext context) {
    return Column(
      children: [
        Container(
          width: 100,
          height: 80,
          child: Text('container 1'),
          color: Colors.red,),
        Container(
            width: 100,
            height: 80,
            child: Text('container 2'),
            color: Colors.green),
        Container(
            width: 100,
            height: 80,
            child: Text('container 3'),
            color: Colors.blue),
      ],
    );
  }
}
결과
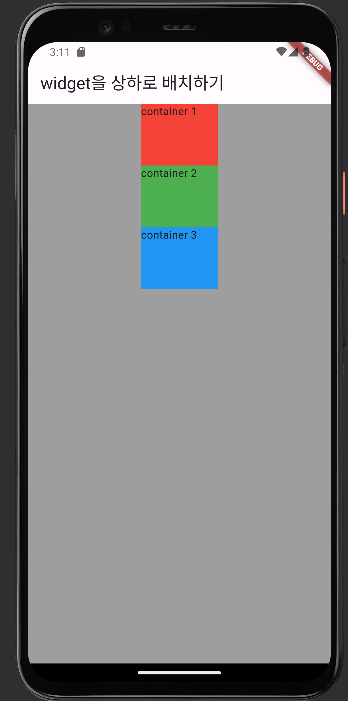
만약 column의 위치를 container안에 있게 한다면
import 'package:flutter/material.dart';

void main() {
  runApp(
    MaterialApp(
      home: Scaffold(
        appBar: AppBar(
          title: Text('widget을 상하로 배치하기'),
        ),
        body: Body(),
      ),
    ),
  );
}

class Body extends StatelessWidget {
  const Body({super.key});

  @override
  Widget build(BuildContext context) {
    return Container(
      width: double.infinity,
      height: double.infinity,
      color: Colors.grey,
      child: Column(

        children: [
        Container(
          width: 100,
          height: 80,
          child: Text('container 1'),
          color: Colors.red,),
        Container(
            width: 100,
            height: 80,
            child: Text('container 2'),
            color: Colors.green),
        Container(
            width: 100,
            height: 80,
            child: Text('container 3'),
            color: Colors.blue),
      ],
    ),
    );
  }
}
이런식으로 코드를 작성할 수 있는데 이렇게 되면 container 1,2,3들이 가운데로 이동하게 되고 배경이 회색이 된다.
결과
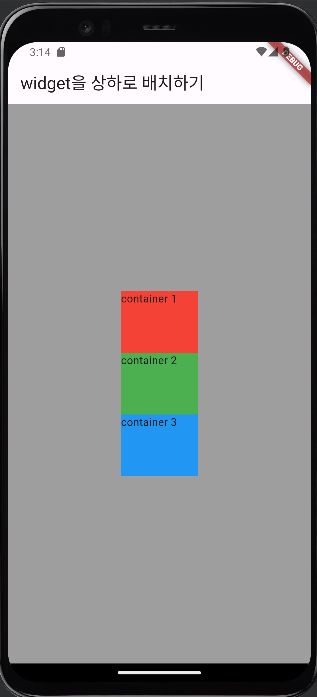
만약에 이 상태로 container들을 완전 한 가운데로 옮기고 싶다면 코드 한 줄을 추가하면 된다
import 'package:flutter/material.dart';

void main() {
  runApp(
    MaterialApp(
      home: Scaffold(
        appBar: AppBar(
          title: Text('widget을 상하로 배치하기'),
        ),
        body: Body(),
      ),
    ),
  );
}

class Body extends StatelessWidget {
  const Body({super.key});

  @override
  Widget build(BuildContext context) {
    return Container(
      width: double.infinity,
      height: double.infinity,
      color: Colors.grey,
      child: Column(
        mainAxisAlignment: MainAxisAlignment.center,
        children: [
        Container(
          width: 100,
          height: 80,
          child: Text('container 1'),
          color: Colors.red,),
        Container(
            width: 100,
            height: 80,
            child: Text('container 2'),
            color: Colors.green),
        Container(
            width: 100,
            height: 80,
            child: Text('container 3'),
            color: Colors.blue),
      ],
    ),
    );
  }
}- 추가된 코드는 'mainAxisAlignment: MainAxisAlignment.center,'인데 이 코드를 통해 container를 중앙으로 옮긴다
결과
container를 맨 왼쪽 혹은 맨 오른쪽으로 보내고싶다면
- 'crossAxisAlignment: CrossAxisAlignment.start,' 추가 //시작지점(맨 왼쪽)부터
- 'crossAxisAlignment: CrossAxisAlignment.end,' 추가 //끝(맨 오른쪽) 부터
container를 상하로 쌓는게 아닌 좌우로 쌓고싶다면
- 코드에 보이는 'child: Column(' 이 부분에서 Column을 Row로 바꾸면 된다.
예시
import 'package:flutter/material.dart';

void main() {
  runApp(
    MaterialApp(
      home: Scaffold(
        appBar: AppBar(
          title: Text('widget을 좌우로 배치하기'),
        ),
        body: Body(),
      ),
    ),
  );
}

class Body extends StatelessWidget {
  const Body({super.key});

  @override
  Widget build(BuildContext context) {
    return Container(
      width: double.infinity,
      height: double.infinity,
      color: Colors.grey,
      child: Row(
        mainAxisAlignment: MainAxisAlignment.center,
        crossAxisAlignment: CrossAxisAlignment.start,
        children: [
        Container(
          width: 100,
          height: 80,
          child: Text('container 1'),
          color: Colors.red,),
        Container(
            width: 100,
            height: 80,
            child: Text('container 2'),
            color: Colors.green),
        Container(
            width: 100,
            height: 80,
            child: Text('container 3'),
            color: Colors.blue),
      ],
    ),
    );
  }
}
결과

- 만약 이상태에서 위젯의 위치를 조정하고 싶다면 Column과 같은 방법으로 조정할 수 있다.
- 또한 좌우로만 배치하고 상하로만 배치하는 것이 아닌 Column과 Row에 들어있는 컨테이너 수를 통해 n열n행으로 위젯을 만들고 그 안에서 Column과 Row의 위치를 따로 조정하는 것도 가능하다.
예시
import 'package:flutter/material.dart';

void main() {
  runApp(
    MaterialApp(
      home: Scaffold(
        appBar: AppBar(
          title: Text('widget을 상하좌우로 배치하기'),
        ),
        body: Body(),
      ),
    ),
  );
}

class Body extends StatelessWidget {
  const Body({super.key});

  @override
  Widget build(BuildContext context) {
    return Container(
      width: double.infinity,
      height: double.infinity,
      color: Colors.grey,
      child: Column(
        mainAxisAlignment: MainAxisAlignment.center,
        children: [
          Row(
            mainAxisAlignment: MainAxisAlignment.center,
            crossAxisAlignment: CrossAxisAlignment.start,
            children: [
            Container(
              width: 100,
              height: 80,
              child: Text('container 1'),
              color: Colors.red,),
            Container(
                width: 100,
                height: 80,
                child: Text('container 2'),
                color: Colors.green),
            Container(
                width: 100,
                height: 80,
                child: Text('container 3'),
                color: Colors.blue),
          ],
              ),
          Container(
            width: 300,
            height: 120,
            color: Colors.purple,
            child: Text('container 4'),
          )
        ],
      ),
    );
  }
}
결과
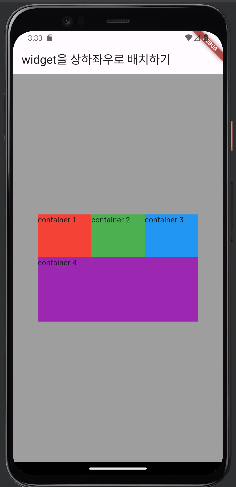
- Row에 alt+enter를 통해 Row에 Column을 씌워서 row의 좌우 칸에 맞게 column의 좌우도 맞춰지는 모습을 볼 수 있고 column의 아래쪽 너비는 따로 설정이 가능하다.
- 반대로 column에 row를 씌워서 colum의 상하 길이에 맞는 row칸을 생성 할 수 있다.
- 크기 및 위치 조정은 위에서 말했던 방법과 같다.
Widget을 스크롤하는 방법
import 'package:flutter/material.dart';

void main() {
  runApp(
    MaterialApp(
      home: Scaffold(
        appBar: AppBar(
          title: Text('widget을 상하좌우로 배치하기'),
        ),
        body: Body(),
      ),
    ),
  );
}

class Body extends StatelessWidget {
  const Body({super.key});

  @override
  Widget build(BuildContext context) {
    return  SingleChildScrollView(
      child: Column(
          mainAxisAlignment: MainAxisAlignment.center,
          children: [
            Container(
              color: Colors.grey,
              width: double.infinity,
              height: 100,
              margin: EdgeInsets.symmetric(vertical: 8),
            ),
            Container(
              color: Colors.grey,
              width: double.infinity,
              height: 100,
              margin: EdgeInsets.symmetric(vertical: 8),
            ),

            Container(
              color: Colors.grey,
              width: double.infinity,
              height: 100,
              margin: EdgeInsets.symmetric(vertical: 8),
            ),

            Container(
              color: Colors.grey,
              width: double.infinity,
              height: 100,
              margin: EdgeInsets.symmetric(vertical: 8),
            ),

            Container(
              color: Colors.grey,
              width: double.infinity,
              height: 100,
              margin: EdgeInsets.symmetric(vertical: 8),
            ),

            Container(
              color: Colors.grey,
              width: double.infinity,
              height: 100,
              margin: EdgeInsets.symmetric(vertical: 8),
            ),

            Container(
              color: Colors.grey,
              width: double.infinity,
              height: 100,
              margin: EdgeInsets.symmetric(vertical: 8),
            ),
            Container(
              color: Colors.grey,
              width: double.infinity,
              height: 100,
              margin: EdgeInsets.symmetric(vertical: 8),
            ),
            Container(
              color: Colors.grey,
              width: double.infinity,
              height: 100,
              margin: EdgeInsets.symmetric(vertical: 8),
            ),

            Container(
              color: Colors.grey,
              width: double.infinity,
              height: 100,
              margin: EdgeInsets.symmetric(vertical: 8),
            ),

            Container(
              color: Colors.grey,
              width: double.infinity,
              height: 100,
              margin: EdgeInsets.symmetric(vertical: 8),
            ),

            Container(
              color: Colors.grey,
              width: double.infinity,
              height: 100,
              margin: EdgeInsets.symmetric(vertical: 8),
            ),
          ],
        ),
    );
  }
}- 위와 같이 무수히 많은 컨테이너로 인해 화면에 보일 수 있는 내용이 초과되면 에러가 발생하는데 이걸 해결하는 방법이
- return 옆에 있는 'SingleChildScrollView'이다. 이것을 통해 화면밖에 있는 것들까지 스크롤을 통해 에러없이 볼 수 있게 해준다.
결과
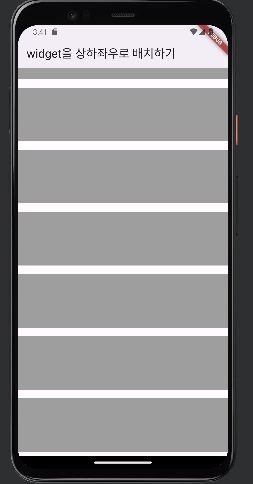
- 만약 'child: Column' 이 부분이 Column이 아닌 Row라면 상하 스크롤이 아닌 좌우 스크롤로 볼 수 있다.

이동완