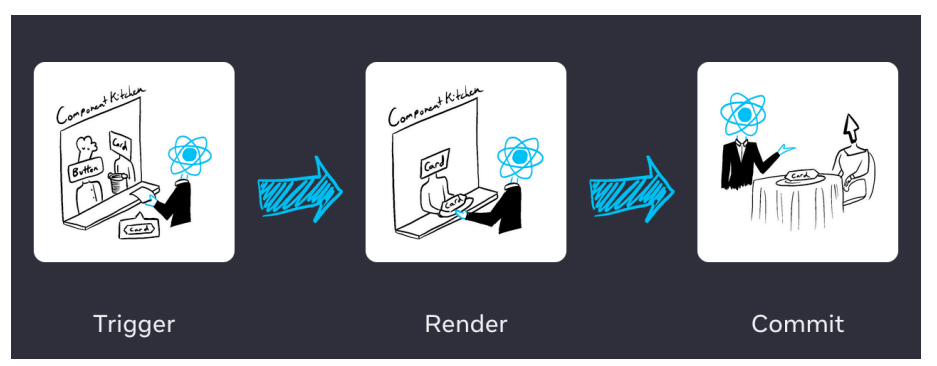
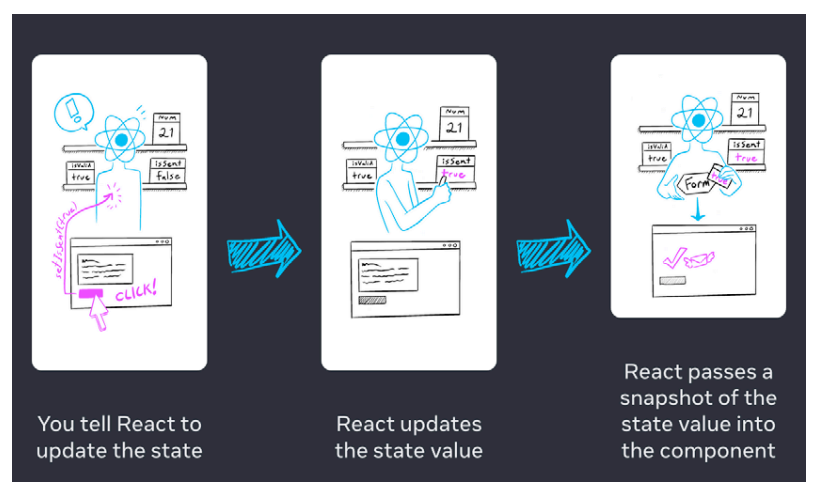
Process of requesting and serving UI
- Triggering a render (delivering the guest’s order to the kitchen)
사용자의 행동(예: 버튼 클릭, 입력 등)이나 상태의 변경 등이 발생하여 컴포넌트가 다시 렌더링되어야 함을 React에 알리는 과정입니다 - Rendering the component (preparing the order in the kitchen)
React가 컴포넌트의 렌더링 함수를 실행하여 새로운 JSX 요소를 생성하는 과정입니다 - Committing to the DOM (placing the order on the table)
React가 생성된 JSX 요소를 실제 웹 페이지의 DOM에 반영하여 사용자에게 보여주는 과정입니다.
트리거한다란 React의 렌더링 과정을 시작하도록 하는 이벤트를 발생시킨다는 의미.
Trigger a Render
- Initial Render
- The start of your app triggers the initial render
- create Roo with the target DOM node and calling the render method (index.js)
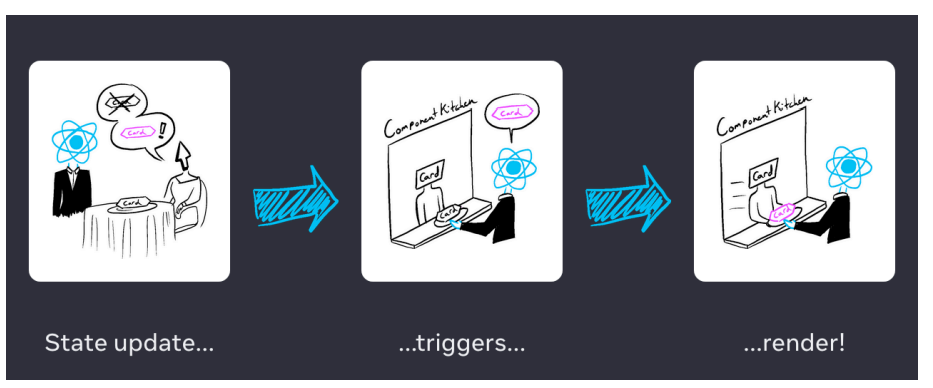
- Re-rendering when state updates
- Trigger renders by updating the state with the set function
- Updating the state automatically queues a render
상태를 업데이트하면 자동으로 렌더 대기열이 발생합니다
Render and Commit
- Triggers: initial render (app start) and component state update
- After the trigger, React calls your components to figure out what to display on screen. “Rendering” is React calling the components.
트리거 후에 React는 화면에 무엇을 표시할지 알아내기 위해 컴포넌트를 호출합니다. '렌더링'이란 React가 컴포넌트를 호출하는 것을 말합니다
- On initial render, React will call the root component.
- For subsequent renders, React will call the function component whose state update triggered the render.
상태 업데이트에 의해 렌더링이 트리거된 함수 컴포넌트를 React가 호출할 것입니다.- This process is recursive: if the updated component returns some other component, React will render that component next. The process will continue until there are no more nested components
- Commits: React commits changes to the DOM
- After rendering (calling) your components, React will modify the DOM.
- For the initial render, use the appendChild() DOM API to put all the DOM nodes.
- For re-renders, apply the minimal necessary operations to make the DOM match the latest rendering output (only changes the DOM nodes if there’s a difference between renders).
“render” in function-based component vs. class-based
import React from 'react';
const MyFunctionalComponent = () => {
    return (
        <div>
            <h1>Hello, World!</h1>
        </div>
    );
};
export default MyFunctionalComponent;- In functional components in React, the rendering is done by the function itself, not a render method. The function itself is responsible for describing what should be rendered
import React, { Component } from 'react';
class MyComponent extends Component {
render() {
return (
<div>
<h1>Hello, World!</h1>
</div>
);
}
}
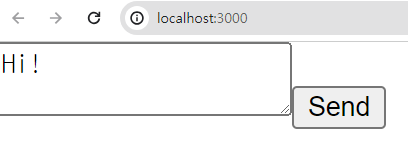
export default MyComponent;Setting state triggers renders
- When pressing “send,”
setIsSent(true)tells React to rerender the UI
- The onSubmit event handler executes.
setIsSent(true)sets isSent to true and queues a new render.- React re-renders the component according to the new isSent value
cf) e.preventDefault();를 사용하여 제출 이벤트가 발생해도 페이지가 새로고침되지 않도록 할 수 있습니다.
import {useState} from 'react';

export default function Form() {
    const [isSent, setIsSent] = useState(false);
    const [message, setMessage] = useState('Hi!');
    if (isSent) {
        return <h1>Your message is on its way!</h1>
    }
    return (
        <form onSubmit={(e) => {
            e.preventDefault();
            setIsSent(true);
            sendMessage(message);
        }}>
            <textarea
                placeholder="Message" value={message}
                onChange={e => setMessage(e.target.value)}
            />
            <button type=" submit">Send</button>
        </form>
    );
}

function sendMessage(message) {
// ...
}

Closer look in rendering and snapshot
- “Rendering” means that React is calling your component, which is a function. The JSX you return from that function is like a snapshot of the UI in time. Its props, event handlers, and local variables were all calculated using its state at the time of the render.
- Since state lives in React, outside of your function. When React calls your component, it gives you a snapshot of the state for that particular render.
An experiment to show how the snapshot works
- The following will be repeated three times:
PlayButtonpasseshandlePlayClickas the setNumber(number + 1): number is 0 so setNumber(0 + 1).- React prepares to change number to 1 on the next render.
- In this render’s event handler number is always 0, So, after your event handler finishes, React re-renders the component with number equal to 1 rather than 3.
import { useState } from 'react';
export default function Counter() {
    const [number, setNumber] = useState(0);
    return (
        <>
            <h1>{number}</h1>
            <button onClick={() => {
                setNumber(number + 1);
                setNumber(number + 1);
                setNumber(number + 1);
            }}>+3</button>
        </>
    )
}
A state variable’s value never changes within a render
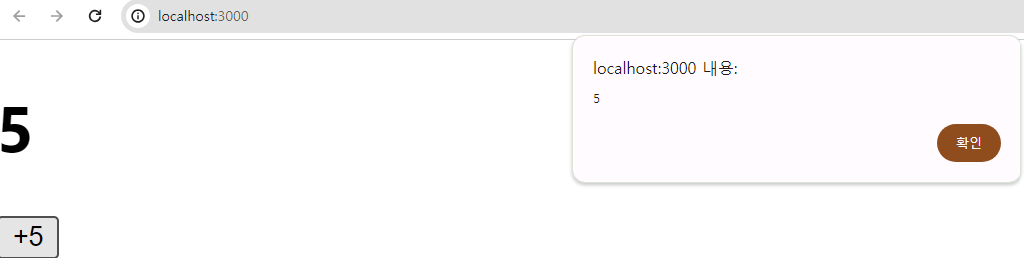
- A state variable’s value never changes within a render, even if its event handler’s code is asynchronous.
- The state stored in React may have changed by the time the alert runs, but it was scheduled using a snapshot of the state at the time the user interacted with it!
import { useState } from 'react';
export default function Counter() {
    const [number, setNumber] = useState(0);
    return (
        <>
            <h1>{number}</h1>
            <button onClick={() => {
                setNumber(number + 5);
                setTimeout(() => {
                    alert(number);
                }, 3000);
            }}>+5</button>
        </>
    )
}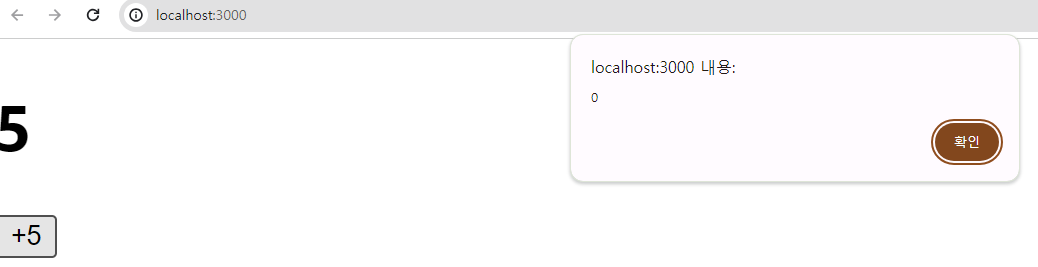
React에 저장된 상태는 Alert가 실행될 때까지 변경되었을 수 있지만, 사용자가 React와 상호 작용할 때의 상태 스냅샷을 사용하는 것을 알 수 있다.
클릭하고 alert에 바로 반영해보기
import {useEffect, useState} from 'react';
export default function Counter() {
    const [number, setNumber] = useState(0);
    useEffect(() => {
       setTimeout(() => {
            alert(number);
        }, 0);
    }, [number]);
    return (
        <>
            <h1>{number}</h1>
            <button onClick={() => {
                setNumber(number=>number + 5);
            }}>+5</button>
        </>
    )
}
Queueing a Series of State Updates
- React waits until all code in the event handlers has run before processing your state updates.
- This lets you update multiple state variables—even from multiple components— without triggering too many re-renders.
- But this also means that the UI won’t be updated until after your event handler,and any code in it, completes.
- This behavior, also known as batching, makes your React app run much faster.
export default function Toolbar() {
    return (
        <div className="Toolbar" onClick={() => {
            alert('You clicked on the toolbar!');
        }}>
            <button onClick={() => alert('Playing!')}>Play Movie</button>
            <button onClick={() => alert('Uploading!')}>Upload Image</button>
        </div>
    );
}
Fix the problem of the previous example
- Instead of passing the next state value like setNumber(number + 1), you can pass a function that calculates the next state based on the previous one in the queue, like setNumber(n => n + 1).
다음 상태 값을 전달하는 것처럼 setNumber(number + 1)을 사용하는 대신, setNumber(n => n + 1)처럼 큐에 있는 이전 상태를 기반으로 다음 상태를 계산하는 함수를 전달할 수 있습니다.- n => n + 1 is called an updater function
- It is a way to tell React to “do something with the state value” instead of just replacing it.
- React queues(큐에 넣다) this function to be processed after all the other code in the event handler has run.
- During the next render, React goes through(통과하다) the queue and gives you the final updated state.
import { useState } from 'react';
export default function Counter() {
    const [number, setNumber] = useState(0);
    return (
        <>
            <h1>{number}</h1>
            <button onClick={() => {
                setNumber(n => n + 1);
                setNumber(n => n + 1);
                setNumber(n => n + 1);
            }}>+3</button>
        </>
    )
}
Declarative Programming: Reacting to Input with State
-
Declare what you want to show and React figures out how to update the UI
- In React, you don’t directly manipulate the UI—meaning you don’t enable, disable, show, or hide components directly. (Imperative(피할수 없는) programming)
- Think of getting into a taxi and telling the driver where you want to go instead of telling them exactly where to turn
-
Implementing UI in React Declaratively
- Identify your component’s different visual states
- Determine what triggers those state changes (Human: click/type or Computer: network response/time out)
해당 상태 변경을 트리거하는 요소 결정 - Represent the state in memory using useState
- Remove any non-essential state variables
- Connect the event handlers to set the state
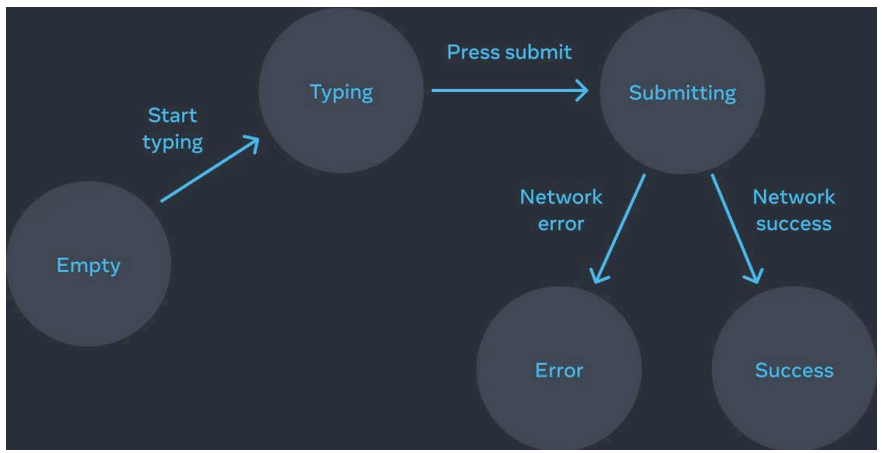
- States of the UI
- Empty: Form has a disabled “Submit” button.
- Typing: Form has an enabled “Submit” button.
- Submitting: Form is completely disabled. Spinner is shown.
- Success: “Thank you” message is shown instead of a form.
- Error: Same as Typing state, but with an extra error message.
- Represent the states and remove any non-essential

- Connect the event handlers to set state
async function handleSubmit(e) {
    e.preventDefault();
    setStatus('submitting');
    try {
        await submitForm(answer);
        setStatus('success');
    } catch (err) {
        setStatus('typing');
        setError(err);
    }
}<form onSubmit={handleSubmit}>
<textarea value={answer}
onChange={handleTextareaChange}
disabled={status === 'submitting'} />
<button disabled={
answer.length === 0 ||
status === 'submitting'
}>Submit</button>
{error !== null &&
<p className="Error">{error.message}</p>
}
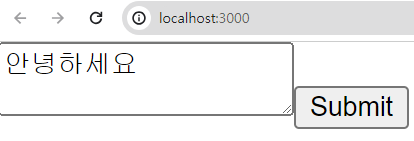
</form><textarea value={answer}>: 이 요소의 value 속성은 answer라는 상태 변수로 설정되어 있으며, 이는 textarea에 입력되는 텍스트 값을 answer 상태에 저장하겠다는 의미입니다.onChange={handleTextareaChange}: onChange는 textarea의 값이 변할 때마다 호출되는 이벤트 핸들러입니다. 사용자가 textarea에 텍스트를 입력하면, handleTextareaChange 함수가 호출됩니다. 이 함수는 사용자가 입력한 텍스트를 받아 answer 상태를 업데이트하는 역할을 합니다.disabled={status === 'submitting'}: disabled 속성은 textarea를 비활성화할지 결정합니다. status 상태가 'submitting'일 때 textarea는 비활성화되며, 이는 폼이 제출되는 동안 사용자가 textarea를 수정할 수 없게 하기 위함입니다.실제로 완성해보면 다음과 같다
import { useState } from 'react';
async function submitForm(answer) {
// 이 부분에 실제로 폼을 제출하는 로직을 추가해야 합니다.
// 예를 들어, 서버로 데이터를 전송하는 API 호출 등이 있을 수 있습니다.
console.log("Form submitted with answer: " + answer);
}
export default function MyFormComponent() {
const [answer, setAnswer] = useState('');
const [error, setError] = useState(null);
// 'typing', 'submitting', or 'success'
const [status, setStatus] = useState('typing');
const handleTextareaChange = (e) => {
setAnswer(e.target.value);
};
const handleSubmit = async (e) => {
e.preventDefault();
setStatus('submitting');
try {
await submitForm(answer);
setStatus('success');
} catch (err) {
setStatus('typing');
setError(err);
}
};
return (
<form onSubmit={handleSubmit}>
<textarea value={answer}
          onChange={handleTextareaChange}
          disabled={status === 'submitting'} />
    <button disabled={
            answer.length === 0 ||
            status === 'submitting'
    }>Submit</button>
    {error !== null &&
    <p className="Error">{error.message}</p>
    }
</form>
);
}
Managing State (Structure & Sharing)
State Structure
- Group Related State
- Two state variables always change together => unify(통합하다) them into a single state variable
const [x, setX] = useState(0);
const [y, setY] = useState(0);
const [position, setPosition] = useState({x: 0, y:0});- Avoid contradictions in state
- Ex) isSending state and isSent state should never be true at the same time. Thus, it is better to replace them with one status state variable that may take one of three valid states: 'typing' (initial), 'sending', and 'sent'
- Avoid duplication in state
Lifting State Up (using Child-to-Parent Communication & props)
- To make the state of two components to always change together, remove state from both of them, move it to their closest common parent, and then pass it down to them via props.
- Lifting State Up is the term we use to describe the way to propagate information from components.
- To pass information from Child A to Child B, we need to pass information from the child A to the parent and then pass it from the parent to the child B.
- The sibling components can not pass the data to the other.
- A collaboration between a parent and children
- data props allow a parent to provide data to a child
- function props (callback) allow a child to communicate with this parent
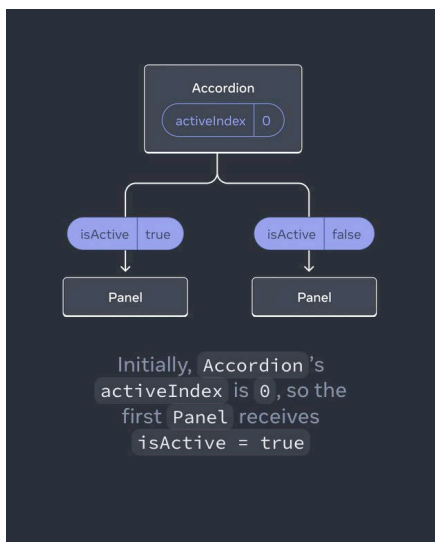
Lifting State Up
import { useState } from 'react';
export default function Accordion() {
const [activeIndex, setActiveIndex] = useState(0);
return (
<>
<h2>Almaty, Kazakhstan</h2>
<Panel title="About"
isActive={activeIndex === 0}
onShow={() => setActiveIndex(0)}
>
Almaty is Kazakhstan's largest city. From
1929 to 1997, it was its capital city.
</Panel>
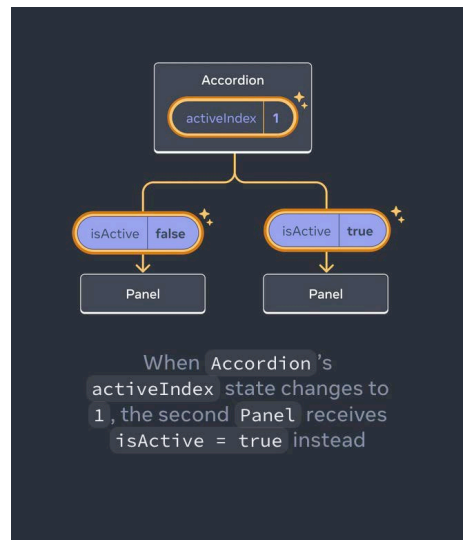
<Panel title="Etymology"
isActive={activeIndex === 1}
onShow={() => setActiveIndex(1)}
>
The region surrounding Almaty is thought to
be the ancestral home of the apple.
</Panel>
</>
);
}
function Panel({
title, children, isActive, onShow
}) {
return (
<section className="panel">
<h3>{title}</h3>
{isActive ? (<p>{children}</p>) :
(<button onClick={onShow}>Show</button>)}
</section>
);
}Lifting State Up