view controller에 tableview넣으면 됨.
앵커 설정할때 safe area -> superview로 하면 화면 끝까지 가능
cell넣을 때 직접 넣어도 되고 빈 파일(cmd + n -> empty)을 만들어서 셀을 만들어도 됨.
control누르고 드래그하면 두 view끼리 height, width 등 맞출 수 있음.
asset에 이미지 불러와서 image view에 추가 가능.
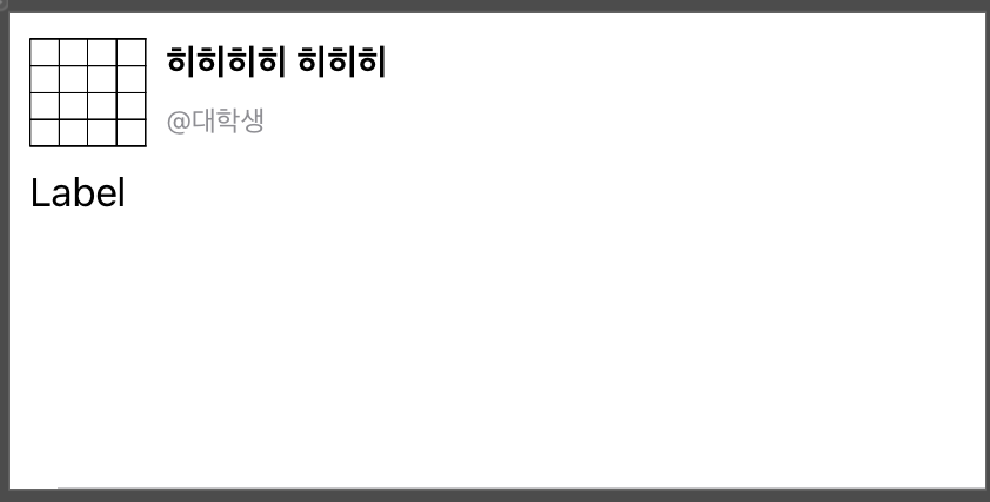
->image view와 stack view를 사용 (distribution -> equal)
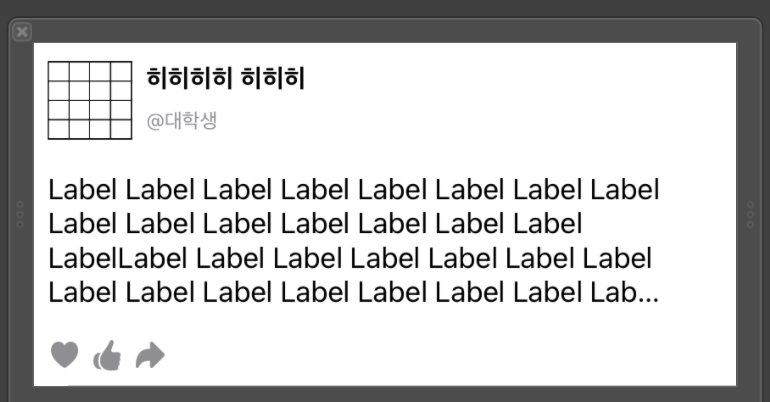
->stackview로 하트, 좋아요, 공유 모양을 넣음(컨스트레인트가 아닌 stackview 메뉴에서 spacing으로 서로의 간격 벌릴 수 있음), 라벨 칸은 greater than or equal과 lines을 0으로 하여 모양을 잡아줌
코드 작성
class ViewController: UIViewController, UITableViewDelegate, UITableViewDataSource{

    override func viewDidLoad() {
        super.viewDidLoad()
        // Do any additional setup after loading the view.
    }


    func tableView(_ tableView: UITableView, numberOfRowsInSection section: Int) -> Int {
        <#code#>
    }


    func tableView(_ tableView: UITableView, cellForRowAt indexPath: IndexPath) -> UITableViewCell {
        <#code#>
    }

} //tableviewdelegate는 tableview에 대한 설정을 하는 것이고, datasource는 source를 집어넣는 것
이 방법과
class ViewController: UIViewController {

    override func viewDidLoad() {
        super.viewDidLoad()
        // Do any additional setup after loading the view.
    }


}


extension ViewController: UITableViewDelegate {


}

extension ViewController: UITableViewDataSource {
    func tableView(_ tableView: UITableView, numberOfRowsInSection section: Int) -> Int {
        <#code#>
    }

    func tableView(_ tableView: UITableView, cellForRowAt indexPath: IndexPath) -> UITableViewCell {
        <#code#>
    }


}
둘 다 가능.
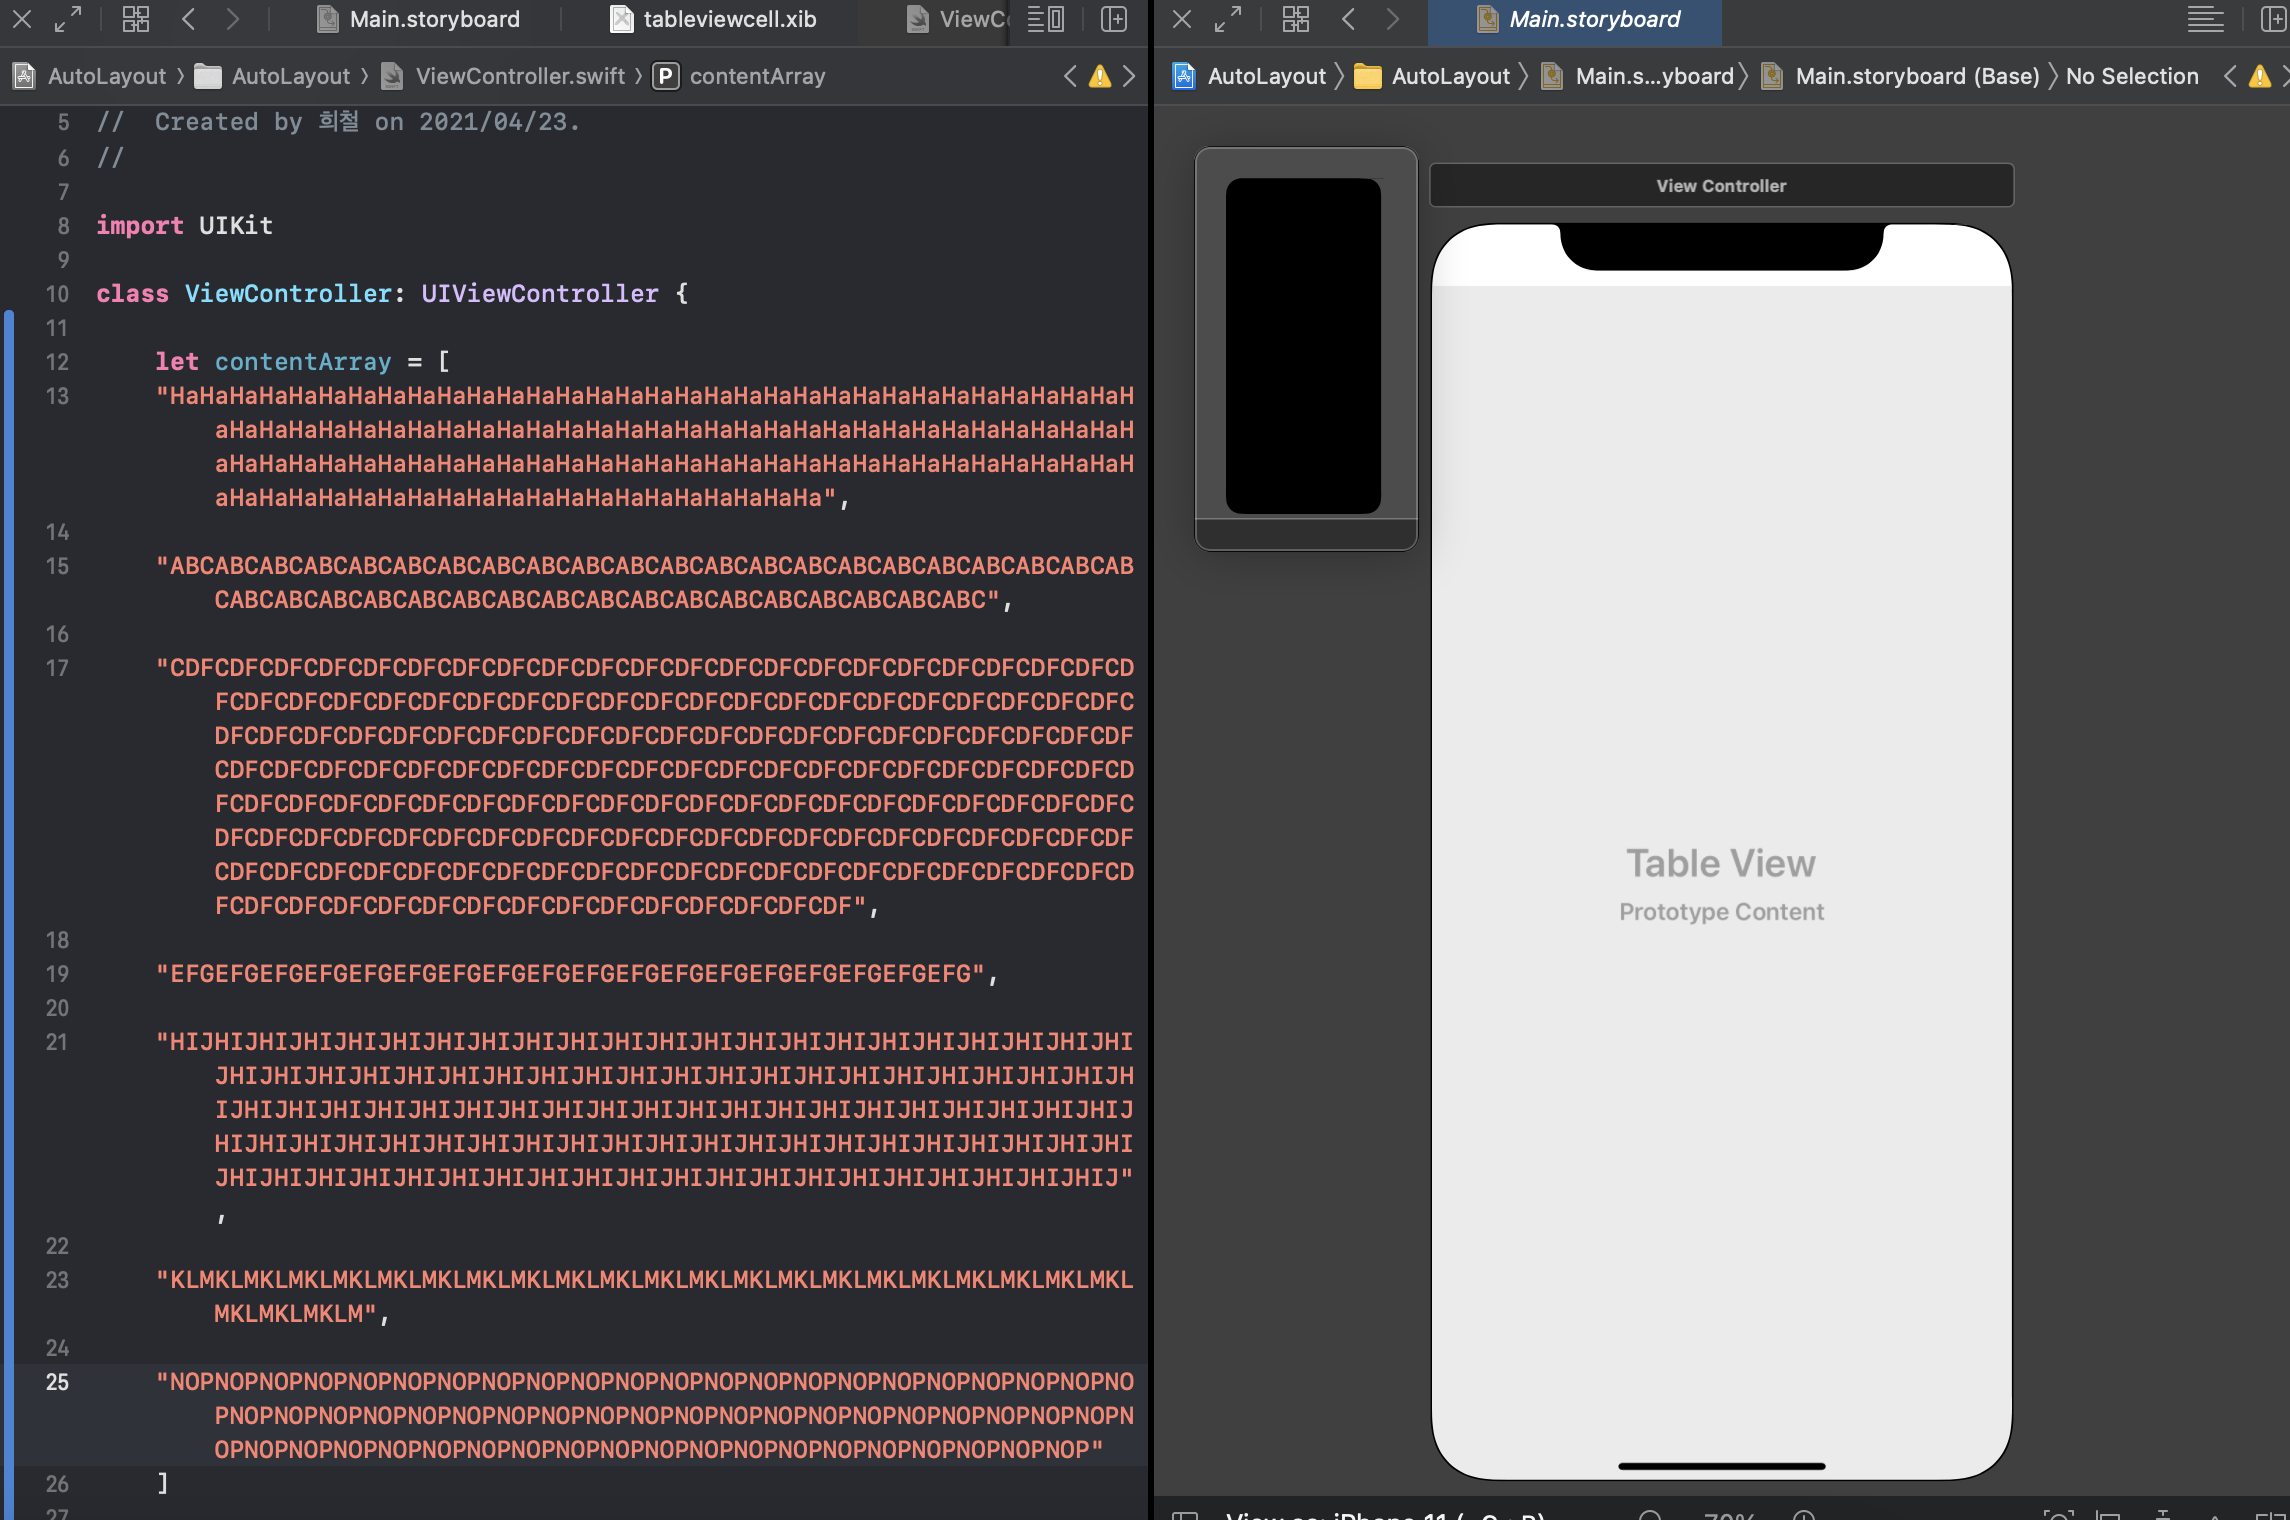
->오른쪽 화면 추가하고 cmd + shift + O로 storyboard로 설정. 왼쪽은 cell의 내용 추가한 것.
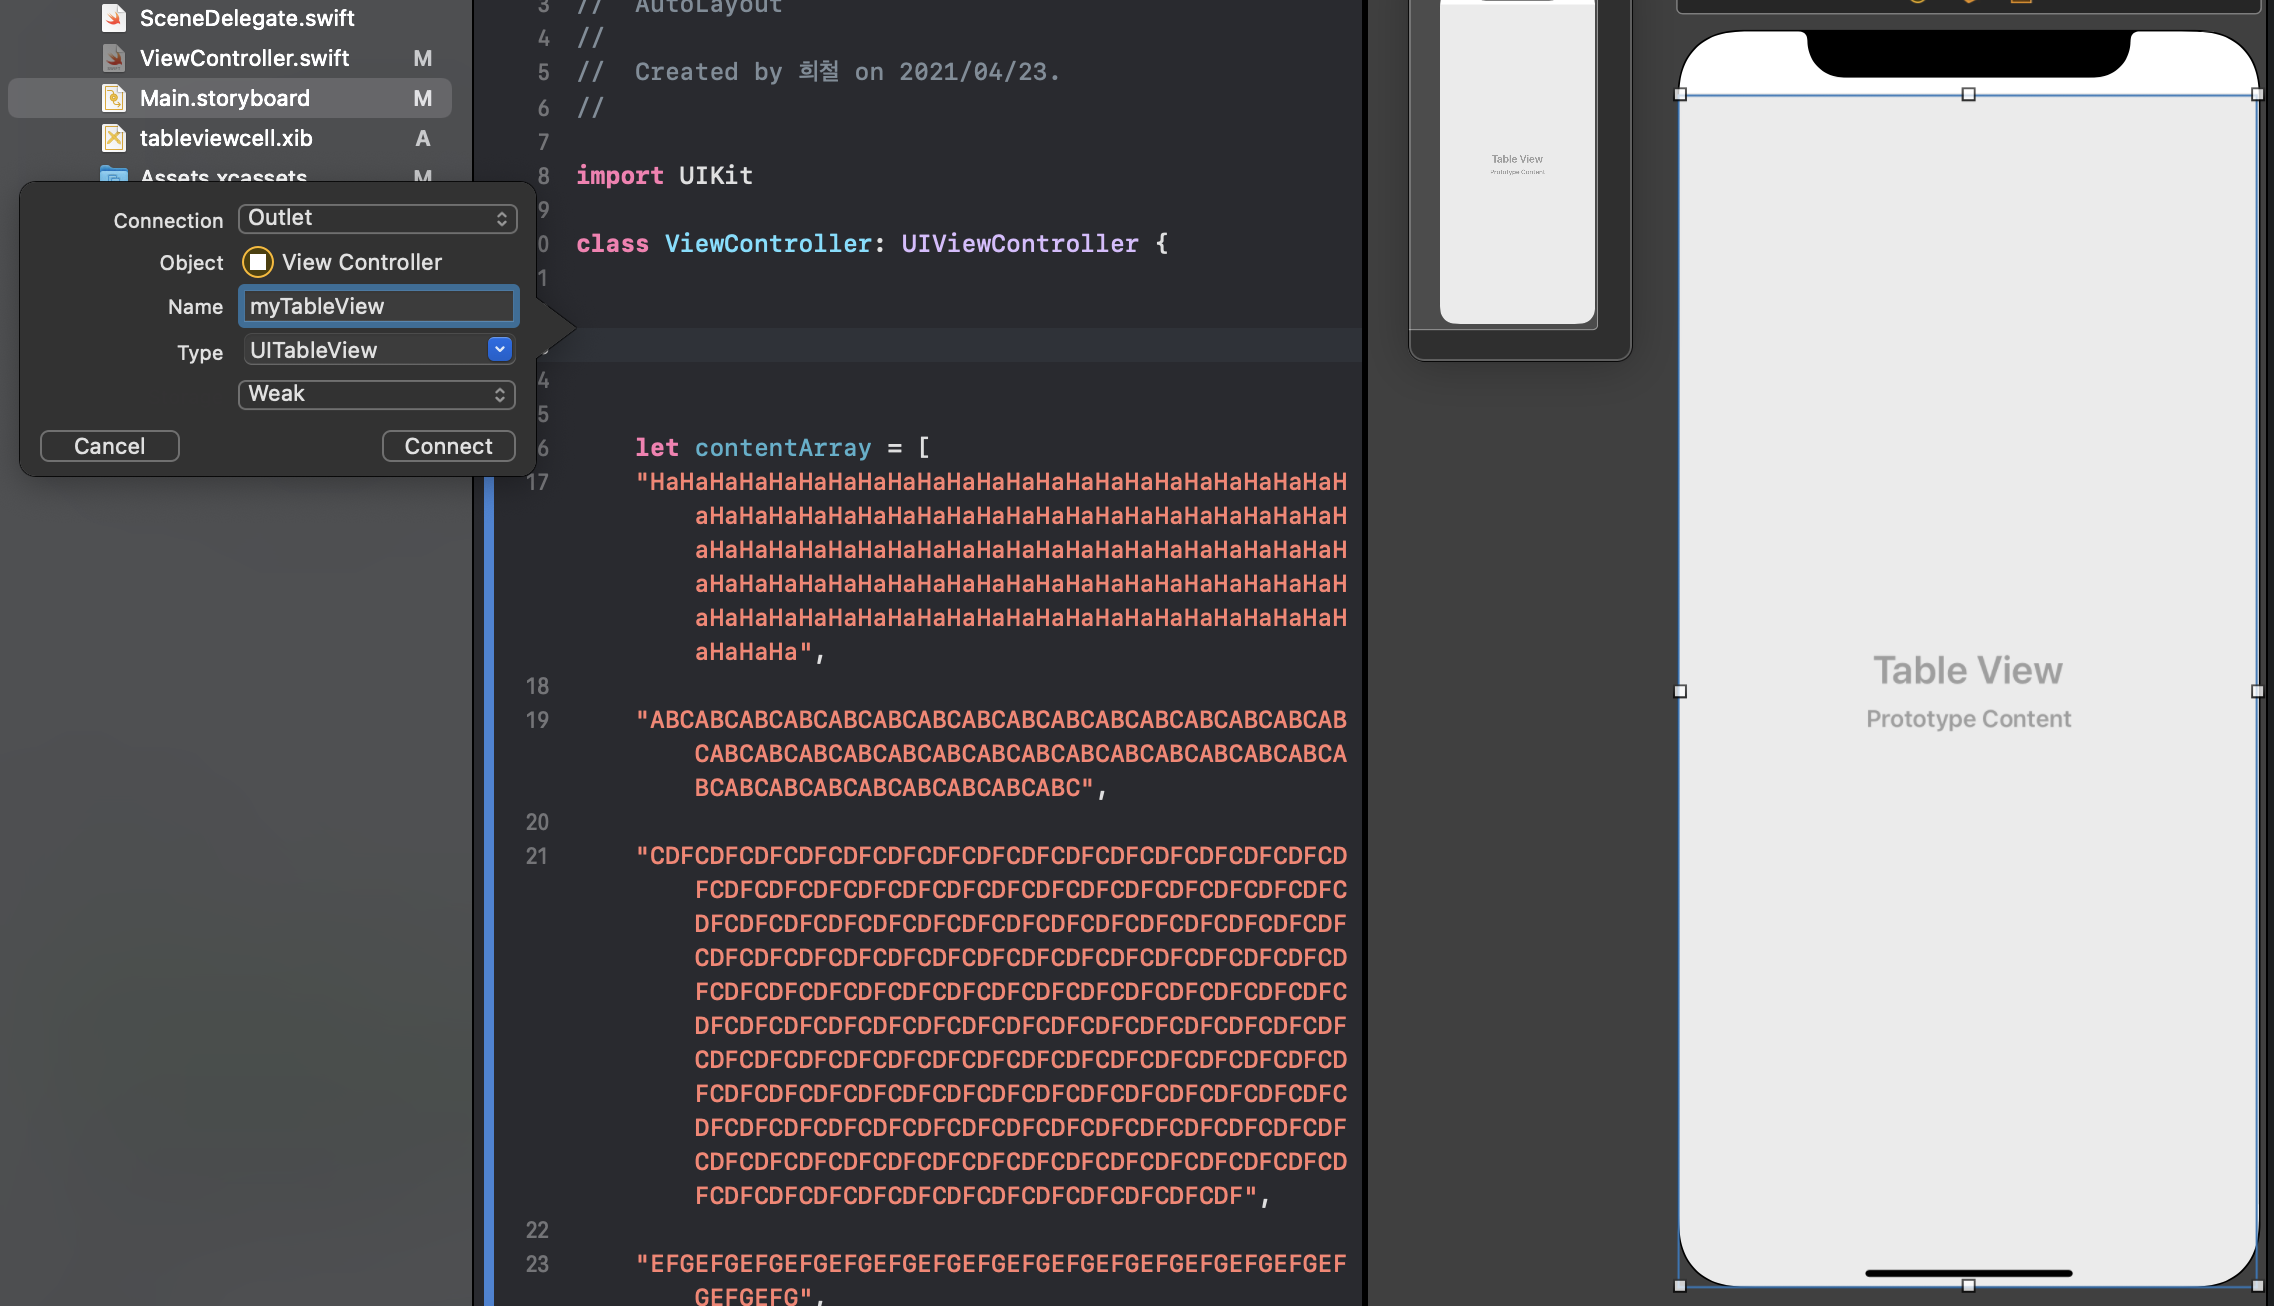
-> 오른쪽 tableview 클릭 후 드래그해서 놓아서 @IBOutlet만듦(오른쪽의 view controller의 클래스가 왼쪽에 클래스로 지정해놓은 ViewController로 맞춰져야 드래그해서 생성가능)

->아까 만든 cell과 연결짓는 다른 클래스가 필요하므로 cmd + n으로 swift파일 생성.
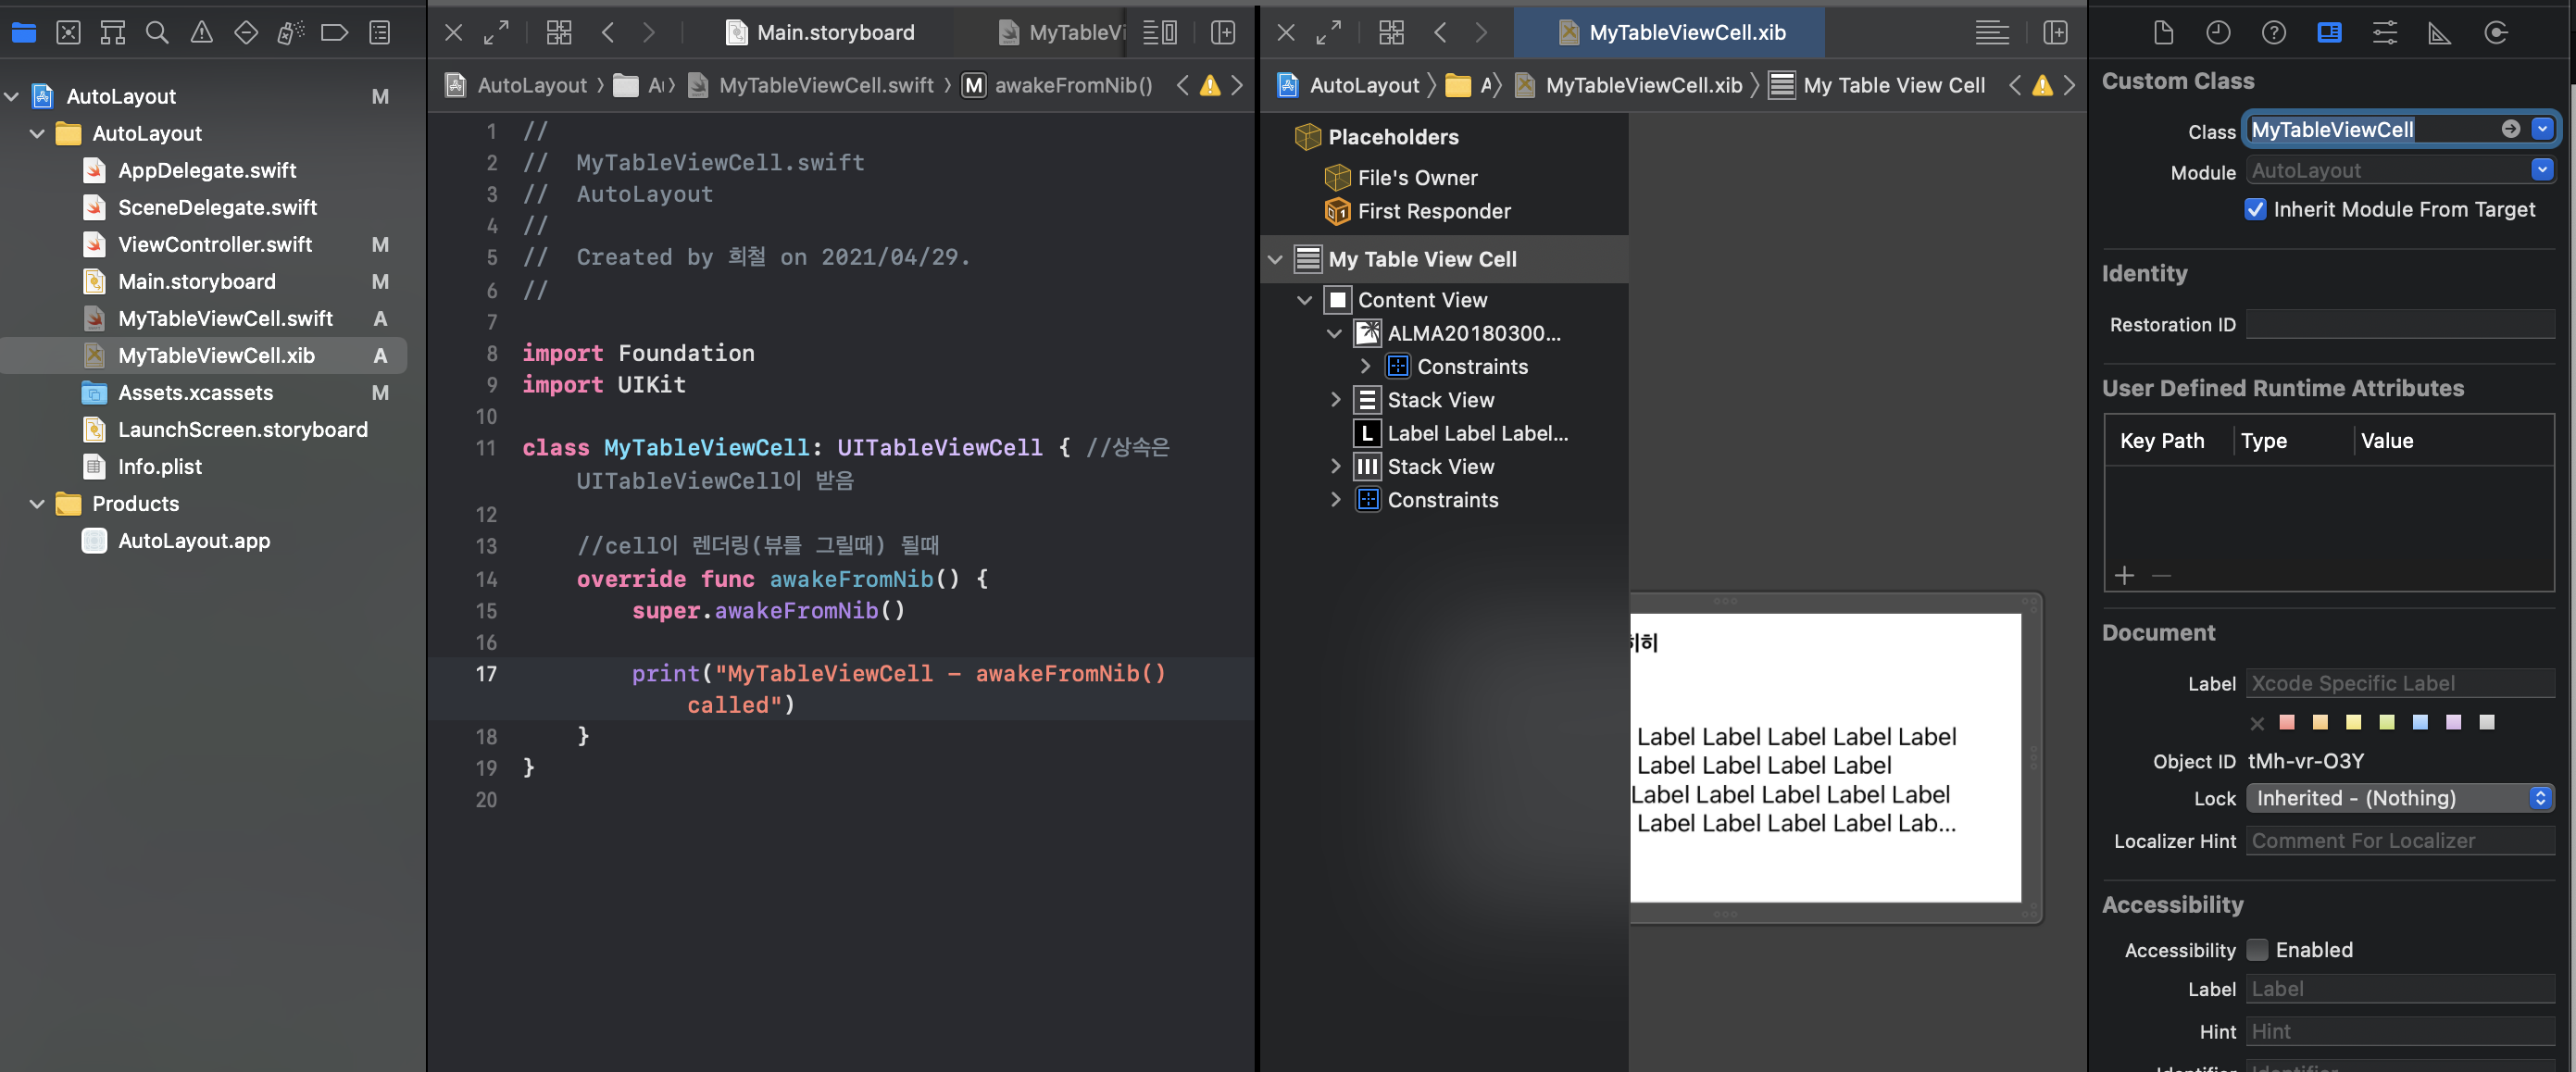
->마찬가지로 코드와 ui를 연결시켜줘야하므로 custom class를 작성하고있는 것과 연결시켜줘야함.

->먼저 image의 outlet
image를 동그랗게 하기 위한 코드
MyTableViewCell swift파일 안의 awakeFromNib()안에 작성 (xib파일을 Nib이라함)
    override func awakeFromNib() {
        super.awakeFromNib()

        print("MyTableViewCell - awakeFromNib() called")

        userProfileImg.layer.cornerRadius = userProfileImg.frame.height / 2
    }
}
ViewController 코드
class 안의 override
override func viewDidLoad() {
        super.viewDidLoad()
        // Do any additional setup after loading the view.

        //cell 리소스 파일 가져오기
        let myTableViewCellNib = UINib(nibName: String(describing: MyTableViewCell.self), bundle: nil)

        //cell에 리소스 등록
        self.myTableView.register(myTableViewCellNib, forCellReuseIdentifier: "myTableViewCEll")
        //height정해주기(윗줄은 알아서 정해주는거고, 아랫줄은 정해주는 것)
        self.myTableView.rowHeight = UITableView.automaticDimension
        self.myTableView.estimatedRowHeight = 120

        //아주 중요******(UITableViewDelegate과 UITableViewDataSource를 연결해줘야함)
        self.myTableView.delegate = self
        self.myTableView.dataSource = self
        //content가 몇갠지
        print("contentArray.count: \(contentArray.count)")
    }
height를 정해주어야 셀 하나에서 셀이 자동적으로 뷰를 계산해서 들어감.
아래 extension 코드
extension ViewController: UITableViewDelegate {


}

extension ViewController: UITableViewDataSource {

    //테이블 뷰 cell의 갯수
    func tableView(_ tableView: UITableView, numberOfRowsInSection section: Int) -> Int {
        return self.contentArray.count
    }

    //각 cell에 대한 설정, 드래그할때마다 cellForRowAt이 호출됨 -> 데이터와 뷰를 연결시켜주는 역할
    func tableView(_ tableView: UITableView, cellForRowAt indexPath: IndexPath) -> UITableViewCell {
        let cell = myTableView.dequeueReusableCell(withIdentifier: "myTableViewCEll", for: indexPath) as! MyTableViewCell //Identifier는 위에 forCellReuseIdentifier과 똑같이 써줘야함, for는 드래그할때마다 호출되면서 인덱스를 넘겨주는데 그것을 indexpath, 이것의 자료형을 강제로 하겠다 -> MyTableViewCell

        cell.userContentLabel.text = contentArray[indexPath.row]

        return cell
    }


}

//tableviewdelegate는 tableview에 대한 설정을 하는 것이고, datasource는 source를 집어넣는 것
오류
[WindowScene] Failed to instantiate the default view controller for UIMainStoryboardFile 'Main' - perhaps the designated entry point is not set?
-> 이런 메세지가 나왔을 땐 어트리뷰트 인스펙터로가서 is Initial View Controller에 처음 뜰 뷰컨트롤러 설정하면 된다.
결과

전체 코드
ViewController
import UIKit

class ViewController: UIViewController {


    @IBOutlet weak var myTableView: UITableView!


    let contentArray = [
    "HaHaHaHaHaHaHaHaHaHaHaHaHaHaHaHaHaHaHaHaHaHaHaHaHaHaHaHaHaHaHaHaHaHaHaHaHaHaHaHaHaHaHaHaHaHaHaHaHaHaHaHaHaHaHaHaHaHaHaHaHaHaHaHaHaHaHaHaHaHaHaHaHaHaHaHaHaHaHaHaHaHaHaHaHaHaHaHaHaHaHaHaHaHaHaHaHaHaHaHaHaHaHaHaHaHaHaHaHaHaHaHaHaHaHa",

    "ABCABCABCABCABCABCABCABCABCABCABCABCABCABCABCABCABCABCABCABCABCABCABCABCABCABCABCABCABCABCABCABCABCABCABCABCABCABCABC",

    "CDFCDFCDFCDFCDFCDFCDFCDFCDFCDFCDFCDFCDFCDFCDFCDFCDFCDFCDFCDFCDFCDFCDFCDFCDFCDFCDFCDFCDFCDFCDFCDFCDFCDFCDFCDFCDFCDFCDFCDFCDFCDFCDFCDFCDFCDFCDFCDFCDFCDFCDFCDFCDFCDFCDFCDFCDFCDFCDFCDFCDFCDFCDFCDFCDFCDFCDFCDFCDFCDFCDFCDFCDFCDFCDFCDFCDFCDFCDFCDFCDFCDFCDFCDFCDFCDFCDFCDFCDFCDFCDFCDFCDFCDFCDFCDFCDFCDFCDFCDFCDFCDFCDFCDFCDFCDFCDFCDFCDFCDFCDFCDFCDFCDFCDFCDFCDFCDFCDFCDFCDFCDFCDFCDFCDFCDFCDFCDFCDFCDFCDFCDFCDFCDFCDFCDFCDFCDFCDFCDFCDFCDFCDFCDFCDFCDFCDFCDFCDFCDFCDFCDFCDFCDFCDFCDFCDFCDFCDFCDF",

    "EFGEFGEFGEFGEFGEFGEFGEFGEFGEFGEFGEFGEFGEFGEFGEFGEFGEFG",

    "HIJHIJHIJHIJHIJHIJHIJHIJHIJHIJHIJHIJHIJHIJHIJHIJHIJHIJHIJHIJHIJHIJHIJHIJHIJHIJHIJHIJHIJHIJHIJHIJHIJHIJHIJHIJHIJHIJHIJHIJHIJHIJHIJHIJHIJHIJHIJHIJHIJHIJHIJHIJHIJHIJHIJHIJHIJHIJHIJHIJHIJHIJHIJHIJHIJHIJHIJHIJHIJHIJHIJHIJHIJHIJHIJHIJHIJHIJHIJHIJHIJHIJHIJHIJHIJHIJHIJHIJHIJHIJHIJHIJHIJHIJHIJHIJHIJHIJHIJHIJHIJHIJHIJHIJ",

    "KLMKLMKLMKLMKLMKLMKLMKLMKLMKLMKLMKLMKLMKLMKLMKLMKLMKLMKLMKLMKLMKLMKLMKLMKLM",

    "NOPNOPNOPNOPNOPNOPNOPNOPNOPNOPNOPNOPNOPNOPNOPNOPNOPNOPNOPNOPNOPNOPNOPNOPNOPNOPNOPNOPNOPNOPNOPNOPNOPNOPNOPNOPNOPNOPNOPNOPNOPNOPNOPNOPNOPNOPNOPNOPNOPNOPNOPNOPNOPNOPNOPNOPNOPNOPNOPNOPNOPNOP"
    ]

    override func viewDidLoad() {
        super.viewDidLoad()
        // Do any additional setup after loading the view.

        //cell 리소스 파일 가져오기
        let myTableViewCellNib = UINib(nibName: String(describing: MyTableViewCell.self), bundle: nil)

        //cell에 리소스 등록
        self.myTableView.register(myTableViewCellNib, forCellReuseIdentifier: "myTableViewCEll")
        //height정해주기(윗줄은 알아서 정해주는거고, 아랫줄은 정해주는 것)
        self.myTableView.rowHeight = UITableView.automaticDimension
        self.myTableView.estimatedRowHeight = 120

        //아주 중요******(UITableViewDelegate과 UITableViewDataSource를 연결해줘야함)
        self.myTableView.delegate = self
        self.myTableView.dataSource = self
        //content가 몇갠지
        print("contentArray.count: \(contentArray.count)")
    }


}


extension ViewController: UITableViewDelegate {


}

extension ViewController: UITableViewDataSource {

    //테이블 뷰 cell의 갯수
    func tableView(_ tableView: UITableView, numberOfRowsInSection section: Int) -> Int {
        return self.contentArray.count
    }

    //각 cell에 대한 설정, 드래그할때마다 cellForRowAt이 호출됨 -> 데이터와 뷰를 연결시켜주는 역할
    func tableView(_ tableView: UITableView, cellForRowAt indexPath: IndexPath) -> UITableViewCell {
        let cell = myTableView.dequeueReusableCell(withIdentifier: "myTableViewCEll", for: indexPath) as! MyTableViewCell //Identifier는 위에 forCellReuseIdentifier과 똑같이 써줘야함, for는 드래그할때마다 호출되면서 인덱스를 넘겨주는데 그것을 indexpath, 이것의 자료형을 강제로 하겠다 -> MyTableViewCell

        cell.userContentLabel.text = contentArray[indexPath.row]

        return cell
    }


}

//tableviewdelegate는 tableview에 대한 설정을 하는 것이고, datasource는 source를 집어넣는 것
MyTableViewCell
import Foundation
import UIKit

class MyTableViewCell: UITableViewCell { //상속은 UITableViewCell이 받음

    @IBOutlet weak var userProfileImg: UIImageView!

    @IBOutlet weak var userContentLabel: UILabel!


    //cell이 렌더링(뷰를 그릴때) 될때
    override func awakeFromNib() {
        super.awakeFromNib()

        print("MyTableViewCell - awakeFromNib() called")

        userProfileImg.layer.cornerRadius = userProfileImg.frame.height / 2
    }
}
