AP에 대해 알아보고 사용해 보기
(추후에 프로젝트에 응용)
ESP32는 AP와 STA를 둘다 한번에 사용가능한 보드이다.
STA에 대해서는 나중에 공부하고 먼저 AP에 대해서 공부하려고 한다.
Access Point(AP)란?
무선랜을 구성하는 장치로 유선랜과 무선랜을 연결해주는 장치이다.
ap는 유선신호를 무선으로 변환해준다.
ESP32에 AP를 설정하면 자체에 WiFi네트워크를 만들고 근처 WiFi장치에 연결할 수 있다.
EPS32에 내장되어있는 LED와 AP를 활용
설명은 https://randomnerdtutorials.com/esp32-access-point-ap-web-server/ 을 참고하였다.
밑에서 코드를 파헤쳐 보자.
코드
#include <WiFi.h>
const char* ssid = "ESP32_test";
const char* password = "123123123";
WiFiServer server(80);
String header;
String output2State = "off";
const int output2 = 2;
void setup() {
Serial.begin(115200);
pinMode(output2, OUTPUT);
digitalWrite(output2, LOW);
Serial.print("Setting AP (Access Point)...");
WiFi.softAP(ssid, password);
IPAddress IP = WiFi.softAPIP();
Serial.print("AP IP adderss: ");
Serial.println(IP);
server.begin();
}
void loop() {
WiFiClient client = server.available();
if(client){
Serial.println("New Client.");
String currentLine = "";
while(client.connected()){
if(client.available()){
char c = client.read();
Serial.write(c);
header += c;
if(c == '\n'){
if(currentLine.length() == 0){
client.println("HTTP/1.1 200 OK");
client.println("Content-type:text/html");
client.println("Connection: close");
client.println();
if(header.indexOf("GET /2/on") >= 0){
Serial.println("GPIO 2 on");
output2State = "on";
digitalWrite(output2, HIGH);
}else if(header.indexOf("GET /2/off") >= 0){
Serial.println("GPIO 2 off");
output2State = "off";
digitalWrite(output2, LOW);
}
client.println("<!DOCTYPE html><html>");
client.println("<head><meta name=\"viewport\" content=\"width=device-width, inital-scale=1\">");
client.println("<link rel=\"icon\" href=\"data:,\">");
client.println("<style>html { font-family: Helvetica; display: inline-block; margin: 0px auto; text-align: center;}");
client.println(".button { background-color: #4CAF50; border: none; color: white; padding: 16px 40px;");
client.println("text-decoration: none; font-size: 30px; margin: 2px; cursor: pointer;}");
client.println(".button2 {background-color: #555555;}</style></head>");
client.println("<h1>ESP32 Web Server</h1>");
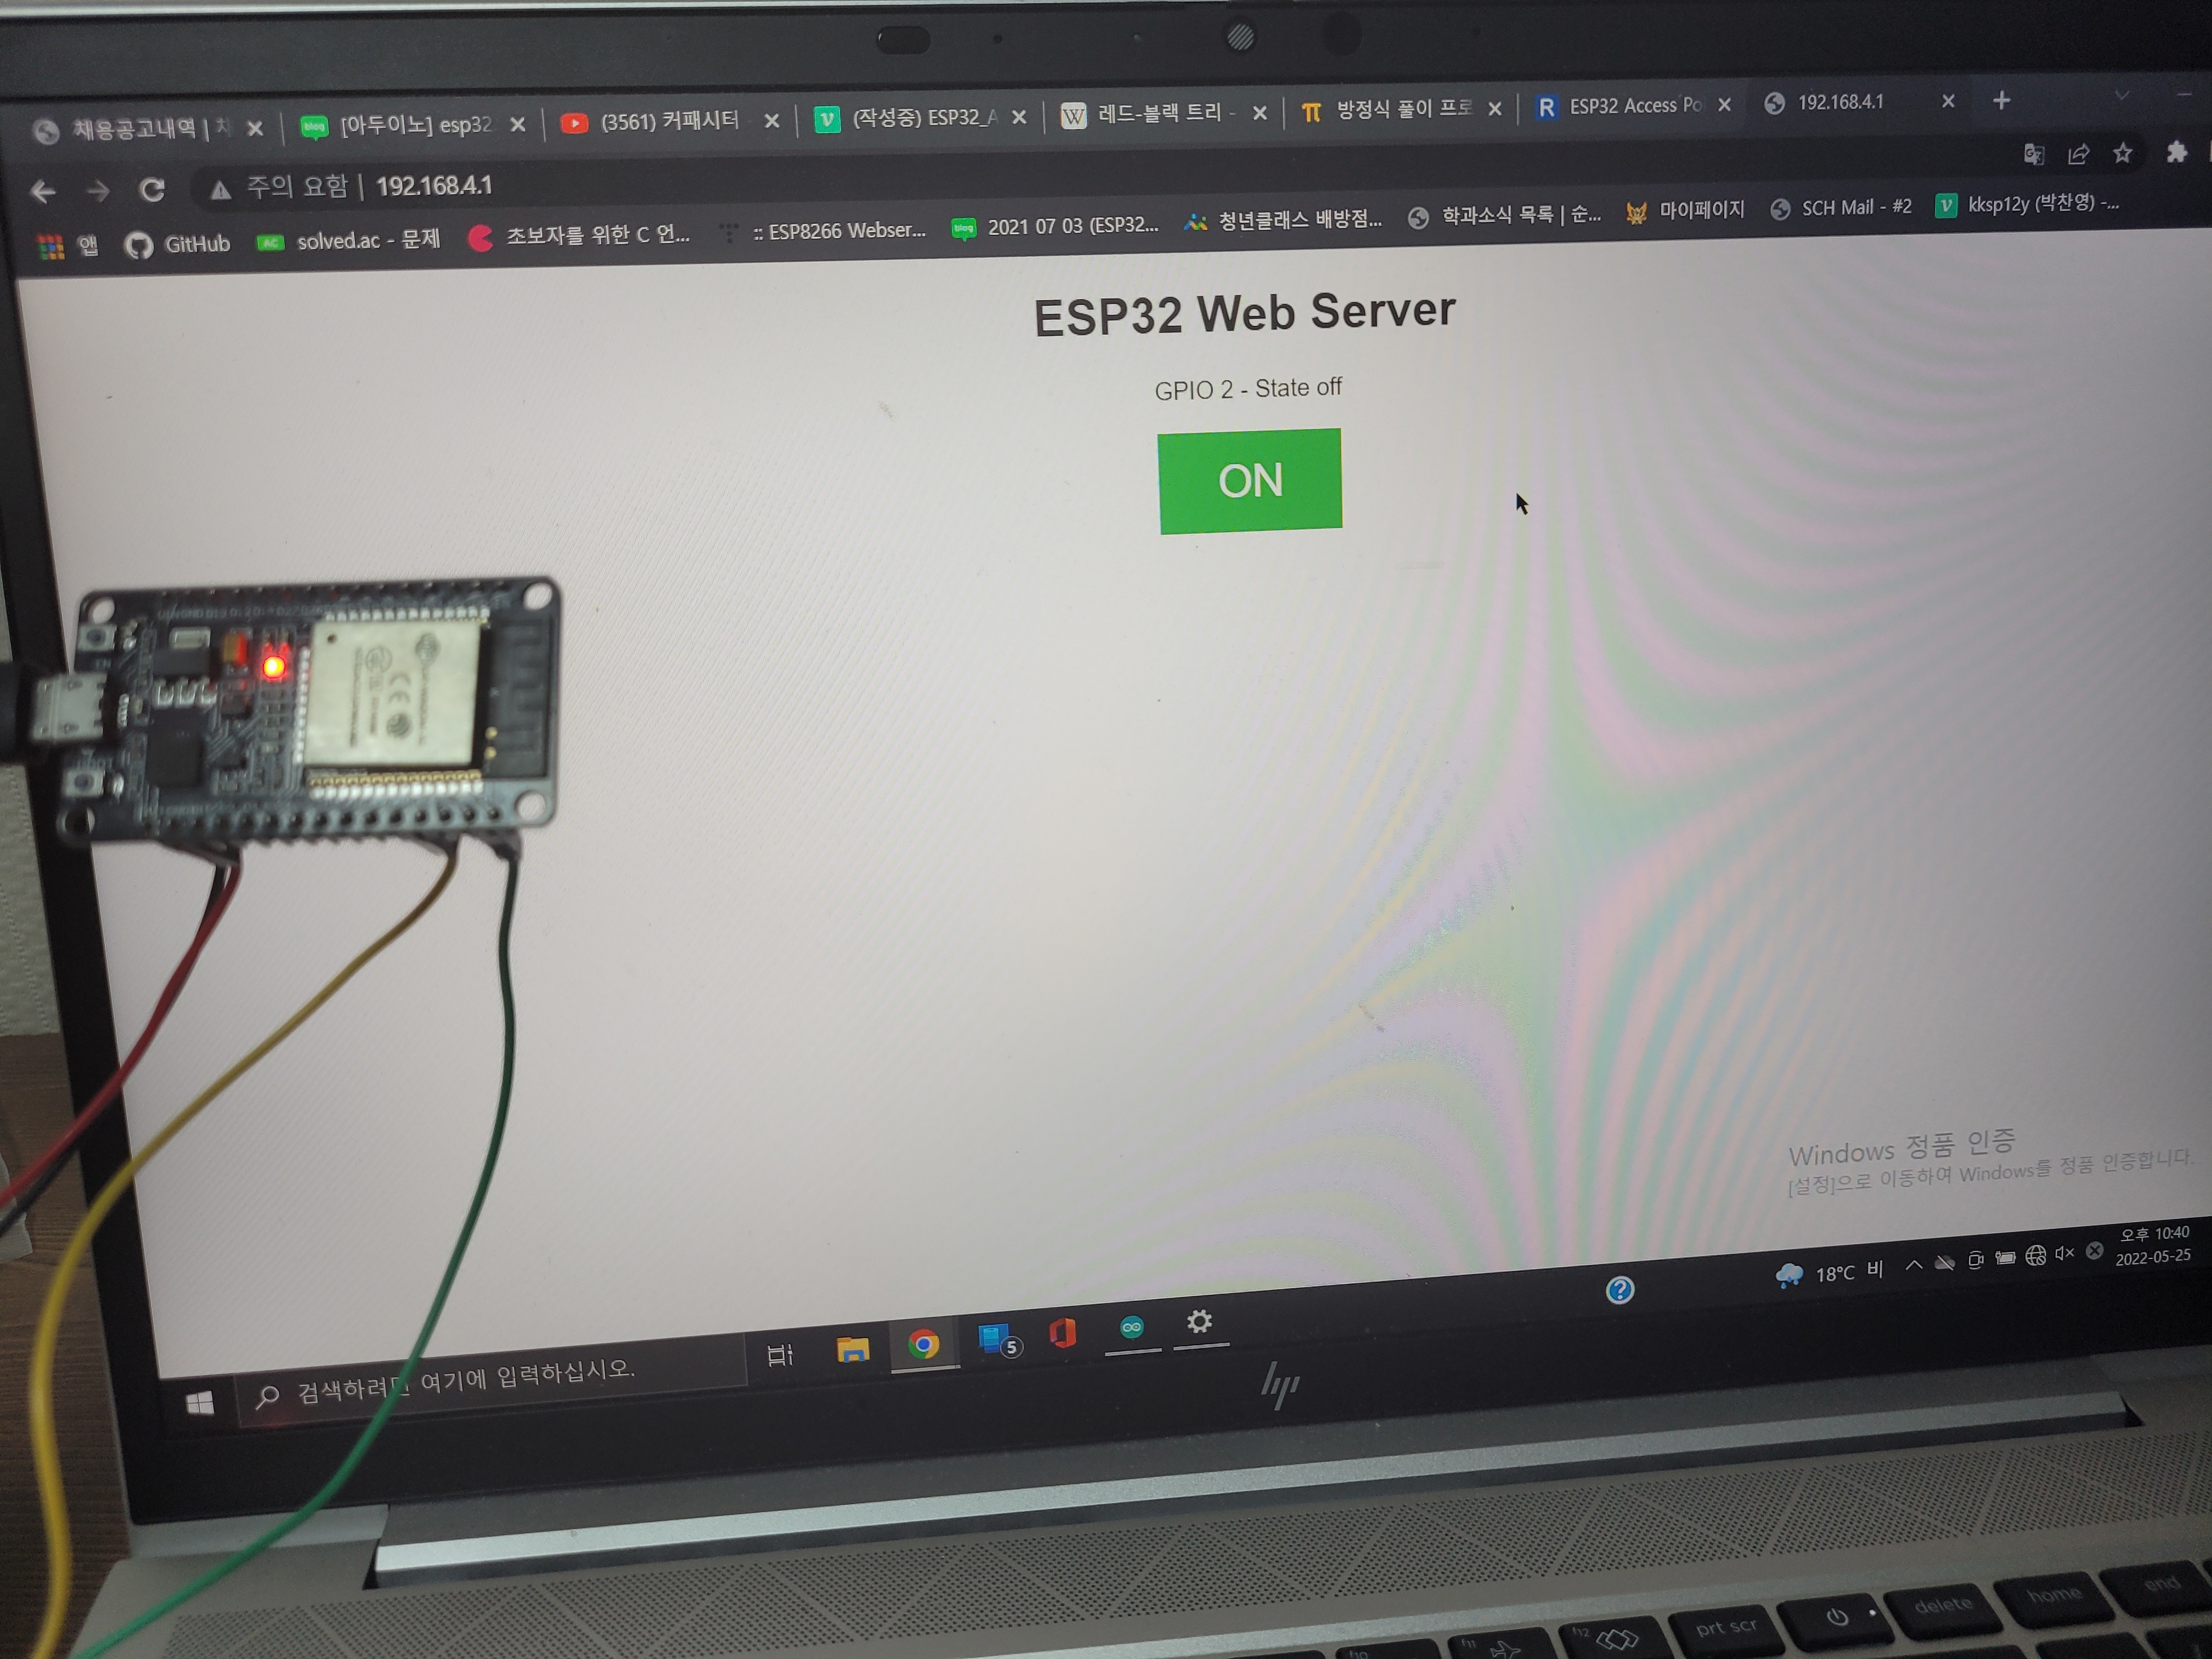
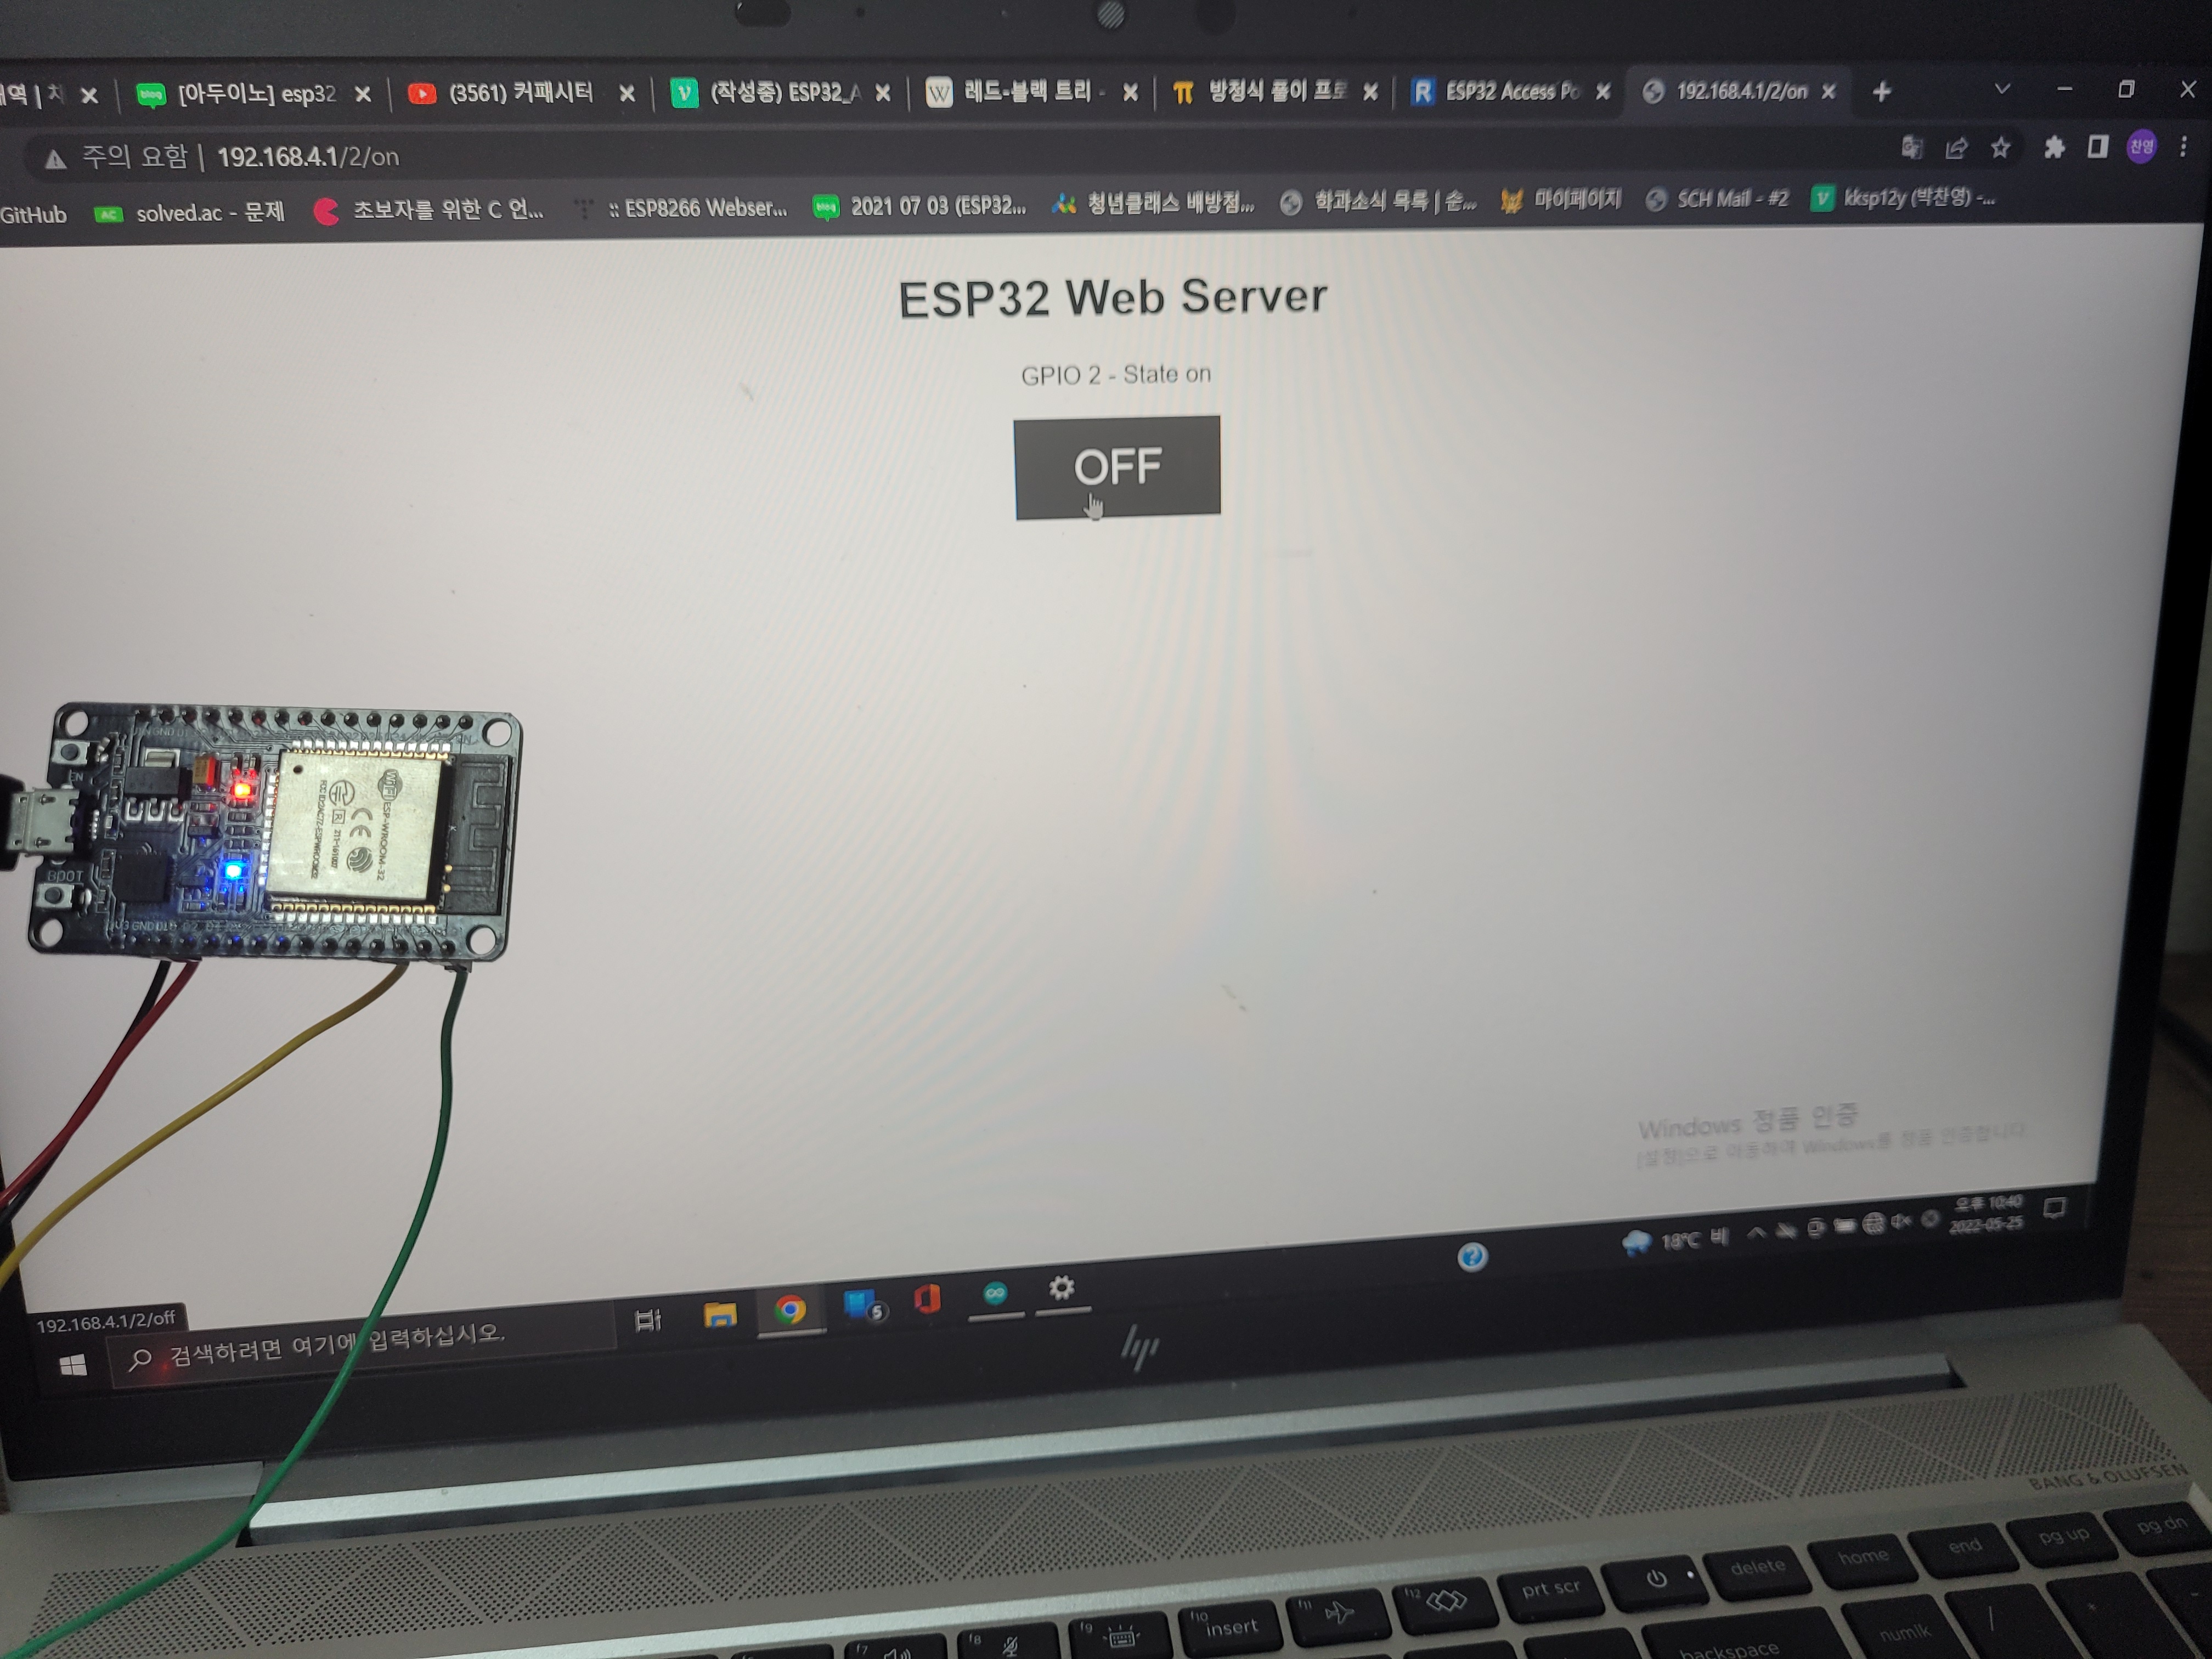
client.println("<p>GPIO 2 - State " + output2State + "</p>");
if (output2State=="off") {
client.println("<p><a href=\"/2/on\"><button class=\"button\">ON</button></a></p>");
} else {
client.println("<p><a href=\"/2/off\"><button class=\"button button2\">OFF</button></a></p>");
}
client.println("</body></html>");
client.println();
break;
}else {
currentLine = "";
}
}else if(c != '\r'){
currentLine += c;
}
}
}
header = "";
client.stop();
Serial.println("Client disconnected.");
Serial.println("");
}
}코드 설명
#include <WiFi.h>WiFi.h 라이브러리를 추가시켜준다.
const char* ssid = "ESP32_test";
const char* password = "123123123";
WiFi검색에 뜨는 이름을 정해주고, 비밀번호도 정해준다.
WiFiServer server(80);

String header;

String output2State = "off";
const int output2 = 2;
보통 서버는 80포트를 사용한다.
HTTP 요청의 헤더를 저장할 변수를 생성해고,
출력의 현재 상태를 저장하기 위한 보조 변수를 생성해준다.
그리고 output2라는 변수에 GIPO를 할당해준다.
  Serial.begin(115200);
  pinMode(output2, OUTPUT);
  digitalWrite(output2, LOW);
디버깅을 위해 115200전송 속도로 직렬 통신을 시작합니다.
다음으로 GPIO를 OUTPUT으로 정의후 LOW로 설정해줍니다.
  Serial.print("Setting AP (Access Point)...");
  WiFi.softAP(ssid, password);

  IPAddress IP = WiFi.softAPIP();
  Serial.print("AP IP adderss: ");
  Serial.println(IP);

  server.begin();
ESP32를 AP로 설정하기 위해 softAP()를 사용합니다.
이 함수는 총 5개의 매개변수를 사용할 수 있지만 우리는 2개의 매개 변수만 사용한다.
ssid와 password만 사용할 것이다. (나머지 3개는 channel, ssid_hidden, max_connection이 존재하고 앞에서 부터
WiFi채널 번호(1-13), (0 = 브로드캐스트SSID, 1 = SSID 숨기기), 최대 동시 접속 클라이언트 (1-4)
IP는 softAP에서 IP주소를 가져와서 Serial모니터에 출력한다.
서버 시작!
WiFiClient client = server.available();항상 클라이언트를 수신대기를 한다.
if(client){
    Serial.println("New Client.");
    //클라이언트에서 들어오는 데이터를 저장할 문자열을 만듭니다.
    String currentLine = "";
    //클라이언트가 연결된 동안 루프합니다.
    while(client.connected()){
      //만약 읽을 byte가 있는 경우
      if(client.available()){
        //읽어 드리고
        char c = client.read();
        //시리얼 모니터에 출력한다.
        Serial.write(c);
        header += c;
        //만약 '\n'이 들어오면
        if(c == '\n'){
          //줄이 비어있으면 줄바꿈 문자가 두 개 연속
          if(currentLine.length() == 0){
            //HTTP 헤더는 항상 응답 코드(예: HTTP/1.1200 OK)로 시작합니다.
            client.println("HTTP/1.1 200 OK");
            //컨텐츠 유형으로 클라이언트에 다음 내용을 알립니다. 그 다음 빈 줄을 표시합니다
            client.println("Content-type:text/html");
            client.println("Connection: close");
            client.println();
클라이언트가 연결된 상태를 유지하는 동안 이어지는 while 루프가 실행됩니다.
 if(header.indexOf("GET /2/on") >= 0){
   //눌렸을 때 시리얼 모니터에서 확인가능하도록 시리얼 출력
   Serial.println("GPIO 2 on");
   output2State = "on";
   digitalWrite(output2, HIGH);
 }else if(header.indexOf("GET /2/off") >= 0){
   Serial.println("GPIO 2 off");
   output2State = "off";
   digitalWrite(output2, LOW);
 }
웹 페이지에서 어떤 버튼이 눌렸는지 확인하고 그에 따라 출력을 제어한다.
눌러진 버튼에 따라 다른 URL에 요청한다.
 client.println("<!DOCTYPE html><html>");
 client.println("<head><meta name=\"viewport\" content=\"width=device-width, inital-scale=1\">");
 //여기서 부터 css텍스트
 client.println("<link rel=\"icon\" href=\"data:,\">");
 client.println("<style>html { font-family: Helvetica; display: inline-block; margin: 0px auto; text-align: center;}");
 //테두리가 없는 #4CAF50 색상, 흰색 텍스트 및 16px 40px의 패딩으로 버튼의 스타일을 지정합니다.
 //또한 텍스트 장식을 없음으로 설정하고 글꼴 크기, 여백 및 포인터에 대한 커서를 정의합니다.
 client.println(".button { background-color: #4CAF50; border: none; color: white; padding: 16px 40px;");
 client.println("text-decoration: none; font-size: 30px; margin: 2px; cursor: pointer;}");
 client.println(".button2 {background-color: #555555;}</style></head>");
 //버튼 끄는 스타일입니다.
 //여기까지

 client.println("<h1>ESP32 Web Server</h1>"); //페이지의 제목부분을 담당합니다.
 client.println("<p>GPIO 2 - State " + output2State + "</p>");
 if (output2State=="off") {
   client.println("<p><a href=\"/2/on\"><button class=\"button\">ON</button></a></p>");
 } else {
   client.println("<p><a href=\"/2/off\"><button class=\"button button2\">OFF</button></a></p>");
 }
 client.println("</body></html>");

 client.println();
 break;
}
웹 페이지를 만드는 코드.
여기서 HTML이 시작한다는 것을 알립니다.
위에 코드는 코드사이에 자세하게 설명을 넣겠습니다.
          else {
            currentLine = "";
          }
        }else if(c != '\r'){
          //만약 다른게 있다면 현재 라인의 끝에 추가한다.
          currentLine += c;
        }
      }
    }
    //응답이 종료되면 헤더변수를 사용하여
    header = "";
    //클라이언트와의 연결을 중지한다.
    client.stop();
    Serial.println("Client disconnected.");
    Serial.println("");
  }
}
마지막으로 응답이 종료되면헤더변수를 사용하여 클라이언트와의 연결을 중지합니다.
추가 자료

유용한 글 감사합니다!!