STA모드를 활용하여 LED 웹으로 제어하기
STA모드란?
STA모드는 Station의 약어이다.
무선 공유기(AP)가 있는 환경에서 데탑 또는 무선 수신기(랜카드)가 없는 PC에 설치하여 무선 신호를 수신 받게하는 모드이다.
무선 클라이언트처럼 작동하느 장치를 Station이라고 할 수 있다.
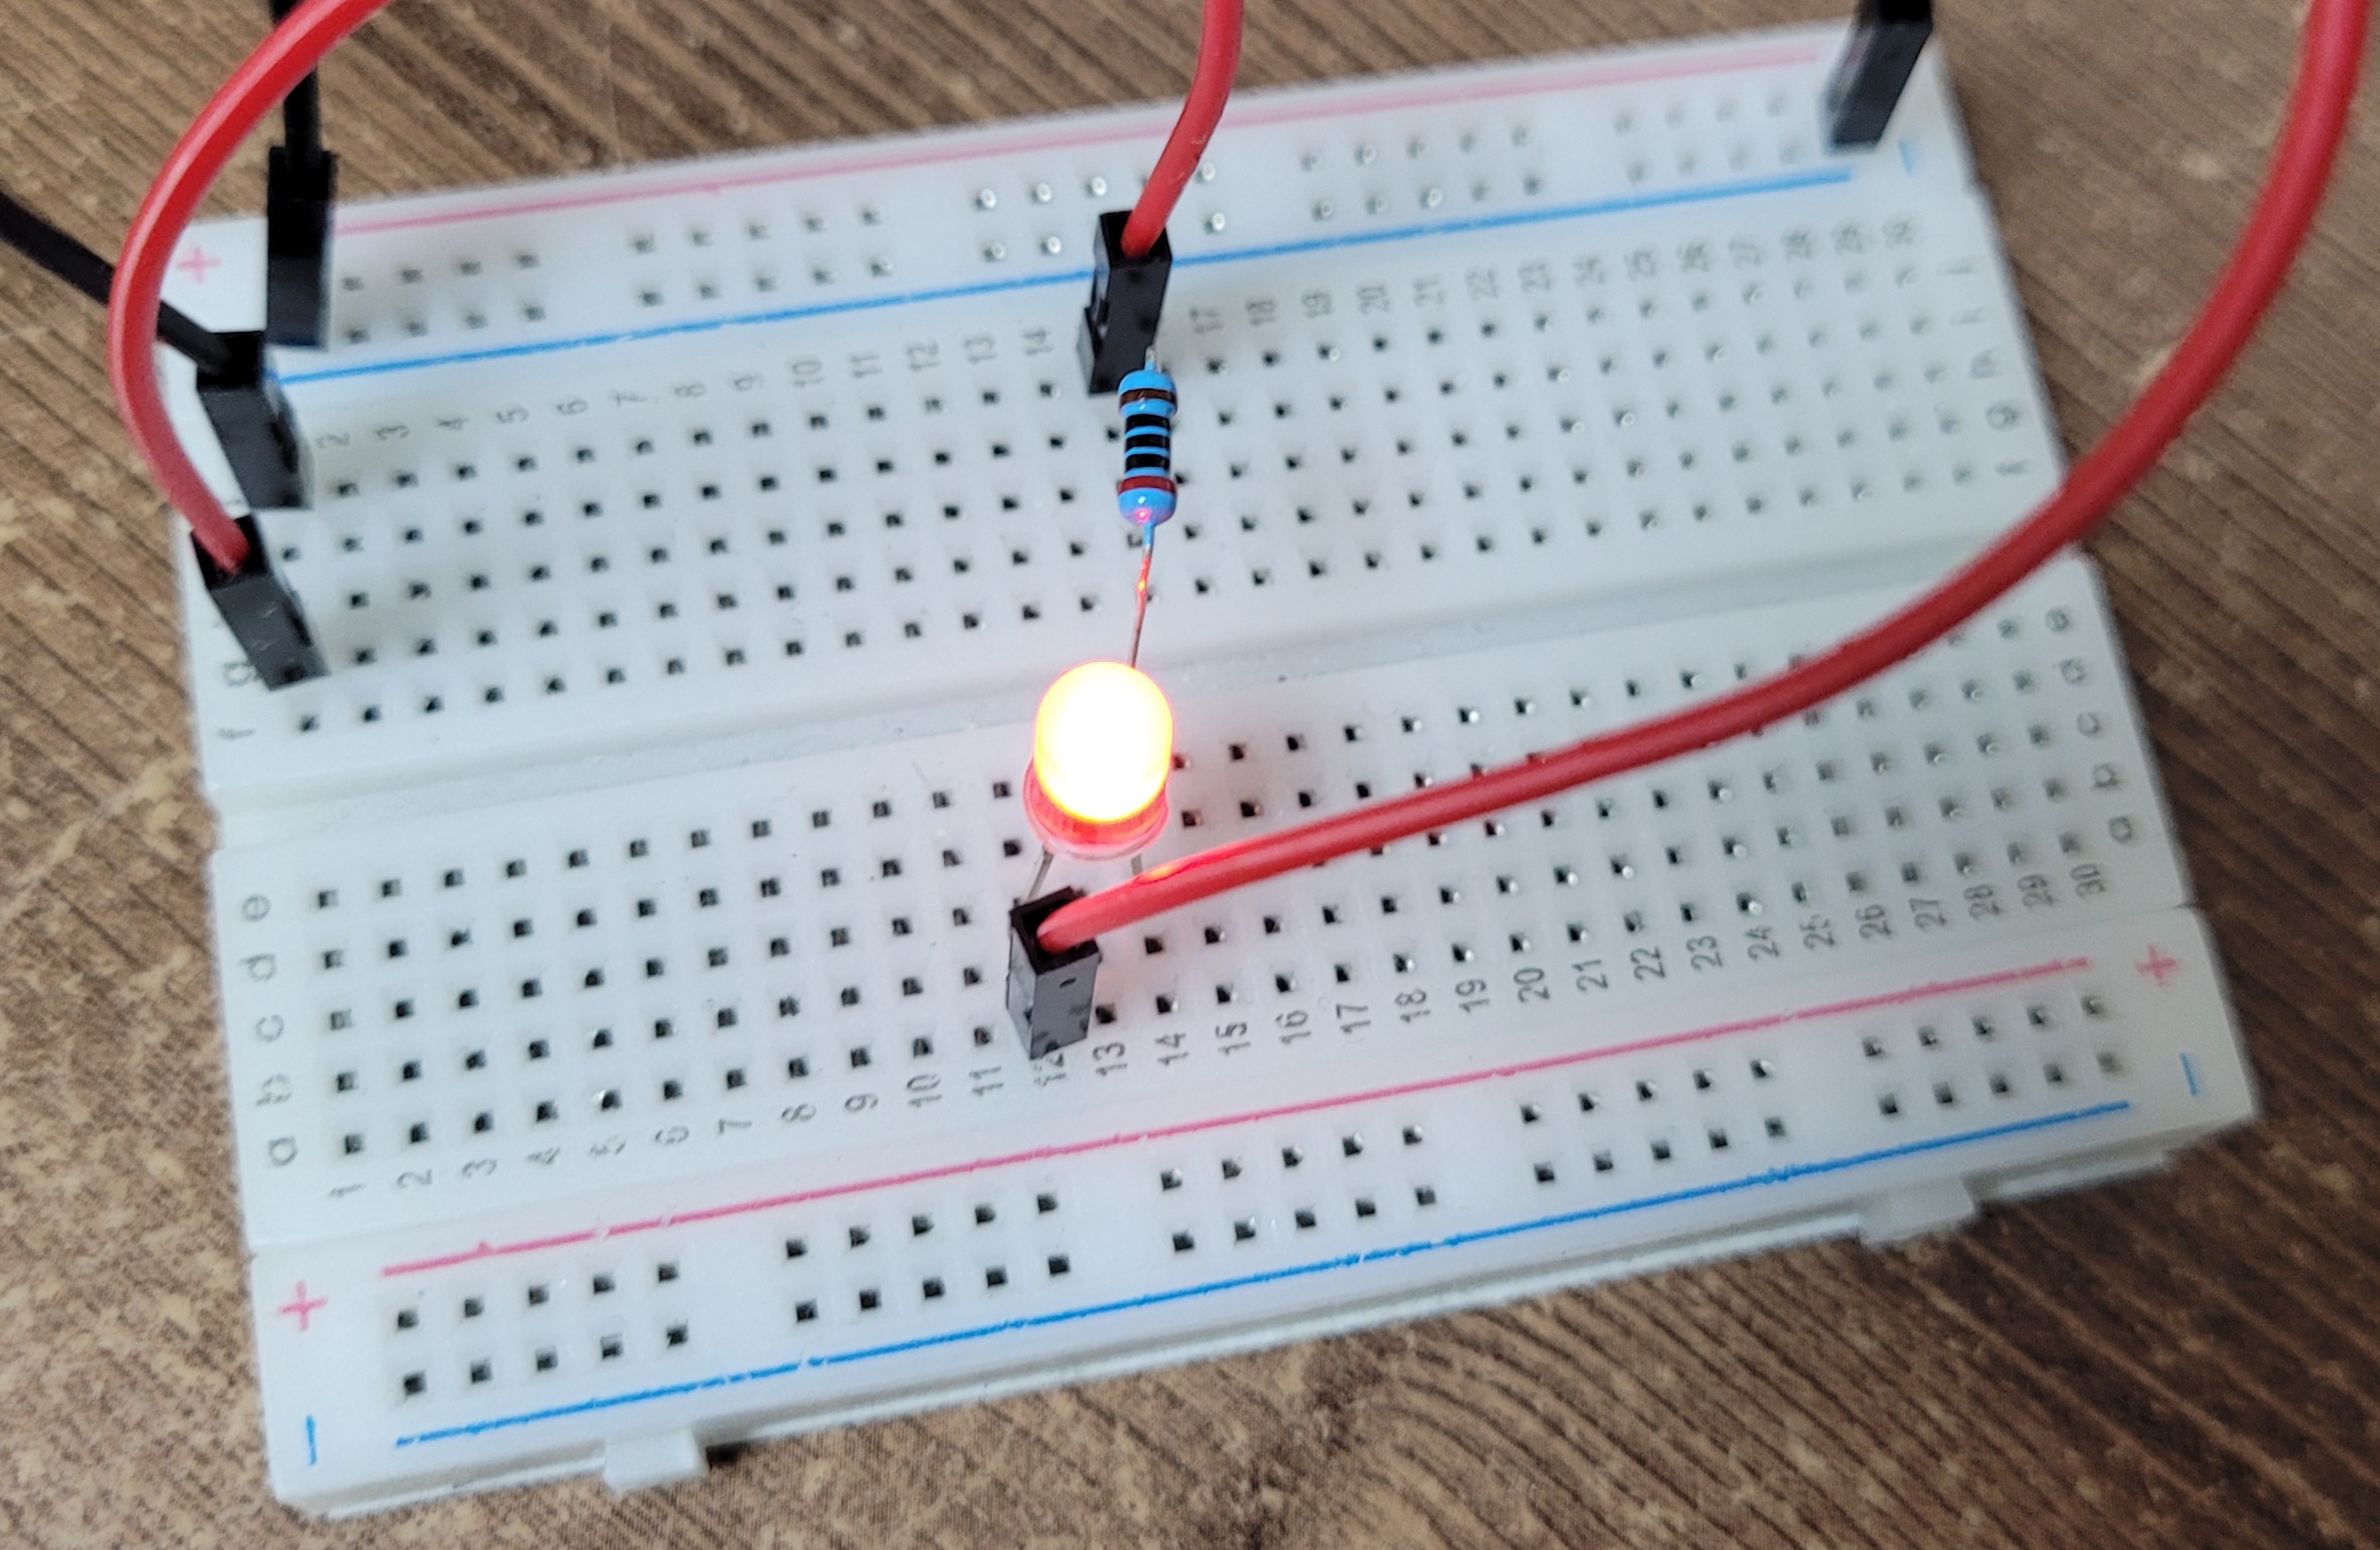
LED의 PWM을 활용하여 웹에서 조절가능하게 하기
설명은 https://randomnerdtutorials.com/esp32-web-server-slider-pwm/ 을 참고하였다.
밑에서 코드 확인해보자.
코드
#include <WiFi.h>
#include <AsyncTCP.h>
#include <ESPAsyncWebServer.h>
const char* ssid = "*********";
const char* password = "********";
const int output = 16;
String sliderValue = "0";
const int freq = 5000;
const int ledChannel = 0;
const int resolution = 8;
const char* PARAM_INPUT = "value";
AsyncWebServer server(80);
const char index_html[] PROGMEM = R"rawliteral(
<!DOCTYPE HTML><html>
<head>
<meta name="viewport" content="width=device-width, initial-scale=1">
<title>ESP Web Server</title>
<style>
html {font-family: Arial; display: inline-block; text-align: center;}
h2 {font-size: 2.3rem;}
p {font-size: 1.9rem;}
body {max-width: 400px; margin:0px auto; padding-bottom: 25px;}
.slider { -webkit-appearance: none; margin: 14px; width: 360px; height: 25px; background: #FFD65C;
outline: none; -webkit-transition: .2s; transition: opacity .2s;}
.slider::-webkit-slider-thumb {-webkit-appearance: none; appearance: none; width: 35px; height: 35px; background: #003249; cursor: pointer;}
.slider::-moz-range-thumb { width: 35px; height: 35px; background: #003249; cursor: pointer; }
</style>
</head>
<body>
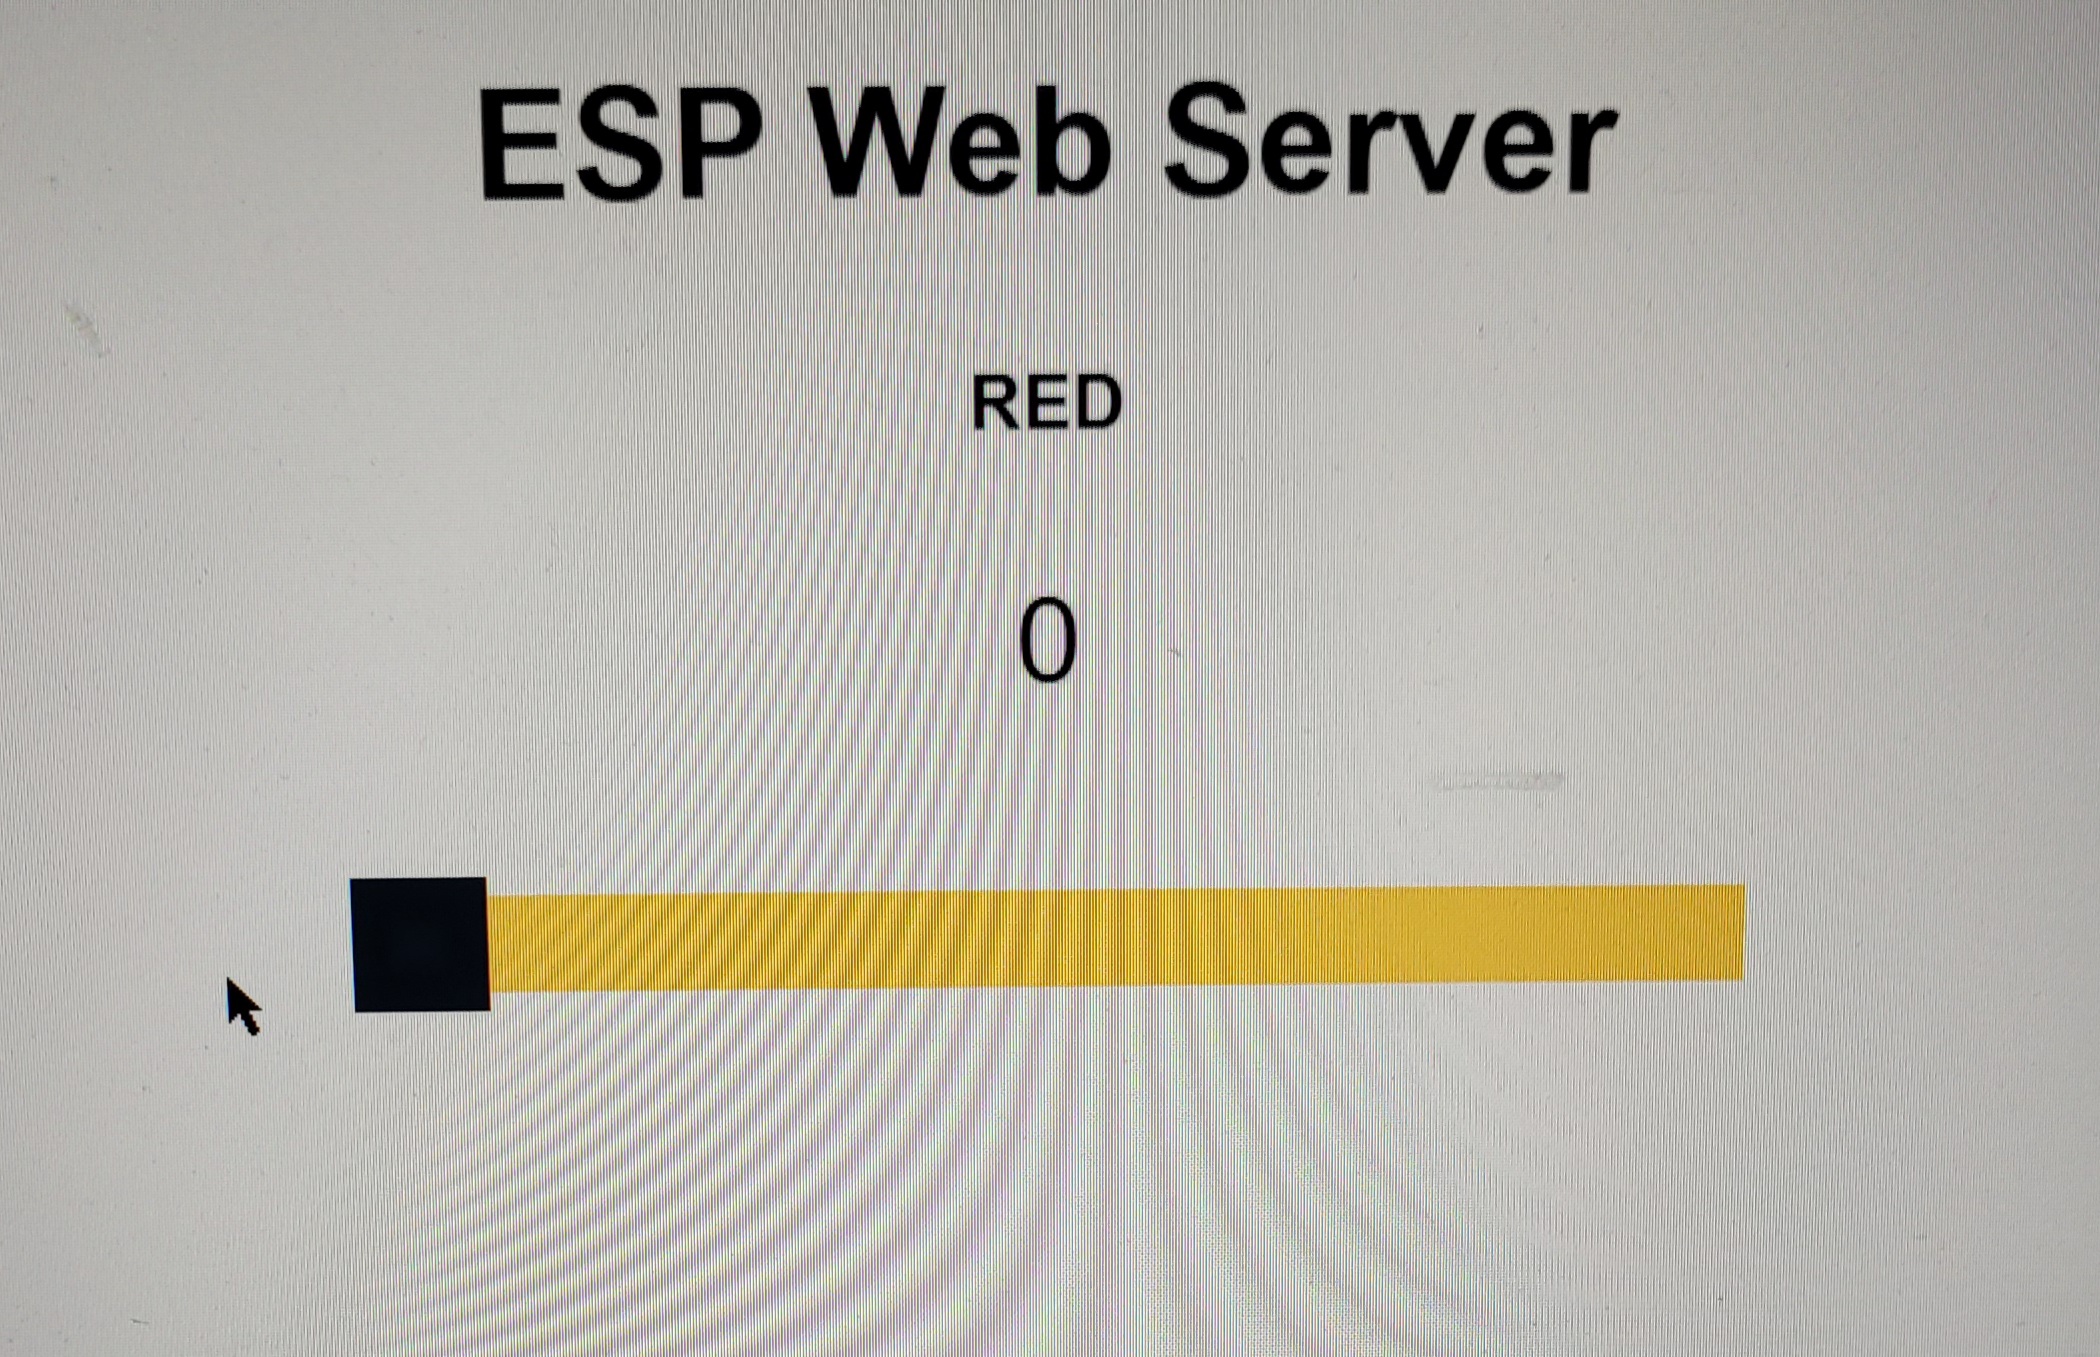
<h2>ESP Web Server</h2>
<h3>RED</h3>
<p><span id="textSliderValue">%SLIDERVALUE%</span></p>
<p><input type="range" id="pwmSlider" min="0" max="255" value="%SLIDERVALUE%" step="1" class="slider"></p>
<script>
function updateSliderPWM(element) {
var sliderValue = document.getElementById("pwmSlider").value;
document.getElementById("textSliderValue").innerHTML = sliderValue;
console.log(sliderValue);
var xhr = new XMLHttpRequest();
xhr.open("GET", "/slider?value="+sliderValue, true);
xhr.send();
}
</script>
</body>
</html>
)rawliteral";
String processor(const String& var){
if (var == "SLIDERVALUE"){
return sliderValue;
}
return String();
}
void setup(){
Serial.begin(115200);
ledcSetup(ledChannel, freq, resolution);
ledcAttachPin(output, ledChannel);
ledcWrite(ledChannel, sliderValue.toInt());
WiFi.begin(ssid, password);
while (WiFi.status() != WL_CONNECTED) {
delay(1000);
Serial.println("Connecting to WiFi..");
}
Serial.println(WiFi.localIP());
server.on("/", HTTP_GET, [](AsyncWebServerRequest *request){
request->send_P(200, "text/html", index_html, processor);
});
server.on("/slider", HTTP_GET, [] (AsyncWebServerRequest *request) {
String inputMessage;
if (request->hasParam(PARAM_INPUT)) {
inputMessage = request->getParam(PARAM_INPUT)->value();
sliderValue = inputMessage;
ledcWrite(ledChannel, sliderValue.toInt());
}
else {
inputMessage = "No message sent";
}
Serial.println(inputMessage);
request->send(200, "text/plain", "OK");
});
server.begin();
}
void loop() {
}코드 설명
#include <WiFi.h>
#include <AsyncTCP.h>
#include <ESPAsyncWebServer.h>
웹 서버 구축하는 데 필요한 라이브러리를 가져온다.
const char* ssid = "********";
const char* password = "********";
ESP가 로컬 네트워크에 연결할 수 있도록 변수에 네트워크를 입력해준다.
GPIO 16번을 사용할 것이므로 output은 16으로 정해준다.
입력 전용 핀인 34-39는 PWM으로 사용 불가능함.
String sliderValue = "0";sliderValue는 변수 슬라이더 값을 유지, 시작 시에는 0으로 설정.
const int freq = 5000;
const int ledChannel = 0;
const int resolution = 8;
LED를 제어하기 위한 PWM속성 정의이다.
신호의 주파수를 정의하는 변수 freq. (보통 LED는 5000을 사용)
ESP32에는 총 16개의 채널이 있다.(0~15)
여기서 0채널을 설정.
최대 주파수를 얻기 위한 최적의 분해능인 PWM 분해능을 8비트로 설정.
변수 resolution는 8비트 해상도을 사용한다는 의미로 사용. (듀티 사이클값 0 ~ 255사이 값 사용)
const char* PARAM_INPUT = "value";변수 PARAM_INPUT는 슬라이더 값 검색하는데 사용한다. (value값을 검색)
ESP32는 다음과 같은 요청을 받는다. GET/slider?value=SLIDERVALUE
AsyncWebServer server(80);포트 80에 비동기 WebServer 개체를 생성한다.
여기서부터 웹페이지를 만드는 코드이다.
<meta name="viewport" content="width=device-width, initial-scale=1">
<title>ESP Web Server</title>
스마트폰, 랩톱, 컴퓨터 등과 같은 모든 브라우저에서 웹 서버를 사용할 수 있도록 mata 태그를 생성한다.
title은 웹 브라우저 탭에 표시되는 텍스트이다.
<style>
    html {font-family: Arial; display: inline-block; text-align: center;}
    h2 {font-size: 2.3rem;}
    p {font-size: 1.9rem;}
    body {max-width: 400px; margin:0px auto; padding-bottom: 25px;}
    .slider { -webkit-appearance: none; margin: 14px; width: 360px; height: 25px; background: #FFD65C;
      outline: none; -webkit-transition: .2s; transition: opacity .2s;}
    .slider::-webkit-slider-thumb {-webkit-appearance: none; appearance: none; width: 35px; height: 35px; background: #003249; cursor: pointer;}
    .slider::-moz-range-thumb { width: 35px; height: 35px; background: #003249; cursor: pointer; }
 </style>
Arial 글꼴로 텍스트를 여백 없이 블록에 표시하고 중앙에 정렬하도록 HTML 페이지를 설정한다.
h2, p의 폰트 사이즈 정의해주고, HTML 본문 속성을 설정해준다.
slider 사용자 지정해준다.
<h2>ESP Web Server</h2>
<h3>RED</h3>
<p><span id="textSliderValue">%SLIDERVALUE%</span></p>
<p><input type="range" onchange="updateSliderPWM(this)" id="pwmSlider" min="0" max="255" value="%SLIDERVALUE%" step="1" class="slider"></p>
웹 페이지 제목을 추가해주고, 더 작은 제목으로 LED의 색깔을 추가 해준다.
슬라이더 값에 대한 단락을 포함한다. (슬라이더 위의 값)
현재 슬라이더 값을 볼 수 있다.
이 값은 PWM 듀티 사이클을 구성할 수 있다. (0-255 사이의 값을 사용할 수 있다)
슬라이더의 현재 값을 나타내기 위해 %SLIDERVALUE% 자리 표시자를 사용했다. (값은 이전에 정의한 sliderValue 값으로 대체됨)
input으로 슬라이더를 만든다. (step은 증가 감소의 값. updateSliderPWM() 함수를 호출하고 onchange 속성에 지정한다. 이것은 사용자가 슬라이더를 움직일 때 발생.)
function updateSliderPWM(element) {
  // 슬라이더 생성 시 지정한 슬라이더의 'id'(pwmSlider)를 참조하여 현재 슬라이더 값을 구합니다. 이 값은 pwmSlider id에 저장된 값으로 업데이트됩니다.
  var sliderValue = document.getElementById("pwmSlider").value;
  document.getElementById("textSliderValue").innerHTML = sliderValue;
  console.log(sliderValue);
  //XMLHttpRequest를 사용합니다. 이렇게 하면 JavaScript에서 HTTP 요청을 할 수 있습니다.
  //XMLHttpRequest를 생성
  var xhr = new XMLHttpRequest();
  //xhr.open() 메서드를 사용하여 요청을 초기화
  //세 가지 인수를 전달할 것입니다. 첫 번째 인수는 우리의 경우 GET인 HTTP 메소드 유형을 지정합니다. 두 번째 인수는 ESP32/ESP8266이 요청할 URL입니다.
  //우리의 경우 /slider?value=sliderValue URL입니다. 요청이 비동기식임을 지정하는 마지막 인수는 true입니다
  xhr.open("GET", "/slider?value="+sliderValue, true);
  //xhr.send()를 사용하여 연결
  xhr.send();
  //이것으로 슬라이딩 버튼이 움직일 때마다 HTTP GET 요청을 수신할 수 있습니다.
}
슬라이더 값을 업데이트하기 위해 updateSliderPWM() 함수를 호출합니다. 이것은 '요소'라는 단일 인수를 취한다.
자세한것은 안에 코드와 함께 적어놨다.
String processor(const String& var){
  if (var == "SLIDERVALUE"){
    return sliderValue;
  }
  return String();
}
브라우저에서 처음 액세스할 때 HTML 텍스트의 자리 표시자를 현재 슬라이더 값으로 대체하는 기능이다.
웹 페이지가 요청되면 HTML에 자리 표시자가 있는지 확인.
%SLIDERVALUE% 자리 표시자를 찾으면 저장된 값을 반환한다.
ledcSetup(ledChannel, freq, resolution);
ledcAttachPin(output, ledChannel);
ledcWrite(ledChannel, sliderValue.toInt());
ledcSetup()을 사용하여 PWM 매개변수를 초기화. (매개변수: PWM 채널의 채널 번호, 주파수 및 분해능)
ledcAttach()를 사용하여 led 핀을 채널에 연결.
ledcWrite()를 사용하여 슬라이더 값에서 액세스한 듀티 사이클 값으로 PWM을 생성.
(정수로 변환된 슬라이더 값은 함수 내에서 두 번째 매개변수로 전달되는 반면 첫 번째 매개변수는 채널)
WiFi.begin(ssid, password);
  while (WiFi.status() != WL_CONNECTED) {
    delay(1000);
    Serial.println("Connecting to WiFi..");
  }

  Serial.println(WiFi.localIP());
이미 지정한 네트워크 자격 증명을 가진 로컬 네트워크와 ESP32 보드를 연결한다.
코드에서 정의한 SSID와 비밀번호이다. 성공적으로 연결되면 IP 주소가 시리얼모니터에 표시된다.
server.on("/", HTTP_GET, [](AsyncWebServerRequest *request){
    request->send_P(200, "text/html", index_html, processor);
});
먼저 ESP32 보드가 수신할 /root URL 요청을 처리함.
send_P() 메서드를 사용할 것이다.
핸들링 함수는 요청 객체의 send_P() 메서드를 사용하여 클라이언트에 응답한다.
(매개변수: 'ok'에 대한 HTTP 상태 코드인 200. 응답의 콘텐츠 유형에 해당하는 "text/html". 보낼 index_html 변수에 저장된 텍스트. 자리 표시자가 현재 값으로 대체되는 프로세서 기능.)
server.on("/slider", HTTP_GET, [] (AsyncWebServerRequest *request) {
    String inputMessage;
    //<ESP_IP>/slider?value=<inputMessage>에서 input 값을 가져옵니다.
    if (request->hasParam(PARAM_INPUT)) {
      inputMessage = request->getParam(PARAM_INPUT)->value();
      sliderValue = inputMessage;
      ledcWrite(ledChannel, sliderValue.toInt());
    }
    else {
      inputMessage = "No message sent";
    }
    Serial.println(inputMessage);
    request->send(200, "text/plain", "OK");
});
slider URL에서 수신된 요청에 ESP 보드가 응답하는 방법.
이것은 슬라이더가 이동되고 새 슬라이더 값이 생성될 때마다 발생한다.
이 새 슬라이더 값은 'inputMessage' 변수에 저장. 값은 직렬 모니터에 인쇄된다.
server.begin();서버 시작!
추가자료
PWM = 0일때

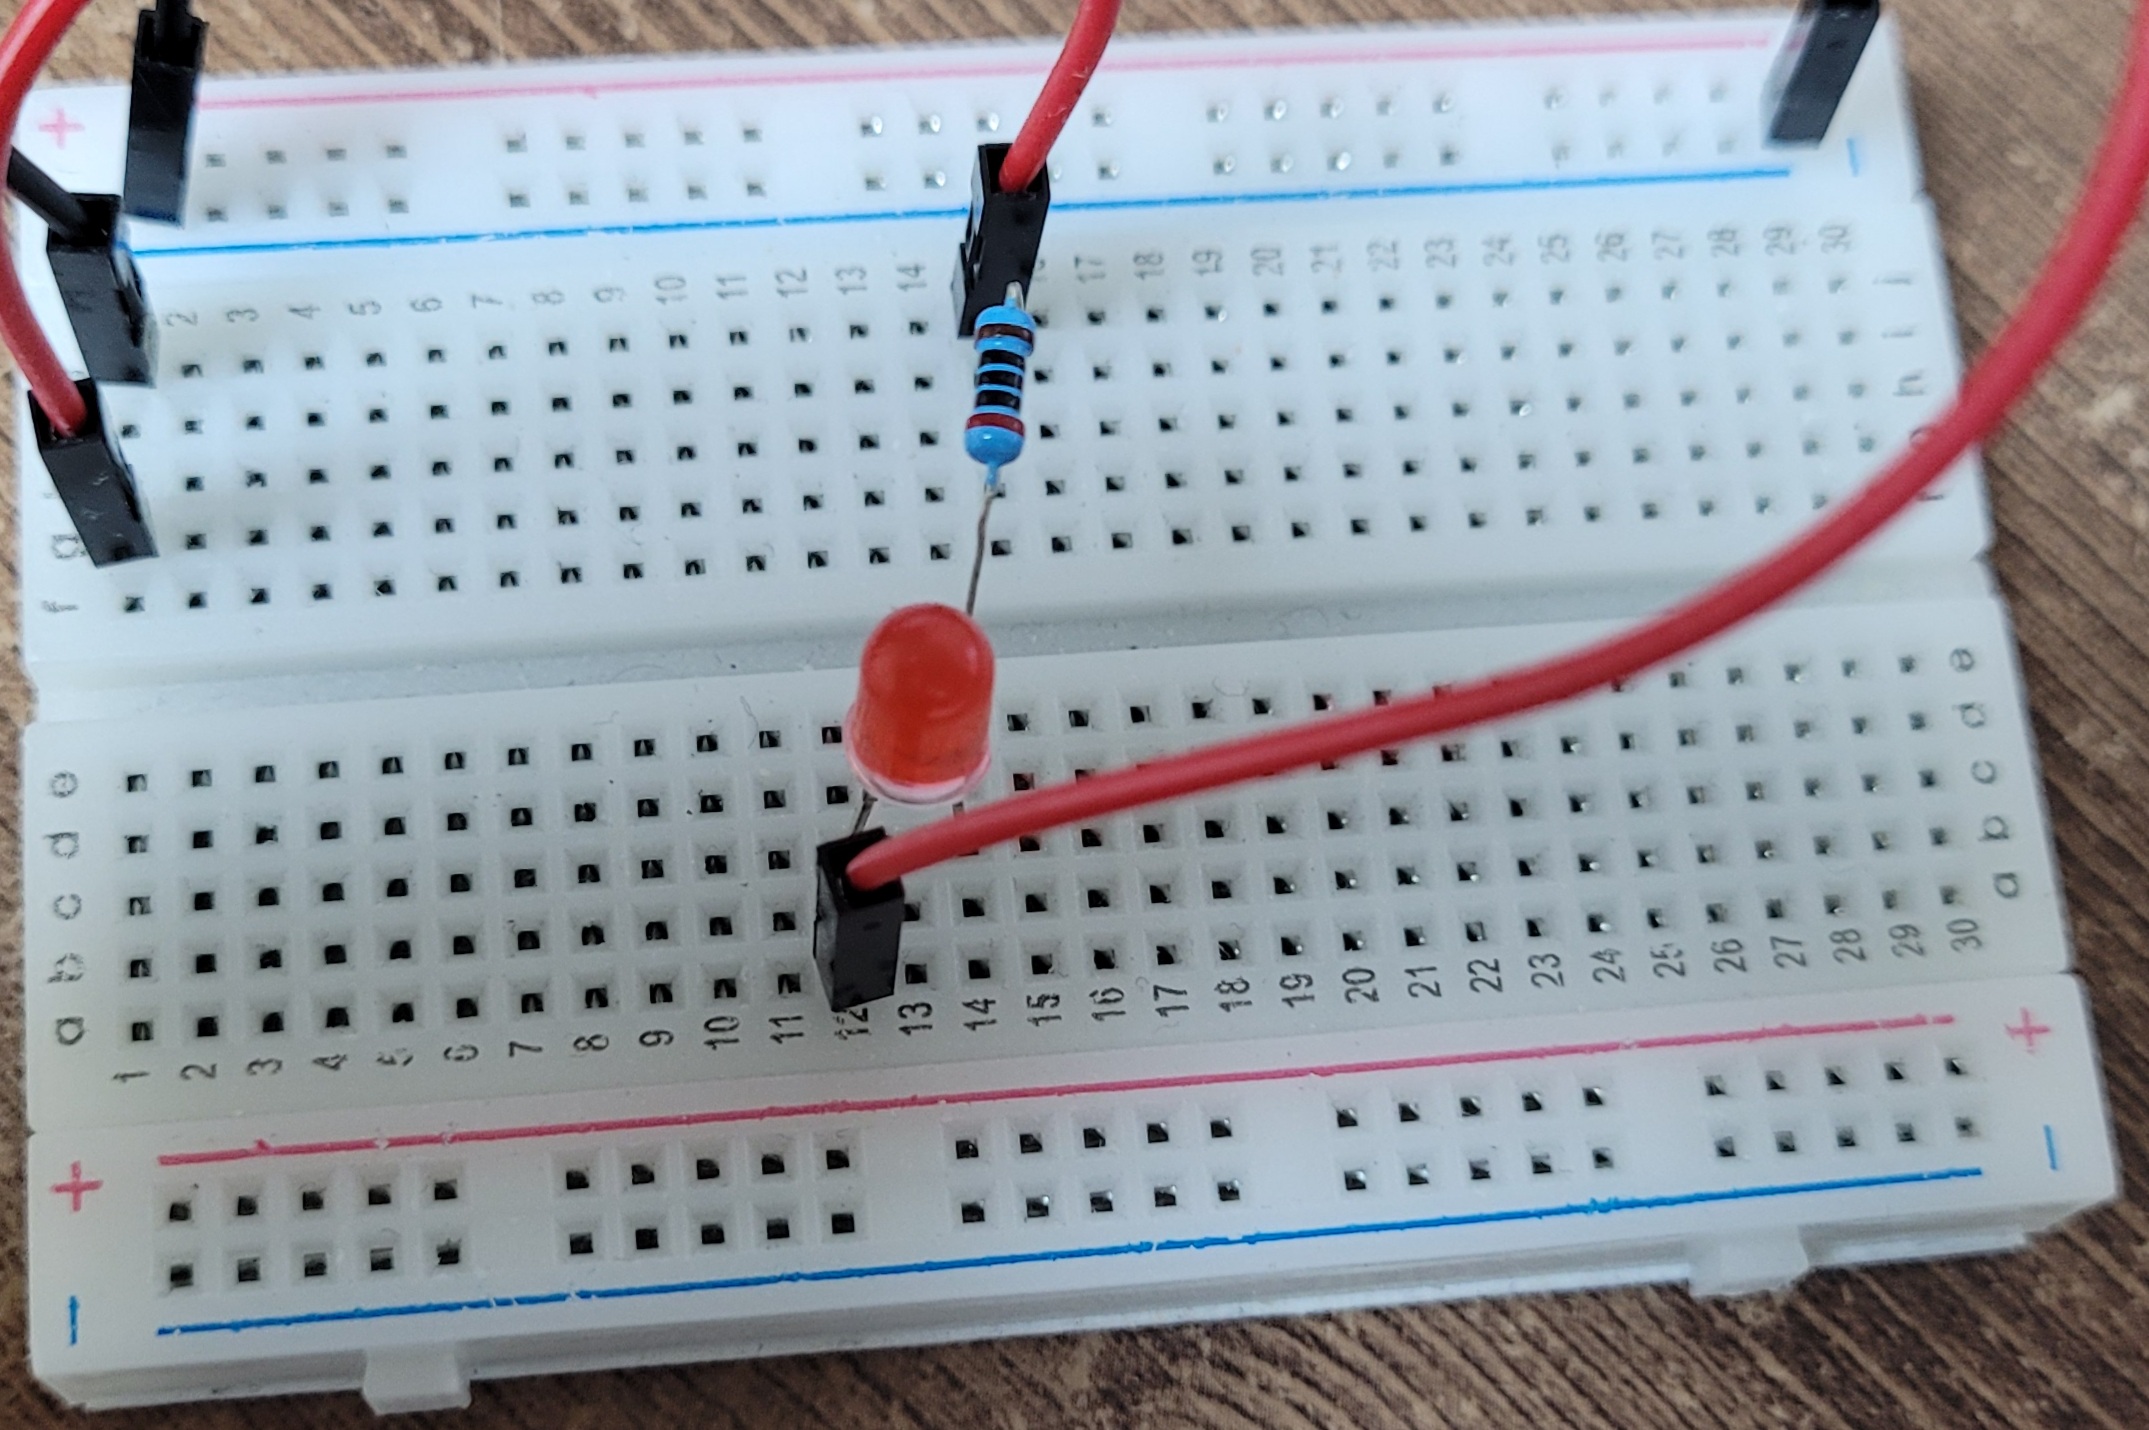
PWM = 37일때


PWM = 244일때