남은 버그들도 수정해보도록 하자.
먼저
- 로그인을 하지 않고 장바구니에 추가를 클릭할 시 아무일도 일어나지 않음
해당 오류를 수정해보았다.
먼저, 스프링 시큐리티에서 장바구니 추가 POST명령을 받으면 로그인이 되어있지 않으면 인가되지 않도록하였다.
.requestMatchers("/user/status", "/products/add", "/cart/**").authenticated()그 후, js에서 401코드가 오면 인가되지 않음을 확인하고 로그인 창으로 이동하도록 권유하는 알림을 띄우도록 하였다.
function handleSubmit(event) {
            event.preventDefault(); // 기본 폼 제출 동작 방지
            const form = event.target;

            // 폼 데이터를 객체로 생성
            const formData = new FormData(form);

            // Fetch API를 사용하여 비동기 요청 보내기
            fetch(form.action, {
                method: form.method,
                body: formData,
                headers: {
                    'X-Requested-With': 'XMLHttpRequest'
                }
            }).then(response => {
                if (response.status === 401) {
                    // 401 상태 코드인 경우 로그인 창으로 이동할지 물어보는 prompt 표시
                    const shouldRedirect = confirm('로그인이 필요합니다. 로그인 페이지로 이동하시겠습니까?');
                    if (shouldRedirect) {
                        window.location.href = '/login'; // 로그인 페이지로 이동
                    }
                    throw new Error('Unauthorized'); // 에러를 throw하여 나머지 then 블록이 실행되지 않도록 함
                } else if (response.ok) {
                    return response.text();
                } else {
                    throw new Error('Network response was not ok.');
                }
            }).then(data => {
                        if (data === 'success') {
                            alert('상품이 장바구니에 추가되었습니다.');
                        } else {
                            alert('상품 추가에 실패했습니다.');
                        }
                })
        }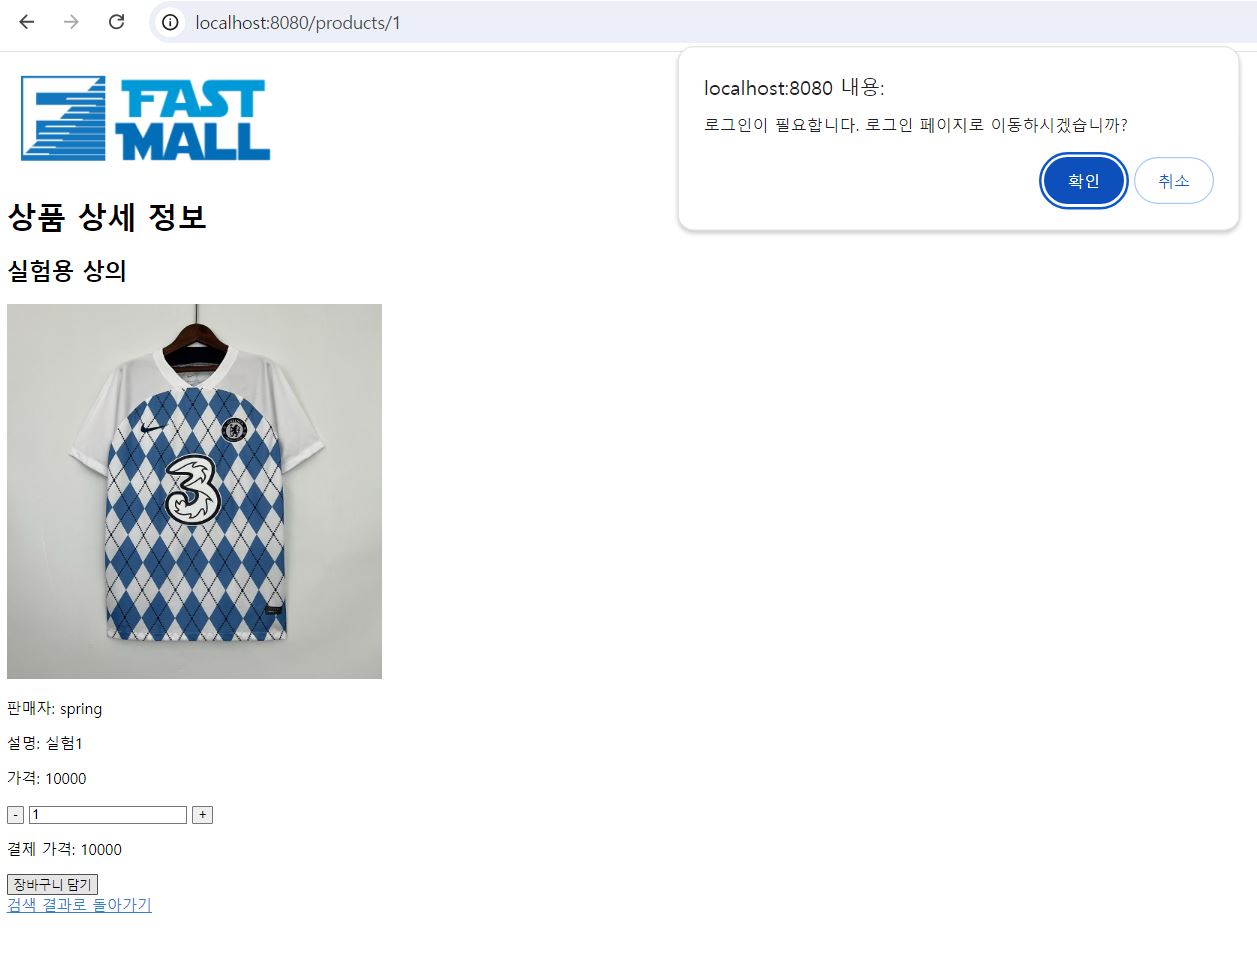
저기서 확인 버튼을 누르면 로그인 창으로 이동하도록 하였다. 장바구니 쪽 코드를 보면서 한가지 오류를 더 찾았다.
- 장바구니에 중복된 상품이 계속 담기도록 설계되어있음
해당 상품이 이미 존재한다면 갯수를 그만큼 추가시키거나 이미 추가된 상품이라고 알림을 보내주어야할 것 같다.
그래서 컨트롤러 코드와 js코드를 다음과 같이 수정하였다.
CartController로 분리하면서 Post명령을 모두 가지고 있던 RestController를 지우고, 해당 컨트롤러에 들어있던 Post명령들을 모두 자신의 관심과 비슷한 컨트롤러에 존재하도록 리팩토링했다.
CartController
@PostMapping("/cart/add")
    public ResponseEntity<CartResponseDto> addToCart(@RequestParam("productId") int productId, @RequestParam("quantity") int quantity, @AuthenticationPrincipal UserDetails userDetails) {
        try {
            String userId = userDetails.getUsername();
            Cart cart = cartService.findByTwoId(userId,productId);
            if(cart == null){
                cartService.addCart(userId, productId, quantity); // 장바구니에 상품 추가
                CartResponseDto response = new CartResponseDto("상품이 장바구니에 추가되었습니다.", userId);
                return ResponseEntity.ok(response); // 200 OK 응답 반환
            }
            else{
                CartResponseDto response = new CartResponseDto("이미 추가된 상품입니다",null);
                return ResponseEntity.ok(response); // 200 OK 응답 반환
            }
        } catch (Exception ex) {
            return ResponseEntity.status(HttpStatus.INTERNAL_SERVER_ERROR)
                    .body(new CartResponseDto("상품 추가에 실패했습니다.", null)); // 500 응답 반환
        }
    }
form을 보내는 코드만 수정 나머지 코드는 생략
function handleSubmit(event) {
            event.preventDefault(); // 기본 폼 제출 동작 방지
            const form = event.target;

            // 폼 데이터를 객체로 생성
            const formData = new FormData(form);

            // Fetch API를 사용하여 비동기 요청 보내기
            fetch(form.action, {
                method: form.method,
                body: formData,
                headers: {
                    'X-Requested-With': 'XMLHttpRequest'
                }
            }).then(response => {
                if (response.status === 401) {
                    // 401 상태 코드인 경우 로그인 창으로 이동할지 물어보는 prompt 표시
                    const shouldRedirect = confirm('로그인이 필요합니다. 로그인 페이지로 이동하시겠습니까?');
                    if (shouldRedirect) {
                        window.location.href = '/login'; // 로그인 페이지로 이동
                    }
                    throw new Error('Unauthorized'); // 에러를 throw하여 나머지 then 블록이 실행되지 않도록 함
                } else if (response.ok) {
                    return response.json();
                } else {
                    throw new Error('Network response was not ok.');
                }
            }).then(data => {
                        alert(data.message);
                        if(data.message === '상품이 장바구니에 추가되었습니다.'){
                            const shouldRedirect = confirm('장바구니를 확인하시겠습니까?');
                            if (shouldRedirect) {

                                const user_id = data.user_id; // 서버 응답에서 user_id 가져오기
                                window.location.href = '/cart/${user_id}'; // 로그인 페이지로 이동
                            }
                        }
                })
                .catch(error => {
                    console.error('Error:', error);
                    if(error === 'Network response was not ok.')
                        alert('네트워크 오류.');
                });
        }
이제 다른 오류나 불편사항들을 수정해보자.
- 로그인시 엔터키로 로그인 불가
위 오류는 form을 submit으로 받게되면서 자동적으로 해결되었다.
- 아이디/비밀번호 찾기 부분이 추가되지않음
- 새로 추가된 html들은 css가 없음
지금은 이 두 가지만 해결하면 다 해결된 것 같다.
먼저 이걸 해결해보자
- 아이디/비밀번호 찾기 부분이 추가되지않음
아이디 찾기는 이메일을 검색해서 찾는로직으로 구성하였다. 원래는 pass와 같은 인증 시스템을 쓰려고 했는데 사업자 번호가 필요한것 같았다
find_id.html
<!DOCTYPE html>
<html lang="ko">
<head>
    <meta charset="UTF-8">
    <title>Fast Mall - 로그인</title>
    <meta name="viewport" content="width=device-width, initial-scale=1.0">
    <script src="https://code.jquery.com/jquery-3.7.0.js" integrity="sha256-JlqSTELeR4TLqP0OG9dxM7yDPqX1ox/HfgiSLBj8+kM=" crossorigin="anonymous"></script>
    <script>
        function handleSubmit(event) {
            event.preventDefault(); // 기본 폼 제출 동작 방지
            const form = event.target;

            // 폼 데이터를 객체로 생성
            const formData = new FormData(form);

            // Fetch API를 사용하여 비동기 요청 보내기
            fetch(form.action, {
                method: form.method,
                body: formData,
                headers: {
                    'X-Requested-With': 'XMLHttpRequest'
                }
            }).then(response => {
                if (response.ok) {
                    return response.text();
                } else {
                    throw new Error('Network response was not ok.');
                }
            }).then(data => {
                if(data === '아이디가 존재하지 않습니다.'){
                    alert(data);
                    window.location.href = "/login";
                }
                else{
                    const find = document.getElementById("find_id_form");
                    find.innerText = '';
                    const id = document.createElement("label");
                    id.id = "id";
                    id.textContent = "id는 " + data + "입니다"; // 텍스트를 업데이트
                    find.appendChild(id);
                }
                })
                .catch(error => {
                    console.error('Error:', error);
                    if(error === 'Network response was not ok.')
                        alert('네트워크 오류.');
                });
        }
    </script>
    <link rel="stylesheet" href="/css/login_style.css">
</head>
<body>
<div class="header">
    <a href="/" id="home_logo">
        <img src="/images/icons/logo.png" />
    </a>
</div>

<form id="find_id_form" action="/find_id", method="post" onsubmit="handleSubmit(event)">
    <label>이름을 입력해주세요</label>
    <div id="box">
        <label>이름: </label>
        <input class = "text" type="text" id="email" name="email"/>
    </div>
    <div>
        <button type="submit" id="find">찾기</button>
    </div>
</form>

</body>
</html>
LoginController에 넣어둠
@GetMapping("/find_id")
    public String findIdPage() {
        return "/user/findId";
    }

    @PostMapping("/find_id")
    public ResponseEntity<String> findIdByEmail(@RequestParam(name = "email") String email){
        ResponseEntity response = null;
        try {
            Users user = userService.findByEmail(email);
            String id = user.getId();
            response = ResponseEntity
                    .status(HttpStatus.CREATED)
                    .body(id);

        } catch (Exception ex) {
            response = ResponseEntity
                    .status(HttpStatus.CREATED)
                    .body("아이디가 존재하지 않습니다.");
        }
        return response;
    }
이렇게 설정해두고, 사용자 테이블에서 이메일이 겹치지않도록 열을 지워두었다.
테스트 결과
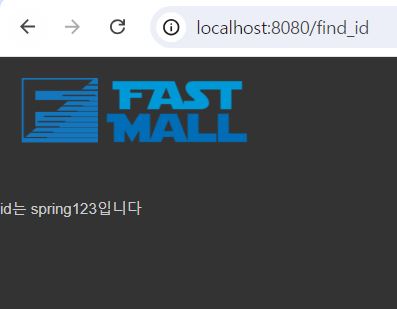
정상적으로 동작함을 확인했다.
비밀번호 찾기는 이메일 인증으로 구현하는게 맞을 것 같다.
이메일 인증을 구현하는 것은 블로그나 티스토리에 잘 되어있어서 쉬웠다. 이제 이걸 이용해서 비밀번호를 재설정해보자.
먼저, 메일 SMTP설정을 해야한다! 해당 블로그를 활용하도록하자.
build.gradle에 해당 줄을 추가해주자
implementation 'org.springframework.boot:spring-boot-starter-mail'그 후, application.properties에 적어도 되지만, MailConfig를 새로 만들어 활용하기로 하였다.
MailConfig.java
package com.shoppingmall.config;

import org.springframework.context.annotation.Bean;
import org.springframework.context.annotation.Configuration;
import org.springframework.mail.javamail.JavaMailSender;
import org.springframework.mail.javamail.JavaMailSenderImpl;

import java.util.Properties;

@Configuration
public class MailConfig {
    @Bean
    public JavaMailSender javaMailService() {
        JavaMailSenderImpl javaMailSender = new JavaMailSenderImpl();

        javaMailSender.setHost("smtp.naver.com");
        javaMailSender.setUsername("네이버 메일");
        javaMailSender.setPassword("해당 네이버메일 비밀 번호");

        javaMailSender.setPort(465);

        javaMailSender.setJavaMailProperties(getMailProperties());

        return javaMailSender;
    }

    private Properties getMailProperties() {
        Properties properties = new Properties();
        properties.setProperty("mail.transport.protocol", "smtp");
        properties.setProperty("mail.smtp.auth", "true");
        properties.setProperty("mail.smtp.starttls.enable", "true");
        properties.setProperty("mail.debug", "true");
        properties.setProperty("mail.smtp.ssl.trust","smtp.naver.com");
        properties.setProperty("mail.smtp.ssl.enable","true");
        return properties;
    }
}
EmailService를 만들어서 메일을 전송할 수 있도록 하자.
여기서 title을 일부러 빼두었다. 나중에 회원가입할 때, 이메일 인증 기능을 만들기 위해서이다.
package com.shoppingmall.service;

import jakarta.mail.MessagingException;
import jakarta.mail.internet.MimeMessage;
import lombok.RequiredArgsConstructor;
import org.springframework.mail.javamail.JavaMailSender;
import org.springframework.stereotype.Service;
import org.thymeleaf.context.Context;
import org.thymeleaf.spring6.SpringTemplateEngine;

import java.io.UnsupportedEncodingException;
import java.util.Map;
import java.util.Random;
import java.util.concurrent.ConcurrentHashMap;

@Service
@RequiredArgsConstructor
public class EmailService {

    //의존성 주입을 통해서 필요한 객체를 가져온다.
    private final JavaMailSender emailSender;

    // 타임리프를사용하기 위한 객체를 의존성 주입으로 가져온다
    private final SpringTemplateEngine templateEngine;
    private String authNum; //랜덤 인증 코드

    private Map<String, String> authCodes = new ConcurrentHashMap<>(); // 인증 코드 저장

    //랜덤 인증 코드 생성
    public void createCode() {
        Random random = new Random();
        StringBuffer key = new StringBuffer();

        for(int i=0;i<8;i++) {
            int index = random.nextInt(3);

            switch (index) {
                case 0 :
                    key.append((char) ((int)random.nextInt(26) + 97));
                    break;
                case 1:
                    key.append((char) ((int)random.nextInt(26) + 65));
                    break;
                case 2:
                    key.append(random.nextInt(9));
                    break;
            }
        }
        authNum = key.toString();
    }

    //메일 양식 작성
    public MimeMessage createEmailForm(String email, String title) throws MessagingException, UnsupportedEncodingException {

        createCode(); //인증 코드 생성
        String setFrom = "kkuldangi3@naver.com"; //email-config에 설정한 자신의 이메일 주소(보내는 사람)
        String toEmail = email; //받는 사람
        String toTitle = title; //제목

        MimeMessage message = emailSender.createMimeMessage();
        message.addRecipients(MimeMessage.RecipientType.TO, email); //보낼 이메일 설정
        message.setSubject(title); //제목 설정
        message.setFrom(setFrom); //보내는 이메일
        message.setText(setContext(authNum), "utf-8", "html");

        return message;
    }

    //실제 메일 전송
    public String sendEmail(String toEmail,String toTitle) throws MessagingException, UnsupportedEncodingException {

        //메일전송에 필요한 정보 설정
        MimeMessage emailForm = createEmailForm(toEmail,toTitle);
        //실제 메일 전송
        emailSender.send(emailForm);
        authCodes.put(toEmail,authNum);
        return authNum; //인증 코드 반환
    }

    //타임리프를 이용한 context 설정
    public String setContext(String code) {
        Context context = new Context();
        context.setVariable("code", code);
        return templateEngine.process("/user/mail", context); //mail.html
    }

    public boolean verifyAuthCode(String email, String authCode) {
        return authCode.equals(authCodes.get(email));
    }

}
메일로 보내질 html파일이다.
<!DOCTYPE html>
<html lang="ko">
<head>
    <meta charset="UTF-8">
    <title>Fast Mall</title>
    <meta name="viewport" content="width=device-width, initial-scale=1.0">
    <script src="https://code.jquery.com/jquery-3.7.0.js" integrity="sha256-JlqSTELeR4TLqP0OG9dxM7yDPqX1ox/HfgiSLBj8+kM=" crossorigin="anonymous"></script>
    <script>

    </script>
</head>
<body>
<div style="margin:100px;">
    <p> 아래 코드를 인증코드 확인 창으로 돌아가 입력해주세요.</p>
    <br>

    <div align="center" style="border:1px solid black; font-family:verdana;">
        <h3 style="color:blue"> 인증 코드 입니다. </h3>
        <div style="font-size:130%" th:text="${code}"> </div>
    </div>
    <br/>
</div>


</body>
</html>
마지막으로, EmailController를 만들어서 사용자가 메일을 보내고 받을 수 있도록 하자.
package com.shoppingmall.controller;

import com.shoppingmall.dto.FindPwDto;
import com.shoppingmall.service.EmailService;
import com.shoppingmall.service.UserService;
import jakarta.mail.MessagingException;
import jakarta.servlet.http.HttpSession;
import lombok.RequiredArgsConstructor;
import org.springframework.http.HttpStatus;
import org.springframework.http.ResponseEntity;
import org.springframework.stereotype.Controller;
import org.springframework.web.bind.annotation.GetMapping;
import org.springframework.web.bind.annotation.PostMapping;
import org.springframework.web.bind.annotation.RequestParam;

import java.io.UnsupportedEncodingException;

@Controller
@RequiredArgsConstructor
public class EmailController {

    private final EmailService emailService;

    private final UserService userService;

    @GetMapping("/find_pw")
    public String pwMail(){
        return "/user/find_pw";
    }

    @PostMapping("/find_pw")
    public ResponseEntity<FindPwDto> sendResetEmail(@RequestParam(name = "id") String id, HttpSession session) throws MessagingException, UnsupportedEncodingException {
        FindPwDto response;
        try {
            String title = "비밀번호 인증 코드";
            String email = userService.findById(id).getEmail();
            emailService.sendEmail(email,title);
            session.setAttribute("email", email); // 이메일을 세션에 저장
            response = new FindPwDto("인증 이메일이 발송되었습니다.", email);
            return ResponseEntity.ok(response); // 200 OK 응답 반환

        } catch (Exception ex) {
            return ResponseEntity.status(HttpStatus.INTERNAL_SERVER_ERROR)
                    .body(new FindPwDto("아이디가 존재하지 않습니다.", null)); // 500 응답 반환
        }
    }

    @GetMapping("/verify_code")
    public String verifyPage(){
        return "/user/verify";
    }

    @PostMapping("/verify_code")
    public ResponseEntity<String> verifyAuthCode(@RequestParam(name="authCode") String authCode,HttpSession session) {
        ResponseEntity response;
        try {
            String email = (String) session.getAttribute("email");
            boolean isValid = emailService.verifyAuthCode(email, authCode);
            if (isValid) {
                response = ResponseEntity
                        .status(HttpStatus.CREATED)
                        .body("인증 코드가 확인되었습니다. 비밀번호 재설정 페이지로 이동합니다.");
            } else {
                response = ResponseEntity
                        .status(HttpStatus.CREATED)
                        .body("인증 코드가 유효하지 않습니다.");
            }

        } catch (Exception ex) {
            response = ResponseEntity
                    .status(HttpStatus.CREATED)
                    .body("아이디가 존재하지 않습니다.");
        }
        return response;
    }
}
나머지 html코드는 깃허브를 참고하도록 하자.
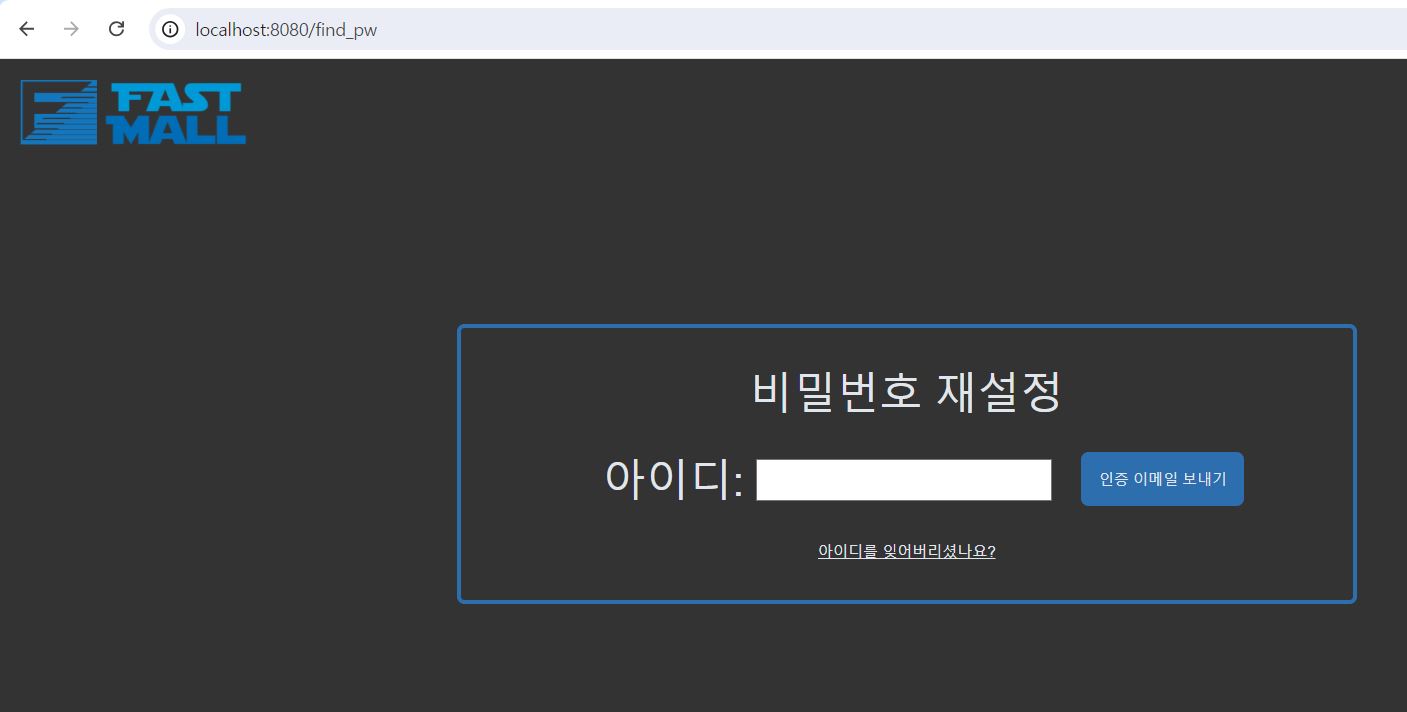
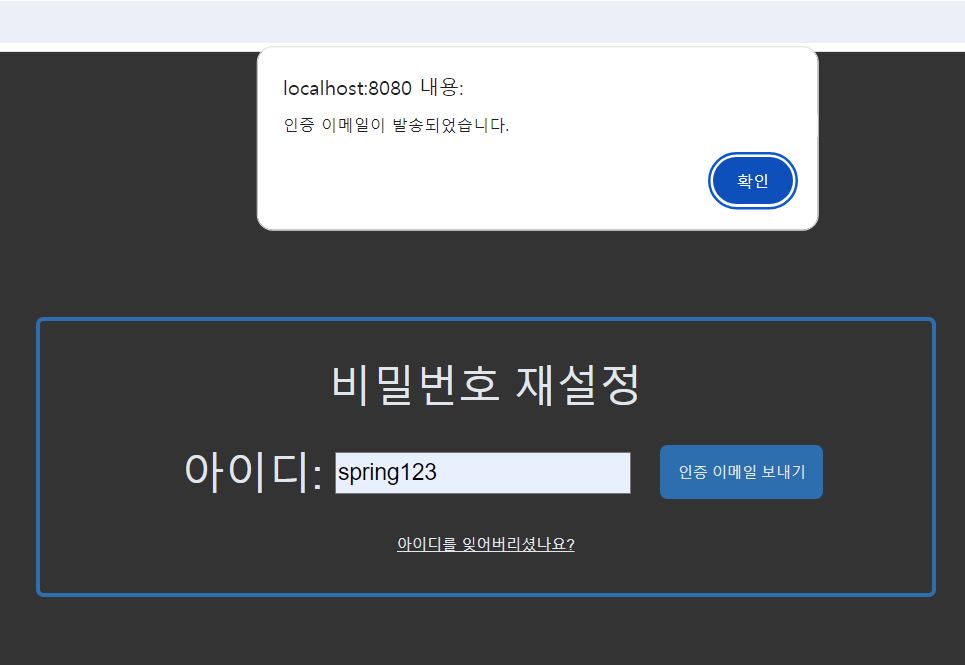
먼저, 아이디 찾기로 아이디를 찾아냈다면 해당 아이디를 입력창에 입력한다.
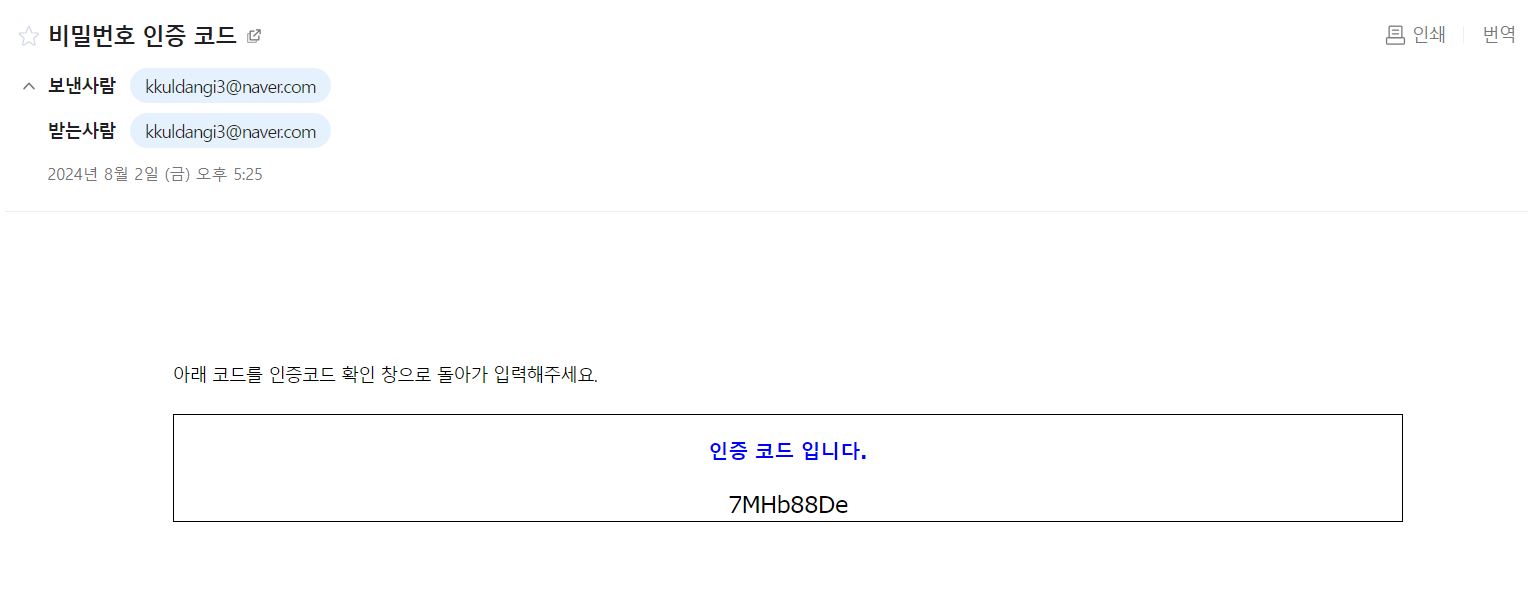
그 후, 인증 이메일 보내기를 누르면

존재하는 아이디라면 인증 이메일이 발송되었다는 알림창이 뜨도록 했다. 확인을 누르면 인증 코드 입력 창으로 넘어간다.
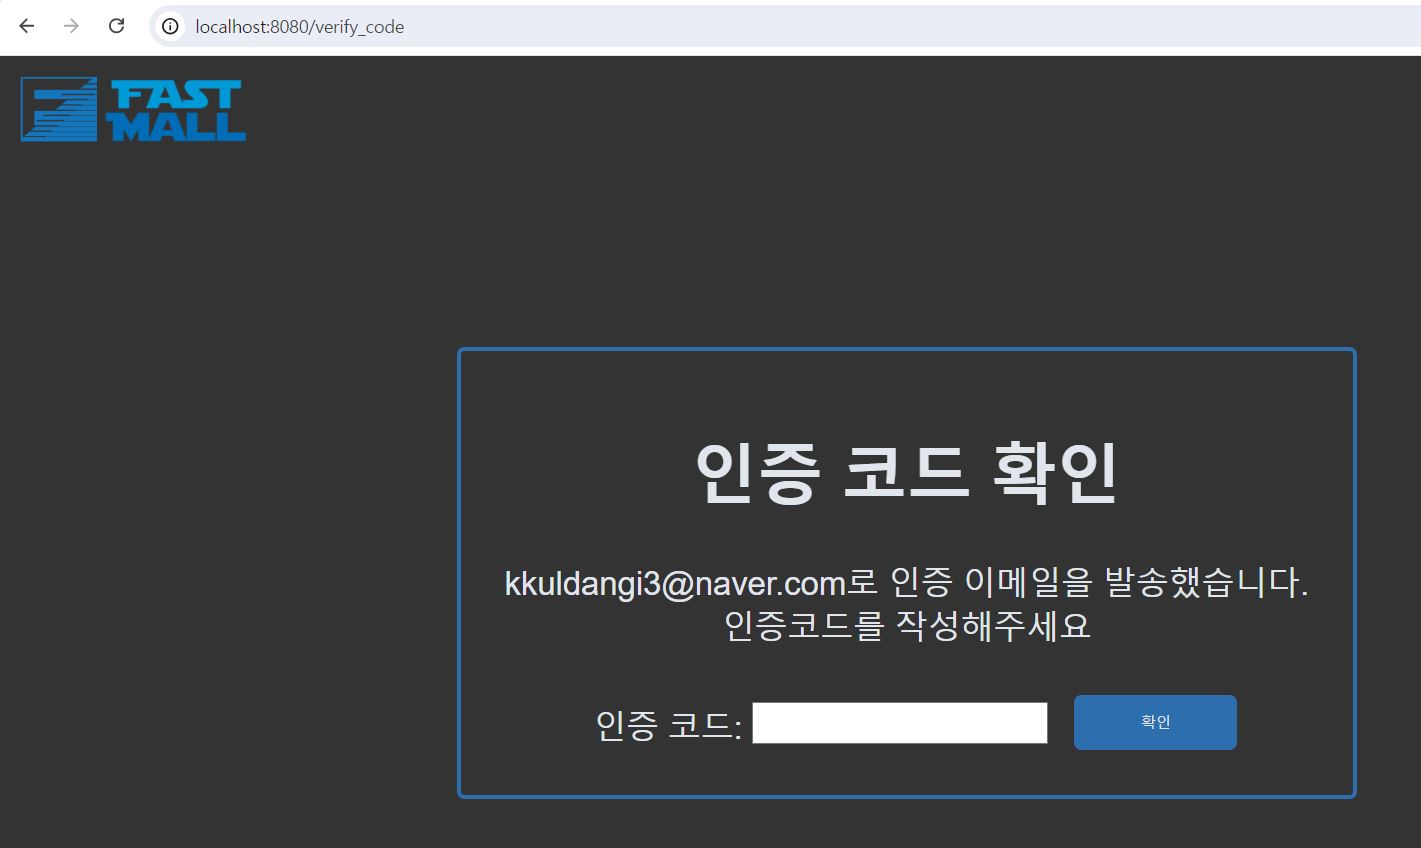
찾은 이메일을 세션에 저장해두고 해당 페이지로 보내주도록 했다.
인증 코드를 받았으니 해당 코드를 그대로 입력해주면 되겠다.
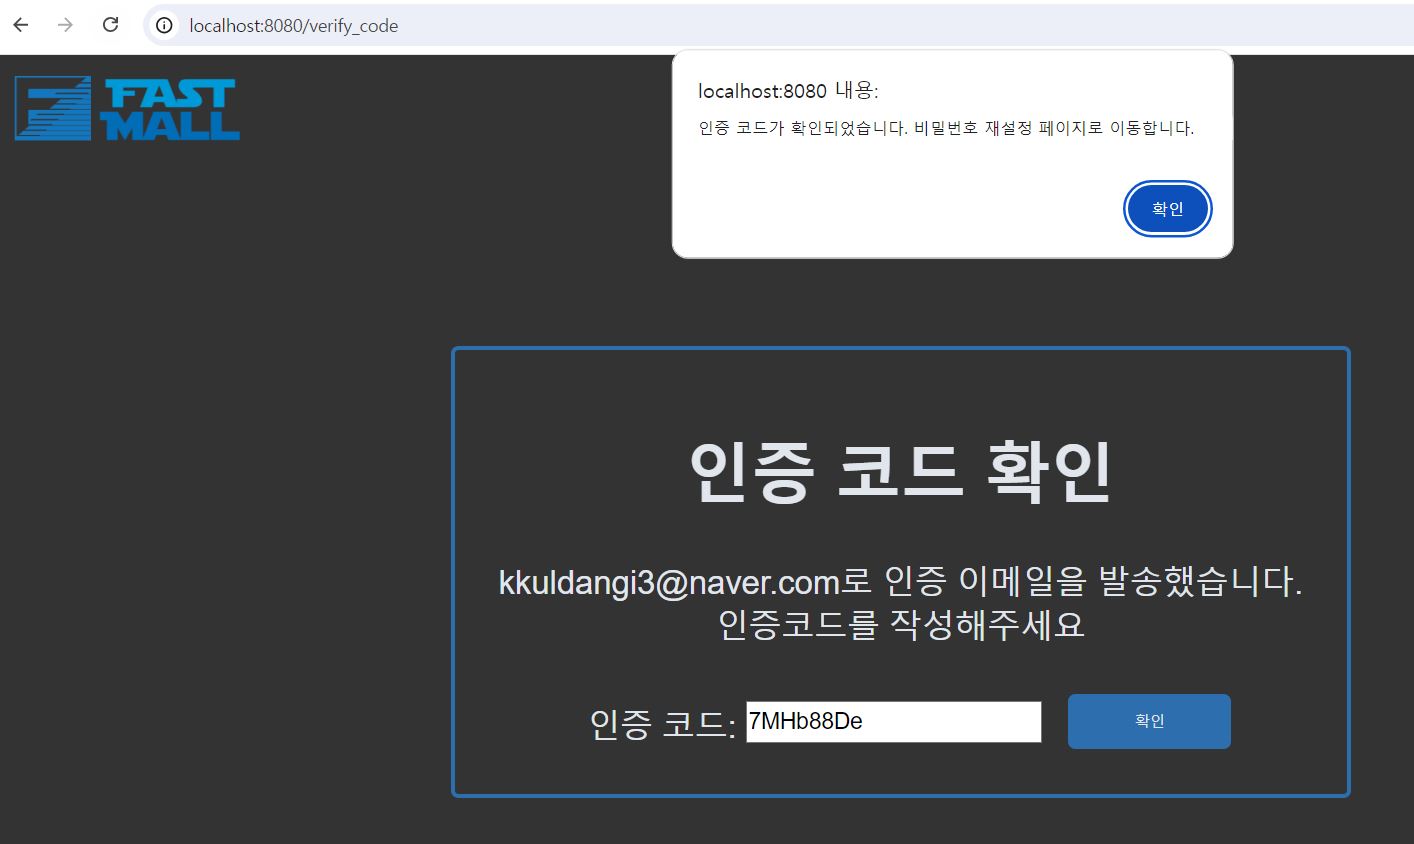
인증코드가 일치한다면 다음과 같이 알림이 뜨면서 비밀번호 재설정 페이지로 이동할 수 있다. 아니라면 인증코드가 유효하지 않는다는 알림을 보내도록 했다.
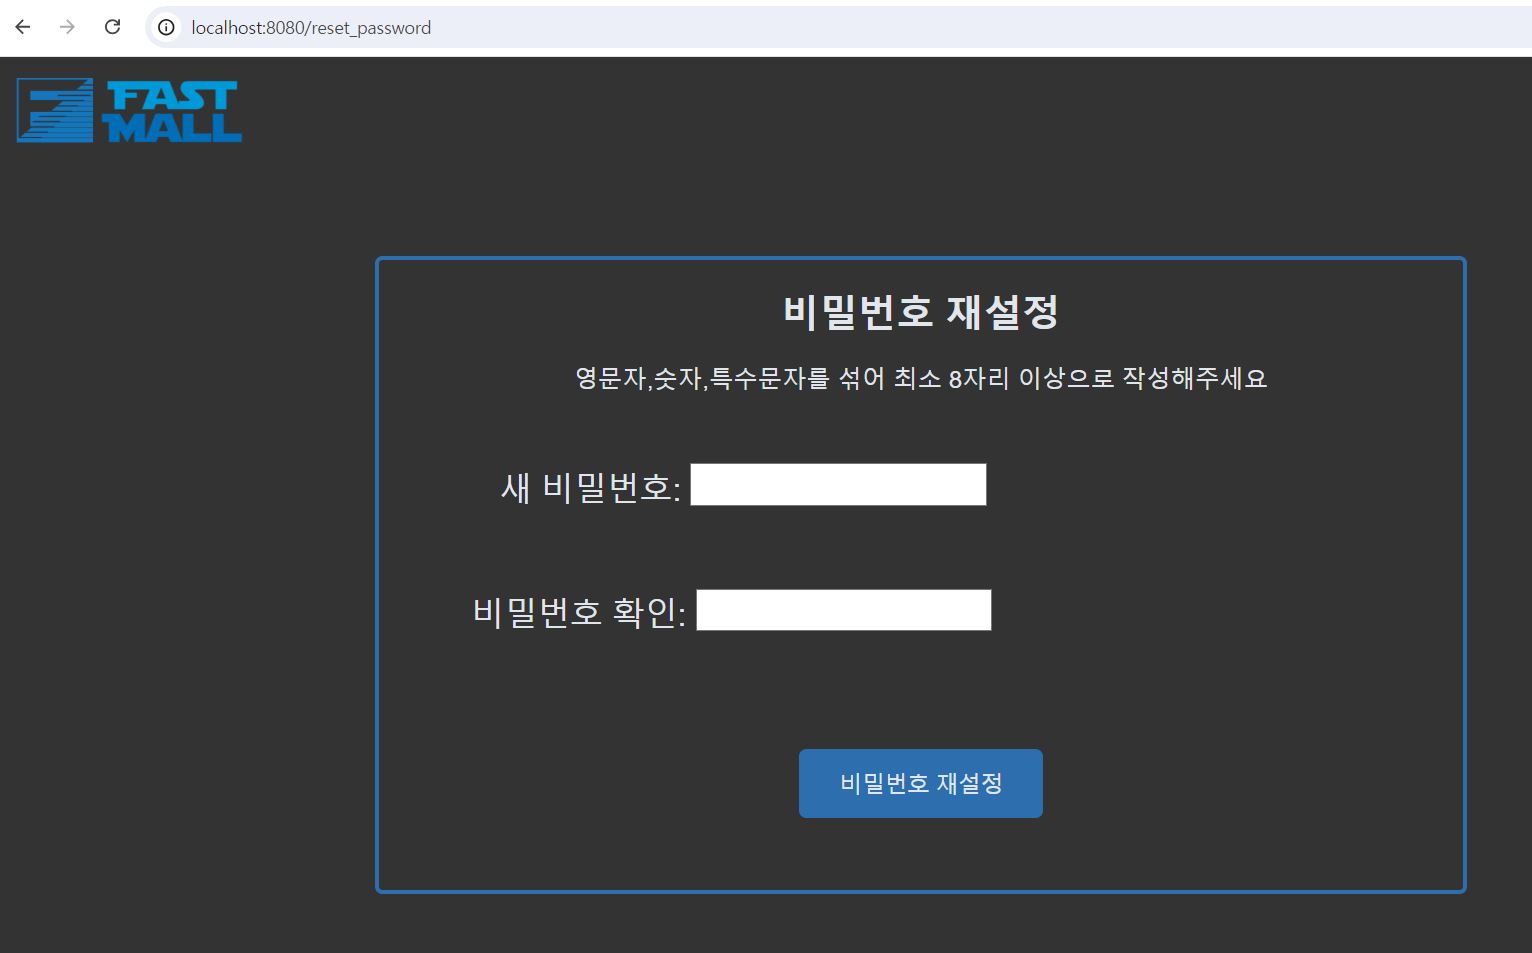
마지막으로 비밀번호를 해당 조건에 맞게 설정해주면 되겠다. 조건에 맞지않는다면 당연히 재설정되지 않도록 해두었다.
이렇게 일단 어느정도 수정해야할 것들, 추가해야할 것들은 추가가 된거같다.
다음 글에서는 할인을 적용해보도록하자.
참고자료