
✍7.0 Get Selectors
만약 selector안에서 atom에 접근하고 싶다면 atom의 값을 가져오게끔 하는 get 함수를 사용하면 된다.
//atoms.ts
export const minuteState = atom({
  key: "minutes",
  default: 0,
});

export const hourSelector = selector({
  key: "hours",
  get: ({ get }) => {
    const minutes = get(minuteState);
    return minutes / 60;
  },
});
이 챕터에서 state는 minutes 하나 뿐이다. minutes과 hour 모두 state로 저장하지 않고 selector를 사용해서 state를 가져오고 output을 수정한 것!
✅추가적으로, string을 number로 바꾸는 방법은 앞에 +만 붙여주면 된다.
const onMinutesChange = (event: React.FormEvent<HTMLInputElement>) => {
    setMinutes(+event.currentTarget.value);
    //event.currentTarget.value는 지금 string인데, 앞에 "+"를 써주면 number타입이 된다.
  };
✍7.1 Set Selectors
7.0에서 구현한 hour input은 onChangeEvent 함수가 없어서 읽기 전용의 input 이였다.
이번 챕터에서는 selector의 또 다른 속성인 set을 알아보자. set은 state를 set하는 것을 도와주는 속성이며, atom을 수정하는 것을 도와준다.
selector에서의 useRecoilState 도 결과값으로 array를 받게 된다. array의 첫번째 요소는 get property로부터 return한 값이고, 두번째 요소는 set property를 부르는 함수가 될 것이다.
따라서
useRecoilState를 atom으로도, selector로도 쓸 수 있는데 결과 array의 첫번째 item은 atom의 값이거나 selector의 get 함수의 값이 된다.
array의 두번째 item은 atom을 수정하는 함수 이거나 selector의 set property를 실행시키는 함수
hour, minute 각각의 atom을 만들지 않았고 minutes 값만 저장해 뒀는데, 이 방법처럼 2개의 atom을 만들고 싶지 않다면 selector를 사용하면 된다🤣🤣🤣
export const hourSelector = selector<number>({
  key: "hours",
  get: ({ get }) => {
    const minutes = get(minuteState);
    return minutes / 60;
  },
  set: ({ set }, newValue) => {
    //console.log(newValue);
    const minutes = Number(newValue) * 60;
    set(minuteState, minutes);
  },
});
✍7.2 Drag and Drop part One
📎https://www.npmjs.com/package/react-beautiful-dnd
드래그앤 드롭을 배우기 위해 react-beautiful-dnd를 이용해보자.
npm i react-beautiful-dnd
npm i --save-dev @types/react-beautiful-dnd
🔥리액트 버전 18을 쓰면 에러가 나서 해결방법을 찾아보았다.
@hello-pangea/dnd를 import 하면 된다!
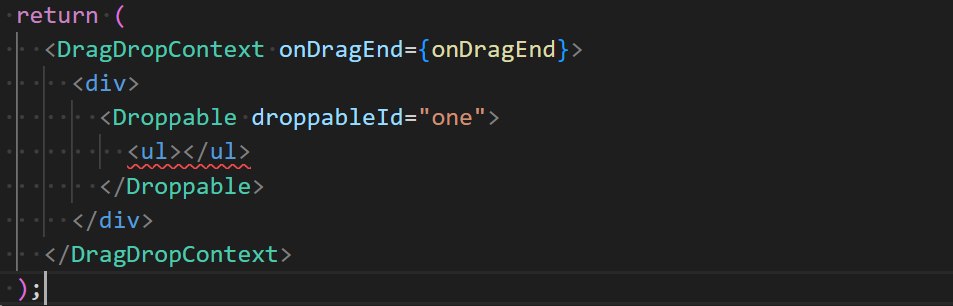
npm install @hello-pangea/dnd DragDropContext은 기본적으로 드래그 앤 드롭을 가능하게 하고 싶은 앱의 한 부분이다. 우리의 앱에서는 상관이 없지만, 앱 전체가 아닌 유저가 드래그앤드롭을 할 특정 영역에만 생성하면 된다.
onDragEnd는 유저가 드래그를 끝낸 시점에 불려지는 함수이다.
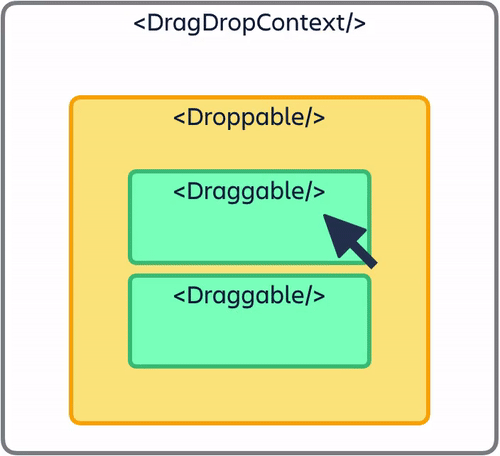
Droppable의 children은 react 요소이면 안돼서 에러가 발생하는데, children은 함수여야 한다. (Draggable도 마찬가지)
✍7.3 Drag and Drop part Two
droppable에서 주는 첫번째 argument는 provided이다. (이름은 마음대로 정의해도 됨. 강의에서는 magic으로 이름을 지었다)
<Draggable draggableId="first" index={0}>
                {(magic) => (
                  <li
                    ref={magic.innerRef}
                    {...magic.draggableProps}
                    {...magic.dragHandleProps}
                  >
                    One
                  </li>
                )}
</Draggable>
원한다면 또 다른 handle을 만들어서 "One"을 움직이기 위해 li에 전체에 클릭 허용하는 것이 아닌 움직일 수 있는 특정한 부분을 만들 수 있다. (지금은 "O"든, "n"이든 어떤 부분에서도 드래그가 가능함)
<Draggable draggableId="first" index={0}>
                {(magic) => (
                  <li
                    ref={magic.innerRef}{...magic.draggableProps}>
                    <span {...magic.dragHandleProps}>🔥</span>
                    One
                  </li>
                )}
              </Draggable>
위의 코드에서는 불 이모지를 선택해야 전체가 드래그 된다.
✍7.4 Styles and Placeholders
문제가 있는데, 한 아이템이 리스트가 나가면 리스트가 작아지거나 커지거나 한다. {magic.placeholder}를 쓰면 리스트에서 어떤걸 빼더라도 리스트의 사이즈는 그대로인것을 확인할 수 있다.
정리하자면, Draggable 엘리먼트를 드래그하는동안 position:fixed를 적용하며, Draggable을 드래그할때 Droppable 리스트가 작아지는 것을 방지하기 위해 필요한 것이다.
✍7.5 Reordering
이번 챕터에서는 아이텝을 드롭했을 때 정리해보는 방법을 알아보자. 7.4까지 구현한 내용에서는 아이템이 드롭되면 원래자리로 돌아가고 있기 때문
const onDragEnd = (args: any) => {
    console.log(args);
};console.log(args)를 해보면 많은 정보들을 알수 있는데, source와 destination등의 정보를 볼수 있다. 또한 현재 하나의 droppable만 가지고 있기 때문에 droppableId가 동일한것도 볼 수있다.
x.splice(0,1)
x.splice(2,0,"a")
splice 이용하는 예를 설명해보면
✅ 1. index 0으로 가서 1개의 item을 삭제
✅ 2. index 2에서 시작해서 어떤 것도 지우지 않고 "a"를 삽입
✍7.6 Reordering part Two
splice는 array를 재정렬하도록 도와주고, 한 자리에서 array를 수정하고 변형시킨다는 것이다 : mutation
non-mutaion의 예는 다음과 같다. name 자체가 변하지 않은 것을 확인 가능
array를 수정시키지 않기 위해 복사본(copyToDos)를 만들어 변형할수 있고, return 하면 된다.
아이템을 드롭하고 정렬하기 위한 순서는 다음과 같다.
✅ 1. source.index에서 아이템을 삭제
✅ 2. destination.index로 item을 넣기
const onDragEnd = ({ draggableId, source, destination }: DropResult) => {
    if (!destination) return;
    setToDos((oldToDos) => {
      const copyToDos = [...oldToDos];
      // 1) Delete item on source.index
      copyToDos.splice(source.index, 1);
      // 2) Put back the item on the destination.index
      copyToDos.splice(destination?.index, 0, draggableId);
      return copyToDos;
    });
  };
여기까지 구현하면 몇개의 문제가 발생한다. 아이템을 드래그하면 아주 짧게 텍스트가 이상해 보이는데, 조정하는데 시간이 걸리기 때문이다. 다음 챕터에서 고쳐보자🤣
✍7.7 Performance
아이템을 드래그 할때 가끔 떨리는 문제를 해결해보자.
react.js에서 component의 State가 변하면 해당 component의 모든 children은 다시 렌더링 된다.
예를들어 "f" 아이템을 움직이면 "a"부터 "f"까지 모든게 렌더링 된다. "f"를 "e"와 자리를 바꾸려고 하는데 "a"부터 "d"까지도 모두 렌더링 된다는 것!
만약 아주 큰 parant component가 있다고 하면, 아주 많은 children을 가지고 있을 것이고, parent component의 State를 바꾸면 children도 모두 재렌더링 될 것이다. 이 동작으로 인해 앱이 느려지게 될 것이므로 가끔은 이렇게 되기를 원하지 않을 것이다.
export default React.memo(DragabbleCard);react memo를 사용해서 react.js에게 특정 component를 렌더링 하지 못하도록 하면 된다.
따라서,
react memo는 react.js에게 prop이 바뀌지 않는다면 컴포넌트를 렌더링 하지 말라고 하는 역할을 한다.
✍7.8 Multi Boards
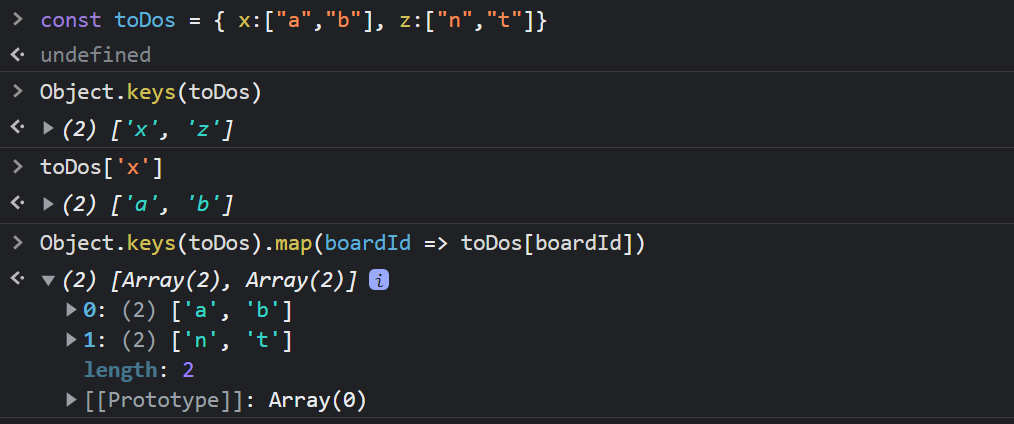
map함수에서는 object를 사용할 수 없으므로 위 사진과 같은 방법을 참고하여 코딩하면 된다.
//atoms.ts

interface IToDoState {
  [key: string]: string[];
}

export const toDoState = atom<IToDoState>({
  key: "toDo",
  default: {
    to_do: ["a", "b"],
    doing: ["c", "d", "e"],
    done: ["f"],
  },
});
interface를 만들지 않으면 타입스크립트는 default 값인 to_do, doing, done 만이 유일한 선택지라고 생각하게 된다. 하지만 나중에 user에게 board를 만들 선택권을 줄수도 있으니 interface를 만들면 된다.