객체(Object)
-
실 세계에서 우리 주변에 있는 모든 것이 객체임
예) TV, 컴퓨터, 책, 건물, 의자, 사람 등등 -
실 세계의 객체들은 자신만의 고유한 특성(속성)과 행동(기능)을 가지고 있음.
-
이러한 객체들은 다른 객체들에게 행동을 요청하거나 정보를 주고 받는 등 상호 작용을 하면서 존재
예를 든다면 사람은 전자계산기의 기능을 이용하게 되고, 전자계산기는 계산 결과를 사람에게 알려 주는 상호 작용을 하게 됨. -
이러한 객체는 속성과 기능(동작)으로 구성이 되어 있음
예를 든다면 사람은 이름, 나이 등의 속성이 있고, 걷다, 쓰다, 달린다 등의 동작이 있음. 또한 자동차의 경우에는 색상, 모델명 등이 속성에 해당이 되고, 달린다, 멈춘다 등의 동작이 있음 -
객체는 개별적으로 사용이 될 수도 있지만, 대부분 다른 객체와 관계를 맺고 있게 됨. 이러한 관계의 종류에는 집합관계, 사용관계, 상속관계가 있음 ==> 중요함
-
집합관계는 객체는 하나의 부품이고, 하나의 완성품에 해당이 됨
예를 든다면 자동차는 엔진, 타이어, 핸들 등으로 구성이 되므로 이 부품들을 집합관계라고 볼 수 있음 -
사용관계는 객체 간의 상호 작용을 말함. 다른 객체의 메서드를 호출하여 원하는 결과를 얻어내는 것을 말함
예를 든다면 사람은 자동차를 사용하므로 사람과 자동차는 사용의 관계라고 볼 수 있음 사람은 자동차를 사용할 때 달린다, 멈춘다 등의 메서드를 호출함 -
상속관계는 상위(부모) 객체를 기반으로 하위(자식) 객체를 생성하는 관계를 말함.일반적으로 상위 객체는 종류를 의미하고, 하위 객체는 구체적인 사물에 해당이 됨
예를 든다면 "독수리는 새의 종류이다" 에서 새(상위)와 독수리(하위)는 상속관계에 있다고 볼 수 있음 -
객체지향 프로그래밍(OOP : Object Oriented Programming)은 만들고자 하는 완성품인 객체를 모델링하고, 집합관계에 있는 부품 객체와 사용관계에 있는 객체를 하나씩 설계한 후 조립하는 방식으로 프로그램을 개발하는 기법임
-
객체지향 4가지 특징
- 추상화(Abstraction)
- 다형성(Polymorphism)
- 캡슐화(Encapsulation)
- 상속(Inheritance)
- 객체지향 패러다임
- 적절한 객체에게 적절한 책임을 할당하여 서로 메세지를 주고 받으며 협력하도록 하는 것
- 점점 증가하는 SW 복잡도를 낮추기 위해 객체지향 패러다임 대두
- 개인적으로 생각하는 두 가지 포인트
- 클래스가 아닌 객체에 초점을 맞추는 것
- 객체들에게 얼마나 적절한 역할과 책임을 할당하는지
클래스(Class)
- 현실에서 객체는 갑자기 만들어지는 것이 아니라, 설계도를 바탕으로 만들어짐
예를 들어 사람들이 자동차를 이용하기 위해서는 우선 공장에서 자동차 설계도를 보고 자동차를 만들어야 함
객체지향 프로그래밍도 마찬가지임, 메모리에서 사용하고 싶은 객체가 있다면 우선 설계도로 해당하는 객체를 만드는 작업이 필요함
자바에서는 설계도가 바로 클래스(Class) - 클래스는 객체를 만들기 위한 설계도(틀, 도면)
- 붕어빵 틀과 붕어빵 객체 사이의 관계를 통해 클래스와 객체 관계를 보여줌 자바로 말하자면 붕어빵 틀은 자바 클래스이며, 붕어빵은 자바 객체임
클래스는 하나이지만 객체들은 수 없이 많이 생성될 수 있음 - 자바는 클래스 단위로 프로그래밍을 함
- 클래스를 구성하는 것을 멤버(member)라고 함
- 멤버 = 속성(멤버변수) + 기능(멤버메서드)
==> 속성 : 멤버변수 - 클래스의 특징 ==> 명사적 개념
==> 기능 : 멤버메서드 - 클래스의 행위(동작) ==> 동사적 개념 - 클래스 구성 : 클래스 헤더, 멤버변수, 멤버메서드, 생성자
[클래스 형식]
[접근제한] class 클래스이름 {
 				멤버변수;
 				생성자();
 				멤버메서드();
 			}
- 클래스 이름 : 반드시 첫 글자는 대문자로 작성(식별자)
=> 멤버변수는 초기값을 설정하지 않으면 JVM이
객체 생성 시점에 해당 데이터 타입(자료형)에 맞게
알아서 해당 자료형의 default(기본)값을 설정을 해 줌
public class ClassExam_01 {

	// class 안에서는 어디든지 사용 가능
	int num;		// 멤버변수 - 전역변수
	String str;		// 멤버변수 - 전역변수

	void display() { // 멤버메서드

		int su = 10; // 지역변수

		System.out.println("멤버변수(num) >>> " + num);
		System.out.println("멤버변수(str) >>> " + str);
		System.out.println("지역변수(su) >>> " + su);

	}// display() 메서드

	public static void main(String[] args) {
		// 객체는 객체마다 속성과 기능이 다 다르다 자료형이 다르다 따라서 heap 메모리에 저장이 된다.
		// stack메모리에 넣어주기 위해서는 new가 필요함 - 배열처럼

		// 클래스를 대상으로 객체를 만드는 과정!
		// 1단계 : 클래스 선언
		//			형식 ) 클래스이름 참조변수(클래스별칭(별명));
		// ClassExam_01 exam; // exam이 참조변수 --> 변수가 그 주소값을 참조하기 때문에 참조변수

		// 2단계 : 클래스를 메모리(heap)에 생성
		//			형식) 참조변수(클래스별명) = new 클래스이름();
		// exam = new ClassExam_01();

		// 1단계 + 2단계 : 클래스 선언 및 클래스 메모리 생성
		ClassExam_01 exam = new ClassExam_01();
		// exam : heap 메모리에 만들어진 시작 주소값이 들어감
		System.out.println("exam >>> " + exam); // 실행해보면 주소값 나옴

		// 3단계 : 참조변수를 이용하여 객체에 접근
		//		  객체에 접근 시 .(도트)를 이용하여 접근

		exam.display(); // display메소드 안의 내용 출력됨
		// 멤버변수는 값 설정이 필요없으므로 값을 주지 않으면 초기값(초기화된 값)을 줌

		System.out.println();

		exam.num = 147;
		exam.str = "홍길동";
		exam.display();
		// 값을 직접 넣어줄 수 있음

		System.out.println();

		ClassExam_01 exam2 = new ClassExam_01();
		// heap 메모리에 다른 공간에 객체가 새로 만들어져 주소값이 달라짐
		System.out.println("exam2 >>> " + exam2); // => exam과 주소값 달라짐

	} // main()메서드 end


}
TV
public class TV {

	// 멤버변수
	String color;		// TV 색상
	boolean power;		// TV 전원 --> 초기값 false
	int channel;		// TV 채널

	// 멤버메서드
	void power() {		// TV 전원 메서드

		power = !power;
		// 초기값은 false !는 가 아니다 이기 때문에 true로 바뀜
		// 따라서 전원 킨다는 뜻

	} // power() 메서드 end

	void channelUp() {		// TV 채널을 올리는 메서드

		if(power) {
			channel++;
		}

	}// channelUp() 메서드 end

	void channelDown() {		// TV 채널을 내리는 메서드

		if(power) {
			channel--;
		}

	}// channelDown() 메서드 end

	void display() {

		String status = "";

		if(power) {
			status = "전원 On";
		}else {
			status= "전원 Off";
		}

		System.out.println("TV 색상 >>> " + color);
		System.out.println("TV 전원 >>> " + status);
		System.out.println("TV 채널 >>> " + channel);
	} // display() 메서드 end
}
public class TV_main {

	public static void main(String[] args) {

		TV tv = new TV();

		tv.display();

		System.out.println();

		tv.color = "검정색";
		tv.channel = 7;
		tv.channelUp(); 	// 채널을 증가시키는 메서드 호출
		tv.display();

		System.out.println();

		tv.power();			// 전원을 On 시키는 메서드 호출
		tv.channelUp();		// 채널을 증가시키는 메서드 호출
		tv.display();

		System.out.println();

		/*
		 * [문제1] TV 객체를 만들되 tv1이라는 참조변수를 이용하여
		 * 		  객체를 만들고 아래와 같이 조건에 맞게 실행해 보세요
		 * 		  조건 1) 색상 : 흰색, 전원 : off, 채널 : 15
		 * 		  조건 2) tv1 정보를 화면에 출력해 보세요
		 * 				 ==> display() 메서드를 이용하면 됨
		 * 		  조건 3) tv1 정보를 다음과 같이 변경하여 화면에 보여주세요
		 * 				 색상 : 흰색, 전원 : on, 채널 : 28
		 */
		TV tv1 = new TV();
		tv1.color="흰색";
		tv1.channel=15;
		tv1.channelUp();
		tv1.display();

		System.out.println("변경 후");

		tv1.power();
		for(int i = tv1.channel;i<=28;i--) {

			tv1.channelUp();
		}

		tv1.display();


		System.out.println();

		/*
		 * [문제2] TV 객체를 만들되 tv1이라는 참조변수를 이용하여
		 * 		  객체를 만들고 아래와 같이 조건에 맞게 실행해 보세요
		 * 		  조건 1) 색상 : 흰색, 전원 : off, 채널 : 32
		 * 		  조건 2) tv2 정보를 화면에 출력해 보세요
		 * 				 ==> display() 메서드를 이용하면 됨
		 * 		  조건 3) tv2 정보를 다음과 같이 변경하여 화면에 보여주세요
		 * 				 색상 : 검정색, 전원 : on, 채널 : 11
		 */

		TV tv2 = new TV();

		tv2.color = "흰색";
		tv2.channel=32;
		tv2.channelUp();
		tv2.display();

		System.out.println("변경 후");

		tv2.color="검정색";
		tv2.power();
		for(int i = tv2.channel;i>11;i--) {

			tv2.channelDown();
		}

		tv2.display();

	}

}
preson
public class Person {
	// 멤버변수
	String name;
	int age;
	boolean marriage;

	// 멤버메서드
	void getPersonInfo() {
		String result = "";
		if(marriage) {
			result = "기혼";
		}else {
			result = "미혼";
		}

		System.out.println("이름 >>> "+name);
		System.out.println("나이 >>> "+age);
		System.out.println("결혼여부 >>> "+result);
	}

}
public class Person_main {

	public static void main(String[] args) {
		Person person = new Person();

		person.getPersonInfo();

		System.out.println();

		person.name = "강감찬";

		person.age = 34;

		person.marriage = true;

		person.getPersonInfo();
	}
}
class
1. 클래스를 대상으로 객체를 생성하는 과정
형식) 클래스이름 참조변수 = new 클래스이름(); ==> X
형식) 클래스이름 참조변수 = new 생성자();
2. 생성자(Constructor)
1) 클래스를 대상으로 객체를 생성하는 역할을 하는 놈
2) 클래스 이름과 동일함
3) 클래스에 포함되어 있으며, 객체를 생성할 때 자동으로 딱 한 번만 호출이 됨
4) 클래스는 생성자를 통해서 객체로 생성이 됨
생성자 형식)
 [접근제한] 생성자이름(매개변수) {
                   생성자 호출 시 실행될 문장;
               }
5) 생성자는 메서드 형태를 띄고 있음
==> 리턴타입(반환형) (X), void(X), 매게변수(O)
6) 모든 클래스는 반드시 한 개 이상의 생성자를 가지고 있음
7) 사용자가 생성자를 정의하지 않으면 JVM이 컴파일 시점에서 자동으로 기본 생성자를 만들어 줌
5) 생성자는 메서드 형태를 띄고 있음
==> 리턴타입(반환형)(X), void(X)
3. 생성자의 목적 : 멤버변수들의 초기화를 목적으로 사용이 됨
4. 생성자 특징
1) 생성자 이름 == 클래스 이름
2) 메서드와 다르게 반환형이 없음
3) 클래스에는 반드시 한 개 이상의 생성자를 가지고 있음
4) 생성자 오버로딩이 가능함 (즉, 여러 개의 생성자가 존재할 수 있음
5) 생성자가 보이지 않으면 기본생성자가 숨어 있음
6) 기본 생성자라 함은 매개변수가 없는 생성자를 말함
7) 기본 생성자 외에 다른 생성자를 만들면, 숨어 있던 기본 생성자는 사라짐
8) 기본 생성자 외에 다른 생성자를 만들면, 무조건 기본 생성자를 만들어 줄 것
(만약, 기본생성자를 만들지 않으면 상속에서 문제 발생 ==> 상송에서 추후 설명 예정)
student
public class Student {

	// 멤버변수
	int hakbun;			// 학생 학번
	String name;		// 학생 이름
	String major;		// 학생 학과
	String phone;		// 학생 연락처
	String adder;		// 학생주소

	// 생성자 오버로딩
	public Student() { // 기본생성자 (숨어있었음) --> () 안에 아무것도 없는 거 = 매개변수 X
		// TODO Auto-generated constructor stub
	}
	public Student(int h, String n, String m, String p, String a) {
		hakbun = h;
		name = n;
		major = m;
		phone = p;
		adder = a;
	} // 인자생성자 --> ()매개변수가 있는 생성자


	// 멤버메서드
	void getStudentInfo() {
		System.out.println("학생 학번 >>> " + hakbun);
		System.out.println("학생 이름 >>> " + name);
		System.out.println("학생 학과 >>> " + major);
		System.out.println("학생 연락처 >>> " + phone);
		System.out.println("학생 주소 >>> " + adder);
	}


}
public class Student_main1 {

	public static void main(String[] args) { // 입력이 된 상태

		// 기본 생성자로 객체를 생성하는 방법
		Student student = new Student();

		student.hakbun = 2024001;
		student.name="홍길동";
		student.major="경제학과";
		student.phone = "010-1111-1234";
		student.adder = "서울시 구로구";

		student.getStudentInfo();

		System.out.println();

		Student student2 = new Student(2024002, "세종대왕", "국문학과",
        							"010-2222-2345", "서울시 중구");
		student2.getStudentInfo();

	}

}
import java.util.Scanner;

public class Student_main2 { // 값을 입력 받음

	public static void main(String[] args) {

		Scanner sc = new Scanner(System.in);
		System.out.println("학생의 학번, 이름, 학과, 연락처, 주소를 입력하세요");

		Student student = new Student(sc.nextInt(), sc.next(),
        					sc.next(),sc.next(),sc.next());

		student.getStudentInfo();

		sc.close();

	}

}
[문제1] 회원 객체의 멤버를 구성하여 멤버에 인자 생성자를 이용하여 초기값을 할당 후 회원 정보 출력
( 회원 구성 요소 : 회원 아이디, 회원 이름, 회원 나이, 회원 연락처, 회원 직업)
public class Member {

	String id;
	String name;
	int age;
	String phone;
	String job;

	public Member() { } // 기본생성자
	public Member(String id, String name, int a, String p, String j) { // 인자생성자

		// 멤버변수의 이름과 매개변수의 이름이 같은경우 구분하기 위해 this. 사용해줌
		this.id = id;
		this.name = name;
		age = a;
		phone = p;
		job = j;

	}

	void getMemberInfo() {
		System.out.println("회원 아이디 : " + id);
		System.out.println("회원 이름 : " + name);
		System.out.println("회원 나이 : " + age);
		System.out.println("회원 연락처 : " + phone);
		System.out.println("회원 직업 : " + job );
	}

}
import java.util.Scanner;

public class Member_main {

	public static void main(String[] args) {
		Scanner sc = new Scanner(System.in);
		System.out.println("회원의 아이디, 이름, 나이, 연락처, 직업을 입력하세요.");

		Member member = new Member(sc.next(), sc.next(),
        				sc.nextInt(), sc.next(), sc.next());

		member.getMemberInfo();

		sc.close();

	}

}
자바에서 사용되는 용어들
1. 변수 : 프로그램이 끝날 때까지 언제든지 변할 수 있는 데이터
==> 소문자로 시작
2. 상수 : 프로그램이 끝날 때까지 절대 변하지 않는 데이터
=> 모든 글자가 대문자
3. instance(인스턴스) 변수 / 메서드
- 객체의 생성과 동시에 만들어지는 변수 / 메서드
- 객체는 heap 메모리 공간에 만들어짐
==> 반드시 객체 생성 후에 사용이 가능함 - 호출방법 : 참조변수.멤버변수 / 참조변수.멤버메서드
4. static(정적) 변수 / 메서드
- 객체의 생성과 상관없이 별도로 만들어지는 변수 / 메서드
- static 메모리(method 영역)에서 별도로 만들어짐
- 공통으로 사용되는 변수 / 메서드
- 겍체를 생성하지 않아도 어느 클래스나 접근 가능
- 접근하는 방법은 쉬우나 실제로 항상 메모리에 상주하게 되어 메모리 회수가 안 되는 단점이 있음
시스템이 며칠 후, 몇 주 혹은 몇 달 정도 가동이 되면 점점 느려지는 현상이 발생 혹은 몇 달 정도 가동이 되면 점점 느려지는 현상이 발생 - 호출방법 : 클래스이름.멤버변수 / 클래스이름.멤버메서드
static
public class Static {

	// 멤버변수
	int su1 = 100;				// 인스턴스 멤버변수
	int su2 = 200; 				// 인스턴스 멤버변수
	static int num = 500;		// static(정적) 멤버변수


	// 멤버메서드
	void sum() {								// 인스턴스 멤버메서드

		System.out.println("sum >>> " + (su1+su2));

	} // sum() 메서드 end

	static int adder(int num1, int num2) { 		// static(정적) 멤버 메서드

		return num1 + num2;

	} // adder() 메서드 end

}
public class Static_main {

	public static void main(String[] args) {

		System.out.println("num(static 변수) >>> " + Static.num);
		System.out.println("adder() 메서드 호출 >>> " + Static.adder(150, 37));

		Static static1 = new Static();

		System.out.println("su1(인스턴스) 변수 값 >>> "+ static1.su1);
		System.out.println("su1(인스턴스) 변수 값 >>> "+ static1.su2);

		static1.sum();
	}

}
객체배열
stack = 자료형의 값이 정해짐
heap = 크기가 다른 데이터 = 값이 바뀔 수 있는 데이터
- 따라서 배열의 크기가 바뀔 수 있으므로 생성되는 객체는 heap메모리에 저장됨
// 음료자판기

// 음료 (6개) - 콜라 사이다 옥수수수염차 17차 몬스터 포카리스웨트

public class Drink {

	// 멤버변수
	String name;		// 음료이름
	int price;			// 음료가격

	public Drink() { }	// 기본 생성자

	public Drink(String name, int price) {

		this.name = name;
		this.price = price;

	} // 인자 생성자

}
// 객체배열

import java.util.Scanner;

public class Drink_main {

	public static void main(String[] args) {

		Scanner sc = new Scanner(System.in);

		System.out.print("자판기 음료 갯수를 입력하세요 : ");

		// 객체 배열 선언 및 객체 배열 메모리 할당
		// stack은 heap 메모리에 만든 새 객체의 주소값을 받아 공간을 만들어줌 일반배열은 그 값이 바로 안에 들어가지만
		Drink[] drinks = new Drink[sc.nextInt()];
		// 객체배열은 heap 메모리에 6개의 데이터가 들어갈 공간이 잡히고 이 시작 주소값을 Stack 안의 drinks가 받음
//		drinks[0] = new Drink("콜라",2500);
//		// heap 메모리안에 Drink가 만들어지고 배열안에 Drink의 주소값이 있어 Drink에 들어가면 name과 price가 있음
//		drinks[1] = new Drink("사이다",2500);
//		drinks[2] = new Drink("옥수수수염차",2000);
//		drinks[3] = new Drink("17차",1800);
//		drinks[4] = new Drink("몬스터",2300);
//		drinks[5] = new Drink("포카리스웨트",2300);
		// 객체가 6개 있기 때문에 heap메모리에 6개의 Drink가 생성됨 -> 안에는 인자생성자 값이 있음(member 변수의 초기값 할당)
//		System.out.println(drinks[0]); // Drink의 주소값이 들어감

//		// 객체 배열의 코드를 풀어서 본다면 아래와 같다
//		Drink drink1 = new Drink("콜라",2500);
//		Drink drink2 = new Drink("사이다",2500);
//		Drink drink3 = new Drink("옥수수수염차",2000);
//		Drink drink4 = new Drink("17차",1800);
//		Drink drink5 = new Drink("몬스터",2300);
//		Drink drink6 = new Drink("포카리스웨트",2300);
//
//		drinks[0] = drink1; // drink1 의 값을 drink[0]에 넣어줌
//		drinks[1] = drink2; drinks[2] = drink3;
//		drinks[3] = drink4; drinks[4] = drink5;
//		drinks[5] = drink6;

		// 반복적이므로 for문으로도 사용 가능
		for (int i=0; i<drinks.length; i++) {
			System.out.println("음료의 이름과 가격을 입력하세요");
			System.out.println("============================");

			drinks[i] = new Drink(sc.next(), sc.nextInt());
		}

		System.out.println();
		System.out.print("돈을 넣어주세요 : ");

		int coin = sc.nextInt();

		for(int i = 0; i<drinks.length; i++) {
			if(coin >= drinks[i].price) {
				System.out.println(drinks[i].name +"\t");
			}
		}

		sc.close();

		/*
		 * 입력을 받은 coin(돈)과 객체 배열에 저장된 Drink
		 * 클래스의 멤버변수인 price(음료가격)을 비교해서
		 * 가격이 작거나 같은 음료를 선택 ==> 반복해서 선택
		 */

	}

}
저금통
package classes;

// 돼지 저금통
public class Pigsave {

	private int balance;			// 돼지 저금통 잔액
	// private 접근 지정자를 선언하면 캡슐화가 되어 balance에 직접 접근하지 못하게 함 (보안 강화)

	public Pigsave() { }	// 기본 생성자

	public Pigsave(int balance) {

		this.balance = balance;

	} // 인자 생성자

	// 입금을 하는 메서드
	public void deposit(int money) {

		System.out.println("돼지 저금통에 입금을 합니다");

		balance += money; // balance = balance + money

		System.out.println("현재 잔액 >>> " + balance + "원");

	}

	// 출금하는 메서드
	public void withdraw(int money) {

		if(money>balance) {
			System.out.println("잔액이 부족합니다");

			return; // 현재 실행되고 있는 메서드를 종료시키는 명령어
		}

		System.out.println("돼지 저금통에 출금을 합니다");

		balance -= money;

		System.out.println("현재 잔액 >>> " + balance + "원");

	}

}
public class Pigsave_main {

	public static void main(String[] args) {
		// 돼지 저금통 객체 생성
		Pigsave save = new Pigsave(0); // 인자생성자이므로 balance에 0 들어감

		save.deposit(30000);	// 입금 메서드 호출
		save.deposit(40000);	// 입금 메서드 호출
		save.withdraw(40000);	// 출금 메서드 호출
		save.deposit(30000);	// 입금 메서드 호출
		save.deposit(20000);	// 입금 메서드 호출
		save.withdraw(60000);	// 출금 메서드 호출

		// 이렇게 접근이 되면 안 됨
//		save.balance = 100000; // 거짓된 값

	}

}
★★★★★★★★★★★★★★★★★★★★★★★★
캡슐화(Encapsulation)
- 객체지향 프로그램 4대 특징 중 하나.
- 데이터를 감추기, 데이터를 외부에서 함부로 변경하지 못하도록 외부의 접근을 제한하는 방법
- 객체를 캡슐로 싸서 내부를 볼 수 없게 하는 것으로 객체의 가장 본질적인 특징
- 예를 든다면 캡슐 약을 생각하면 쉬움. 캡슐에 든 약은 약이 어떤 색인지, 어떤 성분인지 보이지 않으며, 외부의 접근으로부터 안전함
또한 TV에 케이스가 없다면 외부의 접촉으로부터 보호할 수 없게 됨
사람이 피부나 근육으로 캡슐화 되어 있지 않다면 혈관, 장기, 뇌 등이 노출되어 상상하기 조차 싫은 끔찍한 일이 일어나게 됨 - 객체는 캡슐화가 기본 원칙이지만 외부와의 접속을 위해 몇몇 부분만 공개 노출하게 됨
- TV는 내부를 캡슐화하고 on/off 버튼, 밝기 조절 버튼, 채널 버튼, 음량 버튼, 리모컨과 통신하는 부분은 노출을 시킴
- 정보 은닉 : 클래스 멤버 접근 제어 기법.
- private : 외부에서 직접 접근 차단
- public : 누구나 접근 가능
- setter() / getter() 메서드로 접근 가능
==> setter() :
-
지정자 메서드
-
멤버변수에 변경할 값을 전달 받아서 멤버변수의 값을 변경하는 메서드
==> getter() :
-
획득자 메서드.
-
멤버변수의 값을 읽어 와서 호출한 곳으로 읽은 값을 넘겨주는 메서드
★★★★★★★★★★★★★★★★★★★★★★★★
setter() 메서드로 멤버변수에 초기값을 설정
-
private 멤버변수에 값을 지정하는 역할을 하는 메서드
형식 )
			public void set멤버변수명(자료형 매개변수){
				멤버변수 = 매개변수
}getter()(메서드로 멤버변수에 할당된 값을 가져오는 메서드
- private 멤버변수에 할당된 값을 가져오는 역할을 하는 메서드
형식 )
		public 멤버변수자료형(변환형) get멤버변수명(){
					return 멤버변수명;
			}
public class Number {
// 멤버변수
// source에서 generate getters and setters 선택
private int num1;
private int num2;
public int getNum1() {
return num1;
}
public void setNum1(int num1) {
this.num1 = num1;
}
public int getNum2() {
return num2;
}
public void setNum2(int num2) {
this.num2 = num2;
}
/*
* setter() 메서드로 멤버변수에 초기값을 설정
* - private 멤버변수에 값을 지정하는 역할을 하는 메서드
*/
// public void setNum1(int num1) {
// this.num1 = num1;
// }
// public void setNum2(int num2) {
// this.num2 = num2;
// }
/*
* getter()(메서드로 멤버변수에 할당된 값을 가져오는 메서드
* - private 멤버변수에 할당된 값을 가져오는 역할을 하는 메서드
*/
// public int getNum1() {
// return num1;
// }
// public int getNum2() {
// return num2;
// }
}
public class Number_main {

	public static void main(String[] args) {

		Number number = new Number();

		// number.num1 = 100; --> 직접적으로는 접근 안 됨
		number.setNum1(100);

		number.setNum2(200);
		System.out.println("num1 >>> " + number.getNum1());
		System.out.println("num2 >>> " + number.getNum2());

	}

}
문제풀기
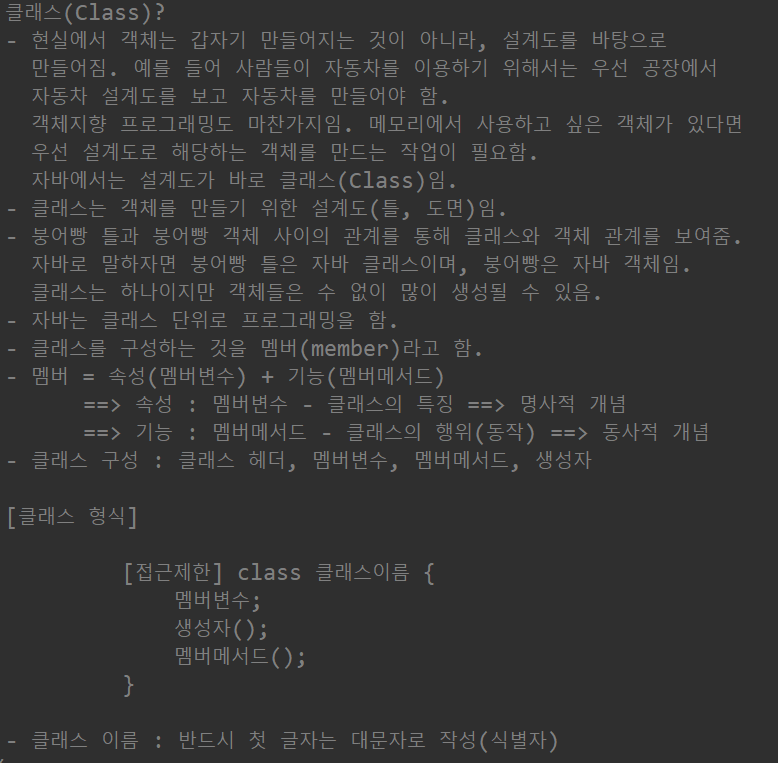
[문제1] 이름, 성별, 나이를 갖는 Person 클래스 작성
멤버 변수(속성) : 이름, 성별, 나이
멤버 메서드(기능) : 이름, 성별, 나이 출력 기능
생성자 : 키보드로 입력 받은 이름, 성별, 나이를 멤버변수에 초기화
public class Person {
	String name;
	String sex;
	int age;

	public Person() { }
	public Person(String name, String sex, int age) {
		this.name = name;
		this.sex = sex;
		this.age = age;
	}

	void personInfo() {
		String result = "";

		if (sex.equalsIgnoreCase("male")) {
			result = "남자";
		}else if(sex.equalsIgnoreCase("female")) {
			result = "여자";
		}
		System.out.println("이름 : " + name);
		System.out.println("성별 : " + result);
		System.out.println("나이 : " + age+"세");
	}

}
import java.util.Scanner;
public class Person_main {
public static void main(String[] args) {
Scanner sc = new Scanner(System.in);
System.out.println("이름, 성별(male/female), 나이를 입력하세요.");
Person person = new Person(sc.next(), sc.next(), sc.nextInt());
person.personInfo();
sc.close();
}
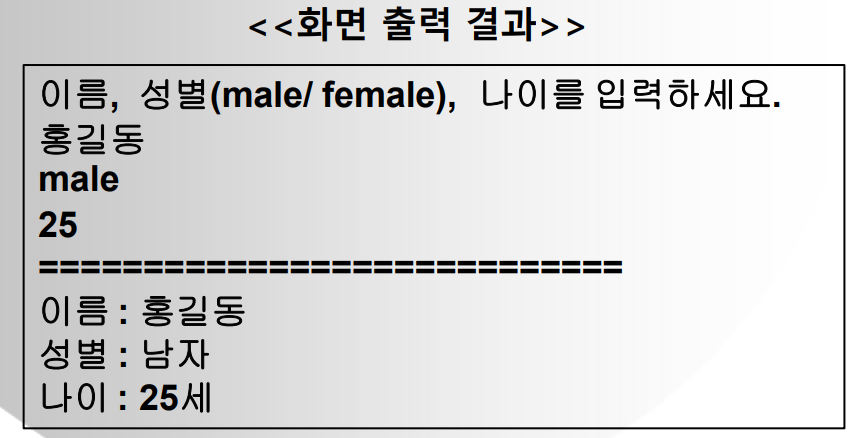
}[문제2]직사각형을 나타내는 Rectangle 클래스 설계
멤버 변수 : 가로, 세로
생성자 : 가로, 세로 멤버변수 초기화
멤버 메서드 : 사각형의 넓이를 구하는 메서드
멤버 메서드 : 사각형의 둘레를 구하는 메서드
public class Rectangle {
	int width;
	int length;

	public Rectangle() {}
	public Rectangle(int width, int length) {
		this.width=width;
		this.length=length;
	}

	void areaInfo() {
		System.out.println("사각형의 넓이 : " + (width*length));
	}
	void duInfo() {
		System.out.println("사각형의 둘레 : " + 2*(width+length));
	}


}
import java.util.Scanner;
public class Rectangle_main {
public static void main(String[] args) {
Scanner sc = new Scanner (System.in);
System.out.println("사각형의 가로, 세로를 입력하세요");
Rectangle rectangle = new Rectangle(sc.nextInt(), sc.nextInt());
rectangle.areaInfo();
rectangle.duInfo();
sc.close();
}
}
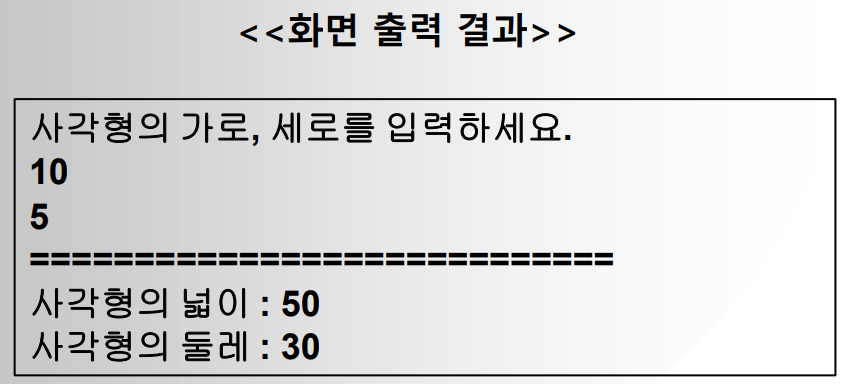
[문제3] 명함정보 클래스와 메인 클래스 설계
NameCard 클래스
• 멤버 변수 : 이름, 전화번호, 주소, 직급
• 생성자 : 멤버변수 초기화
• 멤버 메서드 : 멤버변수값을 콘솔에 출력하는 메서드
Main 클래스(main 메서드)
• 키보드로 명함정보를 입력 받아서 NameCard 클래스의 멤버변수에 초기화
• NameCard 클래스의 멤버 메서드를 호출하여 콘솔에 명함정보 출력
public class NameCard {
	String name;
	String tel;
	String address;
	String grade;

	public NameCard() { }
	public NameCard(String name, String tel, String address, String grade) {
		this.name=name;
		this.tel=tel;
		this.address=address;
		this.grade=grade;
	}

	void CardInfo() {
		System.out.println("이름 : "+name);
		System.out.println("전화번호 : "+tel);
		System.out.println("주소 : "+address);
		System.out.println("직급 : "+grade);
	}

}
import java.util.Scanner;
public class NameCard_main {
public static void main(String[] args) {
Scanner sc = new Scanner(System.in);
System.out.println("이름, 전화번호, 주소, 직급을 입력하세요");
NameCard namecard = new NameCard(sc.nextLine(), sc.nextLine(), sc.nextLine(), sc.nextLine());
// sc.nextLine()을 사용해 space바를 쳐도 값이 안 내려감
namecard.CardInfo();
sc.close();
}
}[문제4] 임시직 클래스(Temporary) 설계
클래스(Temporary) 설계
멤버변수 : 이름(name), 작업 시간(time), 시간당 급여(pay)
생성자 : 멤버변수에 초기화 역할
메서드 : 급여 계산 관련 메서드
• 총급여액 = 일한시간 시간당 급여
• 공제액 = 총급여액 0.03
• 실지급액 = 총급여액 - 공제액
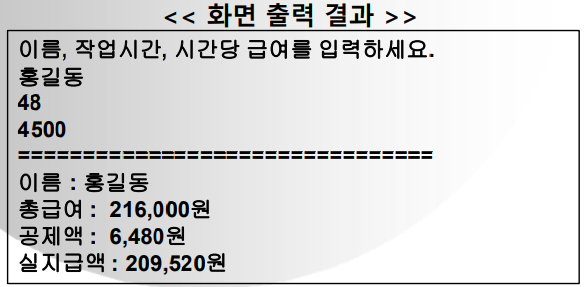
main 에서 : 키보드로 이름, 작업 시간, 시간당 급여를 입력 받아서
• 생성자를 이용하여 멤버변수에 초기화
• 급여계산 관련 메서드를 호출하여 급여를 계산한 후 결과 출력
public class Temporary {
	String name;
	int time;
	int pay;

	public Temporary() { }

	public Temporary(String name, int time, int pay) {
		this.name=name;
		this.time=time;
		this.pay=pay;
	}

	void result() {
		int total = time*pay;
		int gong = (int)(total*0.03);
//		double gong = total*0.03;
		int pays= total - gong;
//		double pays= total - gong;

		System.out.println("이름 : "+name);
		System.out.printf("총급여 : %,d원\n",total);
		System.out.printf("공제액 : %,d원\n",gong);
//		System.out.printf("공제액 : %,.0f원\n",gong);
		System.out.printf("실지급액 : %,d원\n",pays);
//		System.out.printf("실지급액 : %,.0f원\n",pays);
//
	}

}
import java.util.Scanner;
public class Temporary_main {
public static void main(String[] args) {
Scanner sc = new Scanner(System.in);
System.out.println("이름, 작업시간, 시간당 급여를 입력하세요");
Temporary temporary = new Temporary(sc.next(),sc.nextInt(),sc.nextInt());
temporary.result();
sc.close();
}
}
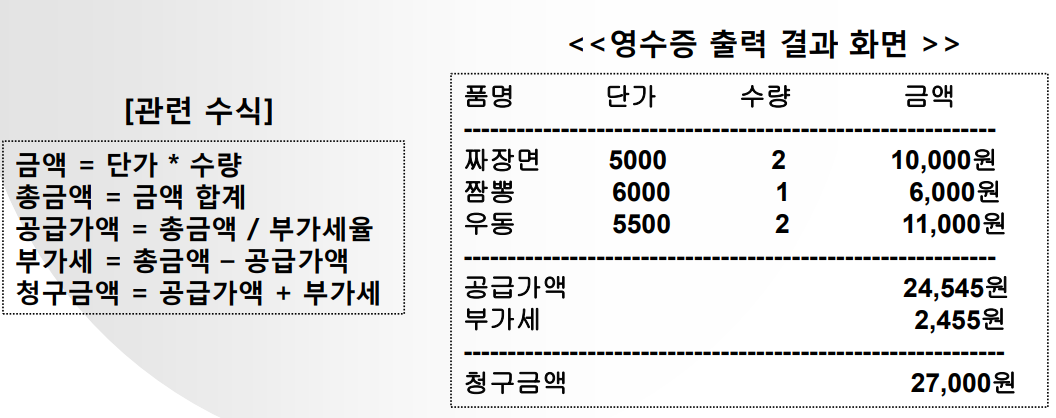
[문제5] 영수증이 출력될 수 있도록 프로그램을 작성
처리조건
• 품명, 단가, 수량은 키보드로 입력 받아서 배열에 저장한다
• 부가가치세율 : 1.1 이며, 클래스 멤버로 선언한다
– 예) 공급가액 = 총금액 / 1.1(부가세율)
• 품명별 금액, 총금액,공급가액,부가세,청구금액은 [관련 수식]을 참조한다
1.
public class Receipt {
	String name;		// 품명
	int price;			// 단가
	int su;				// 수량
	int pay;			// 금액
	int total = 0;  	// 총금액
	int gong = 0;		// 공급가액
	int bu =0;			// 부가세
	int paid=0;			// 청구금액
	double taxp=1.1;	// 부가세율


	public Receipt() { }
	public Receipt(String name, int price, int su ) {
		this.name=name;
		this.price=price;
		this.su=su;
		this.pay = price*su;
	}

	void result() {

		gong = (int) (total/taxp);
		bu = total-gong;
		paid = gong + bu;
		System.out.println("--------------------------------");
		System.out.printf("공급가액            \t %,d원\n",gong);
		System.out.printf("부가세            \t %,d원\n",bu);
		System.out.println("--------------------------------");
		System.out.printf("청구금액             \t %,d원\n",paid);

	}

	void print() {
		System.out.print(name + "\t");
		System.out.print(price + "\t");
		System.out.print(su + "\t");
		System.out.printf("%,d원\n",pay);
	}

}
import java.util.Scanner;

public class Receipt_main {

	public static void main(String[] args) {
		Scanner sc = new Scanner (System.in);
		System.out.print("총 몇개 : ");
		Receipt[] receipt = new Receipt[sc.nextInt()];
		Receipt receipt2 = new Receipt();

		for (int i=0; i<receipt.length;i++) {
			System.out.println("품명, 단가, 수량을 입력하세요");
			System.out.println("=============================");

			receipt[i] = new Receipt(sc.next(),sc.nextInt(),sc.nextInt());
		}

		System.out.println("품명     단가     수량     금액");
		System.out.println("--------------------------------");

		for(int i=0; i<receipt.length; i++) {

			receipt[i]. print();
			receipt2.total+=receipt[i].pay;

		}

		receipt2.result();
		sc.close();

	}

}
2.
public class ReceiptNew {
	String name;	// 품명
	int price;		// 단가
	int su;			// 수량

	public ReceiptNew() { }

	public ReceiptNew(String name, int price, int su) {
		this.name=name;
		this.price=price;
		this.su=su;
	} // 인자 생성자

}
import java.util.Scanner;
public class ReceiptNew_main {
// 클래스(정적-static) 멤버 선언
public static final double TAX_RATE = 1.1; // 부가가치세율
public static void main(String[] args) {
Scanner sc = new Scanner(System.in);
System.out.print("메뉴는 몇 개 인가요 : ");
ReceiptNew[] receiptnew = new ReceiptNew[sc.nextInt()];
// 메뉴와 단가, 수량을 키보드로 입력을 받아서 객체에 저장을 해 주면 됨
for(int i=0; i<receiptnew.length; i++) {
System.out.println((i+1)+"번째 메뉴의 이름, 단가, 수량 입력");
receiptnew[i] = new ReceiptNew(sc.next(), sc.nextInt(), sc.nextInt());
}
System.out.println();
int totalprice=0; // 총금액 변수
System.out.println("------------------------------------");
System.out.println("품명\t 단가\t 수량\t 금액\t");
System.out.println("------------------------------------");
for(int i = 0; i<receiptnew.length; i++) {
System.out.printf("%s\t%,d\t%,d\t%,d\t원\n", receiptnew[i].name, receiptnew[i].price, receiptnew[i].su, (receiptnew[i].price*receiptnew[i].su));
totalprice += (receiptnew[i].price*receiptnew[i].su);
}
// 공급가액 = 총금액(totalprice) / 부가세율
int supplyprice = (int)(totalprice/ReceiptNew_main.TAX_RATE);
// 부가세액 = 총금액(totalprice) - 공급가액(supplyprice)
int vat = totalprice - supplyprice;
System.out.println("------------------------------------");
System.out.printf("공급가액\t\t\t%,d원\n",supplyprice);
System.out.printf("부가세액\t\t\t%,d원\n",vat);
System.out.println("------------------------------------");
System.out.printf("청구금액\t\t\t%,d원\n",totalprice);
sc.close();
}
}