서비스를 개발하다보면 Alert가 반드시 필요로 하게돼요.
고객에게 현재 상태 또는 정보를 인지 시킬 수 있는 최고의 방법이기 때문이지 않을까 싶은데요.
스킨스쿨 일기장 앱에서는 Alert를 자체 라이브러리를 제작하여 이용하고 있어요.
이 글에선 라이브러리를 제작하는 과정이 작성을 만나볼게요 :)
오픈소스 라이브러리 포기
얼럿 라이브러리는 대표적으로 가장 많이 쓰이는 SweetAlert가 있다고 생각이 들지 않나요?
저 역시도 여러 프로젝트에서 많이 이용하고 있는데요.
사용 방법도 간단하고 여러가지 옵션을 제공하고 있기 때문에 원하는 만큼 구현이 가능하다고 생각이 들어요.
하지만 웹 디자이너님의 원하는 얼럿은 SweetAlert를 이용하기 어려웠어요.
실제로 Figma로 여러 형태의 얼럿을 희망하셨기 때문에 라이브러리 제작을 시작했답니다.
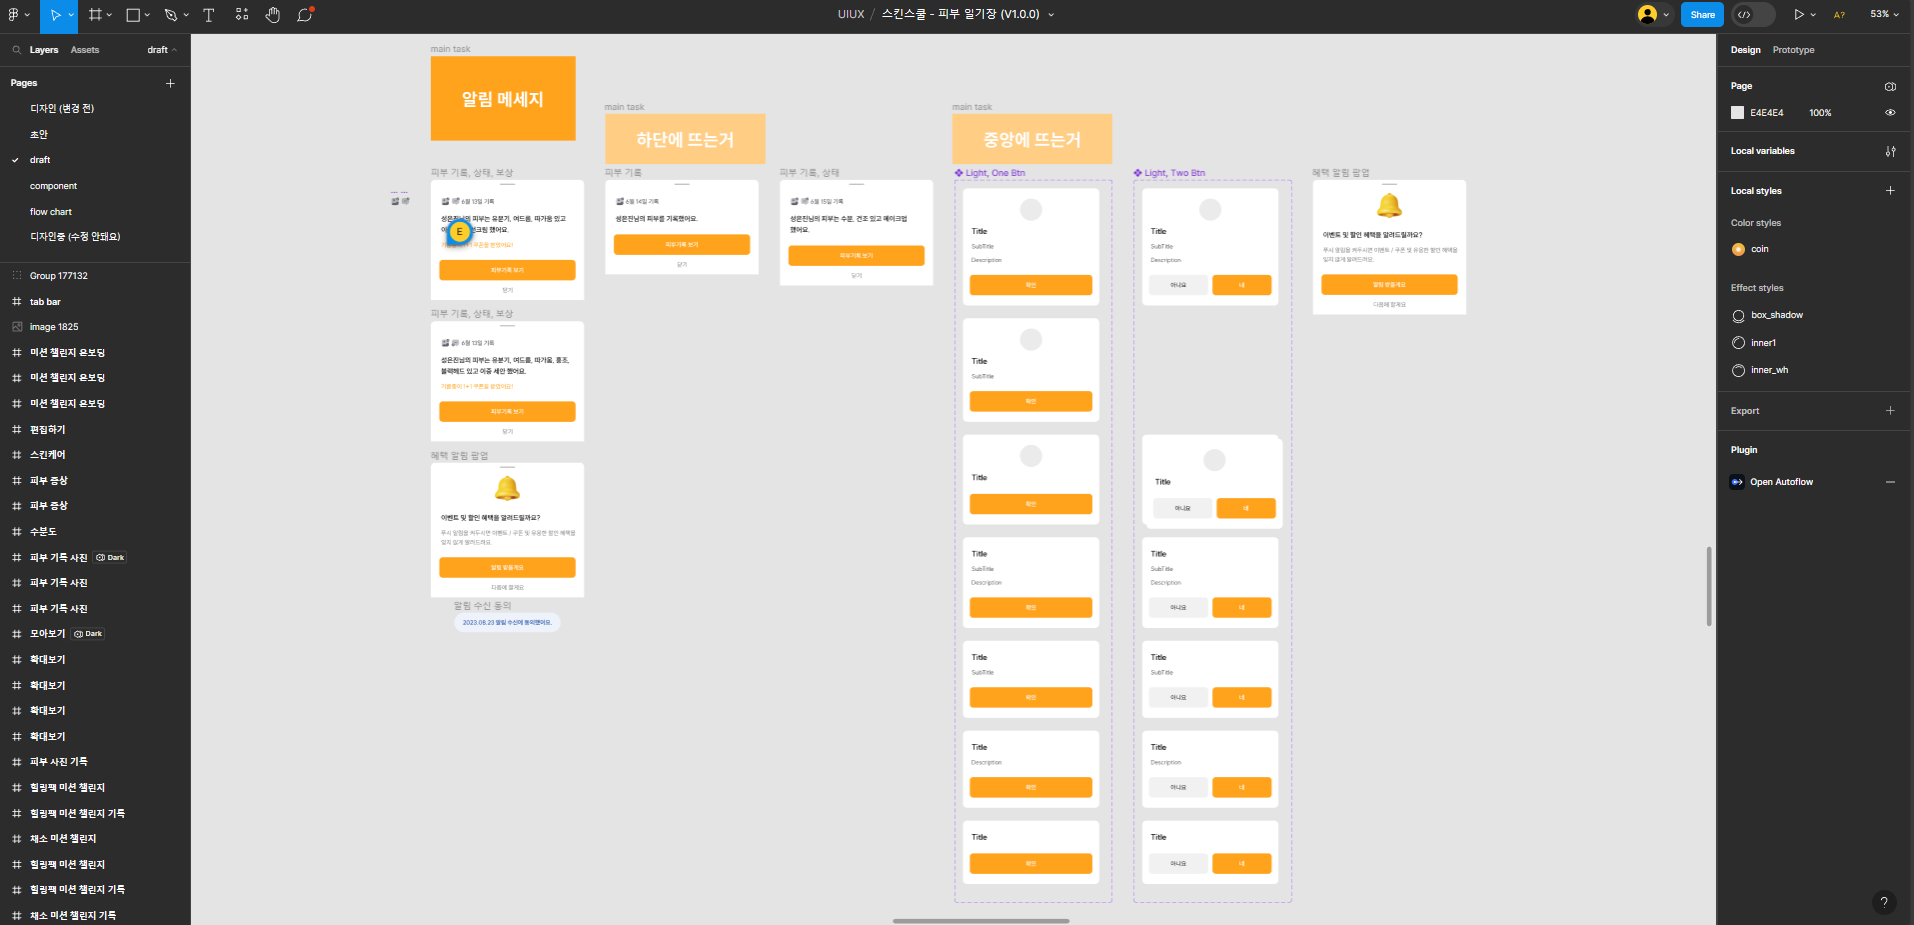
유형별로 Icon, Title, Description, Buttons 를 정리 부탁드렸고 정리된 기획으로 개발을 시작했어요.
개발 플랜 세우기
과정을 세우는건 아주 간단했어요.
- 옵션(Object) 구조 설계
- JavaScript 구조 작성
- HTML 작성
- CSS 작성
- JavaScript 작성
- 각 유형에 맞게 (3 ~ 5) 반복
- 테스트 및 버그 수정
의존 라이브러리
이런식으로 개발 플랜을 세웠답니다.
간단한 과정이라고 생각하겠지만 무언가 개발하기 전 플랜을 세우는건 가장 중요한 부분이라고 생각해요.
anime.js 를 이용하는것은 얼럿 트랜지션을 위해 선택사항이었어요.
CSS3로 트랜지션을 만들어도 됐지만 프로젝트 데드라인이 얼마 남지 않은 상태에서 만드는 상황이었기 때문에 바로 적용이 가능한 라이브러리를 이용하기로 했어요.
1. 옵션(Object) 구조 설계
먼저 (1)은 핵심 작업이었어요.
라이브러리를 이용하기 편하도록 하고 원하는 방향대로 커스텀이 가능케 하는 부분이기 때문이에요.
SweetAlert의 기능을 참고하며 설계하니 한 결 수월했답니다.
이렇게 최종 옵션은 다음과 같이 설계되었어요.
#defaultOption = {
    debug : false,
    id : "appAlert",
    target : "app-content",
    type : 1,
    status : "success",
    icon : "",
    title : "",
    subTitle : "",
    html : "",
    text : "",
    iconStyle : {},
    titleStyle : {},
    subTitleStyle : {},
    htmlStyle : {},
    textStyle : {},
    reverseHtmlText : false,
    showCancelButton : false,
    showConfirmButton : true,
    reverseButton: false,
    cancelButtonStyle : {},
    confirmButtonStyle : {},
    confirmButtonText : "네",
    cancelButtonText : "아니요",
    autoClose : false,
    autoCloseTime : 3000,
    useBackgroundClose : false,
    disableOverflow : true,
    animation: "fade",
    animationSpeed: 300,
    init: function() {},
    beginOpen : function() {},
    afterOpen : function() {},
    beginClose : function() {},
    afterClose : function() {},
    complete: function() {},
    clickCancel : function() {},
    clickConfirm : function() {},
};
넣다보니 욕심이 많아져 안쓰는 옵션들도 존재하지만 언젠가는 이용하겠지라는 생각으로 삭제하진 않았어요.
2. JavaScript 구조 작성
개발하는 동안 계속 SweetAlert의 구조를 그대로 응용하고 싶었어요.
SweetAlert의 함수 호출 방식은 다음과 같은데요.
Swal.fire({
  title: "The Internet?",
  text: "That thing is still around?",
  icon: "question"
});
저도 처음 기획은 Swal.fire() 와 같이 appAlert.fire() 이었지만 기획은 무너지고 어느 순간 static 함수 호출이 아니게 된거에요.
그렇게.. 최종은 이렇게 변경됐답니다.
new appAlert().fire({
    type: 1,
    title: "로그인에 실패했어요.",
    subTitle: "나중에 다시 시도해주세요.",
    confirmButtonText: "확인",
});
이 사실을 나중에 알아차리고 바보같은 실수였지만 괜찮아요! 사용만 할 수 있으면 됐죠 :)
아무튼 호출 방식도 기획이 되었고 코드를 작성했어요.
[alert.js]
'use strict';
class appAlert {
    #defaultOption = {
        ~~~
    };

    /* 전역에서 사용할 옵션 변수 */
    #option = {};

    fire(option = {}) {
        const cloneOption = Object.assign({}, this.#defaultOption);

        /* 옵션 세팅 */
        if (option == {}) {
            option = cloneOption;
        }
        else {
            option = Object.assign(cloneOption, option);
        }
        option.id = option.id + "_" + this.#uuidv4();
        this.#option = option;
        if (option.debug) {
            appAlert.logger.logGroup("setting option : ", option, true);
        }

        if (option.debug) {
            appAlert.logger.log("fire event : init");
        }
        option.init();

        if ($(option.target).length == 0) {
            appAlert.logger.log("target not found");
            return;
        }

        if (option.type == 1) {
            this.#alert_1.fire(option);
        }
        else if (option.type == 2) {
            this.#alert_2.fire(option);
        }
        else if (option.type == 3) {
            this.#alert_3.fire(option);
        }
        else if (option.type == 4) {
            this.#alert_4.fire(option);
        }
        else {
            appAlert.logger.log("alert type not found");
        }

        return option.id;
    }

    #uuidv4() {
        return 'xxxxxxxx-xxxx-4xxx-yxxx-xxxxxxxxxxxx'.replace(/[xy]/g, function (c) {
            var r = Math.random() * 16 | 0,
                v = c == 'x' ? r : (r & 0x3 | 0x8);
            return v.toString(16);
        });
    }

    #alert_1 = class AlertTheme_1 {
    	// code
    }

    #alert_2 = class AlertTheme_2 {
    	// code
    }

    #alert_3 = class AlertTheme_3 {
    	// code
    }

    #alert_4 = class AlertTheme_4 {
    	// code
    }
}
이렇게 구조는 작성이 되었어요.
이제 디자인에 맞는 항목들을 번호별로 채워주면 됩니다.
3. HTML 작성
HTML은 먼저 view 화면에 바로 작성하며 테스트합니다.
먼저 퍼블리싱 대상을 정하고 피그마를 보며 HTML 구조를 머리속으로 그려봅니다.
이미지를 보며 Container -> 내부 순, 위에서 아래로 html 파일에 바로 작성합니다.
<layer class="alert">
<layer-content>
<div class="layer-items w-100">
<div class="layer-icon"><img src="IMG_URL" /></div>
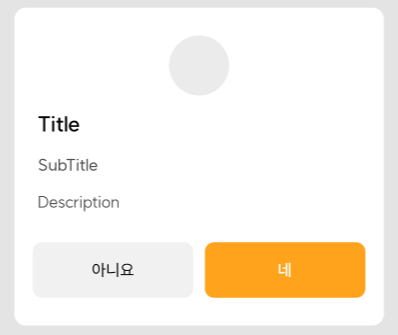
<h1 class="layer-title">타이틀</h1>
<h3 class="layer-subtitle">서브 타이틀</h3>
<p class="layer-message">내용</p>
</div>
<div class="layer-buttons flex-between-center">
<button type="button" class="btnConfirm">확인</button>
<button type="button" class="btnCancel">취소</button>
</div>
</layer-content>
<layer-background></layer-background>
</layer>w-100 와 flex-between-center 는 BootStrap을 이용 할 때 너무 편해서 자체적으로 정해서 만들어 사용하고 있는 class 입니다.
4. CSS 작성
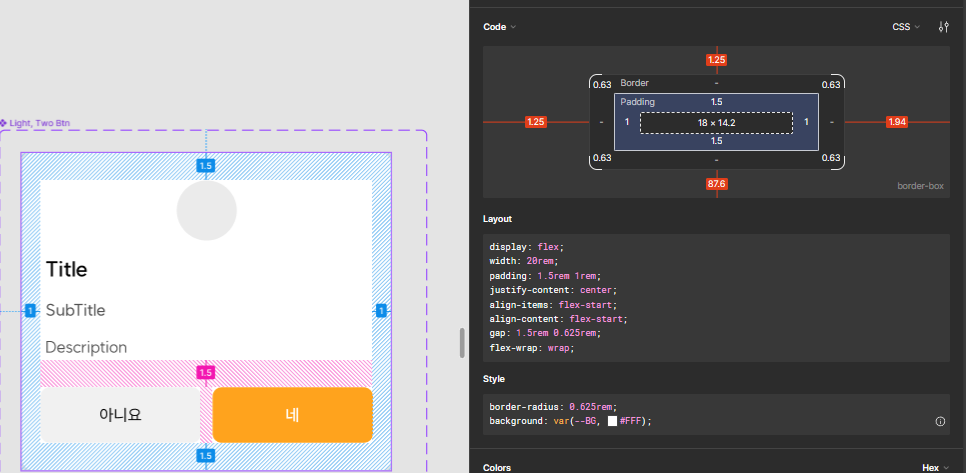
CSS는 Figma를 보며 작성하는데요.
Live 상태로 바로바로 확인하기 위해 크롬의 F12(개발자모드)를 눌러 스타일 편집기를 이용하구요.
피그마의 Layout, Style 안에 작성된 내용들을 보고 필요한 부분만 뽑아서 쓰거나, Padding 또는 Margin의 크기도 확인하며 작성합니다.
5. JavaScript 작성
이제 CSS까지 작업이 완료되었다면 (2)에서 작성했던 스크립트에 넣어줄 차례입니다.
아까 작성했던 AlertTheme_{N} 을 하나씩 채워나가면 되는데요.
이 안에도 구조를 설계했습니다.
(3)에서 작업한 HTML으로 작성한다면 이렇습니다.
JS 안에서 html을 아직 불편하게 입력하고 계셨다면 백틱 (`) 를 이용해보세요!
백틱은 물결(~)을 누르면 입력 가능해요. (아주아주아주아주 정말 편하답니다)
#alert_1 = class AlertTheme_1 {
    static #elementHTML = {
        icon: `<div class="layer-icon" {{:style}}>{{:content}}</div>`,
        title: `<h1 class="layer-title" {{:style}}>{{:content}}</h1>`,
        subTitle: `<h3 class="layer-subtitle" {{:style}}>{{:content}}</h3>`,
        message: `<p class="layer-message" {{:style}}>{{:content}}</p>`,
        html: `<div class="layer-html" {{:style}}>{{:content}}</div>`,
        cancelButton: `<button type="button" class="btnCancel" {{:style}}>{{:content}}</button>`,
        confirmButton: `<button type="button" class="btnConfirm" {{:style}}>{{:content}}</button>`,
    };

    static #option = {};
    static #timer = null;

    static fire(option) {
        this.#option = option;

        /* HTML 생성 */
        if (option.debug) {
            appAlert.logger.log("create alert HTML");
        }
        var html = this.#createHTML(option);
        if (option.debug) {
            appAlert.logger.logGroup("HTML Result :", html);
            appAlert.logger.log("append alert HTML in [" + option.target + "]");
        }
        $(option.target).append(html);

        /* Alert 열기 */
        this.open();

        /* 이벤트 추가 */
        if (option.debug) {
            appAlert.logger.log("bind event : clickCancel");
        }
        $("#" + this.#option.id).find(".btnCancel").on("click", function() {
            if (option.debug) {
                appAlert.logger.log("fire event : clickCancel");
            }
            option.clickCancel();
            this.close();
        }
        .bind(this));

        /* 이벤트 추가 */
        if (option.debug) {
            appAlert.logger.log("bind event : clickConfirm");
        }
        $("#" + this.#option.id).find(".btnConfirm").on("click", function() {
            if (option.debug) {
                appAlert.logger.log("fire event : clickConfirm");
            }
            option.clickConfirm();
            this.close();
        }
        .bind(this));

        /* 이벤트 추가 */
        if (option.debug) {
            appAlert.logger.log("fire event : autoClose");
        }
        if (option.autoClose) {
            if (option.debug) {
                appAlert.logger.log("set auto close time : " + option.autoCloseTime + "ms");
            }
            this.$timer = setTimeout(function() {
                if (option.debug) {
                    appAlert.logger.log("start auto close alert");
                }
                this.close();
            }
            .bind(this), option.autoCloseTime);
        }

        if (option.debug) {
            appAlert.logger.log("fire event : complete");
        }
        option.complete();

        if (option.debug) {
            appAlert.logger.log("fire function complete");
            appAlert.logger.log("==========================================");
        }
    }

    static open() {
    	// Open Code...
    }

    static close() {
    	// Close Code...
    }

    static #createHTML(option) {
        var html = `
        <layer id="${option.id}" class="alert">
            <layer-content>
                <div class="layer-items w-100">`;
        if (option.icon != "") {
            html += this.#insertContent(this.#elementHTML.icon, option.icon, option.iconStyle);
        }
        if (option.title != "") {
            html += this.#insertContent(this.#elementHTML.title, option.title, option.titleStyle);
        }
        if (option.subTitle != "") {
            html += this.#insertContent(this.#elementHTML.subTitle, option.subTitle, option.subTitleStyle);
        }
        if (option.reverseHtmlText) {
            if (option.html != "") {
                html += this.#insertContent(this.#elementHTML.html, option.html, option.htmlStyle);
            }
            if (option.text != "") {
                html += this.#insertContent(this.#elementHTML.message, option.text, option.textStyle);
            }
        }
        else {
            if (option.text != "") {
                html += this.#insertContent(this.#elementHTML.message, option.text, option.textStyle);
            }
            if (option.html != "") {
                html += this.#insertContent(this.#elementHTML.html, option.html, option.htmlStyle);
            }
        }
        html += `` +
                `</div>
                <div class="layer-buttons flex-between-center">`;
        if (option.reverseButton) {
            if (option.showConfirmButton) {
                html += this.#insertContent(this.#elementHTML.confirmButton, option.confirmButtonText, option.confirmButtonStyle);
            }
            if (option.showCancelButton) {
                html += this.#insertContent(this.#elementHTML.cancelButton, option.cancelButtonText, option.cancelButtonStyle);
            }
        }
        else {
            if (option.showCancelButton) {
                html += this.#insertContent(this.#elementHTML.cancelButton, option.cancelButtonText, option.cancelButtonStyle);
            }
            if (option.showConfirmButton) {
                html += this.#insertContent(this.#elementHTML.confirmButton, option.confirmButtonText, option.confirmButtonStyle);
            }
        }
        html += `` +
                `</div>
            </layer-content>
            <layer-background${(option.useBackgroundClose ? " class=\"btnCancel\"" : "")}></layer-background$>
        </layer>
        `;
        return html;
    }

    static #insertContent(html, content, style = {}) {
        var style_css = "";
        for (var key in style) {
            style_css += key + ":" + style[key] + ";";
        }
        if (style_css != "") {
            style_css = `style="${style_css}"`;
        }
        return "\n" + html.replace("{{:style}}", style_css).replace("{{:content}}", content);
    }
}
다소 코드가 복잡하겠지만 이러한 과정을 반복하며 코드를 채워줍니다.
결과
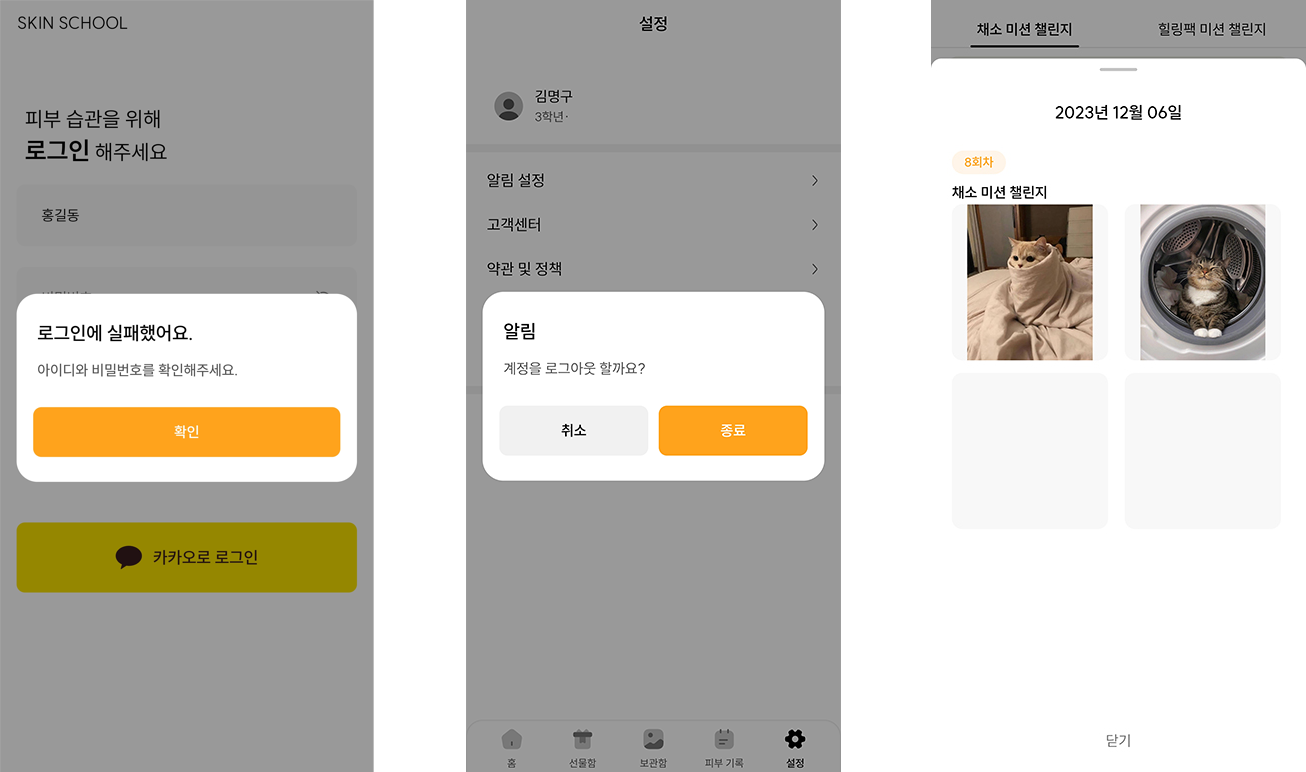
이렇게 모든 유형을 작성하니 총 1065줄로 제작을 완료했어요.
원하는대로 커스텀이 가능했고, 3번째 사진 처럼 HTML을 이용해서 기획과는 완전 다른 모습의 얼럿이지만 레이어도 만들 수 있었어요.
참고 문서
