ESP32의 PIN MAP
ESP32_DEVKIT_V4 - ESP32_WROOM_32D Pin Map
ESP32의 D2, D3는 사용하지 말라고 명시되어 있다.
그렇기에, 이전에 사용하였던 번호인 16, 17번을 그대로 사용하려고 한다.
ESP32의 RX는 16으로 하며, TX는 17로 지정한다
연결 코드는 아래와 같다
#include "DFRobot_C4001.h"

//#define I2C_COMMUNICATION  //use I2C for communication, but use the serial port for communication if the line of codes were masked

#ifdef  I2C_COMMUNICATION
  /*
   * DEVICE_ADDR_0 = 0x2A     default iic_address
   * DEVICE_ADDR_1 = 0x2B
   */
  DFRobot_C4001_I2C radar(&Wire ,DEVICE_ADDR_0);
#else
/* ---------------------------------------------------------------------------------------------------------------------
 *    board   |             MCU                | Leonardo/Mega2560/M0 |    UNO    | ESP8266 | ESP32 |  microbit  |   m0  |
 *     VCC    |            3.3V/5V             |        VCC           |    VCC    |   VCC   |  VCC  |     X      |  vcc  |
 *     GND    |              GND               |        GND           |    GND    |   GND   |  GND  |     X      |  gnd  |
 *     RX     |              TX                |     Serial1 TX1      |     5     |   5/D6  |  D2   |     X      |  tx1  |
 *     TX     |              RX                |     Serial1 RX1      |     4     |   4/D7  |  D3   |     X      |  rx1  |
 * ----------------------------------------------------------------------------------------------------------------------*/
/* Baud rate cannot be changed */
  #if defined(ARDUINO_AVR_UNO) || defined(ESP8266)
    SoftwareSerial mySerial(4, 5);
    DFRobot_C4001_UART radar(&mySerial ,9600);
  #elif defined(ESP32)
    DFRobot_C4001_UART radar(&Serial1 ,9600 ,/*rx*/17 ,/*tx*/16);  // GPIO 10:RX, GPIO 9:TX  / D2=9 , D3=10
  #else
    DFRobot_C4001_UART radar(&Serial1 ,9600);
  #endif
#endif

void setup()
{
  Serial.begin(115200);
  while(!Serial);
  while(!radar.begin()){
    Serial.println("NO Devices !");
    delay(1000);
  }
  Serial.println("Device connected!");

  // exist Mode
  radar.setSensorMode(eExitMode);

  sSensorStatus_t data;
  data = radar.getStatus();
  //  0 stop  1 start
  Serial.print("work status  = ");
  Serial.println(data.workStatus);

  //  0 is exist   1 speed
  Serial.print("work mode  = ");
  Serial.println(data.workMode);

  //  0 no init    1 init success
  Serial.print("init status = ");
  Serial.println(data.initStatus);
  Serial.println();

  /*
   * min Detection range Minimum distance, unit cm, range 0.3~25m (30~2500), not exceeding max, otherwise the function is abnormal.
   * max Detection range Maximum distance, unit cm, range 2.4~25m (240~2500)
   * trig Detection range Maximum distance, unit cm, default trig = max
   */
  if(radar.setDetectionRange(/*min*/30, /*max*/1000, /*trig*/1000)){
    Serial.println("set detection range successfully!");
  }
  // set trigger sensitivity 0 - 9
  if(radar.setTrigSensitivity(1)){
    Serial.println("set trig sensitivity successfully!");
  }

  // set keep sensitivity 0 - 9
  if(radar.setKeepSensitivity(2)){
    Serial.println("set keep sensitivity successfully!");
  }
  /*
   * trig Trigger delay, unit 0.01s, range 0~2s (0~200)
   * keep Maintain the detection timeout, unit 0.5s, range 2~1500 seconds (4~3000)
   */
  if(radar.setDelay(/*trig*/100, /*keep*/4)){
    Serial.println("set delay successfully!");
  }


  // get confige params
  Serial.print("trig sensitivity = ");
  Serial.println(radar.getTrigSensitivity());
  Serial.print("keep sensitivity = ");
  Serial.println(radar.getKeepSensitivity());

  Serial.print("min range = ");
  Serial.println(radar.getMinRange());
  Serial.print("max range = ");
  Serial.println(radar.getMaxRange());
  Serial.print("trig range = ");
  Serial.println(radar.getTrigRange());

  Serial.print("keep time = ");
  Serial.println(radar.getKeepTimerout());

  Serial.print("trig delay = ");
  Serial.println(radar.getTrigDelay());

}

void loop()
{
  // Determine whether the object is moving
  if(radar.motionDetection()){
    Serial.println("exist motion");
    Serial.println();
  }
  delay(100);
}
위의 코드를 실행시키고 변형 시켜서 내가 출력하고자 하는 것들을 출력하면 된다.
2번째 energy, target_number
#include "DFRobot_C4001.h"

//#define I2C_COMMUNICATION  //use I2C for communication, but use the serial port for communication if the line of codes were masked

#ifdef  I2C_COMMUNICATION
  /*
   * DEVICE_ADDR_0 = 0x2A     default iic_address
   * DEVICE_ADDR_1 = 0x2B
   */
  DFRobot_C4001_I2C radar(&Wire ,DEVICE_ADDR_0);
#else
/* ---------------------------------------------------------------------------------------------------------------------
 *    board   |             MCU                | Leonardo/Mega2560/M0 |    UNO    | ESP8266 | ESP32 |  microbit  |   m0  |
 *     VCC    |            3.3V/5V             |        VCC           |    VCC    |   VCC   |  VCC  |     X      |  vcc  |
 *     GND    |              GND               |        GND           |    GND    |   GND   |  GND  |     X      |  gnd  |
 *     RX     |              TX                |     Serial1 TX1      |     5     |   5/D6  |  D2   |     X      |  tx1  |
 *     TX     |              RX                |     Serial1 RX1      |     4     |   4/D7  |  D3   |     X      |  rx1  |
 * ----------------------------------------------------------------------------------------------------------------------*/
/* Baud rate cannot be changed */
  #if defined(ARDUINO_AVR_UNO) || defined(ESP8266)
    SoftwareSerial mySerial(4, 5);
    DFRobot_C4001_UART radar(&mySerial ,9600);
  #elif defined(ESP32)
    DFRobot_C4001_UART radar(&Serial1 ,9600 ,/*rx*/16 ,/*tx*/17);  // GPIO 10:RX, GPIO 9:TX  / D2=9 , D3=10
  #else
    DFRobot_C4001_UART radar(&Serial1 ,9600);
  #endif
#endif

void setup()
{
  Serial.begin(115200);
  while(!Serial);
  while(!radar.begin()){
    Serial.println("NO Devices !");
    delay(1000);
  }
  Serial.println("Device connected!");

  // speed Mode
  radar.setSensorMode(eSpeedMode);

  sSensorStatus_t data;
  data = radar.getStatus();
  //  0 stop  1 start
  Serial.print("work status  = ");
  Serial.println(data.workStatus);

  //  0 is exist   1 speed
  Serial.print("work mode  = ");
  Serial.println(data.workMode);

  //  0 no init    1 init success
  Serial.print("init status = ");
  Serial.println(data.initStatus);
  Serial.println();

  /*
   * min Detection range Minimum distance, unit cm, range 0.3~20m (30~2500), not exceeding max, otherwise the function is abnormal.
   * max Detection range Maximum distance, unit cm, range 2.4~20m (240~2500)
   * thres Target detection threshold, dimensionless unit 0.1, range 0~6553.5 (0~65535)
   */
  if (radar.setDetectThres(/*min*/ 11, /*max*/ 1200, /*thres*/ 10)) {
    Serial.println("set detect threshold successfully");
  }

  // set Fretting Detection
  radar.setFrettingDetection(eON);

  // get confige params
  Serial.print("min range = ");
  Serial.println(radar.getTMinRange());
  Serial.print("max range = ");
  Serial.println(radar.getTMaxRange());
  Serial.print("threshold range = ");
  Serial.println(radar.getThresRange());
  Serial.print("fretting detection = ");
  Serial.println(radar.getFrettingDetection());
}

void loop() {
  Serial.print("target number = ");
  Serial.println(radar.getTargetNumber());  // must exist
  Serial.print("target Speed  = ");
  Serial.print(radar.getTargetSpeed());
  Serial.println(" m/s");

  Serial.print("target range  = ");
  Serial.print(radar.getTargetRange());
  Serial.println(" m");

  Serial.print("target energy  = ");
  Serial.println(radar.getTargetEnergy());
  Serial.println();
  delay(100);
}
센서 설명
-
C4001 mmWave(millimeter-wave)는 정지 물체와 움직이는 물체를 모두 감지할 수 있다는 장점이 있다
-
상대적으로 강력한 간섭 방지 기능이 있어 온도 변화, 주변광 변화 및 환경 소음과 같은 요인에 덜 민감하다
-
사람이 앉아 있든, 잠을 자든, 움직이고 있든 센서는 빠르고 민감하게 사람의 존재를 감지할 수 있다
MMWave 와 Infrared Sensor(적외선 센서)의 차이
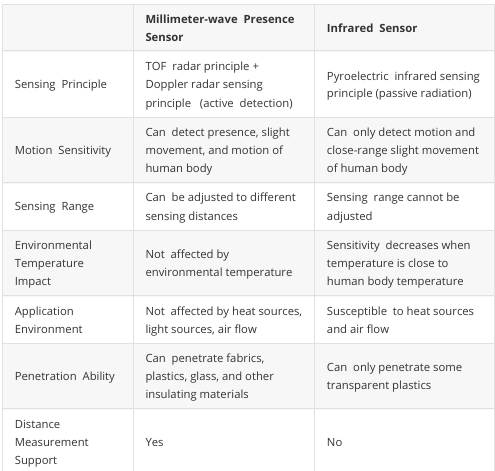
Distance and velocity detection
- 최대 감지 범위는 12m 이고 속도 측정 범위는 초당 0.1 ~ 10m 이다.
Characteristics
-
I2C 와 UART 두 가지 통신 방법을 지원한다
-
Human Detection : 최대 8m 거리에서 인간의 존재를 탐지하고, 최대 12m 거리에서 인간의 움직임을 감지할 수 있다
-
Distance Detection : 1.2m 에서 12m까지의 거리를 측정할 수 있다
-
Speed Detection : 0.1m/s 에서 10m/s 까지의 속도를 감지할 수 있다
-
Strong anti-interference capability : 눈, 안개, 온도, 습도, 먼지, 빛, 소음 등의 요인에 영향을 받지 않는다
Installation Method
: mmWave Sensor는 설치 방법에 민감하며, 부적절한 설치는 센서의 성능과 기능에 영향을 미칠 수 있다. 이 모듈에 일반적으로 사용되는 설치 방법에는 상단 설치, 하단 설치, 수평 설치 및 하향 기울기 설치가 있다
Top Installation(상단 설치)

Bottom Installation(하단 설치)
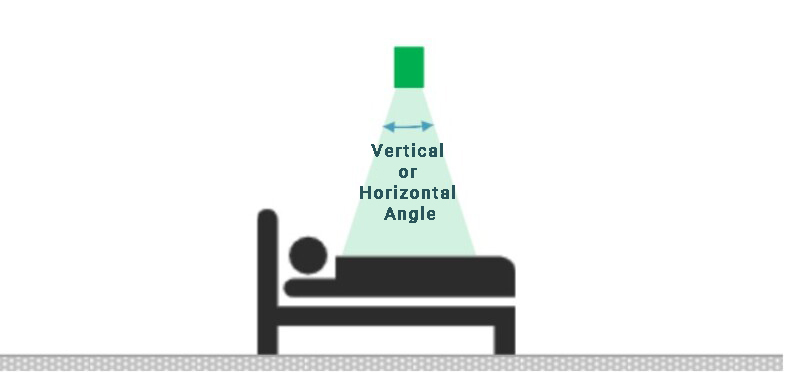
Horizontal Installation(수평 설치)

참고문헌