환경
Arduino IDE 2.3.2
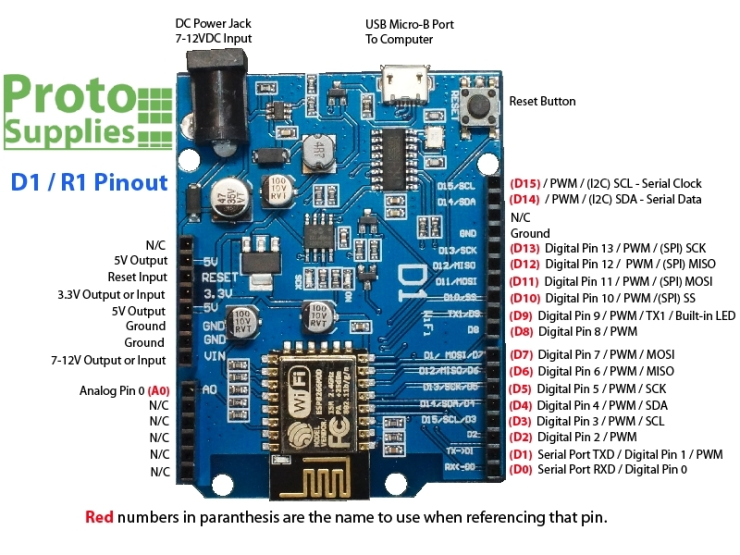
Board : ESP8266 - LOLIN(Wemos)D1 R1
Port : Com4(변동 가능)
Upload Speed : 115200
cf. ESP8266 board manager
http://arduino.esp8266.com/stable/package_esp8266com_index.json
cf. Board - esp32
version : 3.0.2(2024.07.16 기준)
용어 정리
- UART(Universal asynchronous receiver/treansmitter) : 범용 비동기화 송수신기. 병렬 데이터의 형태를 직렬 방식으로 전환하여 데이터를 전송하는 컴퓨터 하드웨어의 일종
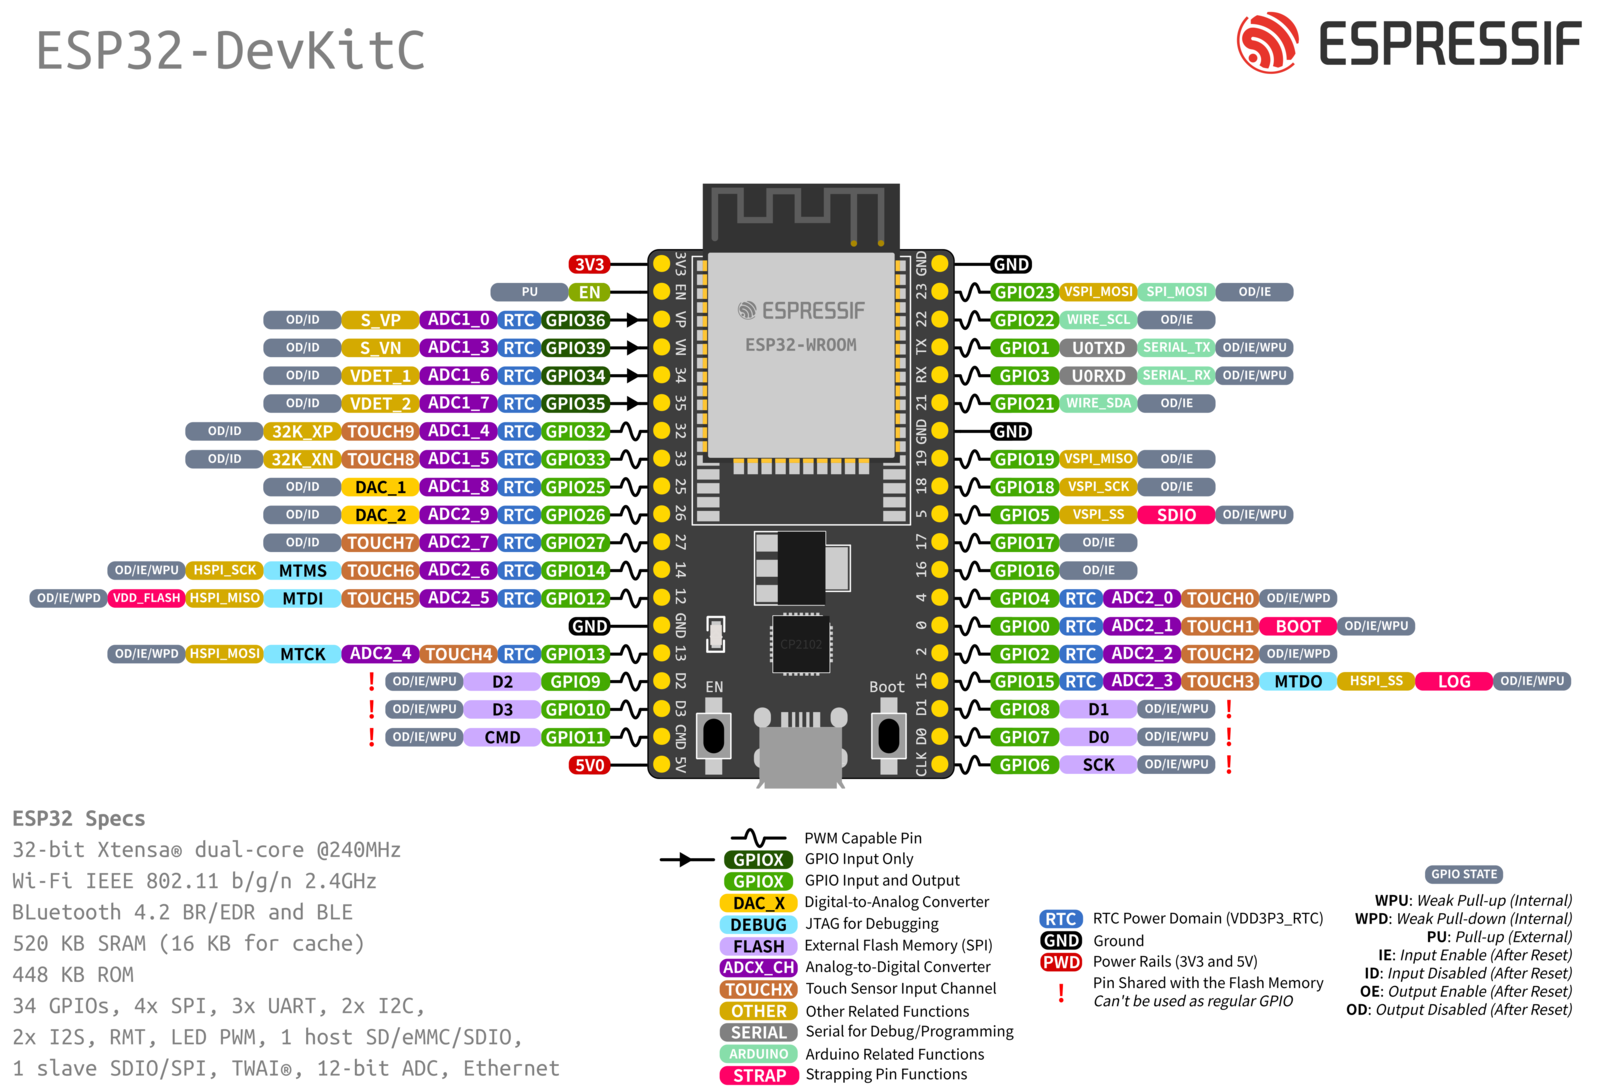
ESP8266 D1 R1 Pin Map
esp 연결 확인
File -> Example -> ESP8266 -> Blink
: Blink를 실행하였을때, ESP8266이 깜빡이면 연결 성공
MR60BHA1(60GHz mmWave Sensor - Human Static Sleep Breathing Monitoring)
MR60BHA1 Reference Link
https://wiki.seeedstudio.com/Radar_MR60BHA1/
60ghzbreathheart.h zip library link
https://github.com/limengdu/Seeed-Studio-MR60BHA1-Sensor
How to bring Library in Github
: In Github page download Zip file -> Arduino Sketch -> Include Library -> Add .Zip Library
Demo1
#include "Arduino.h"
#include <60ghzbreathheart.h>
//#include <SoftwareSerial.h>
// Choose any two pins that can be used with SoftwareSerial to RX & TX
//#define RX_Pin A2
//#define TX_Pin A3
//SoftwareSerial mySerial = SoftwareSerial(RX_Pin, TX_Pin);
// we'll be using software serial
//BreathHeart_60GHz radar = BreathHeart_60GHz(&mySerial);
// can also try hardware serial with
BreathHeart_60GHz radar = BreathHeart_60GHz(&Serial1);
void setup() {
// put your setup code here, to run once:
Serial.begin(115200);
Serial1.begin(115200);
// mySerial.begin(115200);
while(!Serial); //When the serial port is opened, the program starts to execute.
Serial.println("Readly");
}
void loop()
{
// put your main code here, to run repeatedly:
radar.recvRadarBytes(); //Receive radar data and start processing
radar.showData(); //Serial port prints a set of received data frames
delay(200); //Add time delay to avoid program jam
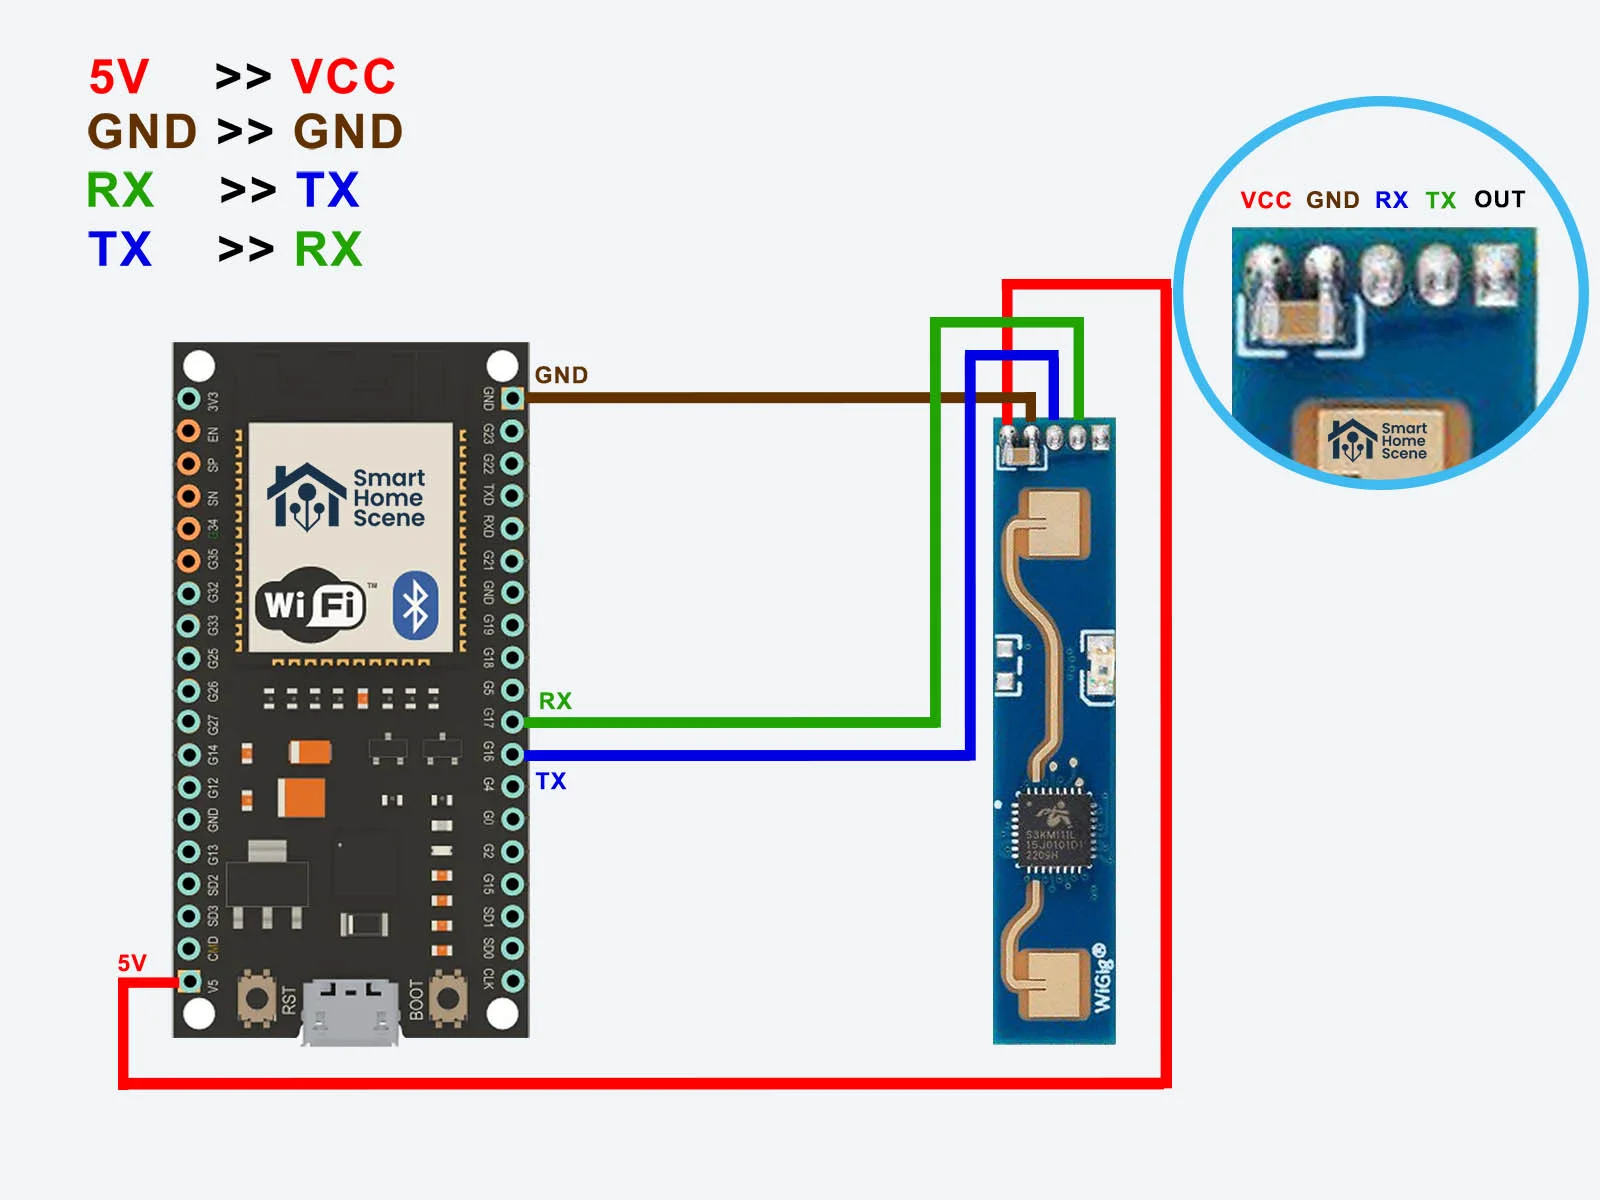
}연결 Tip
먼저 ESP8266만 연결한 상태에서 코드 업로드 -> 코드 업로드 이후, mmWave sensor와 연결하기
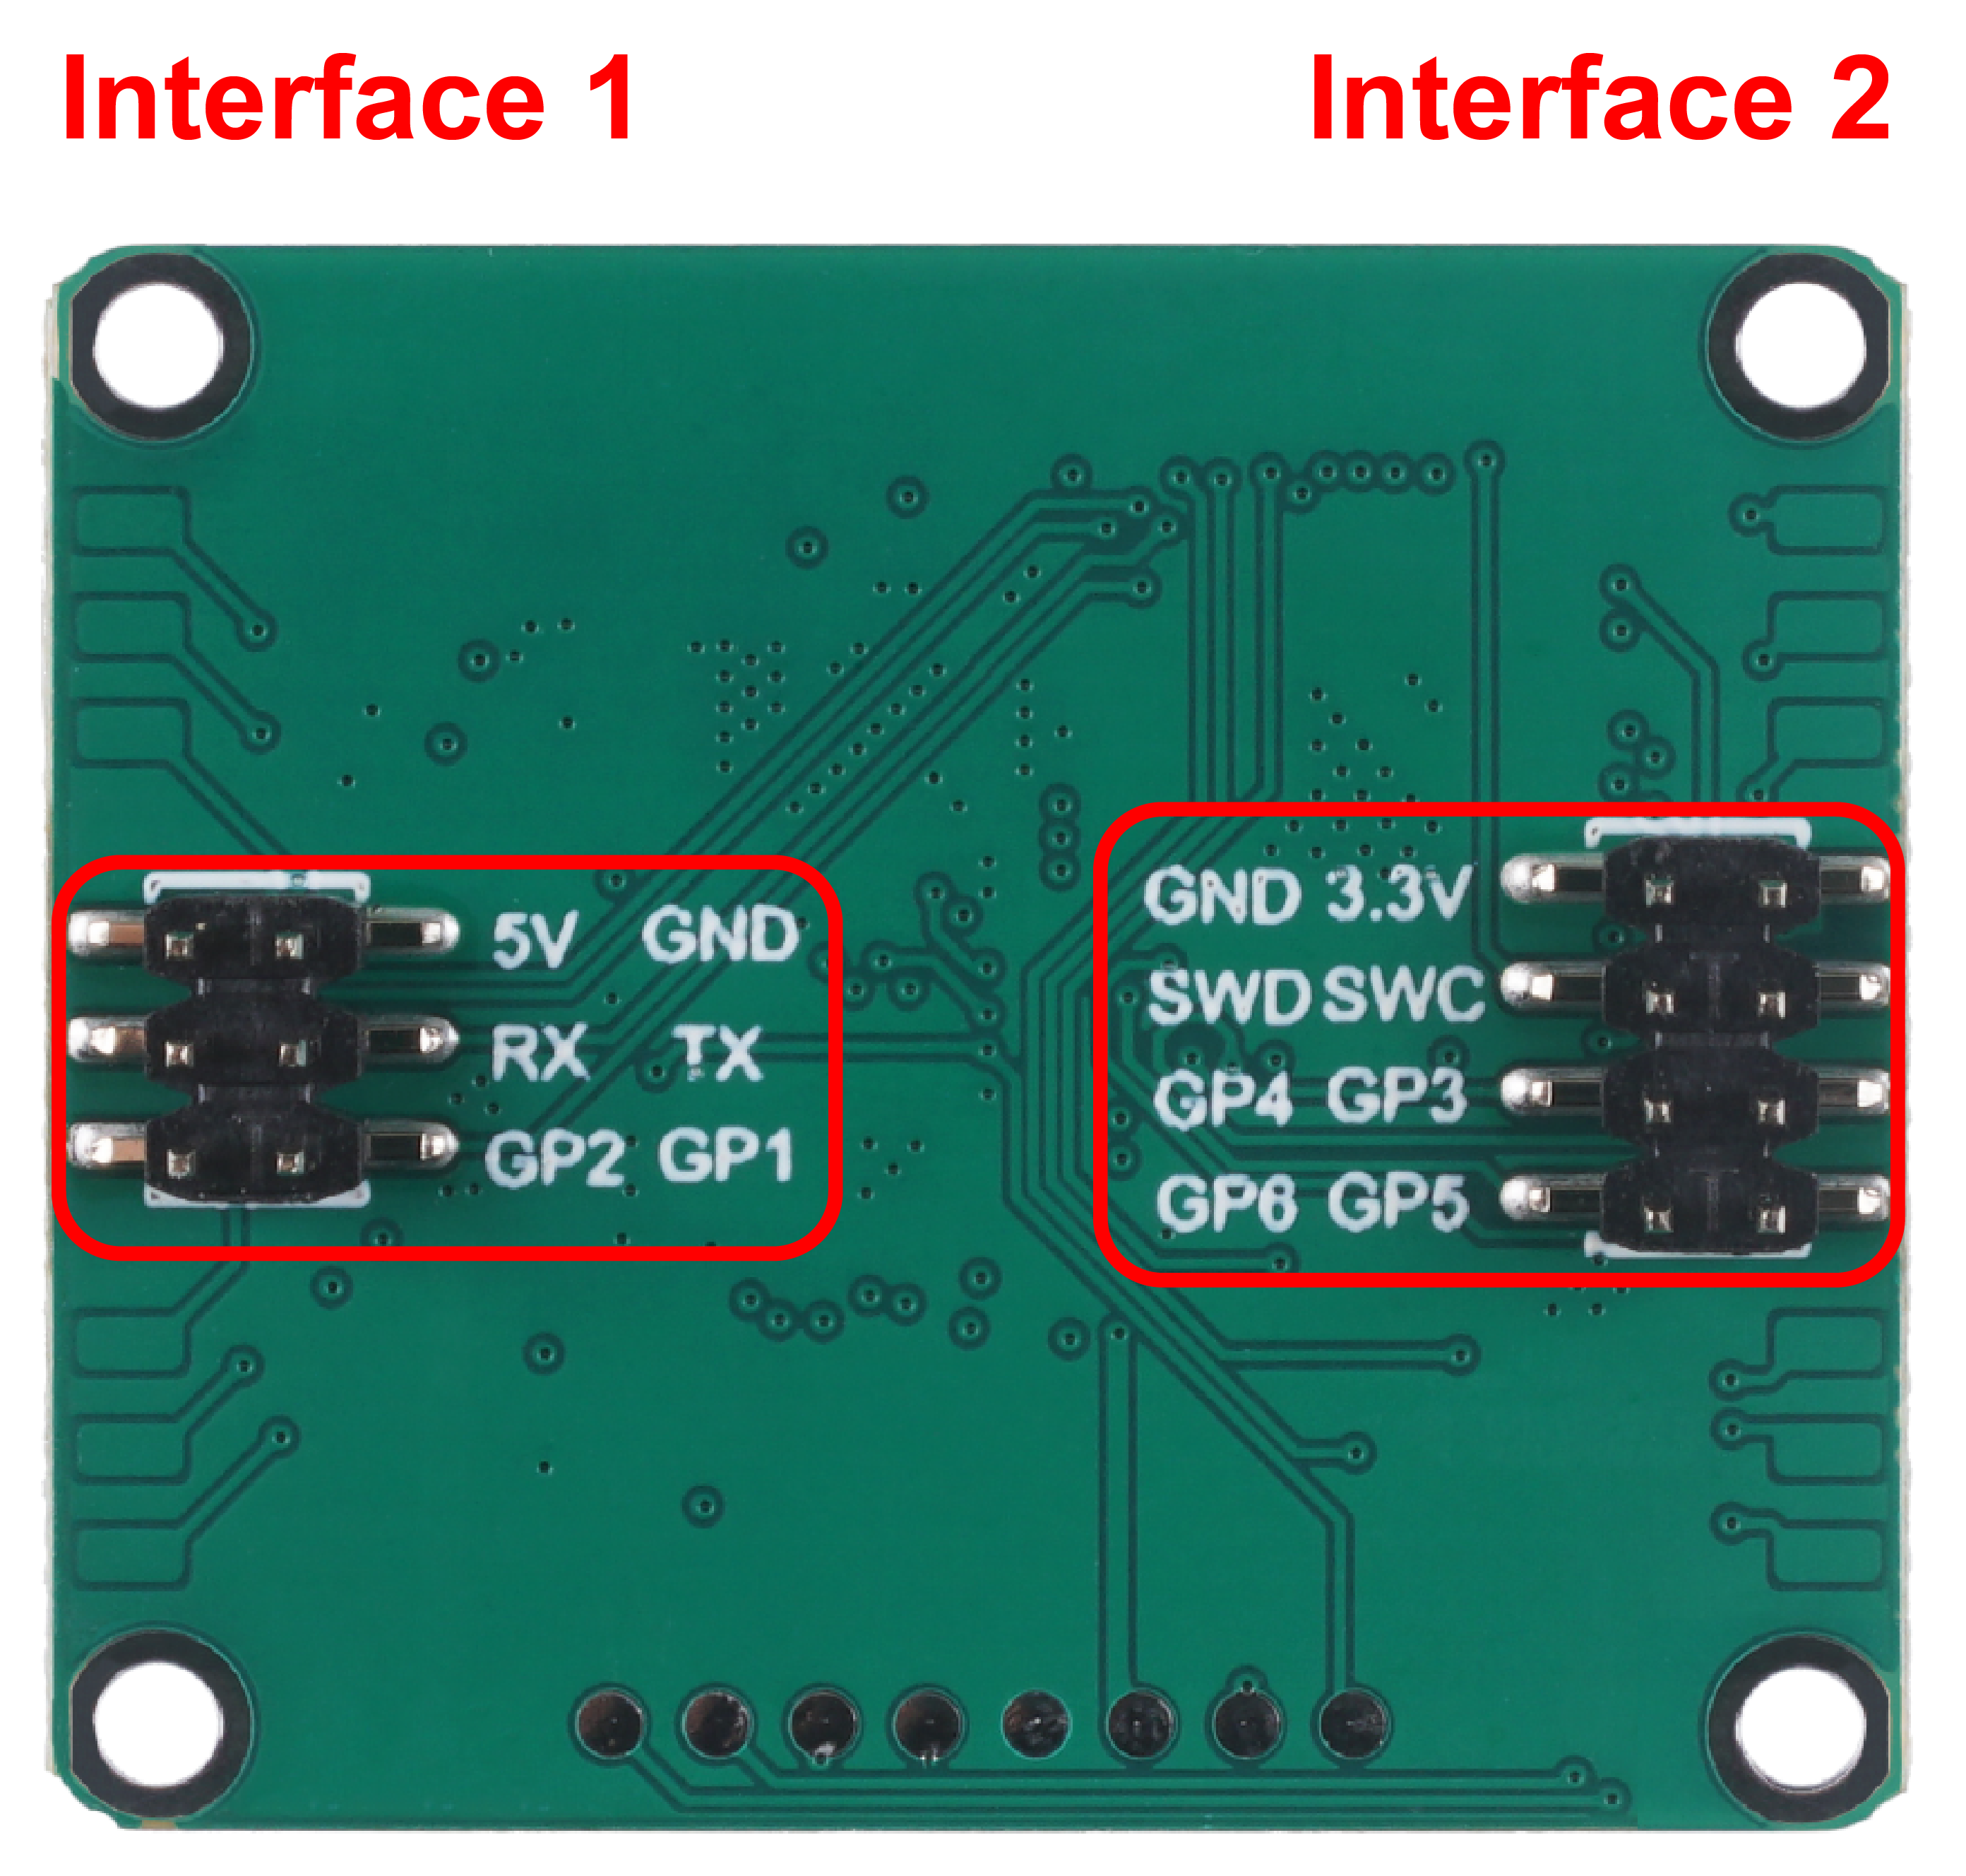
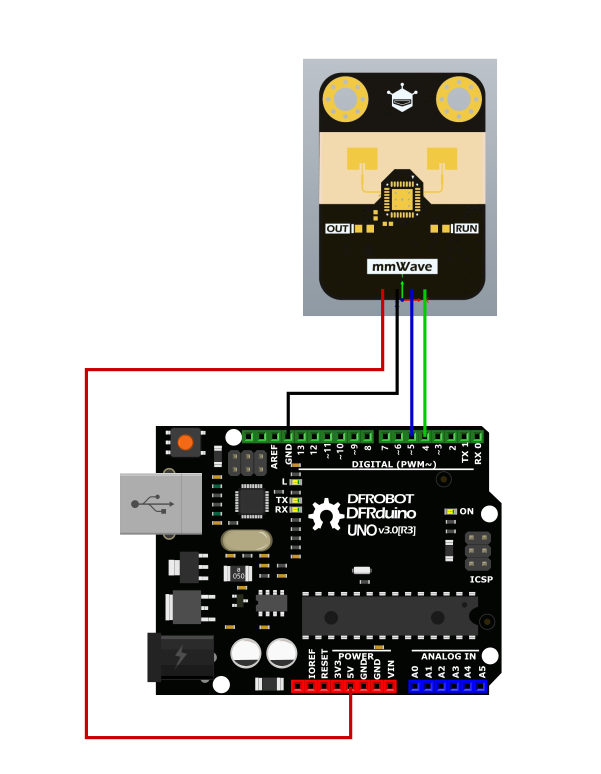
C4001(12M) (ex.Arduino Uno)
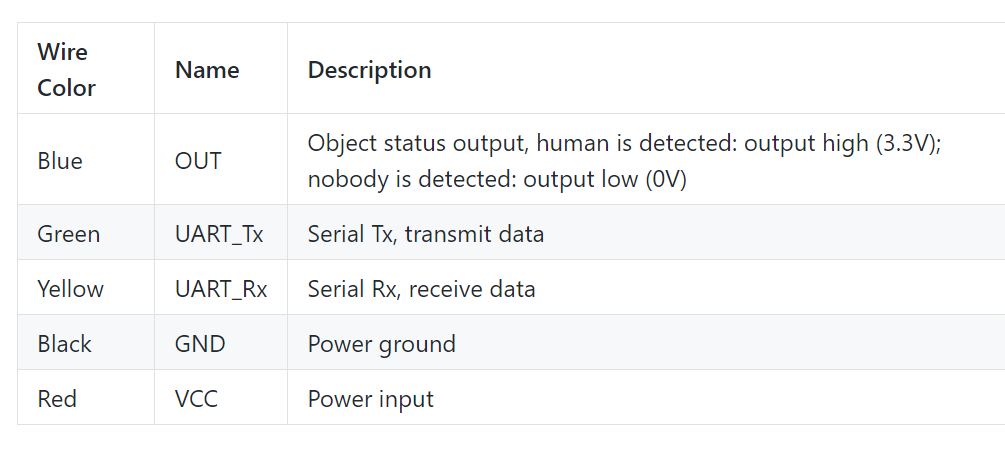
C40010 Interface Definitions
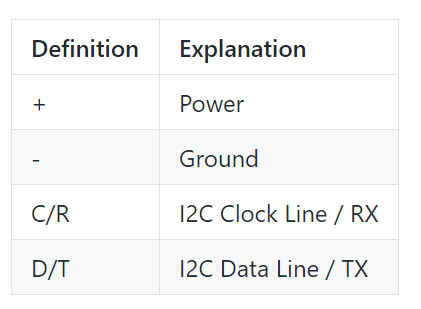
C4001 빨간색 : 5V , 검정색 : GROUND , 파란색 : RX , 초록색 : TX
C4001의 경우, Serial로 하지 않고 I2C 방식으로 연결 해야함
esp8266 과 c4001 을 I2C로 연결해서 진행하기
 /*!
  * @file  motionDetection.ino
  * @brief  Example of radar detecting whether an object is moving
  * @copyright Copyright (c) 2010 DFRobot Co.Ltd (http://www.dfrobot.com)
  * @license The MIT License (MIT)
  * @author ZhixinLiu(zhixin.liu@dfrobot.com)
  * @version V1.0
  * @date 2024-02-02
  * @url https://github.com/dfrobot/DFRobot_C4001
  */

#include "DFRobot_C4001.h"

// #define I2C_COMMUNICATION  //use I2C for communication, but use the serial port for communication if the line of codes were masked

// #ifdef  I2C_COMMUNICATION
// DEVICE_ADDR_0 = 0x2A     default iic_address
// DEVICE_ADDR_1 = 0x2B

DFRobot_C4001_I2C radar(&Wire ,DEVICE_ADDR_0);
// #else
/* ---------------------------------------------------------------------------------------------------------------------
 *    board   |             MCU                | Leonardo/Mega2560/M0 |    UNO    | ESP8266 | ESP32 |  microbit  |   m0  |
 *     VCC    |            3.3V/5V             |        VCC           |    VCC    |   VCC   |  VCC  |     X      |  vcc  |
 *     GND    |              GND               |        GND           |    GND    |   GND   |  GND  |     X      |  gnd  |
 *     RX     |              TX                |     Serial1 TX1      |     5     |   5/D6  |  D2   |     X      |  tx1  |
 *     TX     |              RX                |     Serial1 RX1      |     4     |   4/D7  |  D3   |     X      |  rx1  |
 * ----------------------------------------------------------------------------------------------------------------------*/
// /* Baud rate cannot be changed */
//   #if defined(ARDUINO_AVR_UNO) || defined(ESP8266)
// SoftwareSerial mySerial(4, 5);
// DFRobot_C4001_UART radar(&mySerial ,9600);
//   #elif defined(ESP32)
//     DFRobot_C4001_UART radar(&Serial1 ,9600 ,/*rx*/D2 ,/*tx*/D3);
//   #else
//     DFRobot_C4001_UART radar(&Serial1 ,9600);
//   #endif
// #endif

// DFRobot_C4001_UART radar(&Serial ,9600);

void setup()
{

  Serial.begin(9600);
  while(!Serial);
  while(!radar.begin()){
    Serial.println("NO Deivces !");
    delay(1000);
  }
  Serial.println("Device connected!");

  // exist Mode
  radar.setSensorMode(eExitMode);

  sSensorStatus_t data;
  data = radar.getStatus();
  //  0 stop  1 start
  Serial.print("work status  = ");
  Serial.println(data.workStatus);

  //  0 is exist   1 speed
  Serial.print("work mode  = ");
  Serial.println(data.workMode);

  //  0 no init    1 init success
  Serial.print("init status = ");
  Serial.println(data.initStatus);
  Serial.println();

  /*
   * min Detection range Minimum distance, unit cm, range 0.3~25m (30~2500), not exceeding max, otherwise the function is abnormal.
   * max Detection range Maximum distance, unit cm, range 2.4~25m (240~2500)
   * trig Detection range Maximum distance, unit cm, default trig = max
   */
  if(radar.setDetectionRange(/*min*/30, /*max*/1000, /*trig*/1000)){
    Serial.println("set detection range successfully!");
  }
  // set trigger sensitivity 0 - 9
  if(radar.setTrigSensitivity(1)){
    Serial.println("set trig sensitivity successfully!");
  }

  // set keep sensitivity 0 - 9
  if(radar.setKeepSensitivity(2)){
    Serial.println("set keep sensitivity successfully!");
  }
  /*
   * trig Trigger delay, unit 0.01s, range 0~2s (0~200)
   * keep Maintain the detection timeout, unit 0.5s, range 2~1500 seconds (4~3000)
   */
  if(radar.setDelay(/*trig*/100, /*keep*/4)){
    Serial.println("set delay successfully!");
  }


  // get confige params
  Serial.print("trig sensitivity = ");
  Serial.println(radar.getTrigSensitivity());
  Serial.print("keep sensitivity = ");
  Serial.println(radar.getKeepSensitivity());

  Serial.print("min range = ");
  Serial.println(radar.getMinRange());
  Serial.print("max range = ");
  Serial.println(radar.getMaxRange());
  Serial.print("trig range = ");
  Serial.println(radar.getTrigRange());

  Serial.print("keep time = ");
  Serial.println(radar.getKeepTimerout());

  Serial.print("trig delay = ");
  Serial.println(radar.getTrigDelay());

}

void loop()
{
  // Determine whether the object is moving
  if(radar.motionDetection()){
    Serial.println("exist motion");
    Serial.println();
  }
  delay(100);
}
해당 코드는 현재 ESP8266 이 연결 되지 않는다고 뜬다.
I2C 연결법을 빨리 찾아라...(24.07.23 기준..)
https://alselectro.wordpress.com/2018/04/16/esp8266-wemos-d1-with-i2c-serial-lcd/
위 사이트 참고해봐라 닝겐..
SEN0557(LD2410)
SEN0557 Board Overview

위 사진은 ESP32 와 LD2410 연결에 대해서
ESP32의 16:TX , 17:RX에 해당
 /* Example sketch for reporting on readings from the LD2410 using whatever settings are currently configured.
 *
 * The sketch assumes an ESP32 board with the LD2410 connected as Serial1 to pins 8 & 9, the serial configuration for other boards may vary
 *
 */

#include <ld2410.h>

ld2410 radar;

uint32_t lastReading = 0;

void setup(void)
{
  Serial.begin(115200); //Feedback over Serial Monitor
  radar.debug(Serial);
   //Uncomment to show debug information from the library on the Serial Monitor. By default this does not show sensor reads as they are very frequent.
  Serial1.begin (256000, SERIAL_8N1, 16, 17); //UART for monitoring the radar
  delay(500);
  Serial.println(F("\nLD2410 radar sensor initialising: "));
  if(radar.begin(Serial1))
  {
    Serial.println(F("OK"));
  }
  else
  {
    Serial.println(F("not connected"));
  }
}

void loop()
{
  radar.read();
  if(radar.isConnected() && millis() - lastReading > 1000)  //Report every 1000ms
  {
    lastReading = millis();
    if(radar.presenceDetected())
    {
      if(radar.stationaryTargetDistance())
      {
        Serial.print(F("Stationary target: "));
        Serial.print(radar.stationaryTargetDistance());
        Serial.print(F("cm energy:"));
        Serial.println(radar.stationaryTargetEnergy());
      }
      if(radar.movingTargetDistance())
      {
        Serial.print(F("Moving target: "));
        Serial.print(radar.movingTargetDistance());
        Serial.print(F("cm energy:"));
        Serial.println(radar.movingTargetEnergy());
      }
    }
    else
    {
      Serial.println(F("No target"));
    }
  }
}
관련 근거 사진은 아래와 같다
현재는 모든 연결과 upload만 확인 하였으며 추후에 추가적으로 실험 방향에 대해서 작성하겠다.
ㅡㅡ 2024.07.12 ㅡㅡ
https://blog.naver.com/compass1111/221073101230
ㄴ Serial Monitor esp8266에 띄우는 기본 예제 코드 참고하기
간단 설명) print와 println의 차이는 줄 바꿈에 있다
printf의 경우, $d 와 \n 같이 서식 지정자를 통해 출력할 데이터의 서식을 지정할 수 있다.
> 예제코드 출력
/*
  ESP8266 Blink by Simon Peter
  Blink the blue LED on the ESP-01 module
  This example code is in the public domain

  The blue LED on the ESP-01 module is connected to GPIO1
  (which is also the TXD pin; so we cannot use Serial.print() at the same time)

  Note that this sketch uses LED_BUILTIN to find the pin with the internal LED
*/

void setup() {
  pinMode(LED_BUILTIN, OUTPUT);  // Initialize the LED_BUILTIN pin as an output
  Serial.begin(115200);
}

// the loop function runs over and over again forever
void loop() {
  digitalWrite(LED_BUILTIN, HIGH);  // Turn the LED on (Note that LOW is the voltage level
  Serial.print(1004);
  Serial.print("welcome");
  Serial.println("hello world");
  Serial.printf("Everybody! Esp-%d", 8266);
  Serial.write(1234);

  delay(1000);
  digitalWrite(LED_BUILTIN, LOW);
  delay(1000);
}
Serial Monitor에서 입력하는 코드
/*
 ESP8266 Blink by Simon Peter
 Blink the blue LED on the ESP-01 module
 This example code is in the public domain

 The blue LED on the ESP-01 module is connected to GPIO1
 (which is also the TXD pin; so we cannot use Serial.print() at the same time)

 Note that this sketch uses LED_BUILTIN to find the pin with the internal LED
*/

void setup() {
 pinMode(LED_BUILTIN, OUTPUT);  // Initialize the LED_BUILTIN pin as an output
 Serial.begin(115200);
}

// the loop function runs over and over again forever
void loop()
{
 if(Serial.available()>0)
 {
   char i=Serial.read();
   Serial.printf("Read data is %c \r\n", i);
 }
}
\r 과 \n의 차이
- 정의
- \r : (캐리지 리턴. CR)커서의 위치를 현재 줄의 맨 앞으로 이동
- \n : (라인 피드. LineFeed) 커서를 다음 줄로 이동
- ex. \r
sample1 = "       abcd"
sample2 = "     \refgh"
print(sample1)
print(sample2)

ㅡㅡㅡㅡㅡㅡㅡㅡㅡㅡㅡ
      abcd
efgh
- ex. \n
sample = "abcd\nefgh"
print(sample)

ㅡㅡㅡㅡㅡㅡㅡㅡㅡㅡㅡㅡ
abcd
efgh
연결 완료
-> 먼저 compile하고 나서 센서 연결해야지 뜸(아래는 연결 코드)
코드 수정 완료 / Serial1 은 사용 X
...___... 이러한 형태로 연결되면 그냥 뺐다가 다시 끼기
Demo1 : Raw data export
#include <Arduino.h>
#include <60ghzbreathheart.h>

BreathHeart_60GHz radar = BreathHeart_60GHz(&Serial);

void setup() {
  Serial.begin(115200);

  while(!Serial);   //When the serial port is opened, the program starts to execute.

  Serial.println("Readly");
}

// the loop function runs over and over again forever
void loop() {
  // put your main code here, to run repeatedly:
  radar.recvRadarBytes();           //Receive radar data and start processing
  radar.showData();                 //Serial port prints a set of received data frames
  delay(200);
}
Demo2 : Use of human presence detection function
  #include "Arduino.h"
  #include <60ghzbreathheart.h>

  //#include <SoftwareSerial.h>
  // Choose any two pins that can be used with SoftwareSerial to RX & TX
  //#define RX_Pin A2
  //#define TX_Pin A3

  //SoftwareSerial mySerial = SoftwareSerial(RX_Pin, TX_Pin);

  // we'll be using software serial
  //BreathHeart_60GHz radar = BreathHeart_60GHz(&mySerial);

  // can also try hardware serial with
  BreathHeart_60GHz radar = BreathHeart_60GHz(&Serial);

  void setup() {
    // put your setup code here, to run once:
    Serial.begin(115200);
    //  mySerial.begin(115200);

    while(!Serial);   //When the serial port is opened, the program starts to execute.

    Serial.println("Readly");
  }

  void loop()
  {
    // put your main code here, to run repeatedly:
    radar.HumanExis_Func();           //Human existence information output
    if(radar.sensor_report != 0x00){
      switch(radar.sensor_report){
        case NOONE:
          Serial.println("Nobody here.");
          Serial.println("----------------------------");
          break;
        case SOMEONE:
          Serial.println("Someone is here.");
          Serial.println("----------------------------");
          break;
        case NONEPSE:
          Serial.println("No human activity messages.");
          Serial.println("----------------------------");
          break;
        case STATION:
          Serial.println("Someone stop");
          Serial.println("----------------------------");
          break;
        case MOVE:
          Serial.println("Someone moving");
          Serial.println("----------------------------");
          break;
        case BODYVAL:
          Serial.print("The parameters of human body signs are: ");
          Serial.println(radar.bodysign_val, DEC);
          Serial.println("----------------------------");
          break;
        case DISVAL:
          Serial.print("The sensor judges the distance to the human body to be: ");
          Serial.print(radar.distance, DEC);
          Serial.println(" m");
          Serial.println("----------------------------");
          break;
        case DIREVAL:
          Serial.print("The sensor judges the orientation data with the human body as -- x: ");
          Serial.print(radar.Dir_x);
          Serial.print(" m, y: ");
          Serial.print(radar.Dir_y);
          Serial.print(" m, z: ");
          Serial.print(radar.Dir_z);
          Serial.println(" m");
          Serial.println("----------------------------");
          break;
      }
    }
    delay(200);                    //Add time delay to avoid program jam
  }
Demo3 : The use of respiratory and heartbeat functions in the resting people
#include "Arduino.h"
#include <60ghzbreathheart.h>

//#include <SoftwareSerial.h>
// Choose any two pins that can be used with SoftwareSerial to RX & TX
//#define RX_Pin A2
//#define TX_Pin A3

//SoftwareSerial mySerial = SoftwareSerial(RX_Pin, TX_Pin);

// we'll be using software serial
//BreathHeart_60GHz radar = BreathHeart_60GHz(&mySerial);

// can also try hardware serial with
BreathHeart_60GHz radar = BreathHeart_60GHz(&Serial);

void setup() {
  // put your setup code here, to run once:
  Serial.begin(115200);

  //  mySerial.begin(115200);

  while(!Serial);   //When the serial port is opened, the program starts to execute.

  Serial.println("Readly");

  // radar.ModeSelect_fuc(1);  //1: indicates real-time transmission mode, 2: indicates sleep state mode.
  //After setting the mode, if you do not see data returned, you may need to re-power the sensor.
}

void loop()
{
  // put your main code here, to run repeatedly:
  radar.Breath_Heart();           //Breath and heartbeat information output
  if(radar.sensor_report != 0x00){
    switch(radar.sensor_report){
      case HEARTRATEVAL:
        Serial.print("Sensor monitored the current heart rate value is: ");
        Serial.println(radar.heart_rate, DEC);
        Serial.println("----------------------------");
        break;
      case HEARTRATEWAVE:  //Valid only when real-time data transfer mode is on
        Serial.print("The heart rate waveform(Sine wave) -- point 1: ");
        Serial.print(radar.heart_point_1);
        Serial.print(", point 2 : ");
        Serial.print(radar.heart_point_2);
        Serial.print(", point 3 : ");
        Serial.print(radar.heart_point_3);
        Serial.print(", point 4 : ");
        Serial.print(radar.heart_point_4);
        Serial.print(", point 5 : ");
        Serial.println(radar.heart_point_5);
        Serial.println("----------------------------");
        break;
      case BREATHNOR:
        Serial.println("Sensor detects current breath rate is normal.");
        Serial.println("----------------------------");
        break;
      case BREATHRAPID:
        Serial.println("Sensor detects current breath rate is too fast.");
        Serial.println("----------------------------");
        break;
      case BREATHSLOW:
        Serial.println("Sensor detects current breath rate is too slow.");
        Serial.println("----------------------------");
        break;
      case BREATHNONE:
        Serial.println("There is no breathing information yet, please wait...");
        Serial.println("----------------------------");
        break;
      case BREATHVAL:
        Serial.print("Sensor monitored the current breath rate value is: ");
        Serial.println(radar.breath_rate, DEC);
        Serial.println("----------------------------");
        break;
      case BREATHWAVE:  //Valid only when real-time data transfer mode is on
        Serial.print("The breath rate waveform(Sine wave) -- point 1: ");
        Serial.print(radar.breath_point_1);
        Serial.print(", point 2 : ");
        Serial.print(radar.breath_point_2);
        Serial.print(", point 3 : ");
        Serial.print(radar.breath_point_3);
        Serial.print(", point 4 : ");
        Serial.print(radar.breath_point_4);
        Serial.print(", point 5 : ");
        Serial.println(radar.breath_point_5);
        Serial.println("----------------------------");
        break;
    }
  }
  delay(200);                       //Add time delay to avoid program jam
}
Demo4 : Use of the sleep function
#include "Arduino.h"
#include <60ghzbreathheart.h>

//#include <SoftwareSerial.h>
// Choose any two pins that can be used with SoftwareSerial to RX & TX
//#define RX_Pin A2
//#define TX_Pin A3

//SoftwareSerial mySerial = SoftwareSerial(RX_Pin, TX_Pin);

// we'll be using software serial
//BreathHeart_60GHz radar = BreathHeart_60GHz(&mySerial);

// can also try hardware serial with
BreathHeart_60GHz radar = BreathHeart_60GHz(&Serial1);

void setup() {
  // put your setup code here, to run once:
  Serial.begin(115200);
  // Serial1.begin(115200);

  //  mySerial.begin(115200);

  while(!Serial);   //When the serial port is opened, the program starts to execute.

  Serial.println("Readly");
}

void loop()
{
  // put your main code here, to run repeatedly:
  radar.SleepInf_Decode();           //Sleep-related information output. Data output begins when the monitoring figure is in bed for five minutes.
  if(radar.sensor_report != 0x00){
    switch(radar.sensor_report){
      case OUTBED:
        Serial.println("Sensor detects someone currently leaving the bed.");
        Serial.println("----------------------------");
        break;
      case INBED:
        Serial.println("Sensor detects that someone is currently in bed.");
        Serial.println("----------------------------");
        break;
      case NOINOUT:
        Serial.println("No subject is detected leaving or going to bed.");
        Serial.println("----------------------------");
        break;
      case SLEEPAWAKE:
        Serial.println("Sensor detects that the monitoring people is awake.");
        Serial.println("----------------------------");
        break;
      case SLEEPLIGHT:
        Serial.println("Sensor detects that the monitoring people is in light sleeping.");
        Serial.println("----------------------------");
        break;
      case SLEEPDEEP:
        Serial.println("Sensor detects that the monitoring people is in deep sleeping.");
        Serial.println("----------------------------");
        break;
      case SLEEPNONE:
        Serial.println("Sleep state of the object is not detected.");
        Serial.println("----------------------------");
        break;
      case AWAKETIME:
        Serial.print("Sensor monitored the awake sleep time is: ");
        Serial.print(radar.awake_time);
        Serial.println(" min");
        Serial.println("----------------------------");
        break;
      case LIGHTTIME:
        Serial.print("Sensor monitored the light sleep time is: ");
        Serial.print(radar.light_time);
        Serial.println(" min");
        Serial.println("----------------------------");
        break;
      case DEEPTIME:
        Serial.print("Sensor monitored the deep sleep time is: ");
        Serial.print(radar.deep_time);
        Serial.println(" min");
        Serial.println("----------------------------");
        break;
      case SLEEPSCORE:
        Serial.print("Sensor judgment sleep score is: ");
        Serial.println(radar.sleep_score);
        Serial.println("----------------------------");
        break;
      case SLEEPSTATUE:
        Serial.println("Sleep integrated state information -- ");
        Serial.print("Human existence: ");
        if(radar.existence)Serial.println("human exis");
        else Serial.println("human non-existent");
        Serial.print("Sleep state: ");
        if(radar.sleep_status == SLEEPDEEP)Serial.println("sleeping soundly");
        else if(radar.sleep_status == SLEEPLIGHT)Serial.println("light sleep");
        else if(radar.sleep_status == SLEEPAWAKE)Serial.println("awake");
        else if(radar.sleep_status == SLEEPNONE)Serial.println("off the bed");
        Serial.print("Average breathing: ");
        Serial.println(radar.breath_rate);
        Serial.print("Average heart rate: ");
        Serial.println(radar.heart_rate);
        Serial.print("Number of turning over during sleep: ");
        Serial.println(radar.turn_num);
        Serial.print("Percentage of substantial exercise during sleep: ");
        Serial.println(radar.substantial_move_ratio);
        Serial.print("Percentage of small-amplitude movements during sleep: ");
        Serial.println(radar.samll_move_ratio);
        Serial.print("Number of apnea: ");
        Serial.println(radar.apnea_num);
        Serial.println("----------------------------");
        break;
      case SLEEPQUALITY:
        Serial.println("Quality of sleep information -- ");
        Serial.print("Sleep score: ");
        Serial.println(radar.sleep_score);
        Serial.print("Total time of sleep: ");
        Serial.print(radar.sleep_time);
        Serial.println(" min");
        Serial.print("Percentage of waking time: ");
        Serial.println(radar.awake_time_radio);
        Serial.print("Percentage of light sleep time: ");
        Serial.println(radar.light_time_radio);
        Serial.print("Percentage of deep sleep time: ");
        Serial.println(radar.deep_time_radio);
        Serial.print("Total time away from bed: ");
        Serial.print(radar.outbed_time);
        Serial.println(" min");
        Serial.print("Total number of times out of bed: ");
        Serial.println(radar.outbed_num);
        Serial.print("The number of turning over during sleep: ");
        Serial.println(radar.turn_num);
        Serial.print("Average breathing: ");
        Serial.println(radar.breath_rate);
        Serial.print("Average heart rate: ");
        Serial.println(radar.heart_rate);
        Serial.print("Number of apnea: ");
        Serial.println(radar.apnea_num);
        Serial.println("----------------------------");
        break;
      case SLEEPLESS4H:
        Serial.print("The monitored subjects slept for less than 4 hours.");
        Serial.println("----------------------------");
        break;
      case SLEEPOVER12H:
        Serial.print("The length of sleep of the monitored subjects exceeded 12 hours.");
        Serial.println("----------------------------");
        break;
      case LONGTIMENOONE:
        Serial.print("Abnormally unoccupied for long periods of time.");
        Serial.println("----------------------------");
        break;
      case ERRORNONE:
        Serial.print("No abnormal information.");
        Serial.println("----------------------------");
        break;
    }
  }
  delay(200);                       //Add time delay to avoid program jam
}
Demo5 Send data to Sensor
#include "Arduino.h"
#include <60ghzbreathheart.h>

//#include <SoftwareSerial.h>
// Choose any two pins that can be used with SoftwareSerial to RX & TX
//#define RX_Pin A2
//#define TX_Pin A3

//SoftwareSerial mySerial = SoftwareSerial(RX_Pin, TX_Pin);

// we'll be using software serial
//BreathHeart_60GHz radar = BreathHeart_60GHz(&mySerial);

// can also try hardware serial with
BreathHeart_60GHz radar = BreathHeart_60GHz(&Serial1);

const unsigned char DevID_buff[10] = {0x53, 0x59, 0x02, 0xA1, 0x00, 0x01, 0x0F, 0x5F, 0x54, 0x43};

void setup() {
  // put your setup code here, to run once:
  Serial.begin(115200);
  // Serial1.begin(115200);

  //  mySerial.begin(115200);

  while(!Serial);   //When the serial port is opened, the program starts to execute.

  Serial.println("Readly");
}

void loop()
{
  // put your main code here, to run repeatedly:
  radar.send_func(DevID_buff, 10, false);
  delay(50);                       //Do not set the delay time too long, as this may affect the reception of the data frames returned by the radar.
}
korea_no_1 let's go