
수업 내용에 대한 정리
CS 용어
-
Paradigm Shift(패러다임 변화)
: 사회.문화에 대한 인식들이 천천히 변해 가면서 바뀌는 것이다
( 하나의 기술이 나온다고 바로 바뀌는 것이 아니다 ) -
프로세스 : 운영체제 로부터 자원을 할당 받은 작업의 단위
( 메모리에 할당이 된다 ) -
스레드 : 프로세스가 할당 받은 자원을 이용하는 실행 흐름의 단위
스레드를 만드는 이유 : 하나의 프로세스 안에서 여러가지 흐름을 가질 수 있게 하기 위해서
웹 서버는 thread 이다.
프로그램 -> 프로세스 -> 스레드
- Deadlock
: 운영체제 또는 소프트웨어의 잘못된 자원 관리로 인하여 둘 이상의 프로세스 또는 스레드(thread)들이 아무것도 진행하지 않는 상태로 영원히 대기하는 상황이다. 한국어로는 교착 상태라고 한다.
한정된 자원을 여러 프로세스에서 동시에 사용하는 환경에서 서로 상대방이 사용 중인 자원을 쓰기 위해 대기하는 상황. 즉, A가 B를 기다리고 B가 A를 기다릴 때 발생한다.
<-> 병목 현상은 여러 구성 요소가 동시에 실행될 때, 가장 느린 쪽의 속도에 맞추기 위해 전체 시스템이 느려지는 상황이고, 교착 상태는 한정된 자원을 둘 이상의 주체가 서로 동시에 사용하려고 기다리기 때문에 발생한다.
-
HTTP(Hyper Text Transfer Protocopl)
: Web3 에서 정보를 주고받을 수 있는 프로토콜 이다.
Hyper Text : 하이퍼링크를 가진 문서
Protocol : 통신을 위해 미리 정의된 규약을 의미 -
HTTPS : HTTP 요청과 응답 과정을 암호화해 HTTP의 보안을 한 층 강화한 프로토콜
-
노드 : 자바스크립트 런타임 이다
자바스크립트 런타임은 인터프리터 방식이다 인터프리터 방식은 한 줄씩 읽고 실행하며, C언어의 경우 컴파일 방식이다 -
동기(Synchronous), 비동기(Asynchronous)
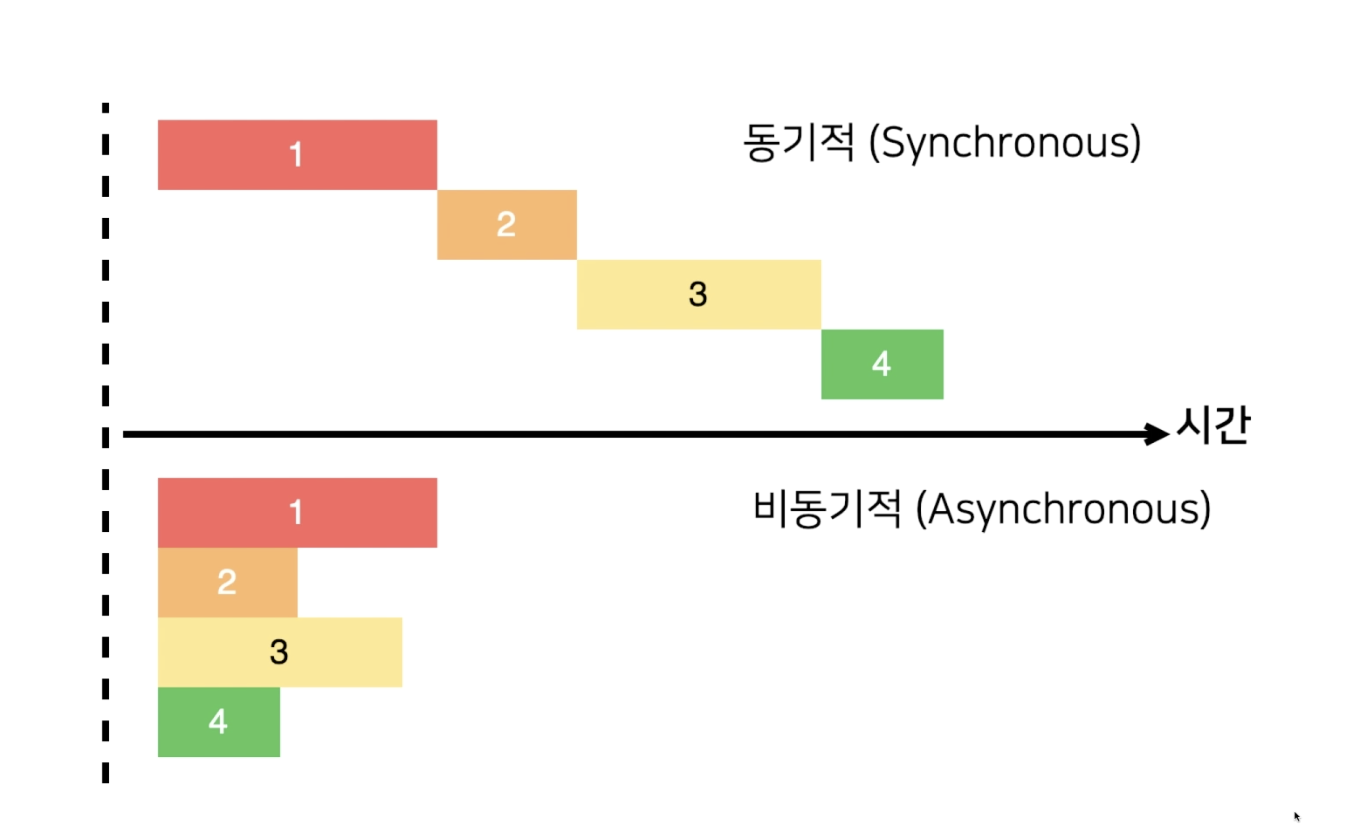
Synchronous(동기) : 요청을 보낸 후 해당 요청의 응답을 받아야 다음 동작을 실행 즉, 직렬적으로 작동하는 방식
Asynchronous(비동기) : 요청을 보낸 후 응답과 관계없이 다음 동작을 실행할 수 있는 방식 즉, 병렬적으로 작동하는 방식
- API(Application Programming Interface)
다른 애플리케이션에서 현재 프로그램의 기능을 사용할 수 있게 함
웹API : 다른 웹 서비스의 기능을 사용하거나 자원을 가져올 수 있게 함
CRUD(Create, Read, Update, Delete)
- HTTP 요청 메서드
GET : 서버 자원을 가져오려고 할 때 사용
POST : 서버에 자원을 새로 등록하고자 할 때 사용(또는 뭘 써야할 지 애매할 때)
PUT : 서버의 자원을 요청에 들어있는 자원으로 치환하고자 할 때 사용
PATCH : 서버 자원의 일부만 수정하고자 할 때 사용
DELETE : 서버의 자원을 삭제하고자 할 때 사용
CS 지식
현재 시대는 Web2.0 에서 Web3.0 으로 넘어가는 시대이다

힙 vs 스택 속도 비교
: 힙이 접근속도 더 느리다
( 이유 : 스택처럼 차곡차곡 쌓는게 아니라 랜덤한 주소에 쌓기 때문에 -> 메모리 단편화(파편화) )
Stack Overflow(힙과 스택 사이가 over될 때)
: 프로세스와 프로세스 사이에 독립성을 유지하기 위해서
ex. 서로가 데이터의 영역을 침범해서 서버가 뻗는것(죽는것)을 예방하기 위해서
Node의 특성
-
이벤트 기반 : 이벤트가 발생할 때 미리 지정해둔 작업을 수행하는 방식
- 콜백 함수 : 이벤트가 발생했을 때 실행될 함수
-
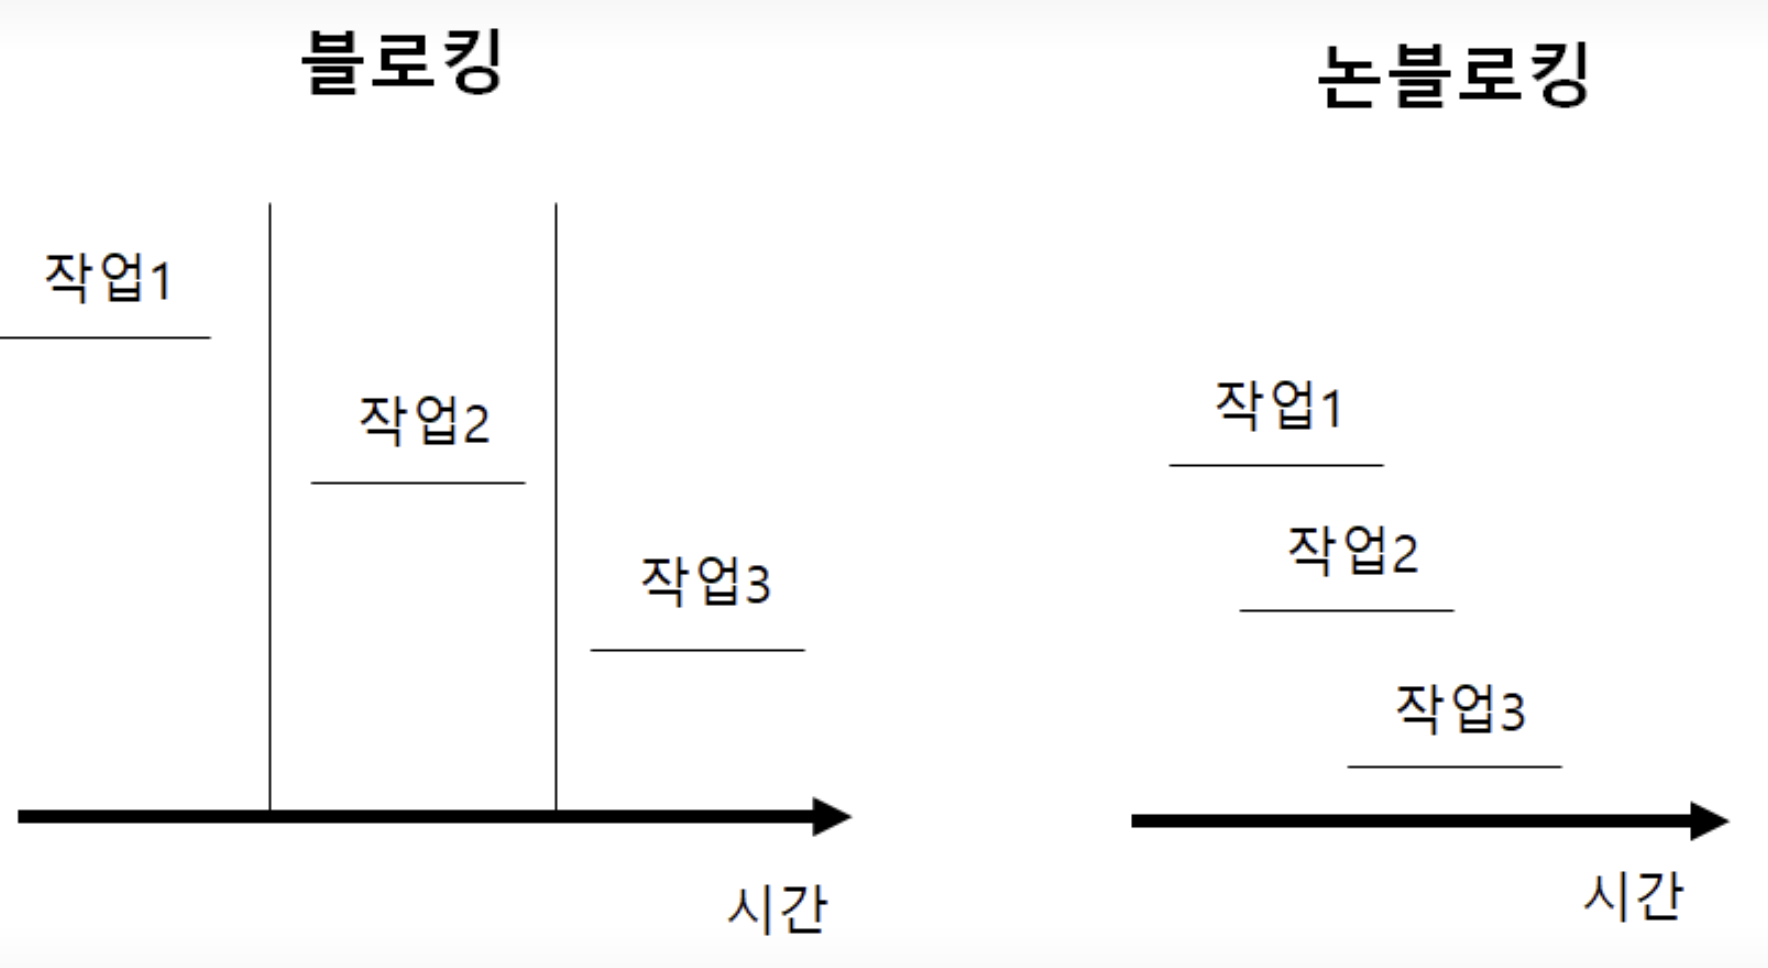
Non-Blocking I/O
- 논 블로킹 : 오래 걸리는 함수를 백그라운드로 보내서 다음 코드가 먼저 실행되게 하고, 나중에 오래 걸리는 함수를 실행
- 논 블로킹 방식 하에서 일부 코드는 백그라운드에서 병렬로 실행
- 일부 코드 : I/O 작업(파일 시스템 접근, 네트워크 요청), 압축, 암호화 등
- I/O 작업을 제외한 나머지 코드는 블로킹 방식으로 실행
(블로킹 방식 : 하나가 끝나야지 다음 것 실행)
- 논 블로킹 : 오래 걸리는 함수를 백그라운드로 보내서 다음 코드가 먼저 실행되게 하고, 나중에 오래 걸리는 함수를 실행
비동기(Asynchronous)란?
- 병렬적으로 작업을 수행한다
- 요청을 보낸 후 응답의 수락 여부와는 상관없이 다음 태스크가 동작하는 방식이다
- A 업무가 실행되는 동안 B업무도 할 수 있으므로 자원을 효율적으로 사용할 수 있다.
- 비동기 요청시 응답 후 처리할 '콜백 함수'를 함께 알려준다. 즉, 해당 태스크가 완료되었을 때, '콜백 함수'가 호출된다
프로미스의 필요성
- Callback Hell
- 콜백 함수를 익명 함수(무명 함수)로 전달하는 과정이 반복되어 코드의 들여쓰기 수준이 감당하기 힘들정도로 깊어지는 현상
- 이벤트 처리 및 서버 통신과 같은 비동기적인 작업을 수행 시 발생
- 코드 가독성 저하
Front-end 와 Back-end 의 통신
- Front와 Back이 주고 받을 수 있어야 함
- Back(express) 에서는 CRUD method를 만들고 대기함
- Front는 Back 에서 설게한대로 요청을 넣음
- Front 에서는 비동기 통신 방법을 이해해야 한다
Front-end에서 구현하는 비동기 통신
- AJAX : Asynchronous JavaScript and XML
이름 그대로, JS를 사용한 비동기 통신, 클라이언트와 서버간에 데이터를 주고받는 기술이다.- Ajax는 웹 페이지 전체를 다시 로딩(새로고침) 하지 않고도, 웹 페이지의 일부분만을 갱신 가능
- Ajax를 이용하면 백그라운드 영역에서 서버와 통신하여, 그 결과를 웹 페이지의 일부분에만 표시 가능
Ajax를 통해 서버와 비동기적으로 통신함으로 인해 우리는 전체 웹페이지를 다시 불러오는 동기 방식과는 다르게 점진적으로 해당 부분의 사용자 인터페이스를 갱신할 수 있다.
예를 들면, 페이스북에서 좋아요 버튼을 누를 때마다 페이지가 갱신이되면 많이 불편하다 그렇기에 비동기식으로 데이터를 주고 받으며 해결하는 것이다.
- Axios
- Axios는 브라우저, Node.js를 위한 Promise API를 활용하는 HTTP 비동기 통신 라이브러리이다.
- Ajax와 더불어 사용한다
- JS에는 fetch API가 있지만, 프레임워크에서는 AJAX를 구현할때 Axios를 사용한다.
- 특징
- 요청과 응답 데이터의 변형
- HTTP 요청 취소
- HTTP 요청과 응답을 JSON 형태로 자동 변경
예시
GET : axios.get(url[, config])
POST : axios.post(url, data[, config])
PUT : axios.put(url, data[, config])
DELETE : axios.delete(url[, config])- XMLHttpRequest
- 라이브러리 없이는 브라우저가 지원하는 XMLHttpRequest 객체 이용
- AJAX 요청 시 Axios 라이브러리 활용
- HTML에 아래 스크립트를 추가하면 사용할 수 있음
<script src="https://unpkg.com/axios/dist/axios.min.js"></script>
<script>
// 예제 코드 작성
</script>
CallBack 함수
: 함수에 파라미터로 들어가는 함수이며, 용도는 순차적으로 하고 싶을때 사용한다.
JS에서 함수는 Object라고 한다. 그래서 함수는 다른 함수의 인사로 쓰일 수도 있고 어떤 함수에 의해 리턴될 수도 있다. 이렇게 인자로 넘겨지는 함수를 callback 함수라고 한다.
예시
<script>
    function first(parameter){
        console.log(1)
        parameter()  // parameter에 second 함수가 실행
    }

    function second(){
        console.log(2)
    }

    first(second)  // first 함수 안의 코드를 실햄시켜 주세요 근데 parameter에 second를 넣어서요

    // first(function(){console.log(2)}) --> first()후에 console.log(2) 바로 실행 하기
</script>
결과 :
1
2
주석으로 처리된 부분을 콜백 함수로 표현한 것
// function func1(){
//     document.write("1.함수 실행");
// }
// function func2(){
//     document.write("2.함수 실행");
// }
// func1();   // JS는 위에서부터 읽기 때문에
// func2();

function func(){
    document.write("2.함수 실행");
}
function callback(str){
    document.write("1.함수 실행");
    str();
}
callback(func);
결과 : 1. 함수 실행 2. 함수 실행
Code
package.json
- 현재 프로젝트에 대한 정보와 사용 중인 패키지에 대한 정보를 담은 파일
- 같은 패키지라도 버전별로 기능이 다를 수 있으므로 버전을 기록
- 노드 프로젝트 시작 전 package.json 부터 만들고 시작함(npm init)
npm init- npm init 이 완료되면 폴더에 node_modules 설치됨
- npm run [스크립트명]으로 스크립트 실행
ex. npm run
express 설치하기
npm install expresspackage.json에 기록이 된다
node_modules
- npm install 시 node_modules 폴더 생성
-> git에 안 올리는게 정석 / package.json으로 확인하기- 내부에 설치한 패키지들이 들어있음
- express 외에도 express와 의존 관계가 있는 패키지들이 모두 설치
- package-lock.json도 생성되어 패키지 간 의존 관계를 명확하게 표시함
nodemon 설치
npm install --save-dev nodemon요청과 응답
const http = require('http');

http.createServer((req, res) => {
    res.writeHead(200, { 'Content-Type': 'text/html; charset=urf-8'});
    res.write('<h1>Hello Node!</h1>');
    res.end('<p>Hello Server!!</p>');
}).listen(8080, () => {
    console.log('8080포트에서 서버 대기 중');
});
res 메서드로 응답 보냄
- write로 응답 내용을 적고
- end로 응답 마무리(내용을 넣어도 됨)
listen(포트) 메서드로 특정 포트에 연결
실행 방법
node [.js파일 이름] : 수정 내용 즉시 반영 x
nodemon [.js파일 이름] : 수정 내용 즉시 반영
const http = require('http');

const server = http.createServer((req, res) => {
    res.writeHead(200, { 'Content-Type': 'text/html; charset=urf-8'});
    res.write('<h1>Hello Node!</h1>');
    res.end('<p>Hello Server!!</p>');
});
server.listen(8080);

server.on('listening', () => {
    console.log('8080포트에서 서버 대기 중입니다.');
});
server.on('error', (error) => {
    console.log(error);
});
여러 개의 서버 실행
createServer를 여러 번 호출하여 한번에 여러 개의 서버 실행 가능
단, 포트를 다르게 해아함
const http = require('http');

http.createServer((req, res) => {
    res.writeHead(200, {'Content-Type': 'text/html; charset=utf-8'});
    res.write('<h1>Hello 8080</h1>');
    res.end('<p>Hello Server~ </p>');
})
.listen(8080, () => {    // 서버 연결
    console.log('8080번 포트에서 서버 대기중 입니다.');
});

http.createServer((req, res) => {
    res.writeHead(200, {'Content-Type':'text/html; charset=utf-8'})
    res.write('<h1>Hello 8081</h1>');
    res.end('<p>Hello Server~ </p>');
})
.listen(8081, () => {
    console.log('8081번 포트에서 서버 대기 중');
});
=> 실행 결과 )
실행후, console창에
8080번 포트에서 서버 대기중 입니다
8081번 포트에서 서버 대기 중
이 뜨며,
localhost:8080 과 localhost:8081 두 개의 페이지가 각각 열리며 작성한 내용들을 볼 수 있다.
비동기 처리(요청과 응답)
- server.html
<!DOCTYPE html>
<html lang="en">
<head>
    <meta charset="UTF-8">
    <meta name="viewport" content="width=device-width, initial-scale=1.0">
    <title>Node.js 웹 서버</title>
</head>
<body>
    <h1>Node.js 웹 서버</h1>
    <p> 만들어 보자잇</p>
</body>
</html>
- http.js
const http = require('http');
const fs = require('fs').promises;

http.createServer(async (req, res) => {
    try {
        const data = await fs.readFile('./server.html');
        res.writeHead(200, {'Content-Type':'text/html; charset=utf-8'});
        res.end(data);
    } catch(err) {
        console.error(err);
        res.writeHead(500, {'Content-Type': 'text/plain; charset=utf-8'});
        res.end(err.message);
    }
}).listen(8080, () => {
    console.log('8080번 포트에서 서버 대기 중');
});
http.js에 대해 코드 분석
-
const http = require('http') 의 경우, Node.js에서 http 서버를 만들기 위해 필요한 http 모듈을 가져온다.
-
const fs = require('fs').promises;
fs는 파일 시스템에 접근하는 모듈이다. 해당 모듈을 사용하여 파일을 읽고, 쓰고, 삭제하는 등의 작업을 할 수 있다.
.promises 를 사용함으로써, fs 모듈의 파일 작업을 promise 기반으로 사용할 수 있다. 또한, 기존의 callback 방식과 다르게 async / await 을 사용하여 비동기 방식으로 처리를 하였다 -
http.createServer(async, (req, res) => { })
http.createServer()는 새로운 http 서버 객체를 생선한다. 이 메서드는 요청(req)과 응답(res) 객체를 매개변수로 받는 콜백 함수를 설정 할 수 있다
async 함수로 만들어졌기에 내부에서 await을 사용할 수 있으며, 비동기 코드를 동기적인 코드처럼 사용할 수 있다.
- const data = await fs.readFile(./server.html')
fs.promises.readFile 메서드를 사용하여 server.html 파일을 읽는다
await 키워드를 사용하면 프로미스가 처리될 때까지 기다릴 수 있으며, 비동기 처리 결과를 마치 동기 처리한 것처럼 다룰 수 있다.
await은 실행 될때까지 대기한다.(파일은 읽는데 오래 걸리기 때문에)
await 뒤에 있는 fs.readFile() 함수는 프로미스를 반환합니다. 프로미스가 성공적으로 처리되면 파일 내용을 data 변수에 할당하게 됩니다.
await는 비동기 작업을 처리하는 동안 함수 실행을 잠시 중단시키고, 그 작업이 완료되면 결과를 반환합니다. 이 방식은 코드의 가독성을 높이고, callback 지옥을 피할 수 있게 도와줍니다.
- res.writeHead(200, {'Content-Type':'text/html; charset=utf-8'});
클라이언트에 응답할 때, HTTP 헤더를 설정하는 부분dl다. 200은 성공적인 요청을 의미하는 상태 코드이다. 헤더에는 Content-Type이 포함되어 있으며, 서버에서 응답하는 콘텐츠가 text/html 형식이라는 것을 명시합니다. charset=utf-8은 응답의 인코딩 방식을 UTF-8로 설정해 클라이언트가 제대로 된 문자를 표시할 수 있도록 한다.
- res.end(data)
res.end() 메서드는 서버가 클라이언트에게 응답을 끝내는 함수이다. 인수로 data를 넘기면, 읽어온 HTML 파일의 내용을 클라이언트에게 보낸다. 이 때 data는 앞서 fs.readFile()을 통해 읽은 server.html 파일의 내용이다.
- catch(err)
파일을 읽는 과정에서 오류가 발생할 경우 try 블록에서 던져진 오류를 처리하는 부분이다. 만약 파일을 읽는 도중 문제가 생기면 이 블록이 실행되어 서버 오류 상태(500)를 클라이언트에게 응답한다. 또한 err.message로 오류 메시지를 전달한다.
REST 서버 만들기(GIT 소스코드 참조 restServer.js)
- restFront.css
a { color: blue; text-decoration: none; }- restFront.html
<!DOCTYPE html>
<html lang="ko">
<head>
  <meta charset="utf-8" />
  <title>RESTful SERVER</title>
  <link rel="stylesheet" href="./restFront.css" />
</head>
<body>
<nav>
  <a href="/">Home</a>
  <a href="/about">About</a>
</nav>
<div>
  <form id="form">
    <input type="text" id="username">
    <button type="submit">등록</button>
  </form>
</div>
<div id="list"></div>
<script src="https://unpkg.com/axios/dist/axios.min.js"></script>
<script src="./restFront.js"></script>
</body>
</html>- restFront.js
async function getUser() { // 로딩 시 사용자 가져오는 함수
    try {
      const res = await axios.get('/users');
      const users = res.data;
      const list = document.getElementById('list');
      list.innerHTML = '';
      // 사용자마다 반복적으로 화면 표시 및 이벤트 연결
      Object.keys(users).map(function (key) {
        const userDiv = document.createElement('div');
        const span = document.createElement('span');
        span.textContent = users[key];
        const edit = document.createElement('button');
        edit.textContent = '수정';
        edit.addEventListener('click', async () => { // 수정 버튼 클릭
          const name = prompt('바꿀 이름을 입력하세요');
          if (!name) {
            return alert('이름을 반드시 입력하셔야 합니다');
          }
          try {
            await axios.put('/user/' + key, { name });
            getUser();
          } catch (err) {
            console.error(err);
          }
        });
        const remove = document.createElement('button');
        remove.textContent = '삭제';
        remove.addEventListener('click', async () => { // 삭제 버튼 클릭
          try {
            await axios.delete('/user/' + key);
            getUser();
          } catch (err) {
            console.error(err);
          }
        });
        userDiv.appendChild(span);
        userDiv.appendChild(edit);
        userDiv.appendChild(remove);
        list.appendChild(userDiv);
        console.log(res.data);
      });
    } catch (err) {
      console.error(err);
    }
  }

  window.onload = getUser; // 화면 로딩 시 getUser 호출
  // 폼 제출(submit) 시 실행
  document.getElementById('form').addEventListener('submit', async (e) => {
    e.preventDefault();
    const name = e.target.username.value;
    if (!name) {
      return alert('이름을 입력하세요');
    }
    try {
      await axios.post('/user', { name });
      getUser();
    } catch (err) {
      console.error(err);
    }
    e.target.username.value = '';
});- restServer.js
const http = require('http');
const fs = require('fs').promises;
const path = require('path');

const users = {}; // 데이터 저장용

http.createServer(async (req, res) => {
  try {
    if (req.method === 'GET') {
      if (req.url === '/') {
        const data = await fs.readFile(path.join(__dirname, 'restFront.html'));
        res.writeHead(200, { 'Content-Type': 'text/html; charset=utf-8' });
        return res.end(data);
      } else if (req.url === '/about') {
        const data = await fs.readFile(path.join(__dirname, 'about.html'));
        res.writeHead(200, { 'Content-Type': 'text/html; charset=utf-8' });
        return res.end(data);
      } else if (req.url === '/users') {
        res.writeHead(200, { 'Content-Type': 'application/json; charset=utf-8' });
        return res.end(JSON.stringify(users));
      }
      // /도 /about도 /users도 아니면
      try {
        const data = await fs.readFile(path.join(__dirname, req.url));
        return res.end(data);
      } catch (err) {
        // 주소에 해당하는 라우트를 못 찾았다는 404 Not Found error 발생
      }
    } else if (req.method === 'POST') {
      if (req.url === '/user') {
        let body = '';
        // 요청의 body를 stream 형식으로 받음
        req.on('data', (data) => {
          body += data;
        });
        // 요청의 body를 다 받은 후 실행됨
        return req.on('end', () => {
          console.log('POST 본문(Body):', body);
          const { name } = JSON.parse(body);
          const id = Date.now();
          users[id] = name;
          res.writeHead(201, { 'Content-Type': 'text/plain; charset=utf-8' });
          res.end('등록 성공');
        });
      }
    } else if (req.method === 'PUT') {
      if (req.url.startsWith('/user/')) {
        const key = req.url.split('/')[2];
        let body = '';
        req.on('data', (data) => {
          body += data;
        });
        return req.on('end', () => {
          console.log('PUT 본문(Body):', body);
          users[key] = JSON.parse(body).name;
          res.writeHead(200, { 'Content-Type': 'text/plain; charset=utf-8' });
          return res.end(JSON.stringify(users));
        });
      }
    } else if (req.method === 'DELETE') {
      if (req.url.startsWith('/user/')) {
        const key = req.url.split('/')[2];
        delete users[key];
        res.writeHead(200, { 'Content-Type': 'text/plain; charset=utf-8' });
        return res.end(JSON.stringify(users));
      }
    }
    res.writeHead(404);
    return res.end('NOT FOUND');
  } catch (err) {
    console.error(err);
    res.writeHead(500, { 'Content-Type': 'text/plain; charset=utf-8' });
    res.end(err.message);
  }
})
  .listen(8082, () => {
    console.log('8082번 포트에서 서버 대기 중입니다');
  });
JavaScript(JS)에서 map 함수
: map( ) 함수는 배열을 순회해서 각 요소를 콜백 함수로 적용해서 처리해 모은 새로운 배열을 반환하기 위한 함수이다.
-
map( ) 함수에 전달되는 콜백 함수는 '각 요소를 변환하여 새로운 배열로 매핑(mapping)하는 역할을 한다' 라고 말한다
-
간단 예제 : 숫자 배열을 받아 각 숫자를 두 배로 만들어 새로운 배열을 생성하는 map( ) 함수의 예시
JS
const numbers = [1, 2, 3, 4, 5];

const doubledNumbers = numbers.map(function(number)) {
	return number * 2;
});

console.log(doubledNumbers);

// 출력 : [2, 4, 6, 8, 10]
Tutorials