Server
Wiki에 따르면, 서버는 클라이언트에게 네트워크를 통해 정보나 서비스를 제공하는 컴퓨터 프로그램이다.
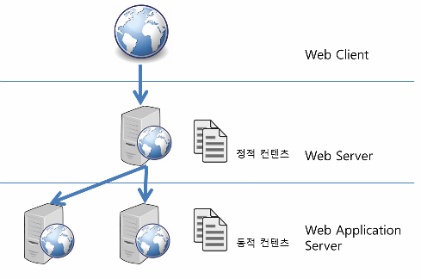
Web에서는 목적에 따라 Web Server, Web Application Server 두 가지 Server로 구분된다.
Web Server
Web Server는 정적 리소스를 제공하거나 도메인에 따라 WAS로 라우팅해주는 Reverse Proxy로 사용한다.
즉, Web Server는 내용이 상황에 따라 동적으로 변경되지 않는 image, html, css 같은 리소스를 제공한다.
Web Server는 실제로 WAS와 함께 많이 사용되는데, WAS는 동적인 리소스 생성뿐만 아니라 다양한 비즈니스 로직을 처리해야 하기 때문에 지고 있는 부담이 크다.
따라서 WAS에 부담을 완화하고자 Web Server가 정적 리소스를 제공하는 다음과 구조를 많이 사용한다.
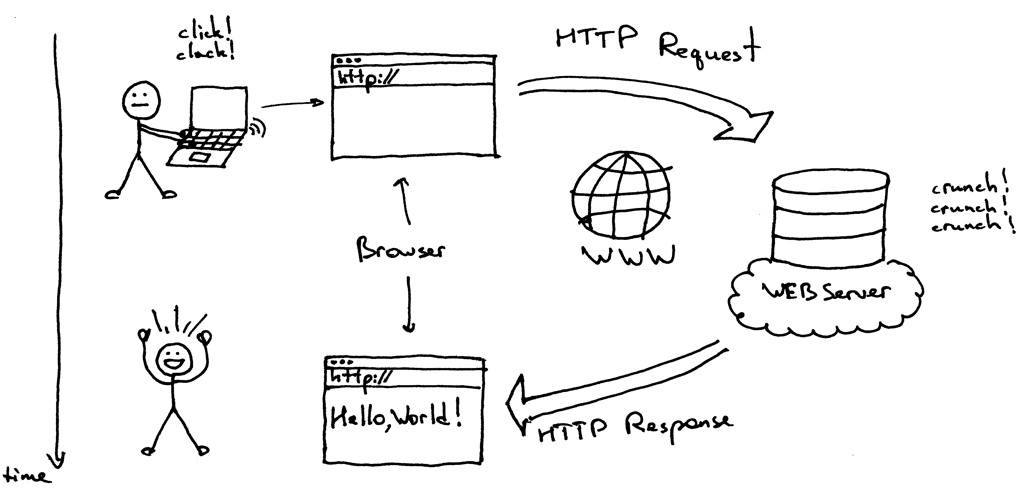
이러한 구조를 통해, Web Server는 정적 리소스 제공외에도 보다 많은 기능을 제공하는데 대표적인 다섯 가지 기능을 살펴보자.
Web Server는 특정 도메인(또는 경로)를 통해서 특정한 WAS로 요청을 라우팅해준다.
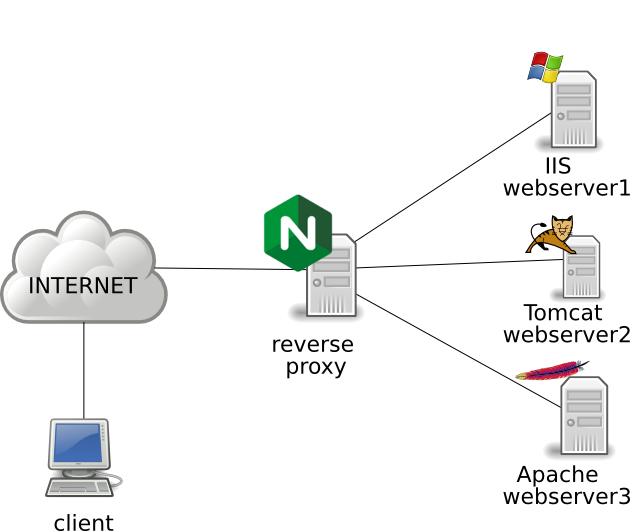
또한, Web Server는 여러 WAS에서 동일한 애플리케이션을 실행해놓은 Pool에 특정한 규칙(주로 Round-Robin 방식)을 적용해서, 각 요청이 규칙에 따라 다른 WAS로 라우팅되도록 하는 Load Balancing 기능을 제공한다.
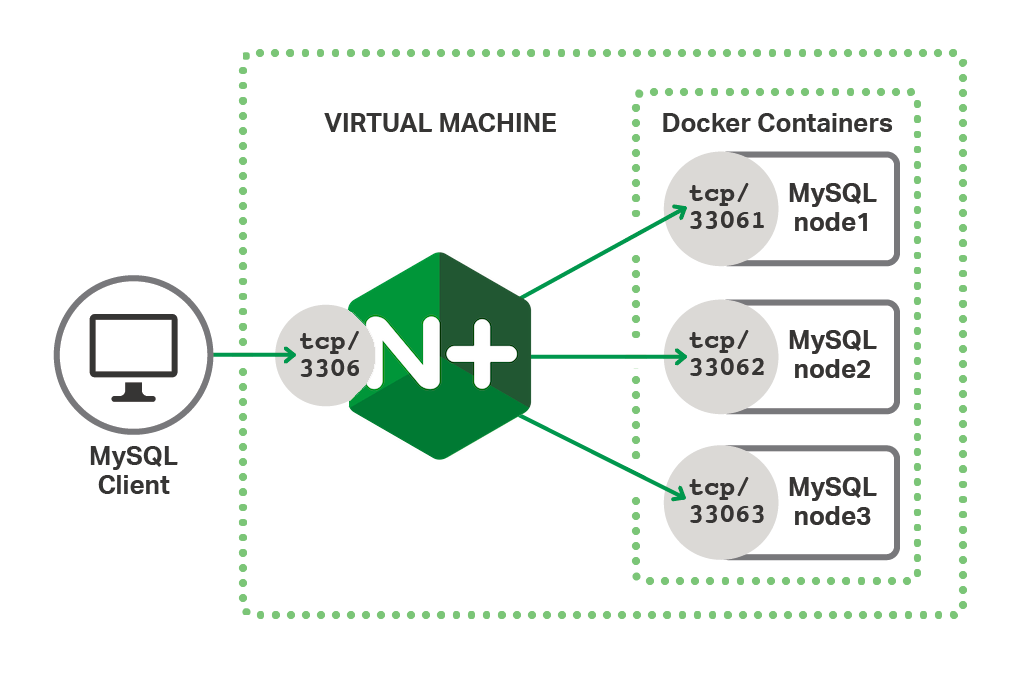
뿐만 아니라, Web Server는 WAS마다 Weight를 설정해서 WAS마다 다른 비율로 요청을 분산시키는 기능도 제공한다.
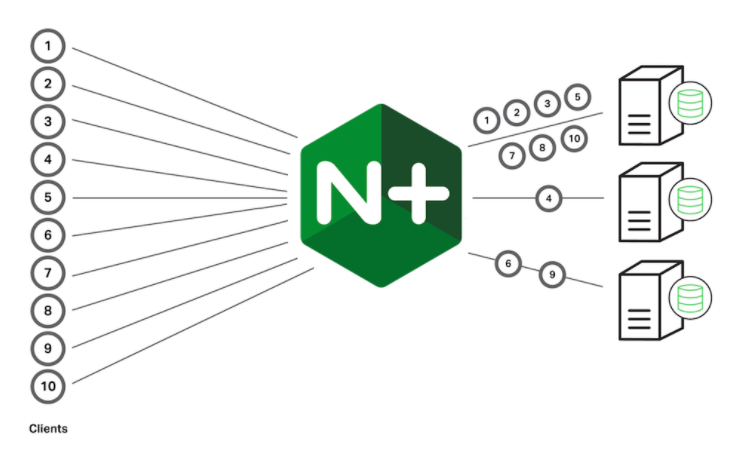
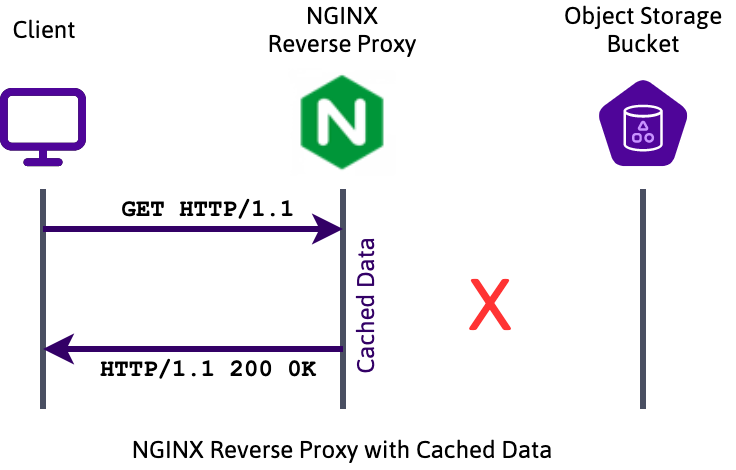
또한, WAS로 부터 받은 응답을 저장하여 동일한 요청에 대해 즉각적으로 응답할 수 있는 Cache 기능을 지원하기도 한다.
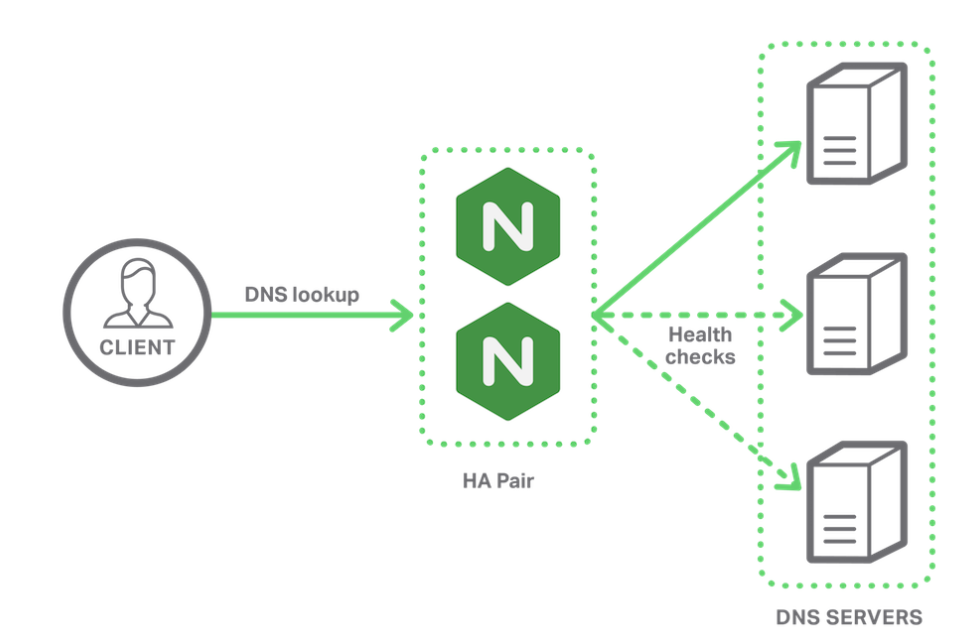
마지막으로 Web Server는 주기적으로 WAS의 Health Check를 하고, WAS에서 실행중인 애플리케이션이 장애가 발생할 경우 다른 WAS로 요청을 리다이렉트하는 failover(장애 극복) 기능을 제공한다.
결과적으로, Web Server는 WAS의 부담을 줄여 성능을 향상시킬 뿐만 아니라 L7 스위치 또는 Load Balancer로써의 역할을 할 수 있다.
개인적으로, Web Server를 사용하면
Blue/Green방식의 무중단 배포도 가능해보인다.
Web Server의 서비스는NginX,Apache등이 있다.
Web Application Server(WAS)
WAS는 HTTP 통신뿐만 아니라, 비즈니스 로직 처리가 가능한 Servlet을 실행/관리하는 서블릿(Servlet) 컨테이너(or Web Container)를 가지고 있다.
서블릿(Servlet) 컨테이너는 WAS의 다른 부분(HTTP 통신)과 Servlet을 분리시킨다.
이로써 Servlet은 Socket listen, accept 등의 작업과 분리해 오직 비즈니스 로직 처리에만 집중할 수 있다.
또한,WAS는 여러 개의 서블릿 컨테이너를 가지고 있을 수 있고 Context Path로 각각을 구분한다.

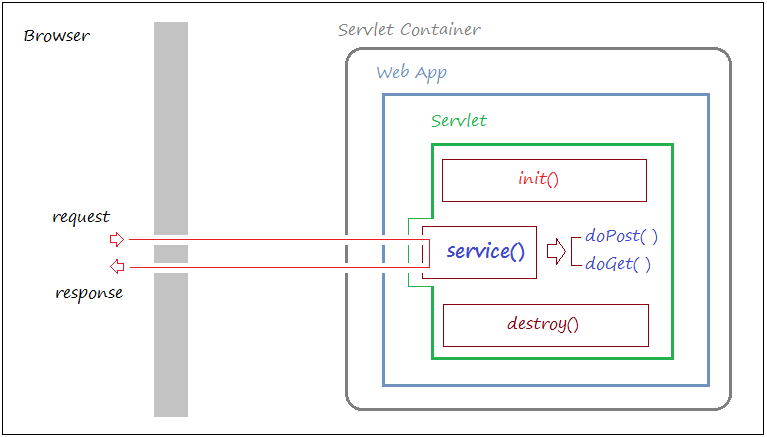
또한,서블릿(Servlet) 컨테이너는 위 그림과 같이 Servlet Life Cycle 관리, 멀티쓰레드 등을 지원하는데 실행 흐름을 통해 하나씩 살펴보자.
클라이언트로부터 요청이 왔다고 가정해보면, 다음과 같은 순서로 실행이 될 것이다.
서블릿 컨테이너는 요청 경로를 기반으로 대응하는Servlet을 탐색한다.- 요청 경로와 대응하는
Servlet를 새로운Thread에서 실행한다. - 사용자 요청을 기반으로
HttpServletRequest,HttpServletResponse객체를 생성한다. HttpServletRequest,HttpServletResponse객체를 인자로Servlet객체의service메서드를 호출한다.service메서드는 HTTP 요청 Method에 대응하는doGet(),doPost(),doPut(),doDelete()같은 메서드를 실행한다.service메서드 실행이 끝나면,HttpServletResponse를 HTTP 응답 메시지로 변환해서 클라이언트에게 전송한다.- 응답이 끝나면 HttpServletRequest, HttpServletResponse 두 객체를 소멸된다.
근데 어떻게 서블릿 컨테이너가 Servlet을 실행하는 것일까?
클라이언트로부터 요청이 왔을때, WAS가 Servlet이 실행하기 위한 공통된 인터페이스가 필요하다.
WAS는 모든 Servlet이 요청을 전달받을 수 있도록 HTTPServlet 공통 인터페이스를 제공하는데, 모든 Servlet이 요청을 전달받기 위해서는 반드시 HTTPServlet을 상속해야만 한다.
그 이후의 Servlet 상세 구현은 요구사항에 따른 개발자의 몫이다.
Web Server와 대조적으로 WAS는 동적 리소스만 제공하는 것으로 착각할 수 있는데, 사실 WAS에서도 정적 리소스를 제공할 수 있다.
하지만 WAS는 비즈니스 로직를 처리하는 것도 충분히 바쁘기 때문에, Web Server를 사용하고 있다면 정적 리소스를 Web Server에 위임하는 것을 권장한다.

대표적으로,
WAS에는 Tomcat, Netty, Jetty 등이 있다.
잠시만... 근데.. Servlet은 구체적으로 무엇일까?
Servlet
Servlet은 자바 웹 애플리케이션의 구성요소 중 동적 처리인 비즈니스 로직를 수행한다.
구체적인 구현 내용은 요구 사항에 따라 달라지겠지만, 단순히 생각해보면 Servlet은 Java 클래스이다.
따라서 서블릿 컨테이너로부터 전달받은 HttpServletRequest, HttpServletResponse 인자를 가지고 여러 요구사항에 대한 기능을 구현할 수 있다.
이제 Servlet의 라이프 사이클에 대해서 살펴보겠다.
이전에 모든 Servlet은 HTTPServlet을 상속받아야 한다고 말했었는데, 이와 관련이 있을 것이다.
Life Cycle
Servlet Container는 Server 실행시 모든Servlet을 메모리에 로드하지 않는다.
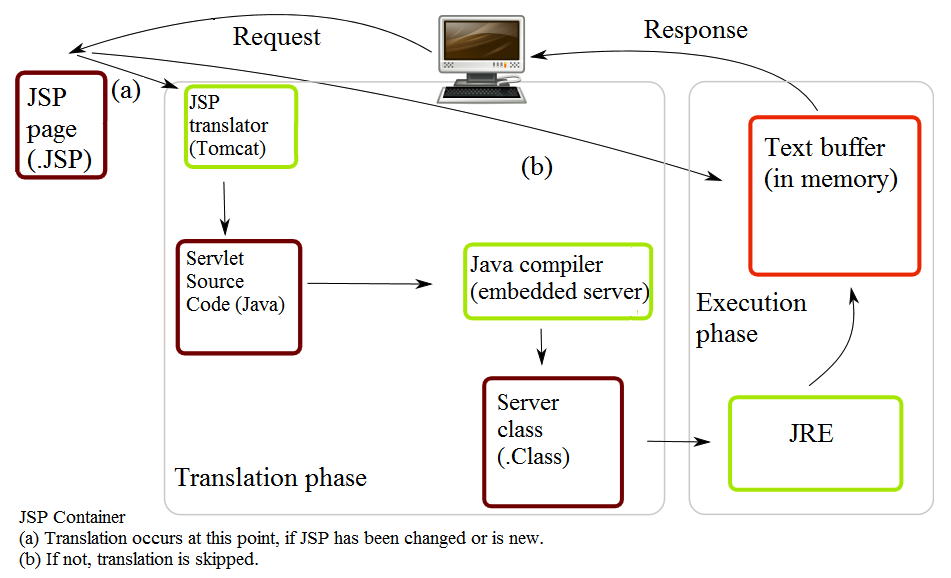
-
Servlet Container는 요청이 오면 메모리에 해당Servlet이 메모리에 있는지 확인한다.
메모리에 존재한다면 재사용하고, 없으면 메모리에 로드해서init()메서드를 호출한다.
또한 만약 런타임에Servlet이 변경된다면,Servlet Container는 기존 서블릿은 제거하고 새로운Servlet을 컴파일해서 메모리에 로드한다. -
다음으로
Servlet Container는service()메서드를 호출한다.
service()메서드에서는 HTTP Method에 따라doGet(),doPost(),doPut()등의 함수가 호출한다.
(HttpServlet의service메서드에 Template Method 패턴이 적용되어 있기 때문에,service메서드에 대해 오버라이딩이 필요한 경우에는 함수 상단에서super(request, response);를 실행해야 한다.)@Override protected void service(HttpServletRequest req, HttpServletResponse resp) throws ServletException, IOException { super.service(req, resp); // 추가 구현 } -
마지막으로,
Servlet Container는Servlet을 메모리에서 제거할 때destroy()메서드를 호출한다.@WebServlet("/custom") public class CustomServlet extends HttpServlet { public CustomServlet() { System.out.println("create CustomServlet"); } @Override public void init(ServletConfig config) throws ServletException { System.out.println("initialize"); } @Override protected void doGet(HttpServletRequest req, HttpServletResponse resp) throws ServletException, IOException { System.out.println("call doGet()"); } @Override public void destroy() { System.out.println("destroy"); } }만약
WAS실행시 특정Servlet을 메모리에 로드하고 싶다면, 다음과 같이 설정하면 된다.
우선순위가 필요한 경우에는 할당한 값이 0에 가까울수록 먼저 초기화된다.@WebServlet(name="CustomServlet", urlPatterns="/custom", loadOnStartup = 1)
web.xml으로 설정하는 경우는 아래와 같다.
```xml
  <servlet>
    <description></description>
    <display-name>CustomServlet</display-name>
    <servlet-name>CustomServlet</servlet-name>
    <servlet-class>something.CustomServlet</servlet-class>
    <load-on-startup>0</load-on-startup>
  </servlet>
출처: https://dololak.tistory.com/737 [코끼리를 냉장고에 넣는 방법]
사용 방법
Servlet 3.0 미만
- Servlet 3.0 미만에서는 web.xml을 이용해서 서블릿을 구성해야 한다.
<?xml version="1.0" encoding="UTF-8"?>
<web-app version="2.5" xmlns="http://java.sun.com/xml/ns/javaee"
    xmlns:xsi="http://www.w3.org/2001/XMLSchema-instance"
    xsi:schemaLocation="http://java.sun.com/xml/ns/javaee https://java.sun.com/xml/ns/javaee/web-app_2_5.xsd">
  <servlet>
    <description></description>
    <display-name>CustomServlet</display-name>
    <servlet-name>CustomServlet</servlet-name>
    <servlet-class>something.CustomServlet</servlet-class>
  </servlet>
  <servlet-mapping>
    <servlet-name>CustomServlet</servlet-name>
    <url-pattern>/custom</url-pattern>
  </servlet-mapping>
</web-app>
public class CustomServlet extends HttpServlet {
@Override
protected void doGet(HttpServletRequest req, HttpServletResponse resp) throws ServletException, IOException {
super.doGet(req, resp);
System.out.println("Hello Servlet");
}
}Servlet 3.0 이상
- Servlet 3.0 이상부터는 자바 어노테이션을 이용해서 서블릿을 구성할 수 있다.
@WebServlet("/custom")
public class CustomServlet extends HttpServlet {
    @Override
    protected void doGet(HttpServletRequest req, HttpServletResponse resp) throws ServletException, IOException {
        super.doGet(req, resp);
        System.out.println("Hello Servlet");
    }
}JSP
JSP는 Servlet을 확장한 기술이다.
기존 Servlet 경우에는 HTML을 만들기 위해서 아래와 같이 Java 코드안에 HTML을 삽입했었다.
@WebServlet("/custom")
public class CustomServlet extends HttpServlet {
    private int count = 0;

    @Override
    protected void doGet(HttpServletRequest req, HttpServletResponse resp) throws ServletException, IOException {
        resp.setContentType("text/html");
        PrintWriter printWriter = resp.getWriter();
        printWriter.print("<html>");
        printWriter.print("<body>");
        printWriter.print("<div>");
        printWriter.print("Hello Wolrd : " + count++);
        printWriter.print("</div>");
        printWriter.print("</body>");
        printWriter.print("<html>");
    }
}
이러한 방법은 코드의 길이가 길어지기 때문에 가독성이 좋지 않고 불편하다.
또한, 만약 Servlet 코드가 수정된다면 해당 Java 클래스를 다시 컴파일한 후 전체 코드를 재배포하는 작업이 필요하기 때문에 개발 생산성 저하된다.
JSP는 HTML 안에 Java 코드를 삽입하는 방식을 지원한다.
구체적으로, 첫 요청에 왔을때 JSP는 JSP 엔진에 의해서 Servlet으로 변환한 후 다시 컴파일된다.
이후,Servlet Container는 재컴파일된 .class 파일의 bytecode를 메모리에 다시 로드한다.
<%@ page language="java" contentType="text/html; charset=UTF-8"
         pageEncoding="UTF-8" %>
<html>
<body>
<div>
    <%!
        int count = 0;
    %>
    <%
        System.out.println("Hello World : " + count++);
    %>
</div>
</body>
</html>
public void _jspService(final javax.servlet.http.HttpServletRequest request, final javax.servlet.http.HttpServletResponse response)
throws java.io.IOException, javax.servlet.ServletException {
// ...
try {
// ...
out.write("\n");
out.write("<html>\n");
out.write("<body>\n");
out.write("\n");
System.out.println("Hello World : " + count++);
out.write("\n");
out.write("Hello World : " + count++);
out.write("\n");
out.write("</body>\n");
out.write("</html>");
} catch (java.lang.Throwable t) {
// ...
} finally {
// ...
}
}또한, JSP는 수정되면 JSP 엔진이 알아차리고 다시 Servlet로 변환과 컴파일하기 때문에 재배포없이 동적으로 수정이 가능하다.
재컴파일이 완료되면, Servlet Container는 기존 Servlet을 메모리에서 제거하고 새로운 Servlet를 로드한다.
Spring Framework
이제 WAS와 Servlet 대해서 어느 정도 이해가 되었다.
그럼, Tomcat은 Spring Framework를 어떻게 실행하는 것일까?
Spring MVC 역시도
DispatcherServlet라는 서블릿이 있고, Tomcat의Servlet Container가DispatcherServlet를 관리하고 있는 것이다.
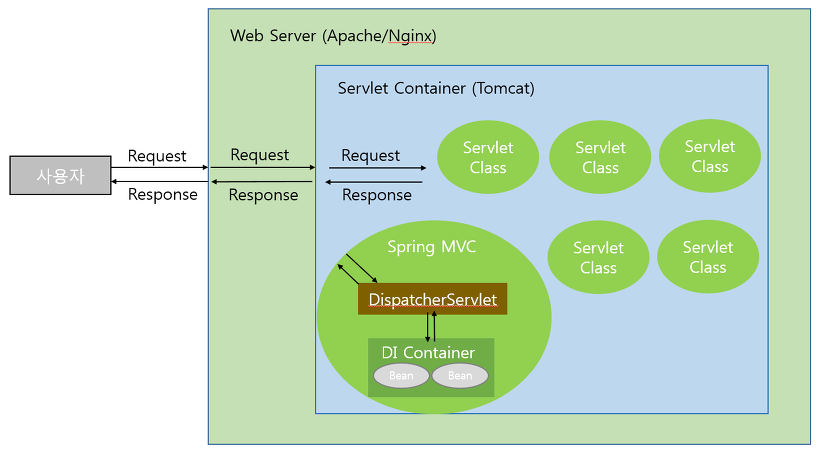
즉, 아래 그림과 같이 Spring MVC 대한 모든 요청과 응답은 DispatcherServlet에서 관리되며, 요청 정보를 기반으로 Application Context에 등록된 Bean을 호출해 비즈니스 로직을 처리한다.
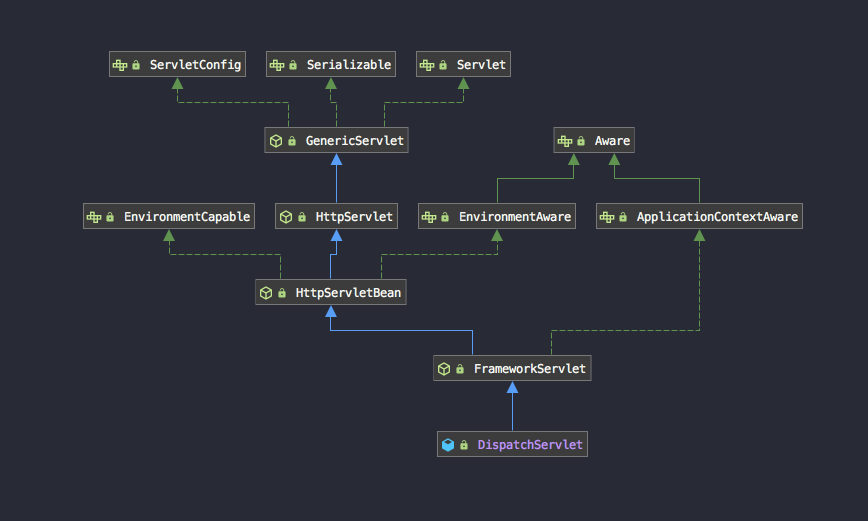
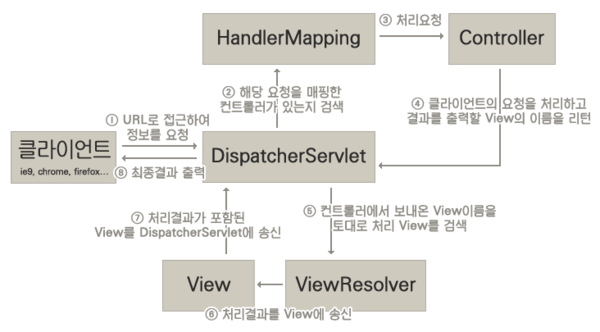
DispatcherServlet 코드를 한 번 보는 것도 추천한다.
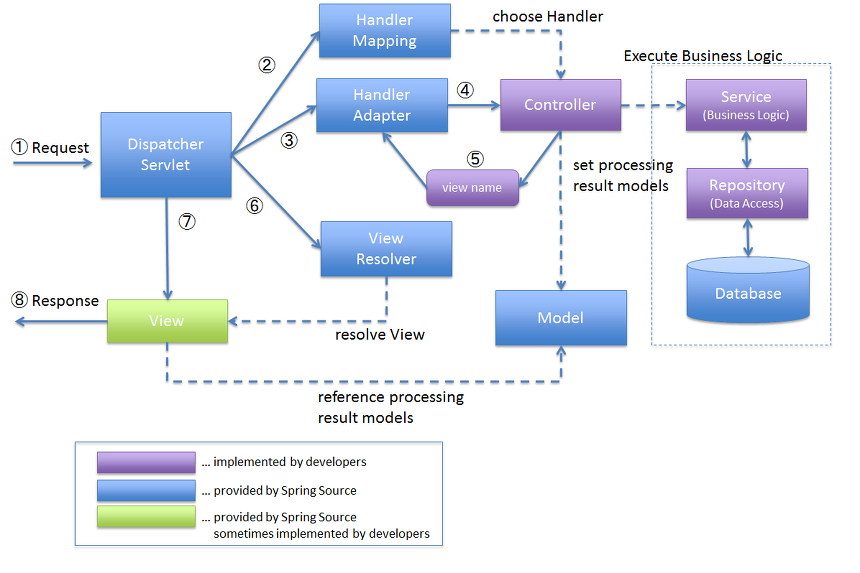
아래 코드는 DispatcherServlet에서 Handler를 탐색/실행 후 ViewResolver로 View를 반환하는 흐름을 볼 수 있다.
protected void doDispatch(HttpServletRequest request, HttpServletResponse response) throws Exception {
        HttpServletRequest processedRequest = request;
        HandlerExecutionChain mappedHandler = null;

	// ...

        mappedHandler = this.getHandler(processedRequest);

        // ...

        HandlerAdapter ha = this.getHandlerAdapter(mappedHandler.getHandler());

        // ...

        mv = ha.handle(processedRequest, response, mappedHandler.getHandler());

	// ...

        this.applyDefaultViewName(processedRequest, mv);

        // ...

        this.processDispatchResult(processedRequest, response, mappedHandler, mv, (Exception)dispatchException);

    // ...
}
참고 자료
- https://docs.spring.io/spring/docs/current/spring-framework-reference/web.html#spring-web
- https://mangkyu.tistory.com/14
- https://gmlwjd9405.github.io/2018/10/27/webserver-vs-was.html
- https://jojoldu.tistory.com/28
- https://ko.wikipedia.org/wiki/%EC%84%9C%EB%B2%84
- https://www.lesstif.com/system-admin/nginx-load-balancing-35357063.html
